AI Toolkit is an easy to use all in one training suite for diffusion models. I try to support all the latest models on consumer grade hardware. Image and video models. It can be run as a GUI or CLI. It is designed to be easy to use but still have every feature imaginable. Free and open source.
Supported Models
Image
Instruction / Edit
Video
Audio
Experimental
Installation
The recommended way to install and run AI Toolkit is with the AI Toolkit
Manager, built into this repo. The manager detects your hardware and sets up
the right PyTorch build, creates the python environment, and grabs local copies
of Node.js and FFmpeg — everything stays inside the ai-toolkit folder, nothing
is installed system-wide. On every launch the manager checks for updates and
applies them (your local changes are never overwritten — if you have modified
files, the update is skipped with a warning), then starts the UI at
http://localhost:8675.
The manager is still experimental — please let me know if you have any
issues with it. The manual instructions below still work if you prefer them
or run into problems.
The only requirement is git (on Windows the manager can even fetch a
portable git for updates, but you need one installed to clone the repo first).
git clone https://github.com/ostris/ai-toolkit.git
cd ai-toolkit
Then start the manager with the script for your platform:
Linux:
chmod +x run_linux.sh
./run_linux.sh
MacOS (Apple Silicon, experimental):
chmod +x run_mac.zsh
./run_mac.zsh
Windows: double-click run_windows.bat (or run it from a terminal).
You can also use the manager directly from a terminal (handy on headless
servers):
python3 -m manager install   # first-time setup
python3 -m manager update    # pull updates + sync dependencies
python3 -m manager launch    # start the UI
python3 -m manager doctor    # diagnose problems
Manual installation
Requirements:
- python >=3.10 (3.12 recommended)
- Nvidia GPU with enough ram to do what you need
- python venv
- git
Linux:
git clone https://github.com/ostris/ai-toolkit.git
cd ai-toolkit
python3 -m venv venv
source venv/bin/activate
# install torch first
pip3 install --no-cache-dir torch==2.13.0 torchvision==0.28.0 torchaudio==2.11.0 --index-url https://download.pytorch.org/whl/cu130
pip3 install -r requirements.txt
For devices running DGX OS (including DGX Spark), follow these instructions.
Windows:
If you are having issues with Windows. I recommend using the easy install script at https://github.com/Tavris1/AI-Toolkit-Easy-Install
git clone https://github.com/ostris/ai-toolkit.git
cd ai-toolkit
python -m venv venv
.\venv\Scripts\activate
pip install --no-cache-dir torch==2.13.0 torchvision==0.28.0 torchaudio==2.11.0 --index-url https://download.pytorch.org/whl/cu130
pip install -r requirements.txt
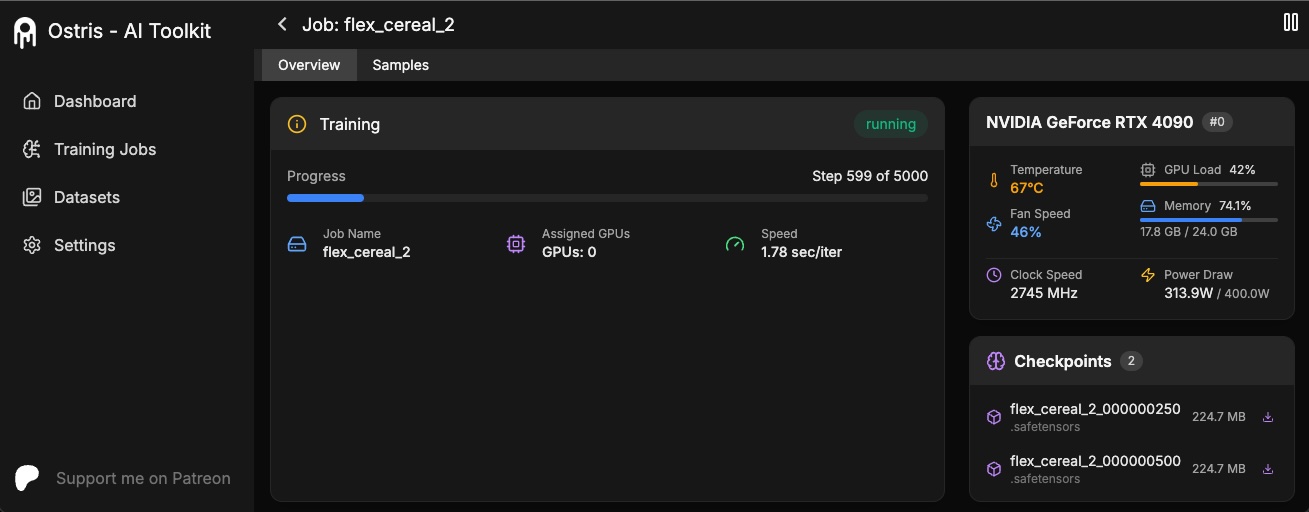
The AI Toolkit UI is a web interface for the AI Toolkit. It allows you to easily start, stop, and monitor jobs. It also allows you to easily train models with a few clicks. It also allows you to set a token for the UI to prevent unauthorized access so it is mostly safe to run on an exposed server.
Running the UI
Requirements:
The UI does not need to be kept running for the jobs to run. It is only needed to start/stop/monitor jobs. The commands below
will install / update the UI and it's dependencies and start the UI.
cd ui
npm run build_and_start
You can now access the UI at http://localhost:8675 or http://<your-ip>:8675 if you are running it on a server.
Securing the UI
If you are hosting the UI on a cloud provider or any network that is not secure, I highly recommend securing it with an auth token.
You can do this by setting the environment variable AI_TOOLKIT_AUTH to super secure password. This token will be required to access
the UI. You can set this when starting the UI like so:
# Linux
AI_TOOLKIT_AUTH=super_secure_password npm run build_and_start

# Windows
set AI_TOOLKIT_AUTH=super_secure_password && npm run build_and_start

# Windows Powershell
$env:AI_TOOLKIT_AUTH="super_secure_password"; npm run build_and_start
Training
- Copy the example config file located at
config/examples/train_lora_flux_24gb.yaml (config/examples/train_lora_flux_schnell_24gb.yaml for schnell) to the config folder and rename it to whatever_you_want.yml
- Edit the file following the comments in the file
- Run the file like so
python run.py config/whatever_you_want.yml
A folder with the name and the training folder from the config file will be created when you start. It will have all
checkpoints and images in it. You can stop the training at any time using ctrl+c and when you resume, it will pick back up
from the last checkpoint.
IMPORTANT. If you press crtl+c while it is saving, it will likely corrupt that checkpoint. So wait until it is done saving
Need help?
Please do not open a bug report unless it is a bug in the code. You are welcome to Join my Discord
and ask for help there. However, please refrain from PMing me directly with general question or support. Ask in the discord
and I will answer when I can.
Ostris Cloud
You can use many cloud providers to rent GPUs. If you want to help support this project in the largest way possible, please consider using Ostris Cloud. Ostris Cloud is owned and operated by me, Ostris, and every dollar earned goes directly back into funding the development of this project.
Training in RunPod
If you would like to use Runpod, but have not signed up yet, please consider using my Runpod affiliate link to help support this project.
I maintain an official Runpod Pod template here which can be accessed here.
I have also created a short video showing how to get started using AI Toolkit with Runpod here.
Training in Modal
1. Setup
git clone https://github.com/ostris/ai-toolkit.git
cd ai-toolkit
git submodule update --init --recursive
python -m venv venv
source venv/bin/activate
pip install torch
pip install -r requirements.txt
pip install --upgrade accelerate transformers diffusers huggingface_hub #Optional, run it if you run into issues
Modal:
- Run
pip install modal to install the modal Python package.
- Run
modal setup to authenticate (if this doesn’t work, try python -m modal setup).
Hugging Face:
- Get a READ token from here and request access to Flux.1-dev model from here.
- Run
huggingface-cli login and paste your token.
2. Upload your dataset
- Drag and drop your dataset folder containing the .jpg, .jpeg, or .png images and .txt files in
ai-toolkit.
3. Configs
- Copy an example config file located at
config/examples/modal to the config folder and rename it to whatever_you_want.yml.
- Edit the config following the comments in the file, be careful and follow the example
/root/ai-toolkit paths.
4. Edit run_modal.py
Set your entire local ai-toolkit path at code_mount = modal.Mount.from_local_dir like:
code_mount = modal.Mount.from_local_dir("/Users/username/ai-toolkit", remote_path="/root/ai-toolkit")
Choose a GPU and Timeout in @app.function (default is A100 40GB and 2 hour timeout).
5. Training
- Run the config file in your terminal:
modal run run_modal.py --config-file-list-str=/root/ai-toolkit/config/whatever_you_want.yml.
- You can monitor your training in your local terminal, or on modal.com.
- Models, samples and optimizer will be stored in
Storage > flux-lora-models.
6. Saving the model
- Check contents of the volume by running
modal volume ls flux-lora-models.
- Download the content by running
modal volume get flux-lora-models your-model-name.
- Example:
modal volume get flux-lora-models my_first_flux_lora_v1.
Screenshot from Modal

Dataset Preparation
Datasets generally need to be a folder containing images and associated text files. Currently, the only supported
formats are jpg, jpeg, and png. Webp currently has issues. The text files should be named the same as the images
but with a .txt extension. For example image2.jpg and image2.txt. The text file should contain only the caption.
You can add the word [trigger] in the caption file and if you have trigger_word in your config, it will be automatically
replaced.
Images are never upscaled but they are downscaled and placed in buckets for batching. You do not need to crop/resize your images.
The loader will automatically resize them and can handle varying aspect ratios.
Training Specific Layers
To train specific layers with LoRA, you can use the only_if_contains network kwargs. For instance, if you want to train only the 2 layers
used by The Last Ben, mentioned in this post, you can adjust your
network kwargs like so:
      network:
        type: "lora"
        linear: 128
        linear_alpha: 128
        network_kwargs:
          only_if_contains:
            - "transformer.single_transformer_blocks.7.proj_out"
            - "transformer.single_transformer_blocks.20.proj_out"
The naming conventions of the layers are in diffusers format, so checking the state dict of a model will reveal
the suffix of the name of the layers you want to train. You can also use this method to only train specific groups of weights.
For instance to only train the single_transformer for FLUX.1, you can use the following:
      network:
        type: "lora"
        linear: 128
        linear_alpha: 128
        network_kwargs:
          only_if_contains:
            - "transformer.single_transformer_blocks."
You can also exclude layers by their names by using ignore_if_contains network kwarg. So to exclude all the single transformer blocks,
      network:
        type: "lora"
        linear: 128
        linear_alpha: 128
        network_kwargs:
          ignore_if_contains:
            - "transformer.single_transformer_blocks."
ignore_if_contains takes priority over only_if_contains. So if a weight is covered by both,
if will be ignored.
LoKr Training
To learn more about LoKr, read more about it at KohakuBlueleaf/LyCORIS. To train a LoKr model, you can adjust the network type in the config file like so:
      network:
        type: "lokr"
        lokr_full_rank: true
        lokr_factor: 8
Everything else should work the same including layer targeting.
Support My Work
If you enjoy my projects or use them commercially, please consider sponsoring me. Every bit helps! 💖
All of these people / organizations are the ones who selflessly make this project possible. Thank you!!


 AI Toolkit 是一套一体化的训练套件,用于微调扩散模型,涵盖图像、视频和音频生成模型,并支持在消费级 GPU 上运行 FLUX、Qwen-Image、Wan 2.1/2.2、Ace-Step 等最新模型。