Generative Models by Stability AI

News
May 20, 2025
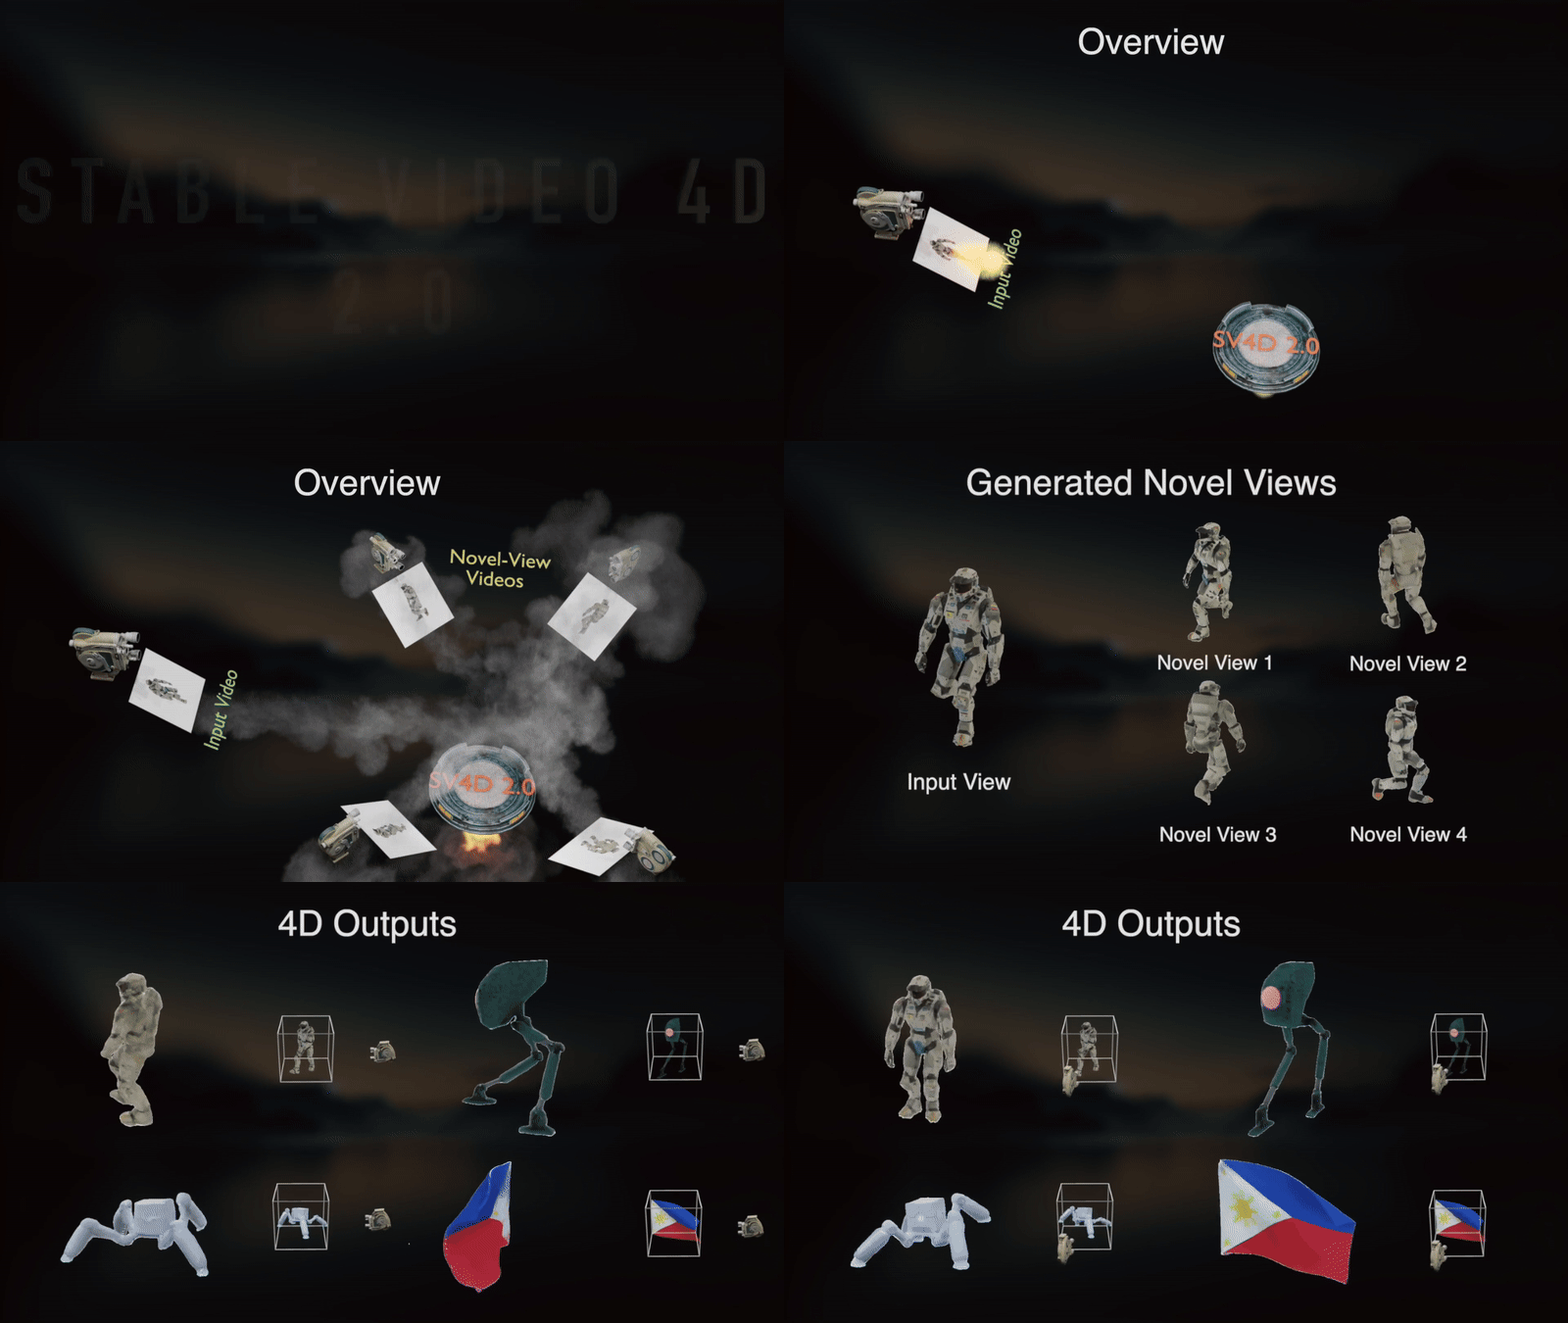
- We are releasing Stable Video 4D 2.0 (SV4D 2.0), an enhanced video-to-4D diffusion model for high-fidelity novel-view video synthesis and 4D asset generation. For research purposes:
- SV4D 2.0 was trained to generate 48 frames (12 video frames x 4 camera views) at 576x576 resolution, given a 12-frame input video of the same size, ideally consisting of white-background images of a moving object.
- Compared to our previous 4D model SV4D, SV4D 2.0 can generate videos with higher fidelity, sharper details during motion, and better spatio-temporal consistency. It also generalizes much better to real-world videos. Moreover, it does not rely on refernce multi-view of the first frame generated by SV3D, making it more robust to self-occlusions.
- To generate longer novel-view videos, we autoregressively generate 12 frames at a time and use the previous generation as conditioning views for the remaining frames.
- Please check our project page, arxiv paper and video summary for more details.
QUICKSTART :
python scripts/sampling/simple_video_sample_4d2.py --input_path assets/sv4d_videos/camel.gif --output_folder outputs (after downloading sv4d2.safetensors from HuggingFace into checkpoints/)
To run SV4D 2.0 on a single input video of 21 frames:
- Download SV4D 2.0 model (
sv4d2.safetensors) from here to checkpoints/: huggingface-cli download stabilityai/sv4d2.0 sv4d2.safetensors --local-dir checkpoints
- Run inference:
python scripts/sampling/simple_video_sample_4d2.py --input_path <path/to/video>
input_path : The input video <path/to/video> can be
- a single video file in
gif or mp4 format, such as assets/sv4d_videos/camel.gif, or
- a folder containing images of video frames in
.jpg, .jpeg, or .png format, or
- a file name pattern matching images of video frames.
num_steps : default is 50, can decrease to it to shorten sampling time.elevations_deg : specified elevations (reletive to input view), default is 0.0 (same as input view).- Background removal : For input videos with plain background, (optionally) use rembg to remove background and crop video frames by setting
--remove_bg=True. To obtain higher quality outputs on real-world input videos with noisy background, try segmenting the foreground object using Clipdrop or SAM2 before running SV4D.
- Low VRAM environment : To run on GPUs with low VRAM, try setting
--encoding_t=1 (of frames encoded at a time) and --decoding_t=1 (of frames decoded at a time) or lower video resolution like --img_size=512.
Notes:
- We also train a 8-view model that generates 5 frames x 8 views at a time (same as SV4D).
- Download the model from huggingface:
huggingface-cli download stabilityai/sv4d2.0 sv4d2_8views.safetensors --local-dir checkpoints
- Run inference:
python scripts/sampling/simple_video_sample_4d2.py --model_path checkpoints/sv4d2_8views.safetensors --input_path assets/sv4d_videos/chest.gif --output_folder outputs
- The 5x8 model takes 5 frames of input at a time. But the inference scripts for both model take 21-frame video as input by default (same as SV3D and SV4D), we run the model autoregressively until we generate 21 frames.
- Install dependencies before running:
python3.10 -m venv .generativemodels
source .generativemodels/bin/activate
pip3 install torch torchvision torchaudio --index-url https://download.pytorch.org/whl/cu118 # check CUDA version
pip3 install -r requirements/pt2.txt
pip3 install .
pip3 install -e git+https://github.com/Stability-AI/datapipelines.git@main#egg=sdata
July 24, 2024
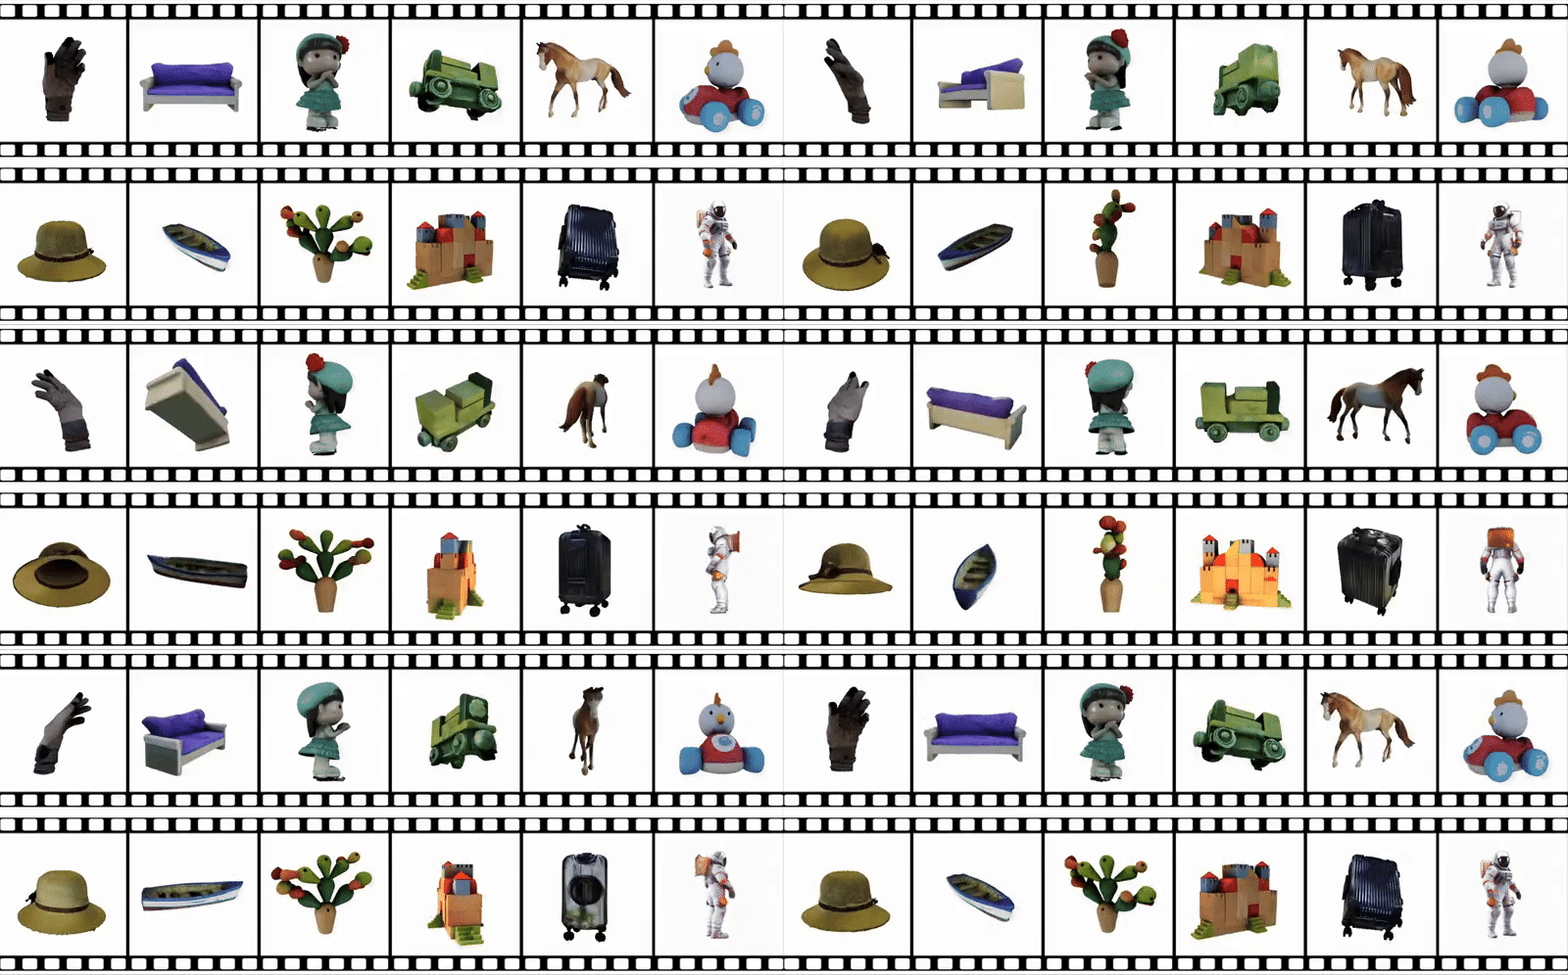
- We are releasing Stable Video 4D (SV4D), a video-to-4D diffusion model for novel-view video synthesis. For research purposes:
- SV4D was trained to generate 40 frames (5 video frames x 8 camera views) at 576x576 resolution, given 5 context frames (the input video), and 8 reference views (synthesised from the first frame of the input video, using a multi-view diffusion model like SV3D) of the same size, ideally white-background images with one object.
- To generate longer novel-view videos (21 frames), we propose a novel sampling method using SV4D, by first sampling 5 anchor frames and then densely sampling the remaining frames while maintaining temporal consistency.
- To run the community-build gradio demo locally, run
python -m scripts.demo.gradio_app_sv4d.
- Please check our project page, tech report and video summary for more details.
QUICKSTART : python scripts/sampling/simple_video_sample_4d.py --input_path assets/sv4d_videos/test_video1.mp4 --output_folder outputs/sv4d (after downloading sv4d.safetensors and sv3d_u.safetensors from HuggingFace into checkpoints/)
To run SV4D on a single input video of 21 frames:
Download SV3D models (sv3d_u.safetensors and sv3d_p.safetensors) from here and SV4D model (sv4d.safetensors) from here to checkpoints/
Run python scripts/sampling/simple_video_sample_4d.py --input_path <path/to/video>
input_path : The input video <path/to/video> can be
- a single video file in
gif or mp4 format, such as assets/sv4d_videos/test_video1.mp4, or
- a folder containing images of video frames in
.jpg, .jpeg, or .png format, or
- a file name pattern matching images of video frames.
num_steps : default is 20, can increase to 50 for better quality but longer sampling time.sv3d_version : To specify the SV3D model to generate reference multi-views, set --sv3d_version=sv3d_u for SV3D_u or --sv3d_version=sv3d_p for SV3D_p.elevations_deg : To generate novel-view videos at a specified elevation (default elevation is 10) using SV3D_p (default is SV3D_u), run python scripts/sampling/simple_video_sample_4d.py --input_path assets/sv4d_videos/test_video1.mp4 --sv3d_version sv3d_p --elevations_deg 30.0- Background removal : For input videos with plain background, (optionally) use rembg to remove background and crop video frames by setting
--remove_bg=True. To obtain higher quality outputs on real-world input videos with noisy background, try segmenting the foreground object using Clipdrop or SAM2 before running SV4D.
- Low VRAM environment : To run on GPUs with low VRAM, try setting
--encoding_t=1 (of frames encoded at a time) and --decoding_t=1 (of frames decoded at a time) or lower video resolution like --img_size=512.

March 18, 2024
- We are releasing SV3D, an image-to-video model for novel multi-view synthesis, for research purposes:
- SV3D was trained to generate 21 frames at resolution 576x576, given 1 context frame of the same size, ideally a white-background image with one object.
- SV3D_u: This variant generates orbital videos based on single image inputs without camera conditioning..
- SV3D_p: Extending the capability of SVD3_u, this variant accommodates both single images and orbital views allowing for the creation of 3D video along specified camera paths.
- We extend the streamlit demo
scripts/demo/video_sampling.py and the standalone python script scripts/sampling/simple_video_sample.py for inference of both models.
- Please check our project page, tech report and video summary for more details.
To run SV3D_u on a single image:
- Download
sv3d_u.safetensors from https://huggingface.co/stabilityai/sv3d to checkpoints/sv3d_u.safetensors
- Run
python scripts/sampling/simple_video_sample.py --input_path <path/to/image.png> --version sv3d_u
To run SV3D_p on a single image:
- Generate static orbit at a specified elevation eg. 10.0 :
python scripts/sampling/simple_video_sample.py --input_path <path/to/image.png> --version sv3d_p --elevations_deg 10.0
- Generate dynamic orbit at a specified elevations and azimuths: specify sequences of 21 elevations (in degrees) to
elevations_deg ([-90, 90]), and 21 azimuths (in degrees) to azimuths_deg [0, 360] in sorted order from 0 to 360. For example: python scripts/sampling/simple_video_sample.py --input_path <path/to/image.png> --version sv3d_p --elevations_deg [<list of 21 elevations in degrees>] --azimuths_deg [<list of 21 azimuths in degrees>]
To run SVD or SV3D on a streamlit server:
streamlit run scripts/demo/video_sampling.py
November 28, 2023
November 21, 2023
July 26, 2023
July 4, 2023
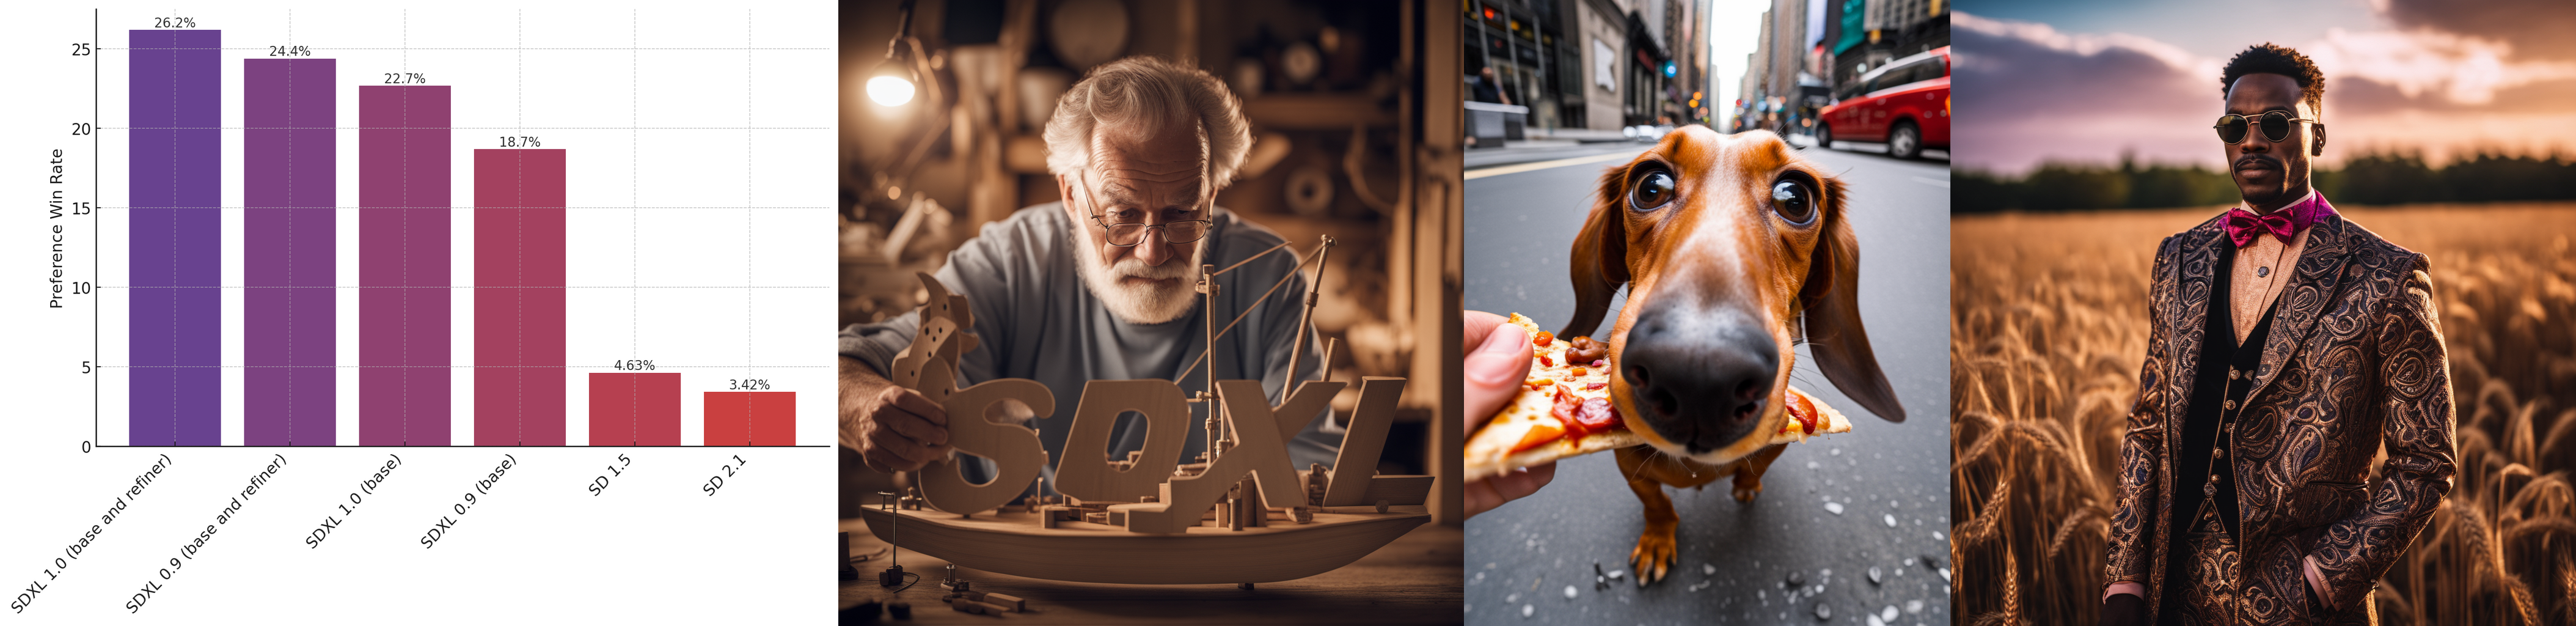
- A technical report on SDXL is now available here.
June 22, 2023
- We are releasing two new diffusion models for research purposes:
SDXL-base-0.9: The base model was trained on a variety of aspect ratios on images with resolution 1024^2. The
base model uses OpenCLIP-ViT/G
and CLIP-ViT/L for text encoding whereas the refiner model only uses
the OpenCLIP model.SDXL-refiner-0.9: The refiner has been trained to denoise small noise levels of high quality data and as such is
not expected to work as a text-to-image model; instead, it should only be used as an image-to-image model.
If you would like to access these models for your research, please apply using one of the following links:
SDXL-0.9-Base model,
and SDXL-0.9-Refiner.
This means that you can apply for any of the two links - and if you are granted - you can access both.
Please log in to your Hugging Face Account with your organization email to request access.
We plan to do a full release soon (July).
The codebase
General Philosophy
Modularity is king. This repo implements a config-driven approach where we build and combine submodules by
calling instantiate_from_config() on objects defined in yaml configs. See configs/ for many examples.
Changelog from the old ldm codebase
For training, we use PyTorch Lightning, but it should be easy to use other
training wrappers around the base modules. The core diffusion model class (formerly LatentDiffusion,
now DiffusionEngine) has been cleaned up:
- No more extensive subclassing! We now handle all types of conditioning inputs (vectors, sequences and spatial
conditionings, and all combinations thereof) in a single class:
GeneralConditioner,
see sgm/modules/encoders/modules.py.
- We separate guiders (such as classifier-free guidance, see
sgm/modules/diffusionmodules/guiders.py) from the
samplers (sgm/modules/diffusionmodules/sampling.py), and the samplers are independent of the model.
- We adopt the "denoiser framework" for both training and inference (most notable
change is probably now the option to train continuous time models):
- Discrete times models (denoisers) are simply a special case of continuous time models (denoisers);
see
sgm/modules/diffusionmodules/denoiser.py.
- The following features are now independent: weighting of the diffusion loss
function (
sgm/modules/diffusionmodules/denoiser_weighting.py), preconditioning of the
network (sgm/modules/diffusionmodules/denoiser_scaling.py), and sampling of noise levels during
training (sgm/modules/diffusionmodules/sigma_sampling.py).
- Autoencoding models have also been cleaned up.
Installation:
1. Clone the repo
git clone https://github.com/Stability-AI/generative-models.git
cd generative-models
2. Setting up the virtualenv
This is assuming you have navigated to the generative-models root after cloning it.
NOTE: This is tested under python3.10. For other python versions, you might encounter version conflicts.
PyTorch 2.0
# install required packages from pypi
python3 -m venv .pt2
source .pt2/bin/activate
pip3 install torch torchvision torchaudio --index-url https://download.pytorch.org/whl/cu118
pip3 install -r requirements/pt2.txt
3. Install sgm
pip3 install .
4. Install sdata for training
pip3 install -e git+https://github.com/Stability-AI/datapipelines.git@main#egg=sdata
Packaging
This repository uses PEP 517 compliant packaging using Hatch.
To build a distributable wheel, install hatch and run hatch build
(specifying -t wheel will skip building a sdist, which is not necessary).
pip install hatch
hatch build -t wheel
You will find the built package in dist/. You can install the wheel with pip install dist/*.whl.
Note that the package does not currently specify dependencies; you will need to install the required packages,
depending on your use case and PyTorch version, manually.
Inference
We provide a streamlit demo for text-to-image and image-to-image sampling
in scripts/demo/sampling.py.
We provide file hashes for the complete file as well as for only the saved tensors in the file (
see Model Spec for a script to evaluate that).
The following models are currently supported:
- SDXL-base-1.0
File Hash (sha256): 31e35c80fc4829d14f90153f4c74cd59c90b779f6afe05a74cd6120b893f7e5b
Tensordata Hash (sha256): 0xd7a9105a900fd52748f20725fe52fe52b507fd36bee4fc107b1550a26e6ee1d7
- SDXL-refiner-1.0
File Hash (sha256): 7440042bbdc8a24813002c09b6b69b64dc90fded4472613437b7f55f9b7d9c5f
Tensordata Hash (sha256): 0x1a77d21bebc4b4de78c474a90cb74dc0d2217caf4061971dbfa75ad406b75d81
- SDXL-base-0.9
- SDXL-refiner-0.9
Weights for SDXL:
SDXL-1.0:
The weights of SDXL-1.0 are available (subject to
a CreativeML Open RAIL++-M license) here:
SDXL-0.9:
The weights of SDXL-0.9 are available and subject to a research license.
If you would like to access these models for your research, please apply using one of the following links:
SDXL-base-0.9 model,
and SDXL-refiner-0.9.
This means that you can apply for any of the two links - and if you are granted - you can access both.
Please log in to your Hugging Face Account with your organization email to request access.
After obtaining the weights, place them into checkpoints/.
Next, start the demo using
streamlit run scripts/demo/sampling.py --server.port <your_port>
Invisible Watermark Detection
Images generated with our code use the
invisible-watermark
library to embed an invisible watermark into the model output. We also provide
a script to easily detect that watermark. Please note that this watermark is
not the same as in previous Stable Diffusion 1.x/2.x versions.
To run the script you need to either have a working installation as above or
try an experimental import using only a minimal amount of packages:
python -m venv .detect
source .detect/bin/activate

pip install "numpy>=1.17" "PyWavelets>=1.1.1" "opencv-python>=4.1.0.25"
pip install --no-deps invisible-watermark
To run the script you need to have a working installation as above. The script
is then useable in the following ways (don't forget to activate your
virtual environment beforehand, e.g. source .pt1/bin/activate):
# test a single file
python scripts/demo/detect.py <your filename here>
# test multiple files at once
python scripts/demo/detect.py <filename 1> <filename 2> ... <filename n>
# test all files in a specific folder
python scripts/demo/detect.py <your folder name here>/*
Training:
We are providing example training configs in configs/example_training. To launch a training, run
python main.py --base configs/<config1.yaml> configs/<config2.yaml>
where configs are merged from left to right (later configs overwrite the same values).
This can be used to combine model, training and data configs. However, all of them can also be
defined in a single config. For example, to run a class-conditional pixel-based diffusion model training on MNIST,
run
python main.py --base configs/example_training/toy/mnist_cond.yaml
NOTE 1: Using the non-toy-dataset
configs configs/example_training/imagenet-f8_cond.yaml, configs/example_training/txt2img-clipl.yaml
and configs/example_training/txt2img-clipl-legacy-ucg-training.yaml for training will require edits depending on the
used dataset (which is expected to stored in tar-file in
the webdataset-format). To find the parts which have to be adapted, search
for comments containing USER: in the respective config.
NOTE 2: This repository supports both pytorch1.13 and pytorch2for training generative models. However for
autoencoder training as e.g. in configs/example_training/autoencoder/kl-f4/imagenet-attnfree-logvar.yaml,
only pytorch1.13 is supported.
NOTE 3: Training latent generative models (as e.g. in configs/example_training/imagenet-f8_cond.yaml) requires
retrieving the checkpoint from Hugging Face and replacing
the CKPT_PATH placeholder in this line. The same is to be done
for the provided text-to-image configs.
Building New Diffusion Models
Conditioner
The GeneralConditioner is configured through the conditioner_config. Its only attribute is emb_models, a list of
different embedders (all inherited from AbstractEmbModel) that are used to condition the generative model.
All embedders should define whether or not they are trainable (is_trainable, default False), a classifier-free
guidance dropout rate is used (ucg_rate, default 0), and an input key (input_key), for example, txt for
text-conditioning or cls for class-conditioning.
When computing conditionings, the embedder will get batch[input_key] as input.
We currently support two to four dimensional conditionings and conditionings of different embedders are concatenated
appropriately.
Note that the order of the embedders in the conditioner_config is important.
Network
The neural network is set through the network_config. This used to be called unet_config, which is not general
enough as we plan to experiment with transformer-based diffusion backbones.
Loss
The loss is configured through loss_config. For standard diffusion model training, you will have to
set sigma_sampler_config.
Sampler config
As discussed above, the sampler is independent of the model. In the sampler_config, we set the type of numerical
solver, number of steps, type of discretization, as well as, for example, guidance wrappers for classifier-free
guidance.
Dataset Handling
For large scale training we recommend using the data pipelines from
our data pipelines project. The project is contained in the requirement
and automatically included when following the steps from the Installation section.
Small map-style datasets should be defined here in the repository (e.g., MNIST, CIFAR-10, ...), and return a dict of
data keys/values,
e.g.,
example = {"jpg": x,  # this is a tensor -1...1 chw
           "txt": "a beautiful image"}
where we expect images in -1...1, channel-first format.



 This is Stability AI's research codebase for a family of generative diffusion models, covering text-to-image (SDXL, SDXL-Turbo), image-to-video (Stable Video Diffusion), image-to-3D-video (SV3D), and video-to-4D (SV4D, SV4D 2.0) synthesis.