TextGen
A desktop app for local LLMs. Open source, no telemetry. Text, vision, tool-calling, web search. UI + API.

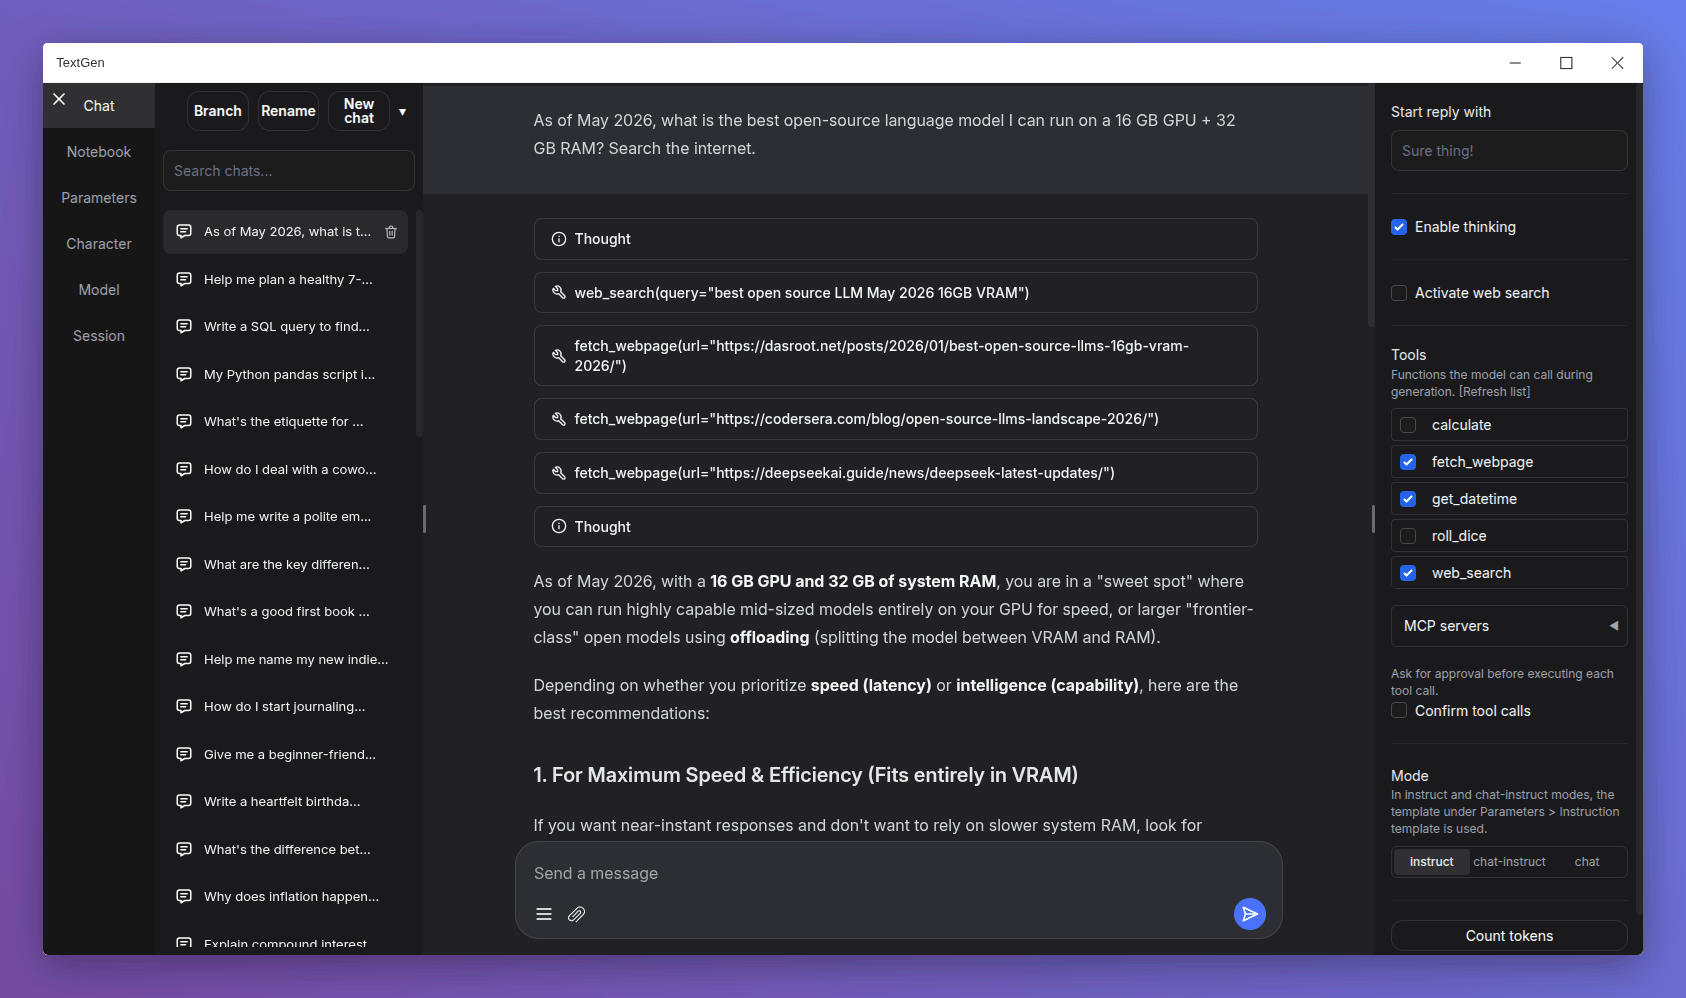
Get started in 1 minute
Download, unzip, double-click textgen. A window opens.
https://github.com/oobabooga/textgen/releases
Portable builds for Linux, Windows, and macOS with CUDA, Vulkan, ROCm, and CPU-only options. All dependencies included. Compatible with GGUF (llama.cpp) models.
For additional backends (ExLlamaV3, Transformers), training, image generation, and extensions, see Installation.
Features
Chat & generation
instruct mode for instruction-following (like ChatGPT), and chat-instruct/chat modes for talking to custom characters. Prompts are automatically formatted with Jinja2 templates.- Vision (multimodal): Attach images to messages for visual understanding (tutorial).
- File attachments: Upload text files, PDF documents, and .docx documents to talk about their contents.
- Edit messages, navigate between message versions, and branch conversations at any point.
- Notebook tab for free-form text generation outside of chat turns.
Backends & API
- Multiple backends: llama.cpp, ik_llama.cpp, Transformers, ExLlamaV3, and TensorRT-LLM. Switch between backends and models without restarting.
- OpenAI/Anthropic-compatible API: Chat, Completions, and Messages endpoints with tool-calling support. Use as a local drop-in replacement for the OpenAI/Anthropic APIs (examples).
- Tool-calling: Models can call custom functions during chat, including web search, page fetching, and math. Each tool is a single
.py file. MCP servers are also supported (tutorial).
Training & image generation
- Training: Fine-tune LoRAs on multi-turn chat or raw text datasets. Supports resuming interrupted runs (tutorial).
- Image generation: A dedicated tab for
diffusers models like Z-Image-Turbo. Features 4-bit/8-bit quantization and a persistent gallery with image metadata (tutorial).
Privacy & interface
- 100% offline and private, with zero telemetry, external resources, or remote update requests.
- Dark/light themes, syntax highlighting for code blocks, and LaTeX rendering for mathematical expressions.
- Built-in and community extensions including TTS, voice input, and translation. See the extensions directory for the full list.
Downloading models
- Download a GGUF model file from Hugging Face.
- Place it in the
user_data/models folder.
That's it. The UI will detect it automatically.
For recommended GGUF quants, check out LocalBench. To estimate how much memory a model will use, try the GGUF Memory Calculator.
Other model types (Transformers, EXL3)
Models that consist of multiple files (like 16-bit Transformers models and EXL3 models) should be placed in a subfolder inside user_data/models:
textgen
└── user_data
    └── models
        └── Qwen_Qwen3-8B
            ├── config.json
            ├── generation_config.json
            ├── model-00001-of-00004.safetensors
            ├── ...
            ├── tokenizer_config.json
            └── tokenizer.json
These formats require the full installation (not the portable build).
Installation
For the desktop app, see the portable builds. The options below run the web UI in your browser instead.
Manual portable install with venv
Fast setup on any Python 3.9+:
# Clone repository
git clone https://github.com/oobabooga/textgen
cd textgen

# Create virtual environment
python -m venv venv

# Activate virtual environment
# On Windows:
venv\Scripts\activate
# On macOS/Linux:
source venv/bin/activate

# Install dependencies (choose appropriate file under requirements/portable for your hardware)
pip install -r requirements/portable/requirements.txt --upgrade

# Launch server (basic command)
python server.py --portable --api --auto-launch

# When done working, deactivate
deactivate
Full installation
For users who need additional backends (ExLlamaV3, Transformers), training, image generation, or extensions like TTS, voice input, and translation. Requires ~10GB disk space and downloads PyTorch.
Installation details
One-click installer
- Clone the repository, or download its source code and extract it.
- Run the startup script for your OS:
start_windows.bat, start_linux.sh, or start_macos.sh.
- When prompted, select your GPU vendor.
- After installation, open
http://127.0.0.1:7860 in your browser.
After installation:
- Restart: run the same
start_ script.
- Pass command-line flags: directly (e.g.,
./start_linux.sh --help), or persist them in user_data/CMD_FLAGS.txt (e.g., --api to enable the API).
- Update: run the update script for your OS (
update_wizard_windows.bat, update_wizard_linux.sh, or update_wizard_macos.sh).
- Reinstall from scratch: delete the
installer_files folder and run the start_ script again.
- Install extension requirements: use the update wizard's "Install/update extensions requirements" option. It reinstalls the main project requirements at the end to ensure they take precedence over conflicting extension dependencies.
Notes:
- These scripts (
start_, update_wizard_, cmd_) don't need to run as admin/root.
- For automated installation, set the
GPU_CHOICE, LAUNCH_AFTER_INSTALL, and INSTALL_EXTENSIONS environment variables. Example: GPU_CHOICE=A LAUNCH_AFTER_INSTALL=FALSE INSTALL_EXTENSIONS=TRUE ./start_linux.sh.
- Under the hood, the script uses Miniforge to set up a Conda environment in
installer_files/. To run anything manually in this environment, launch an interactive shell using cmd_linux.sh, cmd_windows.bat, or cmd_macos.sh.
Full installation with Conda
0. Install Conda
https://github.com/conda-forge/miniforge
On Linux or WSL, Miniforge can be automatically installed with these two commands:
curl -sL "https://github.com/conda-forge/miniforge/releases/latest/download/Miniforge3-Linux-x86_64.sh" > "Miniforge3.sh"
bash Miniforge3.sh
For other platforms, download from: https://github.com/conda-forge/miniforge/releases/latest
1. Create a new conda environment
conda create -n textgen python=3.13
conda activate textgen
2. Install Pytorch
| System |
GPU |
Command |
| Linux/WSL |
NVIDIA |
pip3 install torch==2.9.1 --index-url https://download.pytorch.org/whl/cu128 |
| Linux/WSL |
CPU only |
pip3 install torch==2.9.1 --index-url https://download.pytorch.org/whl/cpu |
| Linux |
AMD |
pip3 install https://repo.radeon.com/rocm/manylinux/rocm-rel-7.2/torch-2.9.1%2Brocm7.2.0.lw.git7e1940d4-cp313-cp313-linux_x86_64.whl |
| MacOS + MPS |
Any |
pip3 install torch==2.9.1 |
| Windows |
NVIDIA |
pip3 install torch==2.9.1 --index-url https://download.pytorch.org/whl/cu128 |
| Windows |
CPU only |
pip3 install torch==2.9.1 |
The up-to-date commands can be found here: https://pytorch.org/get-started/locally/.
If you need nvcc to compile some library manually, you will additionally need to install this:
conda install -y -c "nvidia/label/cuda-12.8.1" cuda
3. Install the web UI
git clone https://github.com/oobabooga/textgen
cd textgen
pip install -r requirements/full/<requirements file according to table below>
Requirements file to use:
| GPU |
requirements file to use |
| NVIDIA |
requirements.txt |
| AMD |
requirements_amd.txt |
| CPU only |
requirements_cpu_only.txt |
| Apple Intel |
requirements_apple_intel.txt |
| Apple Silicon |
requirements_apple_silicon.txt |
4. Start the web UI
conda activate textgen
cd textgen
python server.py
Then browse to http://127.0.0.1:7860.
Manual compilation
The requirements*.txt files above contain wheels precompiled through GitHub Actions. To compile manually (e.g., if no wheels are available for your hardware), use requirements_nowheels.txt and install your desired loaders manually.
Updating the requirements
From time to time, the requirements*.txt files change. To update:
conda activate textgen
cd textgen
pip install -r <requirements file that you have used> --upgrade
Docker
For NVIDIA GPU:
ln -s docker/{nvidia/Dockerfile,nvidia/docker-compose.yml,.dockerignore} .
For AMD GPU:
ln -s docker/{amd/Dockerfile,amd/docker-compose.yml,.dockerignore} .
For Intel GPU:
ln -s docker/{intel/Dockerfile,intel/docker-compose.yml,.dockerignore} .
For CPU only
ln -s docker/{cpu/Dockerfile,cpu/docker-compose.yml,.dockerignore} .
cp docker/.env.example .env
#Create logs/cache dir :
mkdir -p user_data/logs user_data/cache
# Edit .env and set:
#   TORCH_CUDA_ARCH_LIST based on your GPU model
#   APP_RUNTIME_GID      your host user's group id (run `id -g` in a terminal)
#   BUILD_EXTENIONS      optionally add comma separated list of extensions to build
# Edit user_data/CMD_FLAGS.txt and add in it the options you want to execute (like --listen --cpu)
#
docker compose up --build
- You need to have Docker Compose v2.17 or higher installed. See this guide for instructions.
- For additional docker files, check out this repository.
Command-line flags
Show full list
usage: server.py [-h] [--user-data-dir USER_DATA_DIR] [--multi-user] [--model MODEL] [--lora LORA [LORA ...]] [--model-dir MODEL_DIR] [--lora-dir LORA_DIR] [--model-menu] [--settings SETTINGS]
                 [--extensions EXTENSIONS [EXTENSIONS ...]] [--verbose] [--idle-timeout IDLE_TIMEOUT] [--image-model IMAGE_MODEL] [--image-model-dir IMAGE_MODEL_DIR] [--image-dtype {bfloat16,float16}]
                 [--image-attn-backend {flash_attention_2,sdpa}] [--image-cpu-offload] [--image-compile] [--image-quant {none,bnb-8bit,bnb-4bit,torchao-int8wo,torchao-fp4,torchao-float8wo}]
                 [--loader LOADER] [--ctx-size N] [--cache-type N] [--model-draft MODEL_DRAFT] [--draft-max DRAFT_MAX] [--gpu-layers-draft GPU_LAYERS_DRAFT] [--device-draft DEVICE_DRAFT]
                 [--ctx-size-draft CTX_SIZE_DRAFT] [--spec-type {none,ngram-mod,ngram-simple,ngram-map-k,ngram-map-k4v,ngram-cache}] [--spec-ngram-size-n SPEC_NGRAM_SIZE_N]
                 [--spec-ngram-size-m SPEC_NGRAM_SIZE_M] [--spec-ngram-min-hits SPEC_NGRAM_MIN_HITS] [--gpu-layers N] [--cpu-moe] [--mmproj MMPROJ] [--streaming-llm] [--tensor-split TENSOR_SPLIT]
                 [--split-mode {layer,row,tensor,none}] [--no-mmap] [--mlock] [--no-kv-offload] [--batch-size BATCH_SIZE] [--ubatch-size UBATCH_SIZE] [--threads THREADS]
                 [--threads-batch THREADS_BATCH] [--numa] [--parallel PARALLEL] [--fit-target FIT_TARGET] [--extra-flags EXTRA_FLAGS] [--ik] [--cpu] [--cpu-memory CPU_MEMORY] [--disk]
                 [--disk-cache-dir DISK_CACHE_DIR] [--load-in-8bit] [--bf16] [--no-cache] [--trust-remote-code] [--force-safetensors] [--no_use_fast] [--attn-implementation IMPLEMENTATION]
                 [--load-in-4bit] [--use_double_quant] [--compute_dtype COMPUTE_DTYPE] [--quant_type QUANT_TYPE] [--gpu-split GPU_SPLIT] [--enable-tp] [--tp-backend TP_BACKEND] [--cfg-cache]
                 [--listen] [--listen-port LISTEN_PORT] [--listen-host LISTEN_HOST] [--share] [--auto-launch] [--gradio-auth GRADIO_AUTH] [--gradio-auth-path GRADIO_AUTH_PATH]
                 [--ssl-keyfile SSL_KEYFILE] [--ssl-certfile SSL_CERTFILE] [--subpath SUBPATH] [--old-colors] [--portable] [--api] [--public-api] [--public-api-id PUBLIC_API_ID] [--api-port API_PORT]
                 [--api-key API_KEY] [--admin-key ADMIN_KEY] [--api-enable-ipv6] [--api-disable-ipv4] [--nowebui] [--temperature N] [--dynatemp-low N] [--dynatemp-high N] [--dynatemp-exponent N]
                 [--smoothing-factor N] [--smoothing-curve N] [--top-p N] [--top-k N] [--min-p N] [--top-n-sigma N] [--typical-p N] [--xtc-threshold N] [--xtc-probability N] [--epsilon-cutoff N]
                 [--eta-cutoff N] [--tfs N] [--top-a N] [--adaptive-target N] [--adaptive-decay N] [--dry-multiplier N] [--dry-allowed-length N] [--dry-base N] [--repetition-penalty N]
                 [--frequency-penalty N] [--presence-penalty N] [--encoder-repetition-penalty N] [--no-repeat-ngram-size N] [--repetition-penalty-range N] [--penalty-alpha N] [--guidance-scale N]
                 [--mirostat-mode N] [--mirostat-tau N] [--mirostat-eta N] [--do-sample | --no-do-sample] [--dynamic-temperature | --no-dynamic-temperature]
                 [--temperature-last | --no-temperature-last] [--sampler-priority N] [--dry-sequence-breakers N] [--enable-thinking | --no-enable-thinking] [--reasoning-effort N]
                 [--preserve-thinking | --no-preserve-thinking] [--chat-template-file CHAT_TEMPLATE_FILE] [--no-electron]

TextGen

options:
  -h, --help                                           show this help message and exit

Basic settings:
  --user-data-dir USER_DATA_DIR                        Path to the user data directory. Default: auto-detected.
  --multi-user                                         Multi-user mode. Chat histories are not saved or automatically loaded. Best suited for small trusted teams.
  --model MODEL                                        Name of the model to load by default.
  --lora LORA [LORA ...]                               The list of LoRAs to load. If you want to load more than one LoRA, write the names separated by spaces.
  --model-dir MODEL_DIR                                Path to directory with all the models.
  --lora-dir LORA_DIR                                  Path to directory with all the loras.
  --model-menu                                         Show a model menu in the terminal when the web UI is first launched.
  --settings SETTINGS                                  Load the default interface settings from this yaml file. See user_data/settings-template.yaml for an example. If you create a file called
                                                       user_data/settings.yaml, this file will be loaded by default without the need to use the --settings flag.
  --extensions EXTENSIONS [EXTENSIONS ...]             The list of extensions to load. If you want to load more than one extension, write the names separated by spaces.
  --verbose                                            Print the prompts to the terminal.
  --idle-timeout IDLE_TIMEOUT                          Unload model after this many minutes of inactivity. It will be automatically reloaded when you try to use it again.

Image model:
  --image-model IMAGE_MODEL                            Name of the image model to select on startup (overrides saved setting).
  --image-model-dir IMAGE_MODEL_DIR                    Path to directory with all the image models.
  --image-dtype {bfloat16,float16}                     Data type for image model.
  --image-attn-backend {flash_attention_2,sdpa}        Attention backend for image model.
  --image-cpu-offload                                  Enable CPU offloading for image model.
  --image-compile                                      Compile the image model for faster inference.
  --image-quant {none,bnb-8bit,bnb-4bit,torchao-int8wo,torchao-fp4,torchao-float8wo}
                                                       Quantization method for image model.

Model loader:
  --loader LOADER                                      Choose the model loader manually, otherwise, it will get autodetected. Valid options: Transformers, llama.cpp, ExLlamav3_HF, ExLlamav3, TensorRT-
                                                       LLM.

Context and cache:
  --ctx-size, --n_ctx, --max_seq_len N                 Context size in tokens. 0 = auto for llama.cpp (requires gpu-layers=-1), 8192 for other loaders.
  --cache-type, --cache_type N                         KV cache type; valid options: llama.cpp - fp16, q8_0, q4_0; ExLlamaV3 - fp16, q2 to q8 (can specify k_bits and v_bits separately, e.g. q4_q8).

Speculative decoding:
  --model-draft MODEL_DRAFT                            Path to the draft model for speculative decoding.
  --draft-max DRAFT_MAX                                Number of tokens to draft for speculative decoding.
  --gpu-layers-draft GPU_LAYERS_DRAFT                  Number of layers to offload to the GPU for the draft model.
  --device-draft DEVICE_DRAFT                          Comma-separated list of devices to use for offloading the draft model. Example: CUDA0,CUDA1
  --ctx-size-draft CTX_SIZE_DRAFT                      Size of the prompt context for the draft model. If 0, uses the same as the main model.
  --spec-type {none,ngram-mod,ngram-simple,ngram-map-k,ngram-map-k4v,ngram-cache}
                                                       Draftless speculative decoding type. Recommended: ngram-mod.
  --spec-ngram-size-n SPEC_NGRAM_SIZE_N                N-gram lookup size for ngram speculative decoding.
  --spec-ngram-size-m SPEC_NGRAM_SIZE_M                Draft n-gram size for ngram speculative decoding.
  --spec-ngram-min-hits SPEC_NGRAM_MIN_HITS            Minimum n-gram hits for ngram-map speculative decoding.

llama.cpp:
  --gpu-layers, --n-gpu-layers N                       Number of layers to offload to the GPU. -1 = auto.
  --cpu-moe                                            Move the experts to the CPU (for MoE models).
  --mmproj MMPROJ                                      Path to the mmproj file for vision models.
  --streaming-llm                                      Activate StreamingLLM to avoid re-evaluating the entire prompt when old messages are removed.
  --tensor-split TENSOR_SPLIT                          Split the model across multiple GPUs. Comma-separated list of proportions. Example: 60,40.
  --split-mode {layer,row,tensor,none}                 How to split the model across multiple GPUs. "tensor" can make multi-GPU significantly faster.
  --no-mmap                                            Prevent mmap from being used.
  --mlock                                              Force the system to keep the model in RAM.
  --no-kv-offload                                      Do not offload the K, Q, V to the GPU. This saves VRAM but reduces performance.
  --batch-size BATCH_SIZE                              Maximum number of prompt tokens to batch together when calling llama-server. This is the application level batch size.
  --ubatch-size UBATCH_SIZE

 TextGen 是一款开源桌面应用,用于在本地运行大语言模型(LLM),支持文本、视觉和工具调用,并兼容 OpenAI 与 Anthropic 的 API。它设计上做到 100% 隐私保护,不包含任何遥测功能。