


vggt README

The project's README from github.com/facebookresearch/vggt. As one markdown file: README.md.

VGGT: Visual Geometry Grounded Transformer

Paper PDF arXiv Project Page

Visual Geometry Group, University of Oxford; Meta AI

Jianyuan Wang, Minghao Chen, Nikita Karaev, Andrea Vedaldi, Christian Rupprecht, David Novotny

@inproceedings{wang2025vggt,
  title={VGGT: Visual Geometry Grounded Transformer},
  author={Wang, Jianyuan and Chen, Minghao and Karaev, Nikita and Vedaldi, Andrea and Rupprecht, Christian and Novotny, David},
  booktitle={Proceedings of the IEEE/CVF Conference on Computer Vision and Pattern Recognition},
  year={2025}
}

Updates

Overview

Visual Geometry Grounded Transformer (VGGT, CVPR 2025) is a feed-forward neural network that directly infers all key 3D attributes of a scene, including extrinsic and intrinsic camera parameters, point maps, depth maps, and 3D point tracks, from one, a few, or hundreds of its views, within seconds.

Quick Start

First, clone this repository to your local machine, and install the dependencies (torch, torchvision, numpy, Pillow, and huggingface_hub).

git clone [email protected]:facebookresearch/vggt.git 
cd vggt
pip install -r requirements.txt

Alternatively, you can install VGGT as a package (click here for details).

Now, try the model with just a few lines of code:

import torch
from vggt.models.vggt import VGGT
from vggt.utils.load_fn import load_and_preprocess_images

device = "cuda" if torch.cuda.is_available() else "cpu"
# bfloat16 is supported on Ampere GPUs (Compute Capability 8.0+) 
dtype = torch.bfloat16 if torch.cuda.get_device_capability()[0] >= 8 else torch.float16

# Initialize the model and load the pretrained weights.
# This will automatically download the model weights the first time it's run, which may take a while.
model = VGGT.from_pretrained("facebook/VGGT-1B").to(device)

# Load and preprocess example images (replace with your own image paths)
image_names = ["path/to/imageA.png", "path/to/imageB.png", "path/to/imageC.png"]  
images = load_and_preprocess_images(image_names).to(device)

with torch.no_grad():
    with torch.cuda.amp.autocast(dtype=dtype):
        # Predict attributes including cameras, depth maps, and point maps.
        predictions = model(images)

The model weights will be automatically downloaded from Hugging Face. If you encounter issues such as slow loading, you can manually download them here and load, or:

model = VGGT()
_URL = "https://huggingface.co/facebook/VGGT-1B/resolve/main/model.pt"
model.load_state_dict(torch.hub.load_state_dict_from_url(_URL))

Detailed Usage

Click to expand

You can also optionally choose which attributes (branches) to predict, as shown below. This achieves the same result as the example above. This example uses a batch size of 1 (processing a single scene), but it naturally works for multiple scenes.

from vggt.utils.pose_enc import pose_encoding_to_extri_intri
from vggt.utils.geometry import unproject_depth_map_to_point_map

with torch.no_grad():
    with torch.cuda.amp.autocast(dtype=dtype):
        images = images[None]  # add batch dimension
        aggregated_tokens_list, ps_idx = model.aggregator(images)
                
    # Predict Cameras
    pose_enc = model.camera_head(aggregated_tokens_list)[-1]
    # Extrinsic and intrinsic matrices, following OpenCV convention (camera from world)
    extrinsic, intrinsic = pose_encoding_to_extri_intri(pose_enc, images.shape[-2:])

    # Predict Depth Maps
    depth_map, depth_conf = model.depth_head(aggregated_tokens_list, images, ps_idx)

    # Predict Point Maps
    point_map, point_conf = model.point_head(aggregated_tokens_list, images, ps_idx)
        
    # Construct 3D Points from Depth Maps and Cameras
    # which usually leads to more accurate 3D points than point map branch
    point_map_by_unprojection = unproject_depth_map_to_point_map(depth_map.squeeze(0), 
                                                                extrinsic.squeeze(0), 
                                                                intrinsic.squeeze(0))

    # Predict Tracks
    # choose your own points to track, with shape (N, 2) for one scene
    query_points = torch.FloatTensor([[100.0, 200.0], 
                                        [60.72, 259.94]]).to(device)
    track_list, vis_score, conf_score = model.track_head(aggregated_tokens_list, images, ps_idx, query_points=query_points[None])

Furthermore, if certain pixels in the input frames are unwanted (e.g., reflective surfaces, sky, or water), you can simply mask them by setting the corresponding pixel values to 0 or 1. Precise segmentation masks aren't necessary - simple bounding box masks work effectively (check this issue for an example).

Interactive Demo

We provide multiple ways to visualize your 3D reconstructions. Before using these visualization tools, install the required dependencies:

pip install -r requirements_demo.txt

Interactive 3D Visualization

Please note: VGGT typically reconstructs a scene in less than 1 second. However, visualizing 3D points may take tens of seconds due to third-party rendering, independent of VGGT's processing time. The visualization is slow especially when the number of images is large.

Gradio Web Interface

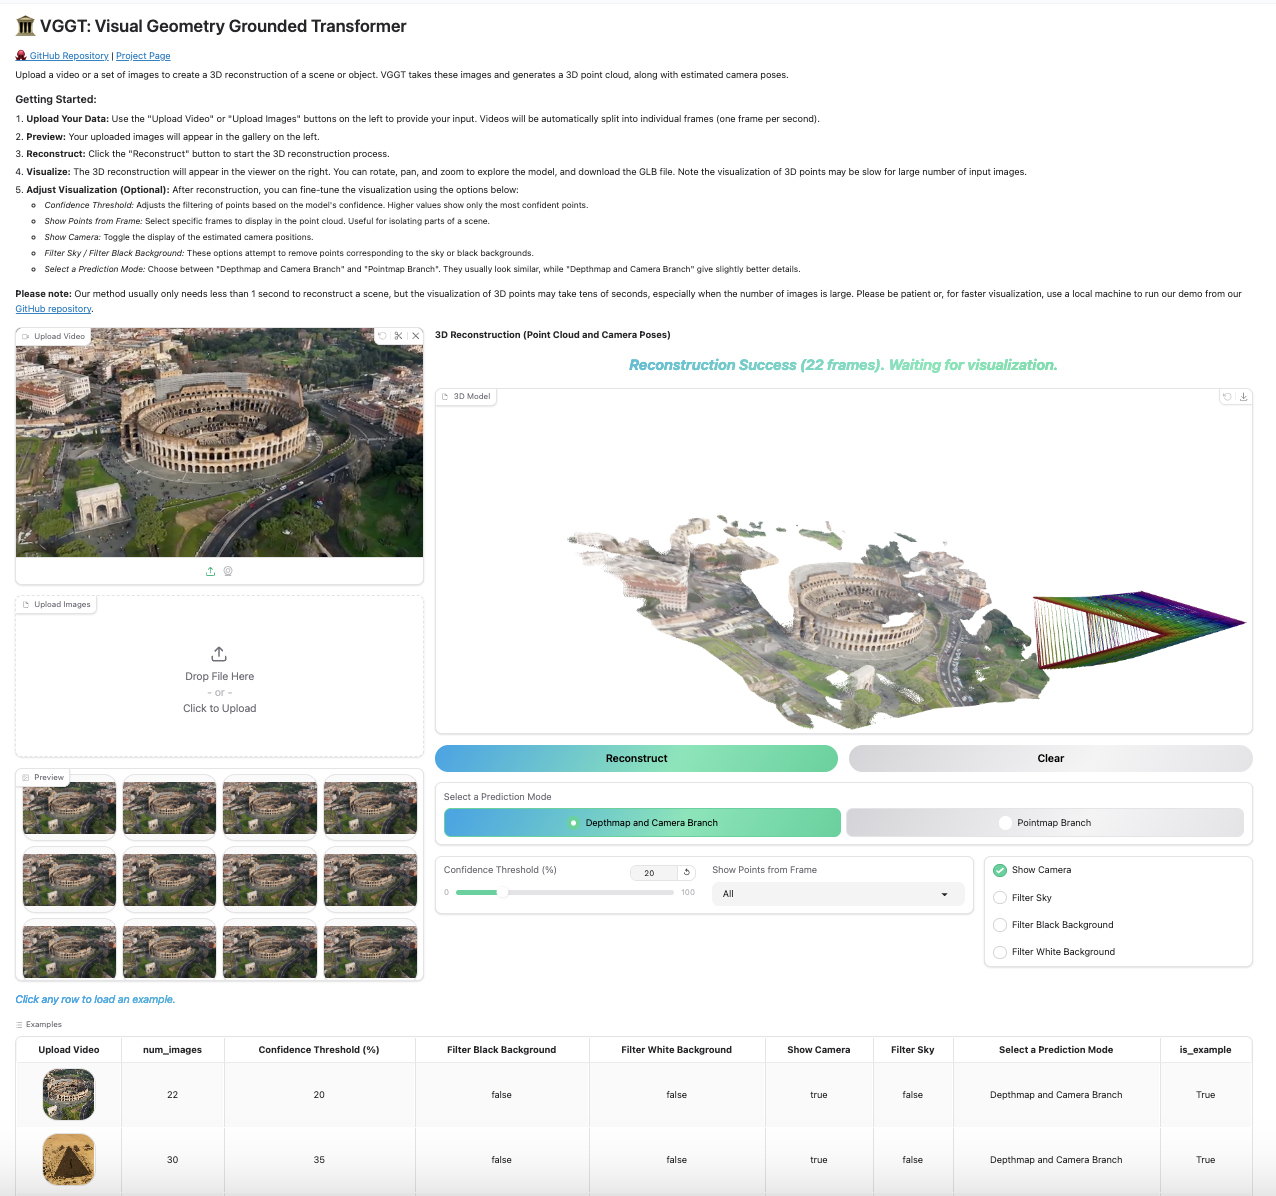
Our Gradio-based interface allows you to upload images/videos, run reconstruction, and interactively explore the 3D scene in your browser. You can launch this in your local machine or try it on Hugging Face.

python demo_gradio.py
Click to preview the Gradio interactive interface

Gradio Web Interface Preview

Viser 3D Viewer

Run the following command to run reconstruction and visualize the point clouds in viser. Note this script requires a path to a folder containing images. It assumes only image files under the folder. You can set --use_point_map to use the point cloud from the point map branch, instead of the depth-based point cloud.

python demo_viser.py --image_folder path/to/your/images/folder

Exporting to COLMAP Format

We also support exporting VGGT's predictions directly to COLMAP format, by:

# Feedforward prediction only
python demo_colmap.py --scene_dir=/YOUR/SCENE_DIR/ 

# With bundle adjustment
python demo_colmap.py --scene_dir=/YOUR/SCENE_DIR/ --use_ba

# Run with bundle adjustment using reduced parameters
# Reduces max_query_pts from 4096 (default) to 2048 and query_frame_num from 8 (default) to 5
# Trade-off: Potentially less robust reconstruction in complex scenes (you may consider setting query_frame_num equal to your total number of images) 
# See demo_colmap.py for additional bundle adjustment configuration options
python demo_colmap.py --scene_dir=/YOUR/SCENE_DIR/ --use_ba --max_query_pts=2048 --query_frame_num=5

Please ensure that the images are stored in /YOUR/SCENE_DIR/images/. This folder should contain only the images. Check the examples folder for the desired data structure.

The reconstruction result (camera parameters and 3D points) will be automatically saved under /YOUR/SCENE_DIR/sparse/ in the COLMAP format, such as:

SCENE_DIR/
├── images/
└── sparse/
    ├── cameras.bin
    ├── images.bin
    └── points3D.bin

Integration with Gaussian Splatting

The exported COLMAP files can be directly used with gsplat for Gaussian Splatting training. Install gsplat following their official instructions (we recommend gsplat==1.3.0):

An example command to train the model is:

cd gsplat
python examples/simple_trainer.py  default --data_factor 1 --data_dir /YOUR/SCENE_DIR/ --result_dir /YOUR/RESULT_DIR/

Zero-shot Single-view Reconstruction

Our model shows surprisingly good performance on single-view reconstruction, although it was never trained for this task. The model does not need to duplicate the single-view image to a pair, instead, it can directly infer the 3D structure from the tokens of the single view image. Feel free to try it with our demos above, which naturally works for single-view reconstruction.

We did not quantitatively test monocular depth estimation performance ourselves, but @kabouzeid generously provided a comparison of VGGT to recent methods here. VGGT shows competitive or better results compared to state-of-the-art monocular approaches such as DepthAnything v2 or MoGe, despite never being explicitly trained for single-view tasks.

Research Progression

Our work builds upon a series of previous research projects. If you're interested in understanding how our research evolved, check out our previous works:

Deep SfM Revisited ──┐
PoseDiffusion ─────► VGGSfM ──► VGGT
CoTracker ──┘

Acknowledgements

Thanks to these great repositories: PoseDiffusion, VGGSfM, CoTracker, DINOv2, Dust3r, Moge, PyTorch3D, Sky Segmentation, Depth Anything V2, Metric3D and many other inspiring works in the community.

Checklist

License

See the LICENSE file for details about the license under which this code is made available.

Please note that only this model checkpoint allows commercial usage. This new checkpoint achieves the same performance level (might be slightly better) as the original one, e.g., AUC@30: 90.37 vs. 89.98 on the Co3D dataset.

vggt (facebookresearch/vggt)

Searching Database…

14.5K ·GitHub
What is this?VGGT (Visual Geometry Grounded Transformer) is a feed-forward neural network that directly infers a scene's 3D attributes - camera intrinsics/extrinsics, depth maps, point maps, and 3D point tracks - from one, a few, or hundreds of images, in seconds. It won the CVPR 2025 Best Paper Award.
Is this a ready-made app or a model I call from Python code?It is a Python model/library you load and run with a few lines of code; weights download automatically from Hugging Face. It also ships an optional Gradio web demo and a Viser 3D viewer for interactive exploration, but those are add-ons, not the core interface.
How do I get VGGT running?Clone the repository and install the dependencies (torch, torchvision, numpy, Pillow, huggingface_hub), or install VGGT directly as a pip package. Model weights are then fetched automatically from Hugging Face the first time you run it.
What libraries do I need before running it?torch, torchvision, numpy, Pillow, and huggingface_hub are required to run inference; extra packages are needed only for the visualization demos (Gradio, Viser) or for COLMAP/gsplat export.
Can I use VGGT for commercial projects?Only the separately released VGGT-1B-Commercial checkpoint is licensed for commercial use (excluding military applications), and you must apply for access through an approval process similar to LLaMA's. The original checkpoint remains non-commercial/research-only.
What's the deal with the license?As of July 2025 the repository's code license was updated to permit commercial use (excluding military applications), but commercial rights to the actual model weights apply only to the separate VGGT-1B-Commercial checkpoint, obtained via an application process.
What is VGGT-Omega?It is the next-generation successor to VGGT, announced in May 2026, which fixes a memory inefficiency so the same GPU budget now supports roughly 2-3x more input frames.
How fast is the 3D reconstruction itself?VGGT typically reconstructs a scene in under one second; the longer wait times seen in demos come from third-party point-cloud rendering, not from the model's inference.
Can it reconstruct 3D from just a single image?Yes - despite never being trained for single-view input, VGGT performs competitively with or better than dedicated monocular depth methods like DepthAnything v2 or MoGe.
Can I feed the output into Gaussian Splatting tools?Yes, VGGT can export its camera and point predictions directly to COLMAP format, which plugs straight into gsplat for Gaussian Splatting training.
Size
65 MB
Stars
14.5K
Updated
CommitMay 19
Age
1y
Commits · 90 Days