LingBot-Map: Geometric Context Transformer for Streaming 3D Reconstruction
Robbyant Team
https://github.com/user-attachments/assets/fe39e095-af2c-4ec9-b68d-a8ba97e505ab
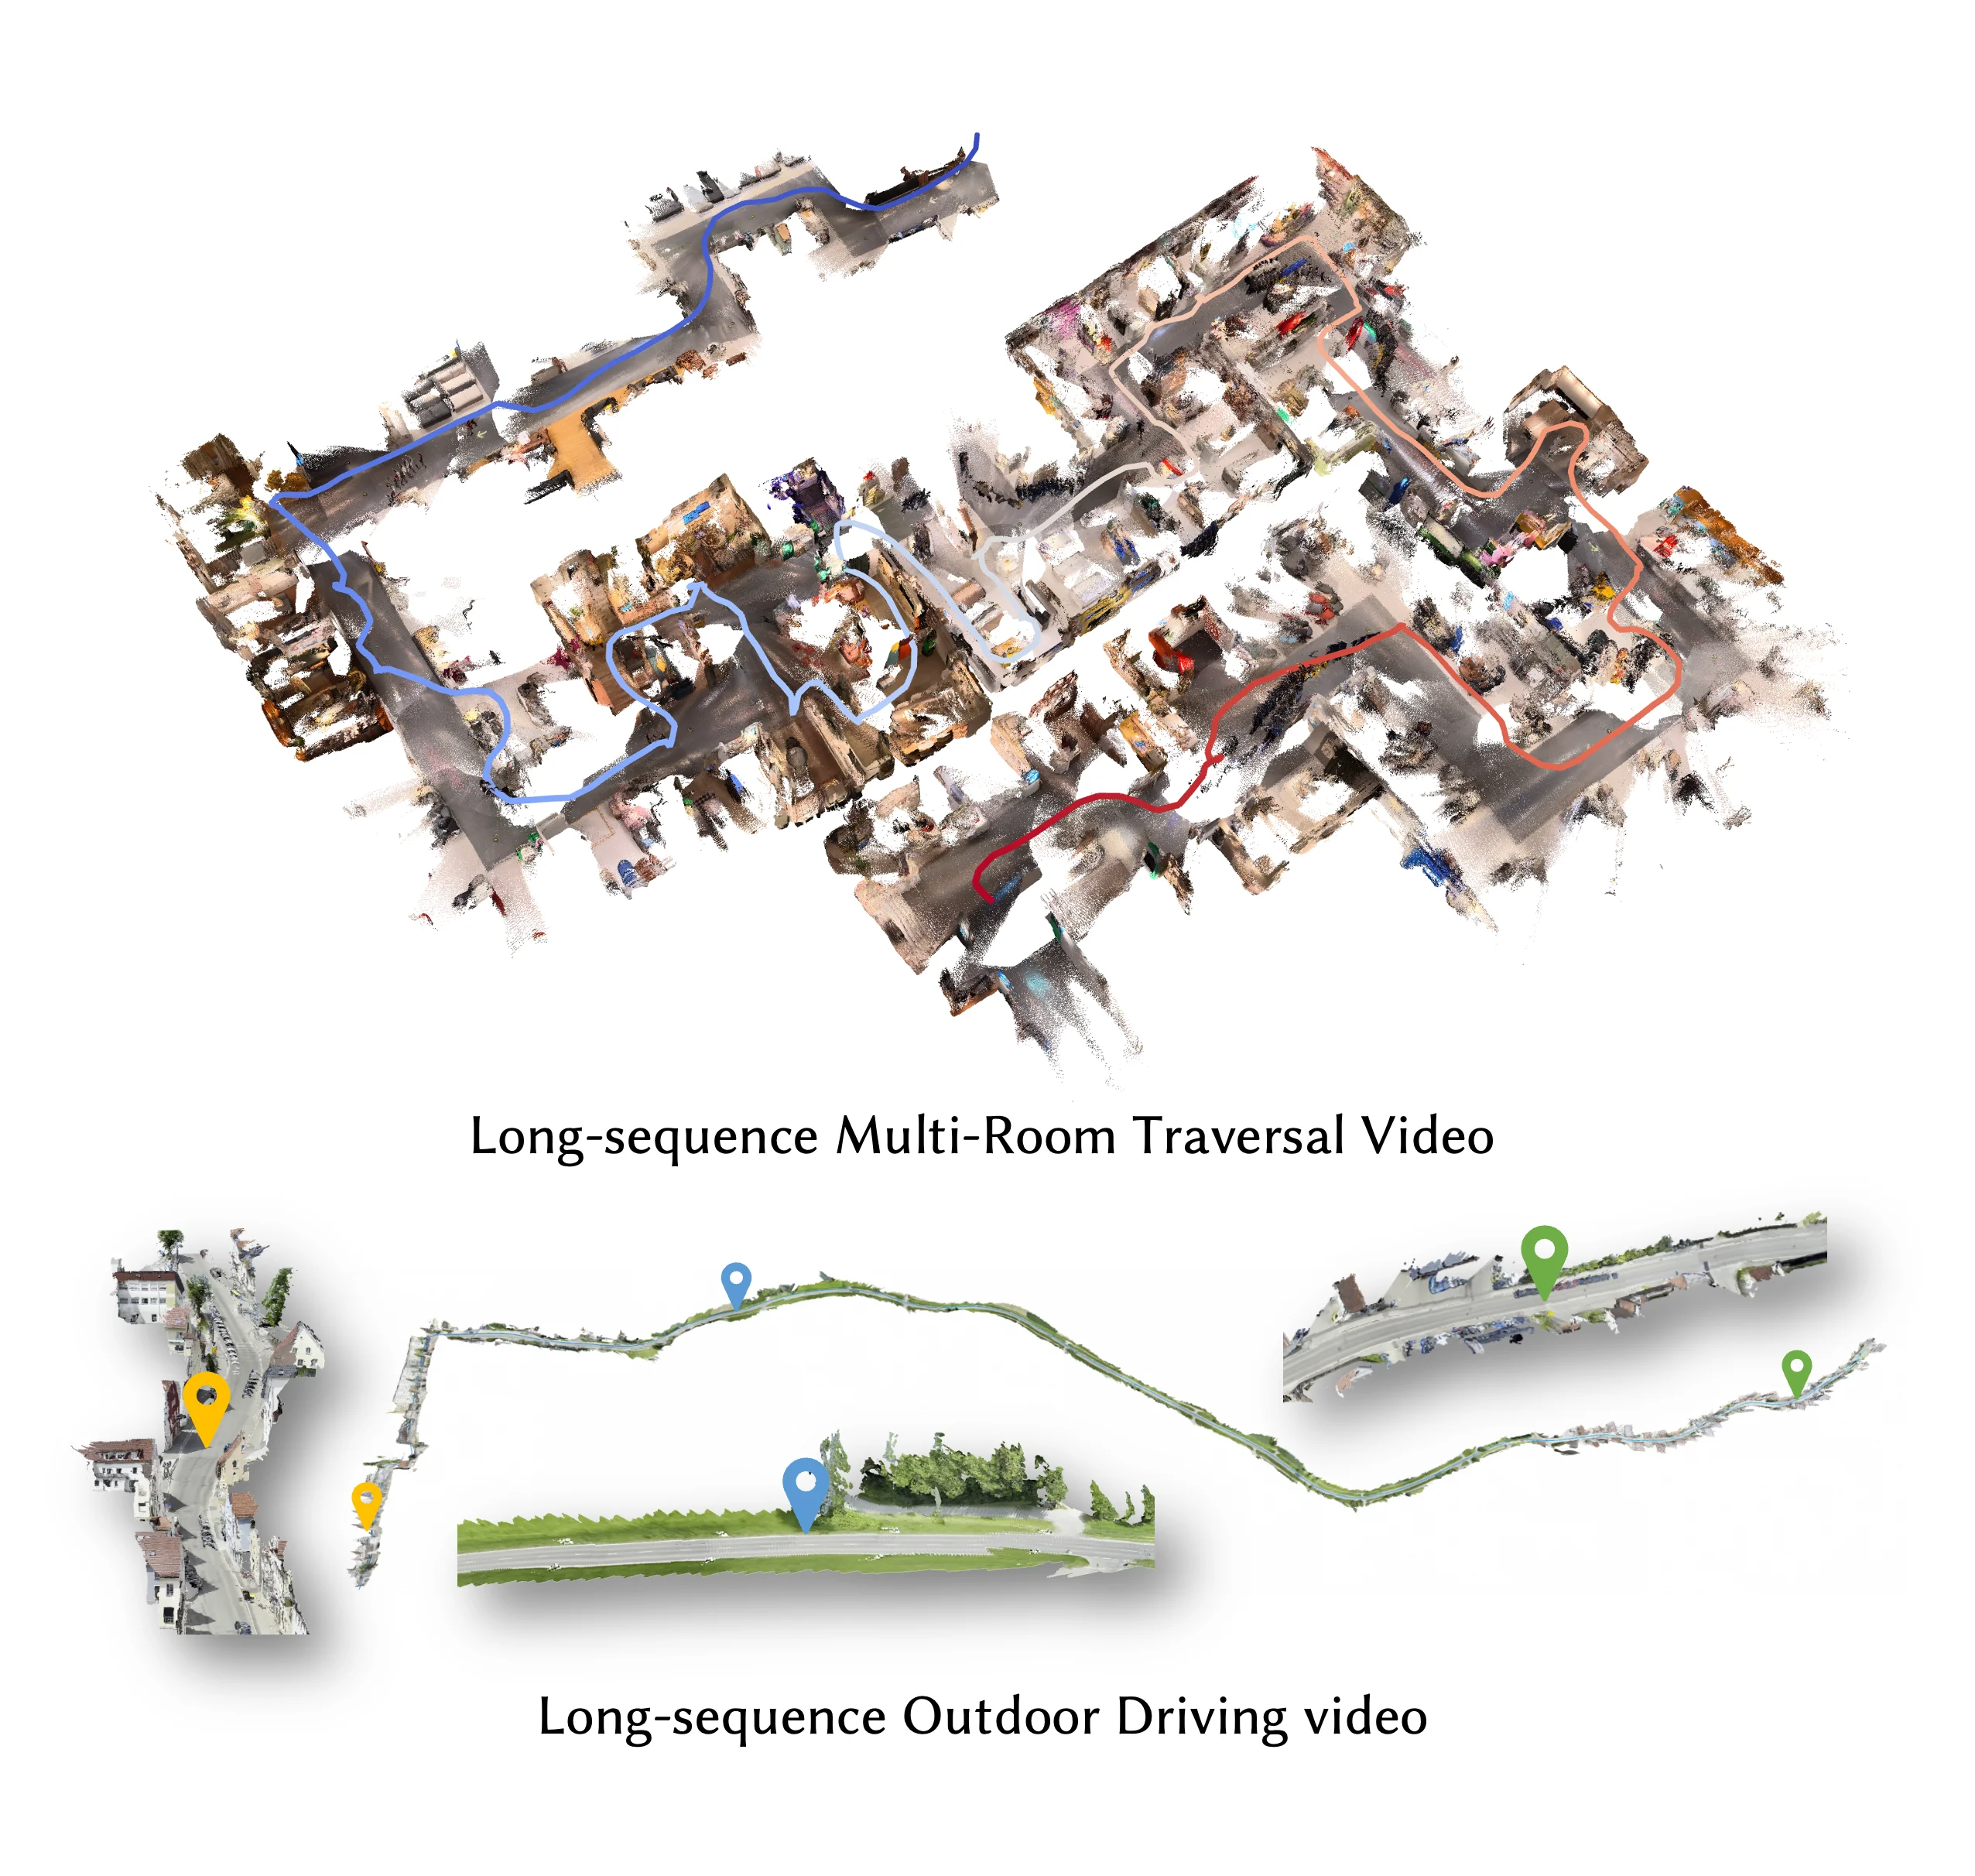
🗺️ Meet LingBot-Map! We've built a feed-forward 3D foundation model for streaming 3D reconstruction! 🏗️🌍
LingBot-Map has focused on:
- Geometric Context Transformer: Architecturally unifies coordinate grounding, dense geometric cues, and long-range drift correction within a single streaming framework through anchor context, pose-reference window, and trajectory memory.
- High-Efficiency Streaming Inference: A feed-forward architecture with paged KV cache attention, enabling stable inference at ~20 FPS on 518×378 resolution over long sequences exceeding 10,000 frames.
- State-of-the-Art Reconstruction: Superior performance on diverse benchmarks compared to both existing streaming and iterative optimization-based approaches.
📑 Table of Contents
Click to expand
📰 News
- 2026-06-28 — Fixed an SDPA KV cache bug. The SDPA backend now performs better on long sequences. We still recommend the FlashInfer backend for the best performance.
- 2026-05-25 — 📊 Evaluation benchmark released. We released the evaluation scripts for KITTI and Oxford Spires — see benchmark/ for the pipeline, and run
preprocess/oxford.py to prepare Oxford Spires data before evaluation.
- 2026-04-29 — 📹 Long-video demo released. We released a very-long-video example (~25 000 frames, 13-minute indoor walkthrough) rendered with the offline pipeline — see Worked Example for the command, flag rationale, and rendered output.
- 2026-04-27 — 🚀 LingBot-Map accelerated. Pull the latest
main and run python demo.py --compile ... or python gct_profile.py --backend flashinfer --dtype bf16 --compile to verify on your hardware.
- 2026-04-24 — Fixed a FlashInfer KV cache bug where
--keyframe_interval > 1 silently cached non-keyframes. You should now see better pose and reconstruction quality when running with more than 320 frames.
📋 TODO
- ✅ Release evaluation benchmark
- ✅ Oxford Spires dataset
- ✅ KITTI dataset
- ✅ VBR dataset
- ✅ Droid-W dataset
- ✅ TUM-D dataset
- ✅ 7-scenes dataset
- ✅ ETH3D dataset
- ✅ Tanks and Temples dataset
- ✅ NRGBD dataset
- ✅ Release demo scripts
⚙️ Installation
1. Create conda environment
conda create -n lingbot-map python=3.10 -y
conda activate lingbot-map
2. Install PyTorch (CUDA 12.8)
pip install torch==2.8.0 torchvision==0.23.0 --index-url https://download.pytorch.org/whl/cu128
PyTorch 2.8.0 is the recommended version because NVIDIA Kaolin (required by the batch rendering pipeline) has prebuilt wheels for torch-2.8.0_cu128. If you only need demo.py you may use a newer PyTorch, but the batch renderer then requires building Kaolin from source.
For other CUDA versions, see PyTorch Get Started.
3. Install lingbot-map
pip install -e .
4. Install FlashInfer (recommended)
FlashInfer provides paged KV cache attention for efficient streaming inference. It is a pure-Python package that JIT-compiles CUDA kernels on first use, so a single wheel works across CUDA/PyTorch versions:
pip install --index-url https://pypi.org/simple flashinfer-python
--index-url https://pypi.org/simple is only needed if your default pip index is an internal mirror that doesn't have flashinfer-python.
(Optional) For faster first-use, you can additionally install a CUDA-specific JIT cache: pip install flashinfer-jit-cache -f https://flashinfer.ai/whl/cu128/flashinfer-jit-cache/.
See FlashInfer installation for details. If FlashInfer is not installed, the model falls back to SDPA (PyTorch native attention) via --use_sdpa.
5. Visualization dependencies (optional)
pip install -e ".[vis]"
📦 Model Download
| Model Name |
Huggingface Repository |
ModelScope Repository |
Description |
| lingbot-map |
robbyant/lingbot-map |
Robbyant/lingbot-map |
Balanced checkpoint (used in paper, benchmark and offline demo) — trade off all-around performance across short and long sequences. |
| lingbot-map-stage1 |
robbyant/lingbot-map |
Robbyant/lingbot-map |
Stage-1 training checkpoint of lingbot-map — can be loaded into the VGGT model for bidirectional inference (c2w). |
🚧 Coming soon: we're training an stronger model that supports longer sequences — stay tuned.
🚀 Quick Start
After installation, run your first scene with one command:
python demo.py --model_path /path/to/lingbot-map.pt \
    --image_folder example/courthouse --mask_sky
This launches an interactive viser viewer at http://localhost:8080. See Interactive Demo below for the full set of scenes and flags, or jump to Offline Rendering Pipeline for long-sequence batch rendering.
🎬 Interactive Demo (demo.py)
Run demo.py for interactive 3D visualization via a browser-based viser viewer (default http://localhost:8080).
Try the Example Scenes
We provide three example scenes in example/ that you can run out of the box:
# courthouse scene
python demo.py --model_path /path/to/lingbot-map.pt \
    --image_folder example/courthouse --mask_sky
https://github.com/user-attachments/assets/aa10f7ab-8024-43c7-92f8-d56159ec85c8
# University scene
python demo.py --model_path /path/to/lingbot-map.pt \
    --image_folder example/university --mask_sky
https://github.com/user-attachments/assets/212a1744-6ff5-4ccf-9bd4-728608248b57
# Loop scene (loop closure trajectory)
python demo.py --model_path /path/to/lingbot-map.pt \
    --image_folder example/loop
https://github.com/user-attachments/assets/5ae0a292-b081-40c6-838c-b7c1a0538d75
🎯 Featured: indoor walkthrough (~25 000 frames, 13 minutes)
Sequence is too long for the interactive viser viewer — this clip was rendered with the Offline Rendering Pipeline. See that section for the full command.
We will provide more examples in the follow-up.
Dynamic Demo (From Droid-W)
Dataset: Download the demo sequences from robbyant/lingbot-map-demo on Hugging Face.
Example run on the dynamic sequence from the dataset above (sky masking on, 4 camera optimization iterations, keyframe every 2 frames):
Run the dynamic sequence with sky masking, 4 camera optimization iterations, and an input stride of 2:
python demo.py \
    --image_folder /path/to/dynamic\
    --model_path ../../Lingbot-Map/lingbot-map.pt \
    --camera_num_iterations 4 \
    --mask_sky \
    --stride 2
https://github.com/user-attachments/assets/567b6e9b-1cbf-402a-96be-9bab70715ec3

Streaming with Keyframe Interval
Use --keyframe_interval to reduce KV cache memory by only keeping every N-th frame as a keyframe. Non-keyframe frames still produce predictions but are not stored in the cache. This is useful for long sequences which exceed 320 frames (We train with video RoPE on 320 views, so performance degrades when the KV cache stores more than 320 views. Using a keyframe strategy allows inference over longer sequences.). In demo.py, the keyframe interval is calculated automatically.
Note on inference range. Our method does not perform state resetting by default, so the maximum inference range is bounded by the longest distance seen during training on the dataset. Beyond that distance, state resetting becomes necessary. If you observe pose collapse, switch to windowed mode (--mode windowed) — in most cases tuning --keyframe_interval alone is enough and the rest of the windowed parameters can stay at their defaults.
Windowed Inference (for long sequences, >3000 frames)
python demo.py --model_path /path/to/lingbot-map.pt \
    --video_path video.mp4 --fps 10 \
    --mode windowed --window_size 128 --overlap_keyframes 16 --keyframe_interval 2
Sky Masking
Sky masking uses an ONNX sky segmentation model to filter out sky points from the reconstructed point cloud, which improves visualization quality for outdoor scenes.
Setup:
# Install onnxruntime (required)
pip install onnxruntime        # CPU
# or
pip install onnxruntime-gpu    # GPU (faster for large image sets)
By default, root demo.py resolves the sky segmentation model as skyseg.onnx relative to the current working directory. If that default file is missing, it is automatically downloaded from HuggingFace on first use. If the download fails or does not produce a regular file, sky masking stops with a RuntimeError that reports the model path, download URL, cause, and manual setup guidance; it never silently continues without masking.
For manual recovery while keeping the default path, download skyseg.onnx into the directory from which you run demo.py:
wget -O skyseg.onnx https://huggingface.co/JianyuanWang/skyseg/resolve/main/skyseg.onnx
python demo.py --model_path /path/to/checkpoint.pt \
    --image_folder /path/to/images/ --mask_sky
Usage with an explicit model path:
To use a model stored elsewhere, pass its absolute path with --sky_model:
python demo.py --model_path /path/to/checkpoint.pt \
    --image_folder /path/to/images/ --mask_sky \
    --sky_model /absolute/path/to/skyseg.onnx
Sky masks are cached in <image_folder>_sky_masks/ so subsequent runs skip regeneration. You can also specify a custom cache directory with --sky_mask_dir, or save side-by-side mask visualizations with --sky_mask_visualization_dir:
python demo.py --model_path /path/to/checkpoint.pt \
    --image_folder /path/to/images/ --mask_sky \
    --sky_mask_dir /path/to/cached_masks/ \
    --sky_mask_visualization_dir /path/to/mask_viz/
Visualization Options
| Argument |
Default |
Description |
--port |
8080 |
Viser viewer port |
--conf_threshold |
1.5 |
Visibility threshold for filtering low-confidence points |
--point_size |
0.00001 |
Point cloud point size |
--downsample_factor |
10 |
Spatial downsampling for point cloud display |
Without FlashInfer (SDPA fallback)
python demo.py --model_path /path/to/checkpoint.pt \
    --image_folder /path/to/images/ --use_sdpa
Running on Limited GPU Memory
If you run into out-of-memory issues, try one (or both) of the following:
--offload_to_cpu — offload per-frame predictions to CPU during inference (on by default; use --no-offload_to_cpu only if you have memory to spare).--num_scale_frames 2 — reduce the number of bidirectional scale frames from the default 8 down to 2, which shrinks the activation peak of the initial scale phase.
Faster Inference
Lower the number of iterative refinement steps in the camera head to trade a small amount of pose accuracy for wall-clock speed:
python demo.py --model_path /path/to/checkpoint.pt \
    --image_folder /path/to/images/ --camera_num_iterations 1
--camera_num_iterations defaults to 4; setting it to 1 skips three refinement passes in the camera head (and shrinks its KV cache by 4×).
🎥 Offline Rendering Pipeline (demo_render/batch_demo.py)
Use this pipeline when your sequence is too long for the interactive viser viewer — for example, the indoor walkthrough featured above. demo_render/batch_demo.py is the all-in-one offline entry point: feed it a video or a folder of images and it will run model inference and produce a headless point-cloud flythrough MP4 in a single command. It shares the same PyTorch / FlashInfer / checkpoint stack as demo.py.
For those constrained by limited VRAM or GPU usage, you may also refer to the implementation at: https://github.com/ureeey/lingbot-map-rtx4060-8g/commit/eeee84a89cc97c1e39b736b46df4ee315275700b
Install (extends the main install)
1. Rendering Python dependencies
pip install -e ".[vis,render]"
render pulls in open3d>=0.19 and pyyaml (the core numpy<2
constraint comes from the base lingbot-map install). Sky masking in this
pipeline uses onnxruntime-gpu with the dynamic-batch
skyseg_batch.onnx published in the
robbyant/lingbot-map
model repository:
pip install onnxruntime-gpu
wget -O skyseg_batch.onnx \
  https://huggingface.co/robbyant/lingbot-map/resolve/main/skyseg_batch.onnx
The offline renderer downloads skyseg_batch.onnx automatically when its
configured path is missing. Use
--skyseg_model_path /absolute/path/to/skyseg_batch.onnx with
demo_render/batch_demo.py; for standalone
demo_render/rgbd_scan_render.py, use
--sky_model /absolute/path/to/skyseg_batch.onnx or set
preprocess.sky_model in YAML. The single-image root demo.py continues to
use skyseg.onnx.
2. Kaolin — matches the PyTorch 2.8.0 + CUDA 12.8 recommended above:
pip install --index-url https://pypi.org/simple \
    kaolin -f https://nvidia-kaolin.s3.us-east-2.amazonaws.com/torch-2.8.0_cu128.html
--index-url https://pypi.org/simple bypasses any internal mirror that might otherwise serve the PyPI placeholder wheel (which raises ImportError on import).
NVIDIA Kaolin does not publish prebuilt wheels for PyTorch 2.9.x — if you're on 2.9 for other reasons, build Kaolin from source (pip install --no-build-isolation git+https://github.com/NVIDIAGameWorks/kaolin.git, needs local CUDA toolkit). For other torch/CUDA combinations see NVIDIA Kaolin installation.
3. ffmpeg
sudo apt install ffmpeg # or: brew install ffmpeg
4. CUDA extensions (required before first run)
cd demo_render/render_cuda_ext && python setup.py build_ext --inplace && cd ../..
This builds voxel_morton_ext and frustum_cull_ext in place — both are imported by rgbd_render for GPU voxelization and frustum culling.
Worked Example — long indoor walkthrough (~25 000 frames, 13 minutes)
Dataset: Download the example video from robbyant/lingbot-map-demo on Hugging Face.
    python demo_render/batch_demo.py \
    --video_path /data/demo_videos/indoor_travel.MP4 \
    --output_folder /data/outputs/indoor_travel/ \
    --model_path /path/to/lingbot-map.pt \
    --config demo_render/config/indoor.yaml \
    --mode windowed --window_size 128 \
    --keyframe_interval 10 --overlap_keyframes 8 \
    --sky_mask_dir /data/outputs/sky_masks \
    --sky_mask_visualization_dir /data/outputs/sky_mask_viz \
    --camera_vis default --keyframes_only_points \
    --frame_tag --frame_tag_position top_right \
    --save_predictions

Flag-by-flag rationale:
| Flag |
Why it's there |
--mode windowed --window_size 128 |
Sliding-window inference is required once the sequence exceeds the ~320-frame RoPE training range; each window resets the KV cache. window_size counts KV-cache slots, not actual frames — the first num_scale_frames (=8) slots hold the scale frames and the remaining 128 − 8 = 120 slots hold keyframes. With keyframe_interval = 13, one window therefore covers 8 + 120 × 13 = 1568 actual frames. |
--keyframe_interval 10 |
Cache only every 10th frame as a keyframe. Non-keyframes still emit per-frame predictions but don't grow the KV cache |
--overlap_keyframes 8 |
Adjacent windows share 8 keyframes of context, resolved internally to max(num_scale_frames, 8 × keyframe_interval) = 8 × 13 = 104 actual frames of overlap. Recommended whenever keyframe_interval > 1, to keep cross-window pose alignment stable. |
--config demo_render/config/indoor.yaml |
Seed render/scene/camera/overlay defaults from the indoor preset (short depth, tighter follow cam). Any CLI flag the user explicitly passes still overrides the YAML value. |
--sky_mask_dir / --sky_mask_visualization_dir |
Persist sky masks and their side-by-side visualizations to disk so subsequent reruns reuse them instead of re-running ONNX segmentation. (The render pipeline only consumes them when sky masking is enabled — by the YAML preset or by --mask_sky.) |
--camera_vis default |
Overlay the trajectory trail + recent-frame points on the rendered video. |
--keyframes_only_points |
Only unproject keyframe depth into the point cloud; non-keyframes still contribute their pose to the trajectory/frustum overlay. Keeps the cloud sparse for very long sequences. |
--frame_tag --frame_tag_position top_right |
Stamp a <i> / <N> Frames counter in the top-right cor |







 LingBot-Map — это фундаментальная 3D-модель прямого распространения (feed-forward) для потоковой 3D-реконструкции, построенная на основе Geometric Context Transformer, которая входила в число кандидатов на награду Best Paper Award на ECCV 2026.