Image to 3D Lab
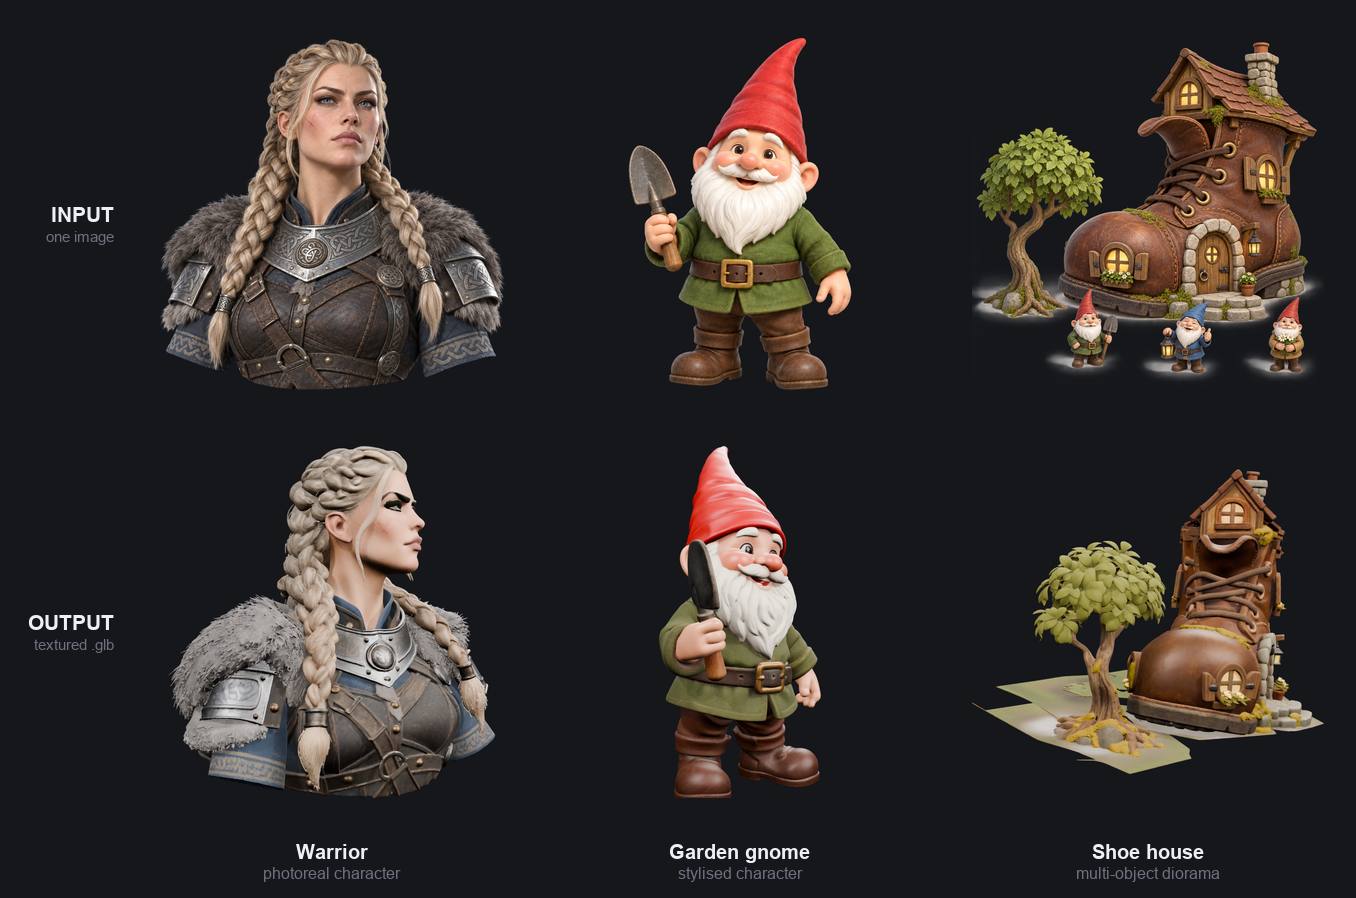
Turn a single image into a textured 3D model on your own machine (an Apple Silicon
Mac, or Linux with an NVIDIA card), with a license-provenance record for every result.
Apple Silicon deserves more love in the 3D and Imagen community. So this is an attempt at that.
Drop in a picture of a character or object; get back a .glb (with PBR texture) plus a
.provenance.json sidecar recording exactly how it was made and under which licenses. This should make your game-dev or whatever else you're up to easier to manage.
Everything runs on your machine; nothing is uploaded to a cloud service.
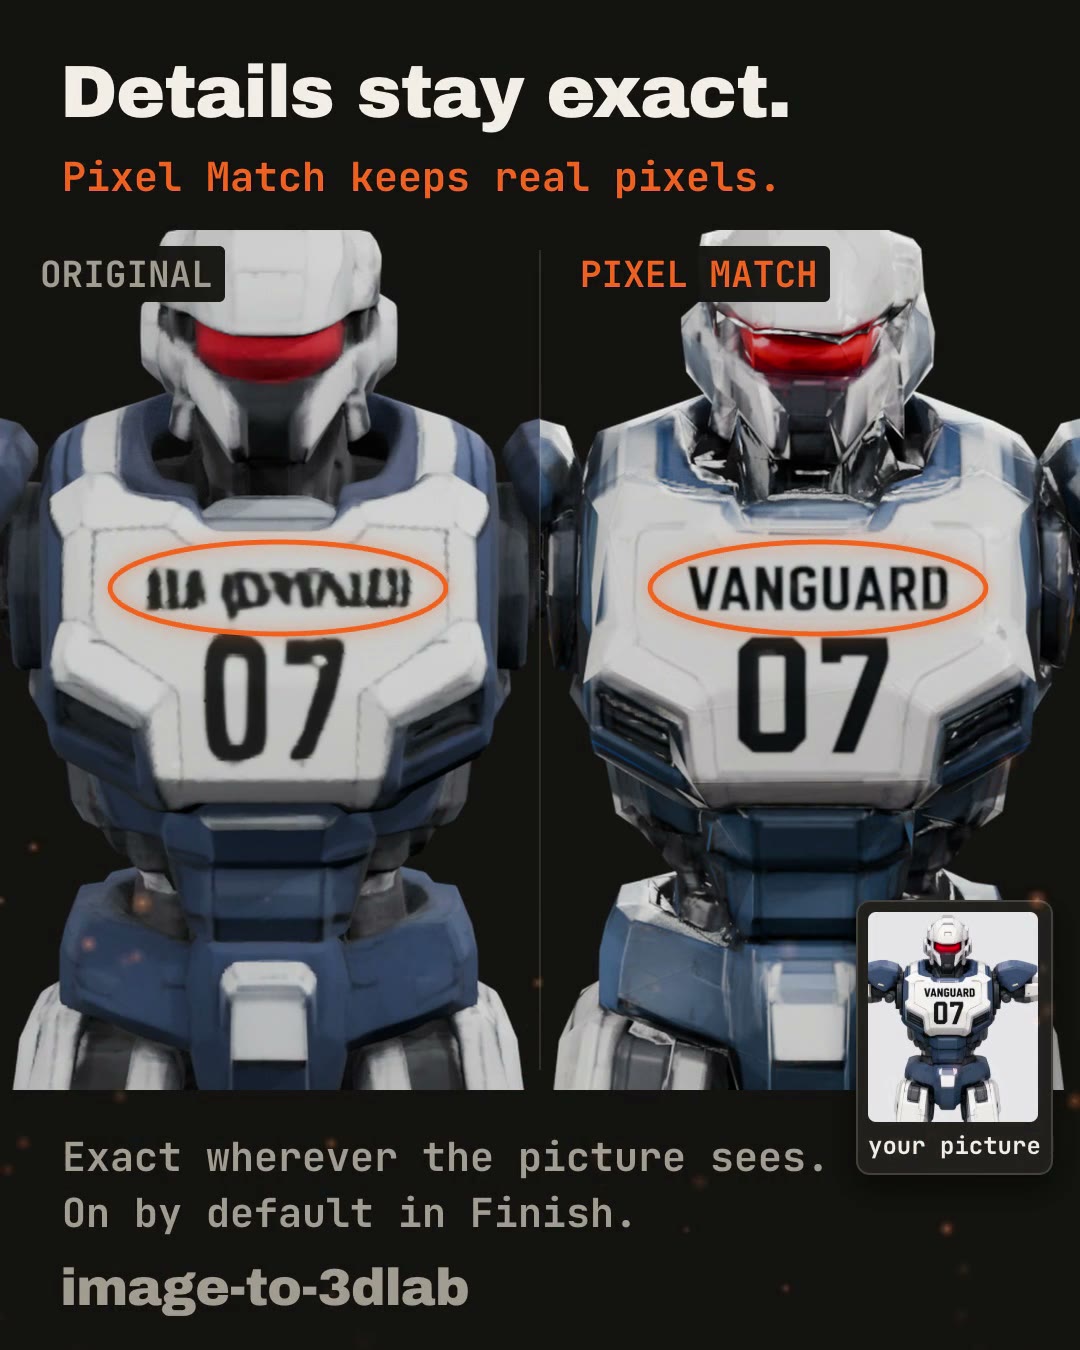
Pixel Match: your picture's real pixels, on the model. Image-to-3D models redraw your
picture, so text, logos and faces come back as garbled lookalikes. Pixel Match, in the
Finish step, copies the real pixels from your source image back onto every surface the
image can see. "VANGUARD 07" on a chest stays "VANGUARD 07", even after Finish cuts the
model down to ~5k faces. On by default for Pixal3D models made in the lab; other backends
and more camera angles are next. How Finish works.
Install
Mac (Apple Silicon) or Linux:
curl -fsSL https://raw.githubusercontent.com/Bingeljell/image-to-3dlab/main/install.sh | bash
Windows (limited testing, more testers wanted: tell us how it goes):
irm https://raw.githubusercontent.com/Bingeljell/image-to-3dlab/main/install.ps1 | iex
The installer is short, so read it before you run it
(Windows version). It checks your machine, installs the code and
Python 3.11, and prints how to start the viewer. It downloads no model weights: you
choose those in Setup & Status, which states each size and licence and asks first. To
update, run the same line again.
For scripts and agents: curl -fsSL …/install.sh | bash -s -- --yes --dir ~/lab
(--dry-run shows what it would do).
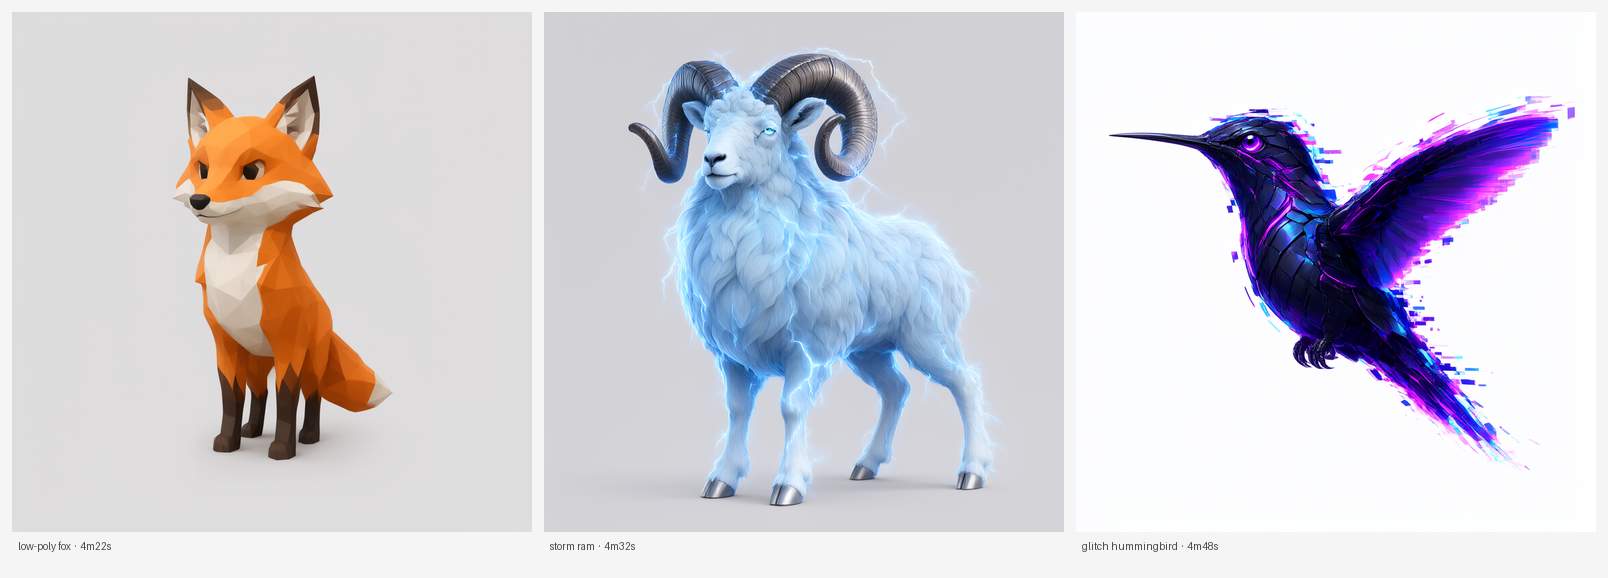
No picture to start from? There is now a Generate Image tab that makes one. Type a
prompt, get a source image, hand it to Generate 3D. It runs Qwen-Image 2.1 on your own
machine: about four and a half minutes an image on an M-series Mac, about twenty seconds
on an RTX 4090.
Built with Qwen. Candidly, Qwen's licence is a bit ambiguous. Qwen says the pictures you
generate are yours (their statement), but the licence still says the model
is for non-commercial use. Our reading is that commercial work needs a licence from Qwen;
if you plan to go commercial, check their licence yourself. The pipeline keeps those runs in
their own folder and says so in the sidecar. Bring your own image and none of that applies.
Five backends, one Generate 3D page. Sadly life is full of trade-offs, so pick the tradeoff you want (lol):
| Backend |
Best for |
Runs on |
Setup |
License |
| Pixal3D (C++/GGML) ⭐ |
Best results we have; one pass, no repaint needed |
Mac, NVIDIA |
Setup & Status, or scripts/bootstrap_pixal3d.py (8.4 GB weights) |
MIT (code + flow weights); DINOv3 License (bundled encoder) |
| Hunyuan3D-MLX (Xiong, full pipeline) |
Fast, clean results |
Mac (NVIDIA: official Hunyuan3D-2.1) |
Code is in this repo; weights download separately |
MIT (code); Tencent Community License (weights) |
| Hunyuan3D-MLX (dgrauet shape + Xiong paint) |
The cleanest shapes, at the cost of manual setup |
Mac (NVIDIA: official Hunyuan3D-2.1) |
Cloned separately, manual |
Tencent Community License (code + weights) |
| TRELLIS.2 |
Highest fidelity, closest to the official demo |
Mac (NVIDIA: official TRELLIS.2) |
Setup & Status (~1h) |
MIT + DINOv3 License |
| Stable Fast 3D |
Fastest, lower fidelity |
Mac, NVIDIA (Linux) |
Setup & Status, or scripts/bootstrap_sf3d.py (gated weights) |
Stability AI Community License |
⭐ Start with Pixal3D. It keeps flat, saturated colours in a single pass, where
TRELLIS.2 often needs a separate repaint.
TRELLIS.2 and Hunyuan3D are built for NVIDIA upstream; this lab wraps their Apple Silicon
ports. On an NVIDIA machine, use the official repos linked above for those two for now.

The warrior above, turned through 360°. Pixal3D, one pass, no repaint stage.
Every model on this page came from a single image.
Hunyuan3D-MLX (Xiong, full pipeline) remains the quickest to get running from a fresh clone
(~9 min shape+paint end to end at its default model).
Reach for TRELLIS.2 when fidelity matters more than speed. Its material model can produce
severe colour drift on flat/vector-style illustrations; prefer photographs or softly lit
3D-style references. See picking a picture for TRELLIS.2.
Setting up a backend
Go to Generate, pick a backend from the dropdown. Each one has its own Setup
status telling you exactly what's missing:
Then drop a pre-masked PNG (transparent background), pick your settings, hit
Generate. Progress streams live; the GLB lands in output/. You can also Compare
two models side by side in the same viewer.
CLI
Same engines without the browser.
Pixal3D:
python scripts/pixal3d_generate.py input.png output.glb --seed 42
A pre-matted RGBA image skips background removal entirely and keeps the cutout identical to
whatever else you ran on it. Pixal3D runs at 1024, the only resolution its single-image
mode supports. It takes 8 sampling steps by default, 15-30% faster than 12 with the same
shape; pass --steps 12 for a hero asset. The 8-step default needs a Pixal3D built from
source (every Mac, and Linux with the CUDA toolkit); the prebuilt NVIDIA download runs 12.
Hunyuan3D-MLX (Xiong, full pipeline):
hunyuan_mlx/shape/.venv/bin/python scripts/hunyuan_mlx_xiong_generate.py \
    input.png output.glb --model 2.0
Reproducible runs
For a run you can audit or repeat later, use a manifest; it records the input, the
backend, every parameter and the licensing intent the run was gated on:
cp manifests/example-trellis2.json manifests/my-run.json
# point "input.path" at your own image, then:
python pipeline.py --run-manifest manifests/my-run.json
Paths inside a manifest resolve relative to the manifest file, not your working
directory. Manifests you write land in manifests/ and stay local; only the template is
tracked. See manifests/README.md.
TRELLIS.2 (after the bootstrap):
vendor/trellis-space-mac/.venv/bin/python scripts/trellis_space_generate.py input.png output/out.glb
--check verifies the environment first (seconds, no model load).- Resume modes skip the expensive parts:
--from-latents out_latents.pt: skip sampling (stages 1–3), re-decode + bake--from-decode out_decode.pt: skip sampling, decode and model load (bake only)
- Every run writes
<out>.glb, <out>_latents.pt, <out>_decode.pt, and a .json manifest
with exact params and per-stage timings.
- In the web UI, a failed TRELLIS decode or bake retains
<out>_latents.pt even when
Debug is off, so the expensive sampling stage can be resumed. Successful non-debug
runs clean up the checkpoint after the GLB is safely written.
Finishing an asset
Generated assets arrive dense and heavy, often ~900k faces and 30+ MB, nearly all of it
uncompressed texture. The Finish page in the viewer, and the same chain on the CLI,
brings that down without a visible quality cost:
python scripts/retopo_repaint.py generated.glb source.png finished.glb \
    --faces 40000 --skip-paint
Up to four stages; Finish in the viewer runs retopologise, Pixel Match and compress by
default:
- Retopologise: voxel-remesh, then decimate. The ordering matters: decimating the raw
mesh shatters thin geometry, measured.
- Repaint (optional, Apple Silicon): hands the clean mesh to Hunyuan 2.1 PBR and
paints from the source art. Pixal3D output rarely needs it, so it is off by default
(
--skip-paint on the CLI) and a finish takes seconds instead of ~6 minutes.
- Pixel Match: every surface the source picture can see takes its real pixel, so
text, logos, numbers and faces stay exact instead of redrawn lookalikes. Automatic for
Pixal3D models made in the lab (their camera is found for you); on the CLI pass
--views <run>.svviews, or use scripts/photo_paint.py on its own. Surfaces the
picture cannot see keep the generator's paint.
- Compress: re-encodes the textures. The paint stage emits two uncompressed 4096²
PNGs; core-glTF JPEG at 2048 measures below the renderer's own sampling noise and takes a
typical asset from 32 MB to under 5.
Every run writes a JSON record of the settings used, so a batch of finished assets is
comparable rather than each one being tuned by hand.
Blender animation recipes
The reusable Blender tooling lives in scripts/blender_*.py: import, inspect,
stage, bake, render, rig and rebind helpers that work on any mesh this pipeline
produces. scripts/README.md indexes every tool in the
repository, grouped by what you are trying to do, and is kept honest by a test
that reads each script's own docstring.
Per-creature rigs and animations are not shipped. They lived here once and
were model-specific references rather than drop-in tools, so they now sit in a
git-ignored characters/<name>/ folder alongside their tests. The techniques are
documented in docs/; the creature-specific scripts are ours, not yours. The
quadruped pipeline walks through rigging a four-legged
character with them.
Requirements
| Thing |
Why |
| Apple Silicon Mac (M-series), 32 GB recommended |
Every route |
| or Linux with an NVIDIA card (24 GB VRAM tested; Pixal3D's authors run it on 16 GB) |
Pixal3D, Stable Fast 3D, Generate Image |
| macOS: full Xcode |
compiles the Metal kernels for Pixal3D and TRELLIS |
| Blender 4.2+ |
Finish (low-poly clean-up, Pixel Match) and rigging. Install it yourself from blender.org; Setup & Status shows whether it was found |
uv |
builds the reproducible Python environments |
| Python 3.11 (TRELLIS) / 3.12 (Hunyuan3D-MLX) |
pinned by each backend's own setup |
| ~13 GB disk |
Hunyuan3D-MLX 2.0 shape + paint weights (auto-downloaded once) |
| ~14 GB disk |
TRELLIS.2-4B weights (auto-downloaded once, if using TRELLIS) |
| ~94 MB download |
TinyCLIP flat-input advisor (local and non-blocking) |
| ~224 MB download |
BiRefNet-lite background remover (comes with Pixal3D; otherwise Setup & Status or scripts/bootstrap_matte.py) |
How long a run takes
Rough times for one run on a base M5 MacBook (32 GB); the RTX 4090 column is from a rented
cloud GPU. Yours will differ with the machine and the picture.
| Step |
M5 MacBook, 32 GB |
RTX 4090 |
| Text to image (Qwen-Image) |
~4.5 min |
~20 s |
| Image to 3D (Pixal3D) |
~6 min |
~3 min |
| Image to 3D (Hunyuan3D-MLX) |
~9 min |
Mac only |
| Image to 3D (TRELLIS.2) |
15–35 min |
Mac only |
On a Mac, TRELLIS.2 runs about twice as fast with Attention backend set to mlx.
Licensing & provenance (non-negotiable)
- Pixal3D code and flow weights: MIT. The Q8_0 bundle also carries the DINOv3 image
encoder under its own licence, so treat its output the same as TRELLIS's. Background
removal uses BiRefNet-lite (MIT) once installed,
rembg's u2net otherwise, and never
BRIA RMBG-2.0.
- TRELLIS.2 code and weights: MIT. DINOv3 image encoder: separate DINOv3 License,
so TRELLIS output is classified
commercial-conditional.
- TinyCLIP ViT-8M/16 input advisor: MIT. It only warns about risky input style and is
not part of the generated artifact.
- Hunyuan3D-2 / 2.1 model weights (used by both Hunyuan3D-MLX backends): Tencent
Hunyuan Community License; not licensed for use in the EU, UK, or South Korea;
verify exact terms per model before any redistribution-sensitive use.
- Hunyuan3D-MLX (Xiong, full pipeline) code: MIT, tracked in this repo at
hunyuan_mlx/, safe to clone and modify freely (weights are the license-restricted
part, downloaded separately).
- Hunyuan3D-MLX (dgrauet shape) code: Tencent Hunyuan Community License, not MIT;
the code itself, not just the weights, carries the same restriction. Stays vendor-cloned
rather than tracked in this repo for that reason.
- BRIA RMBG-2.0 is disabled by patch and must stay unloaded in the TRELLIS pipeline.
Inputs must carry a real transparent alpha foreground; the pipeline refuses anything else
unless you explicitly pass
--allow-rembg.
- Every run emits a
.provenance.json sidecar (hashes, settings, license classification,
component licenses).
Full credits and per-backend detail: docs/info_and_credits.md.
License
This repo's own code is Apache-2.0: use it, fork it, sell things built on it.
If you do, keep the NOTICE file and credit image-to-3dlab with a link back
here. Model weights keep their own licences, listed above.
Development
python -m pip install -r requirements-dev.txt
PYTHONPATH=. pytest -q        # backends that load real models stay manual
ruff check .
Conventions: Conventional Commits, Keep a Changelog (CHANGELOG.md), test-first.
Credits
This repo trains nothing and invents nothing; it builds upon other people's models and
work. What it does add is filling the gaps that exist to make some of these models work
on Apple Silicon, and improving the overall experience. Grateful to everyone who built
before me; they are named and credited in
docs/info_and_credits.md. Also a special thanks to Claude
and Codex for being my partners through this! Not just helping me build, but teaching me
so much along the way. Yes, I just credited AI.

 AssetFurnace(image-to-3dlab)能把一张图片或一段文字提示变成带贴图、绑好骨骼、带动画的 3D 游戏角色,全部跑在你自己的 Apple Silicon Mac 或 NVIDIA Linux 机器上。