
Structured 3D Latents
for Scalable and Versatile 3D Generation



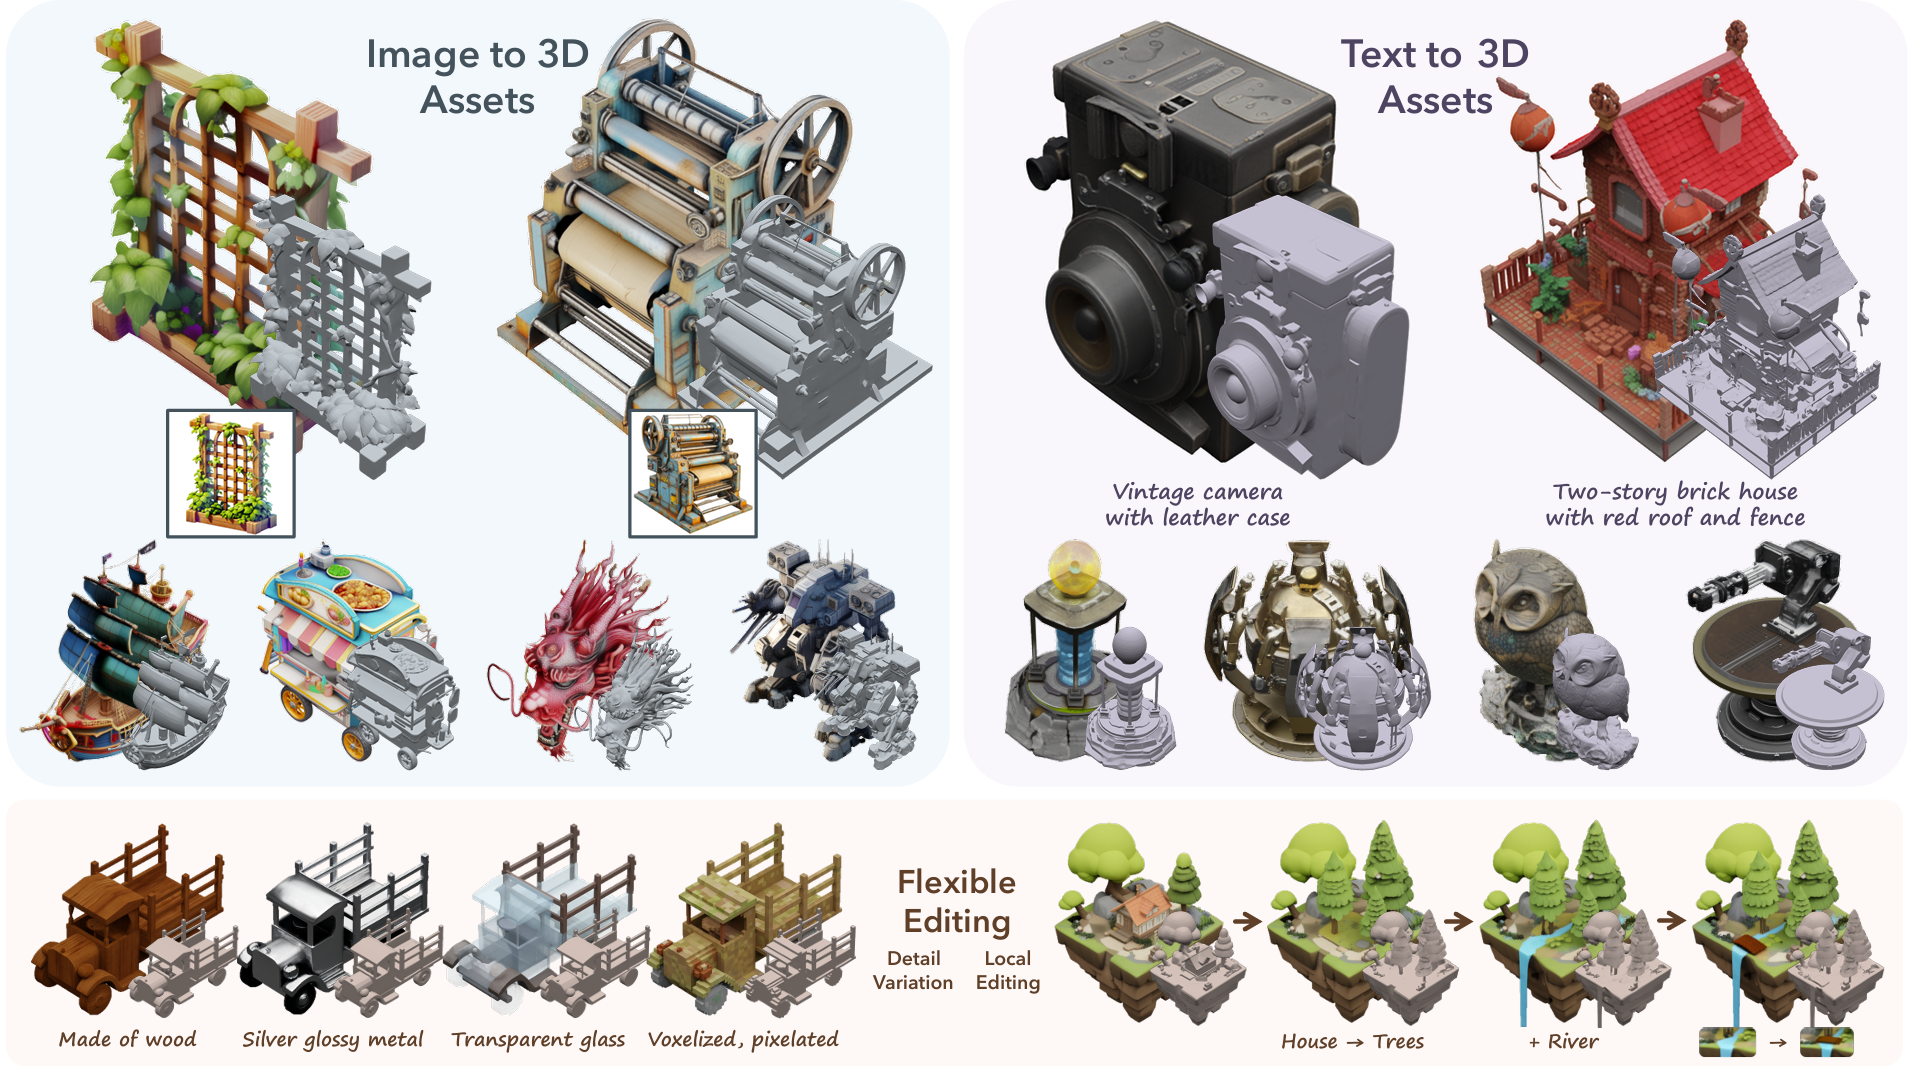
TRELLIS is a large 3D asset generation model. It takes in text or image prompts and generates high-quality 3D assets in various formats, such as Radiance Fields, 3D Gaussians, and meshes. The cornerstone of TRELLIS is a unified Structured LATent (SLAT) representation that allows decoding to different output formats and Rectified Flow Transformers tailored for SLAT as the powerful backbones. We provide large-scale pre-trained models with up to 2 billion parameters on a large 3D asset dataset of 500K diverse objects. TRELLIS significantly surpasses existing methods, including recent ones at similar scales, and showcases flexible output format selection and local 3D editing capabilities which were not offered by previous models.
Check out our Project Page for more videos and interactive demos!
🌟 Features
- High Quality: It produces diverse 3D assets at high quality with intricate shape and texture details.
- Versatility: It takes text or image prompts and can generate various final 3D representations including but not limited to Radiance Fields, 3D Gaussians, and meshes, accommodating diverse downstream requirements.
- Flexible Editing: It allows for easy editings of generated 3D assets, such as generating variants of the same object or local editing of the 3D asset.
⏩ Updates
03/25/2025
- Release training code.
- Release TRELLIS-text models and asset variants generation.
- Examples are provided as example_text.py and example_variant.py.
- Gradio demo is provided as app_text.py.
- Note: It is always recommended to do text to 3D generation by first generating images using text-to-image models and then using TRELLIS-image models for 3D generation. Text-conditioned models are less creative and detailed due to data limitations.
12/26/2024
- Release TRELLIS-500K dataset and toolkits for data preparation.
12/18/2024
- Implementation of multi-image conditioning for TRELLIS-image model. (#7). This is based on tuning-free algorithm without training a specialized model, so it may not give the best results for all input images.
- Add Gaussian export in
app.py and example.py. (#40)
📦 Installation
Prerequisites
- System: The code is currently tested only on Linux. For windows setup, you may refer to #3 (not fully tested).
- Hardware: An NVIDIA GPU with at least 16GB of memory is necessary. The code has been verified on NVIDIA A100 and A6000 GPUs.
- Software:
- The CUDA Toolkit is needed to compile certain submodules. The code has been tested with CUDA versions 11.8 and 12.2.
- Conda is recommended for managing dependencies.
- Python version 3.8 or higher is required.
Installation Steps
Clone the repo:
git clone --recurse-submodules https://github.com/microsoft/TRELLIS.git
cd TRELLIS
Install the dependencies:
Before running the following command there are somethings to note:
- By adding
--new-env, a new conda environment named trellis will be created. If you want to use an existing conda environment, please remove this flag.
- By default the
trellis environment will use pytorch 2.4.0 with CUDA 11.8. If you want to use a different version of CUDA (e.g., if you have CUDA Toolkit 12.2 installed and do not want to install another 11.8 version for submodule compilation), you can remove the --new-env flag and manually install the required dependencies. Refer to PyTorch for the installation command.
- If you have multiple CUDA Toolkit versions installed,
PATH should be set to the correct version before running the command. For example, if you have CUDA Toolkit 11.8 and 12.2 installed, you should run export PATH=/usr/local/cuda-11.8/bin:$PATH before running the command.
- By default, the code uses the
flash-attn backend for attention. For GPUs do not support flash-attn (e.g., NVIDIA V100), you can remove the --flash-attn flag to install xformers only and set the ATTN_BACKEND environment variable to xformers before running the code. See the Minimal Example for more details.
- The installation may take a while due to the large number of dependencies. Please be patient. If you encounter any issues, you can try to install the dependencies one by one, specifying one flag at a time.
- If you encounter any issues during the installation, feel free to open an issue or contact us.
Create a new conda environment named trellis and install the dependencies:
. ./setup.sh --new-env --basic --xformers --flash-attn --diffoctreerast --spconv --mipgaussian --kaolin --nvdiffrast
The detailed usage of setup.sh can be found by running . ./setup.sh --help.
Usage: setup.sh [OPTIONS]
Options:
    -h, --help              Display this help message
    --new-env               Create a new conda environment
    --basic                 Install basic dependencies
    --train                 Install training dependencies
    --xformers              Install xformers
    --flash-attn            Install flash-attn
    --diffoctreerast        Install diffoctreerast
    --spconv                Install spconv
    --mipgaussian           Install mip-splatting
    --kaolin                Install kaolin
    --nvdiffrast            Install nvdiffrast
    --demo                  Install all dependencies for demo
🤖 Pretrained Models
We provide the following pretrained models:
| Model |
Description |
#Params |
Download |
| TRELLIS-image-large |
Large image-to-3D model |
1.2B |
Download |
| TRELLIS-text-base |
Base text-to-3D model |
342M |
Download |
| TRELLIS-text-large |
Large text-to-3D model |
1.1B |
Download |
| TRELLIS-text-xlarge |
Extra-large text-to-3D model |
2.0B |
Download |
Note: It is always recommended to use the image conditioned version of the models for better performance.
Note: All VAEs are included in TRELLIS-image-large model repo.
The models are hosted on Hugging Face. You can directly load the models with their repository names in the code:
TrellisImageTo3DPipeline.from_pretrained("microsoft/TRELLIS-image-large")
If you prefer loading the model from local, you can download the model files from the links above and load the model with the folder path (folder structure should be maintained):
TrellisImageTo3DPipeline.from_pretrained("/path/to/TRELLIS-image-large")
💡 Usage
Minimal Example
Here is an example of how to use the pretrained models for 3D asset generation.
import os
# os.environ['ATTN_BACKEND'] = 'xformers'   # Can be 'flash-attn' or 'xformers', default is 'flash-attn'
os.environ['SPCONV_ALGO'] = 'native'        # Can be 'native' or 'auto', default is 'auto'.
                                            # 'auto' is faster but will do benchmarking at the beginning.
                                            # Recommended to set to 'native' if run only once.

import imageio
from PIL import Image
from trellis.pipelines import TrellisImageTo3DPipeline
from trellis.utils import render_utils, postprocessing_utils

# Load a pipeline from a model folder or a Hugging Face model hub.
pipeline = TrellisImageTo3DPipeline.from_pretrained("microsoft/TRELLIS-image-large")
pipeline.cuda()

# Load an image
image = Image.open("assets/example_image/T.png")

# Run the pipeline
outputs = pipeline.run(
    image,
    seed=1,
    # Optional parameters
    # sparse_structure_sampler_params={
    #     "steps": 12,
    #     "cfg_strength": 7.5,
    # },
    # slat_sampler_params={
    #     "steps": 12,
    #     "cfg_strength": 3,
    # },
)
# outputs is a dictionary containing generated 3D assets in different formats:
# - outputs['gaussian']: a list of 3D Gaussians
# - outputs['radiance_field']: a list of radiance fields
# - outputs['mesh']: a list of meshes

# Render the outputs
video = render_utils.render_video(outputs['gaussian'][0])['color']
imageio.mimsave("sample_gs.mp4", video, fps=30)
video = render_utils.render_video(outputs['radiance_field'][0])['color']
imageio.mimsave("sample_rf.mp4", video, fps=30)
video = render_utils.render_video(outputs['mesh'][0])['normal']
imageio.mimsave("sample_mesh.mp4", video, fps=30)

# GLB files can be extracted from the outputs
glb = postprocessing_utils.to_glb(
    outputs['gaussian'][0],
    outputs['mesh'][0],
    # Optional parameters
    simplify=0.95,          # Ratio of triangles to remove in the simplification process
    texture_size=1024,      # Size of the texture used for the GLB
)
glb.export("sample.glb")

# Save Gaussians as PLY files
outputs['gaussian'][0].save_ply("sample.ply")
After running the code, you will get the following files:
sample_gs.mp4: a video showing the 3D Gaussian representationsample_rf.mp4: a video showing the Radiance Field representationsample_mesh.mp4: a video showing the mesh representationsample.glb: a GLB file containing the extracted textured meshsample.ply: a PLY file containing the 3D Gaussian representation
Web Demo
app.py provides a simple web demo for 3D asset generation. Since this demo is based on Gradio, additional dependencies are required:
. ./setup.sh --demo
After installing the dependencies, you can run the demo with the following command:
python app.py
Then, you can access the demo at the address shown in the terminal.
📚 Dataset
We provide TRELLIS-500K, a large-scale dataset containing 500K 3D assets curated from Objaverse(XL), ABO, 3D-FUTURE, HSSD, and Toys4k, filtered based on aesthetic scores. Please refer to the dataset README for more details.
🏋️♂️ Training
TRELLIS’s training framework is organized to provide a flexible and modular approach to building and fine-tuning large-scale 3D generation models. The training code is centered around train.py and is structured into several directories to clearly separate dataset handling, model components, training logic, and visualization utilities.
Code Structure
- train.py: Main entry point for training.
- trellis/datasets: Dataset loading and preprocessing.
- trellis/models: Different models and their components.
- trellis/modules: Custom modules for various models.
- trellis/pipelines: Inference pipelines for different models.
- trellis/renderers: Renderers for different 3D representations.
- trellis/representations: Different 3D representations.
- trellis/trainers: Training logic for different models.
- trellis/utils: Utility functions for training and visualization.
Training Setup
Prepare the Environment:
- Ensure all training dependencies are installed.
- Use a Linux system with an NVIDIA GPU (The models are trained on NVIDIA A100 GPUs).
- For distributed training, verify that your nodes can communicate through the designated master address and port.
Dataset Preparation:
- Organize your dataset similar to TRELLIS-500K. Specify your dataset path using the
--data_dir argument when launching training.
Configuration Files:
- Training hyperparameters and model architectures are defined in configuration files under the
configs/ directory.
- Example configuration files include:
Command-Line Options
The training script can be run as follows:
usage: train.py [-h] --config CONFIG --output_dir OUTPUT_DIR [--load_dir LOAD_DIR] [--ckpt CKPT] [--data_dir DATA_DIR] [--auto_retry AUTO_RETRY] [--tryrun] [--profile] [--num_nodes NUM_NODES] [--node_rank NODE_RANK] [--num_gpus NUM_GPUS] [--master_addr MASTER_ADDR] [--master_port MASTER_PORT]

options:
  -h, --help                    show this help message and exit
  --config CONFIG               Experiment config file
  --output_dir OUTPUT_DIR       Output directory
  --load_dir LOAD_DIR           Load directory, default to output_dir
  --ckpt CKPT                   Checkpoint step to resume training, default to latest
  --data_dir DATA_DIR           Data directory
  --auto_retry AUTO_RETRY       Number of retries on error
  --tryrun                      Try run without training
  --profile                     Profile training
  --num_nodes NUM_NODES         Number of nodes
  --node_rank NODE_RANK         Node rank
  --num_gpus NUM_GPUS           Number of GPUs per node, default to all
  --master_addr MASTER_ADDR     Master address for distributed training
  --master_port MASTER_PORT     Port for distributed training
Example Training Commands
Single-node Training
To train a image-to-3D stage 2 model with a single machine.
python train.py \
  --config configs/vae/slat_vae_dec_mesh_swin8_B_64l8_fp16.json \
  --output_dir outputs/slat_vae_dec_mesh_swin8_B_64l8_fp16_1node \
  --data_dir /path/to/your/dataset1,/path/to/your/dataset2 \
The script will automatically distribute the training across all available GPUs. Specify the number of GPUs with the --num_gpus flag if you want to limit the number of GPUs used.
Multi-node Training
To train a image-to-3D stage 2 model with multiple GPUs across nodes (e.g., 2 nodes):
python train.py \
  --config configs/generation/slat_flow_img_dit_L_64l8p2_fp16.json \
  --output_dir outputs/slat_flow_img_dit_L_64l8p2_fp16_2nodes \
  --data_dir /path/to/your/dataset1,/path/to/your/dataset2 \
  --num_nodes 2 \
  --node_rank 0 \
  --master_addr $MASTER_ADDR \
  --master_port $MASTER_PORT
Be sure to adjust node_rank, master_addr, and master_port for each node accordingly.
Resuming Training
By default, training will resume from the latest saved checkpoint in the same output directory. To specify a specific checkpoint to resume from, use the --load_dir and --ckpt flags:
python train.py \
  --config configs/generation/slat_flow_img_dit_L_64l8p2_fp16.json \
  --output_dir outputs/slat_flow_img_dit_L_64l8p2_fp16_resume \

 微软的大规模 3D 资产生成模型:输入一段文字或一张图片作为提示,它就能生成高质量的 3D 资产,输出形式可以是辐射场(Radiance Fields)、3D 高斯(3D Gaussians)或网格(mesh)。这是 CVPR'25 Spotlight 论文的官方代码。