🚀 Janus-Series: Unified Multimodal Understanding and Generation Models
📥 Model Download |
⚡ Quick Start |
📜 License |
📖 Citation
🤗 Online Demo (Janus-Pro-7B, Janus, JanusFlow)
News
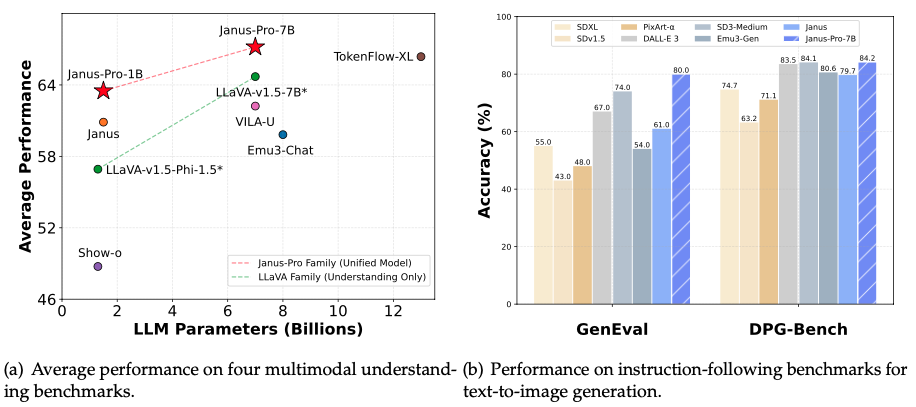
2025.01.27: Janus-Pro is released, an advanced version of Janus, improving both multimodal understanding and visual generation significantly. See paper
2024.11.13: JanusFlow is released, a new unified model with rectified flow for image generation. See paper, demo and usage.
2024.10.23: Evaluation code for reproducing the multimodal understanding results from the paper has been added to VLMEvalKit. Please refer to this link.
2024.10.20: (1) Fix a bug in tokenizer_config.json. The previous version caused classifier-free guidance to not function properly, resulting in relatively poor visual generation quality. (2) Release Gradio demo (online demo and local).
1. Introduction
Janus-Pro: Unified Multimodal Understanding and
Generation with Data and Model Scaling
Janus-Pro is an advanced version of the previous work Janus. Specifically, Janus-Pro incorporates (1) an optimized training strategy, (2) expanded training data, and (3) scaling to larger model size. With these improvements, Janus-Pro achieves significant advancements in both multimodal understanding and text-to-image instruction-following capabilities, while also enhancing the stability of text-to-image generation.
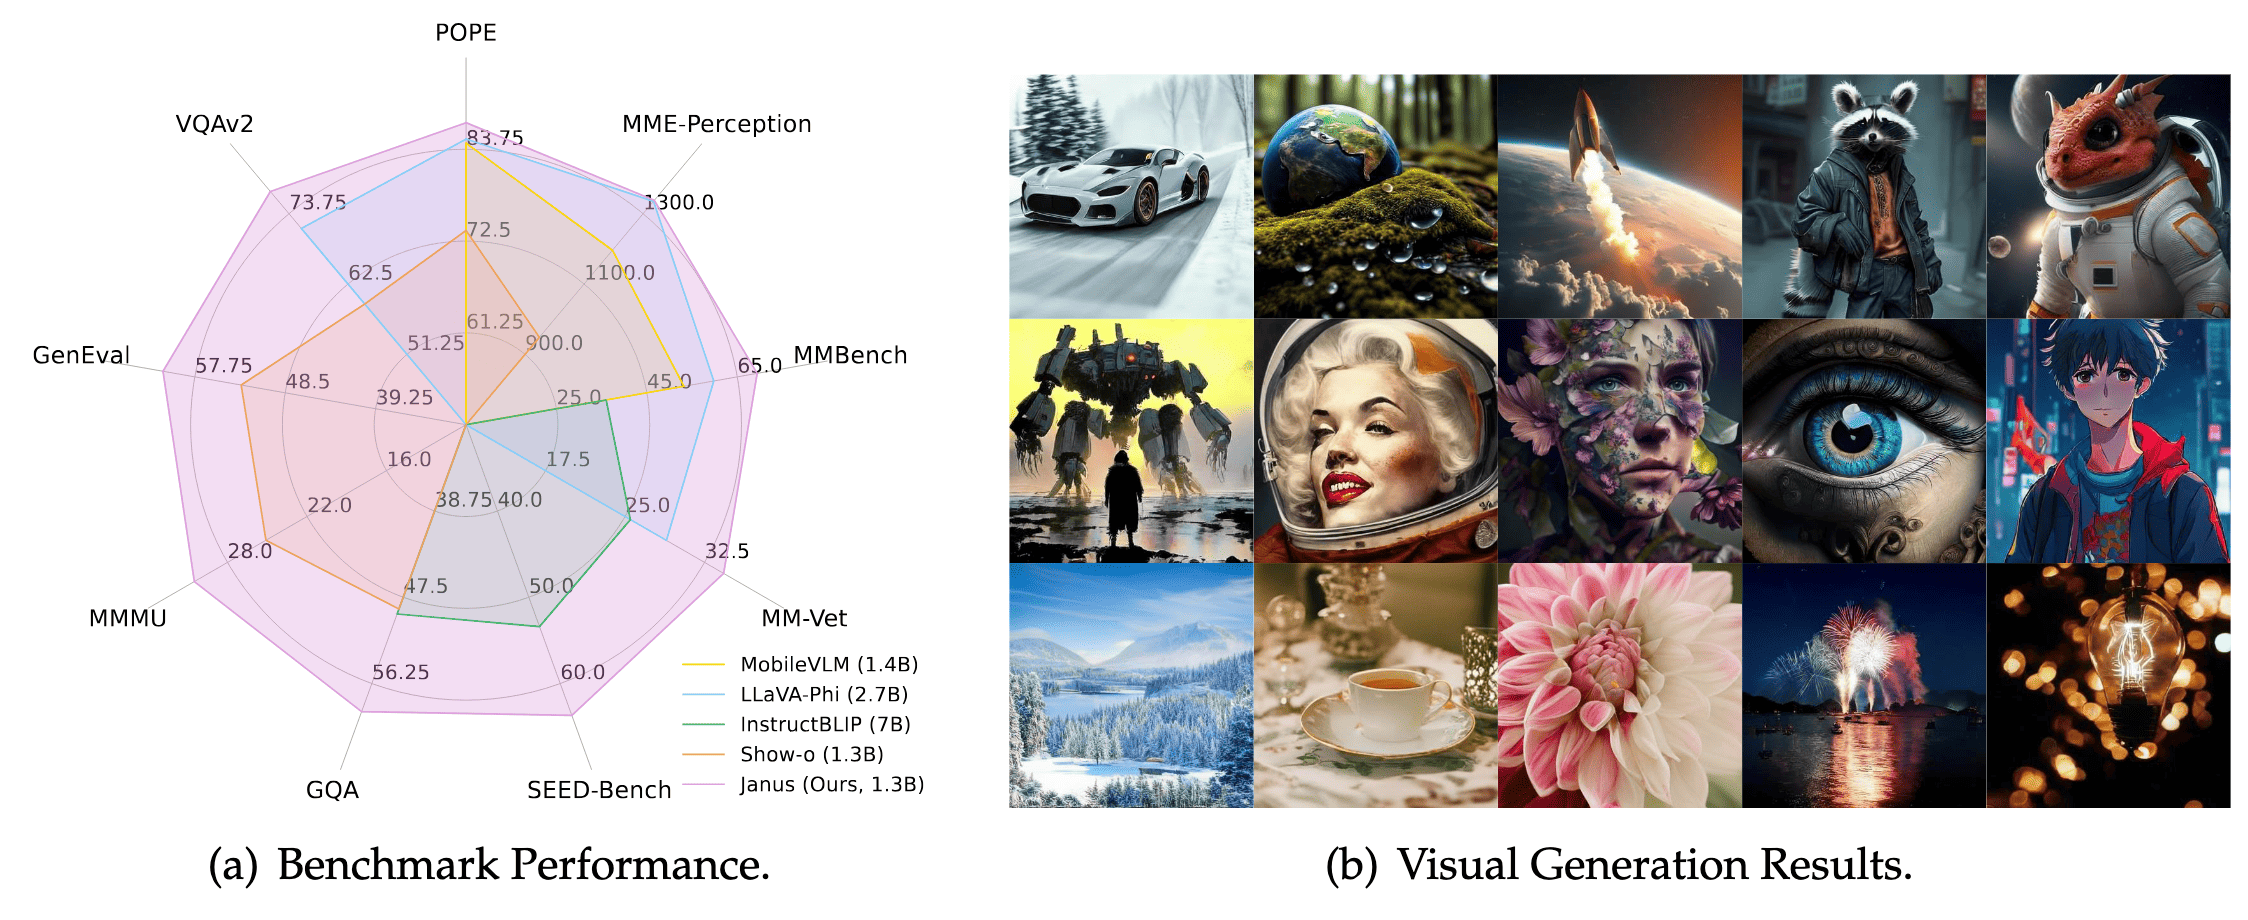
Janus: Decoupling Visual Encoding for Unified Multimodal Understanding and Generation
Janus is a novel autoregressive framework that unifies multimodal understanding and generation. It addresses the limitations of previous approaches by decoupling visual encoding into separate pathways, while still utilizing a single, unified transformer architecture for processing. The decoupling not only alleviates the conflict between the visual encoder’s roles in understanding and generation, but also enhances the framework’s flexibility. Janus surpasses previous unified model and matches or exceeds the performance of task-specific models. The simplicity, high flexibility, and effectiveness of Janus make it a strong candidate for next-generation unified multimodal models.
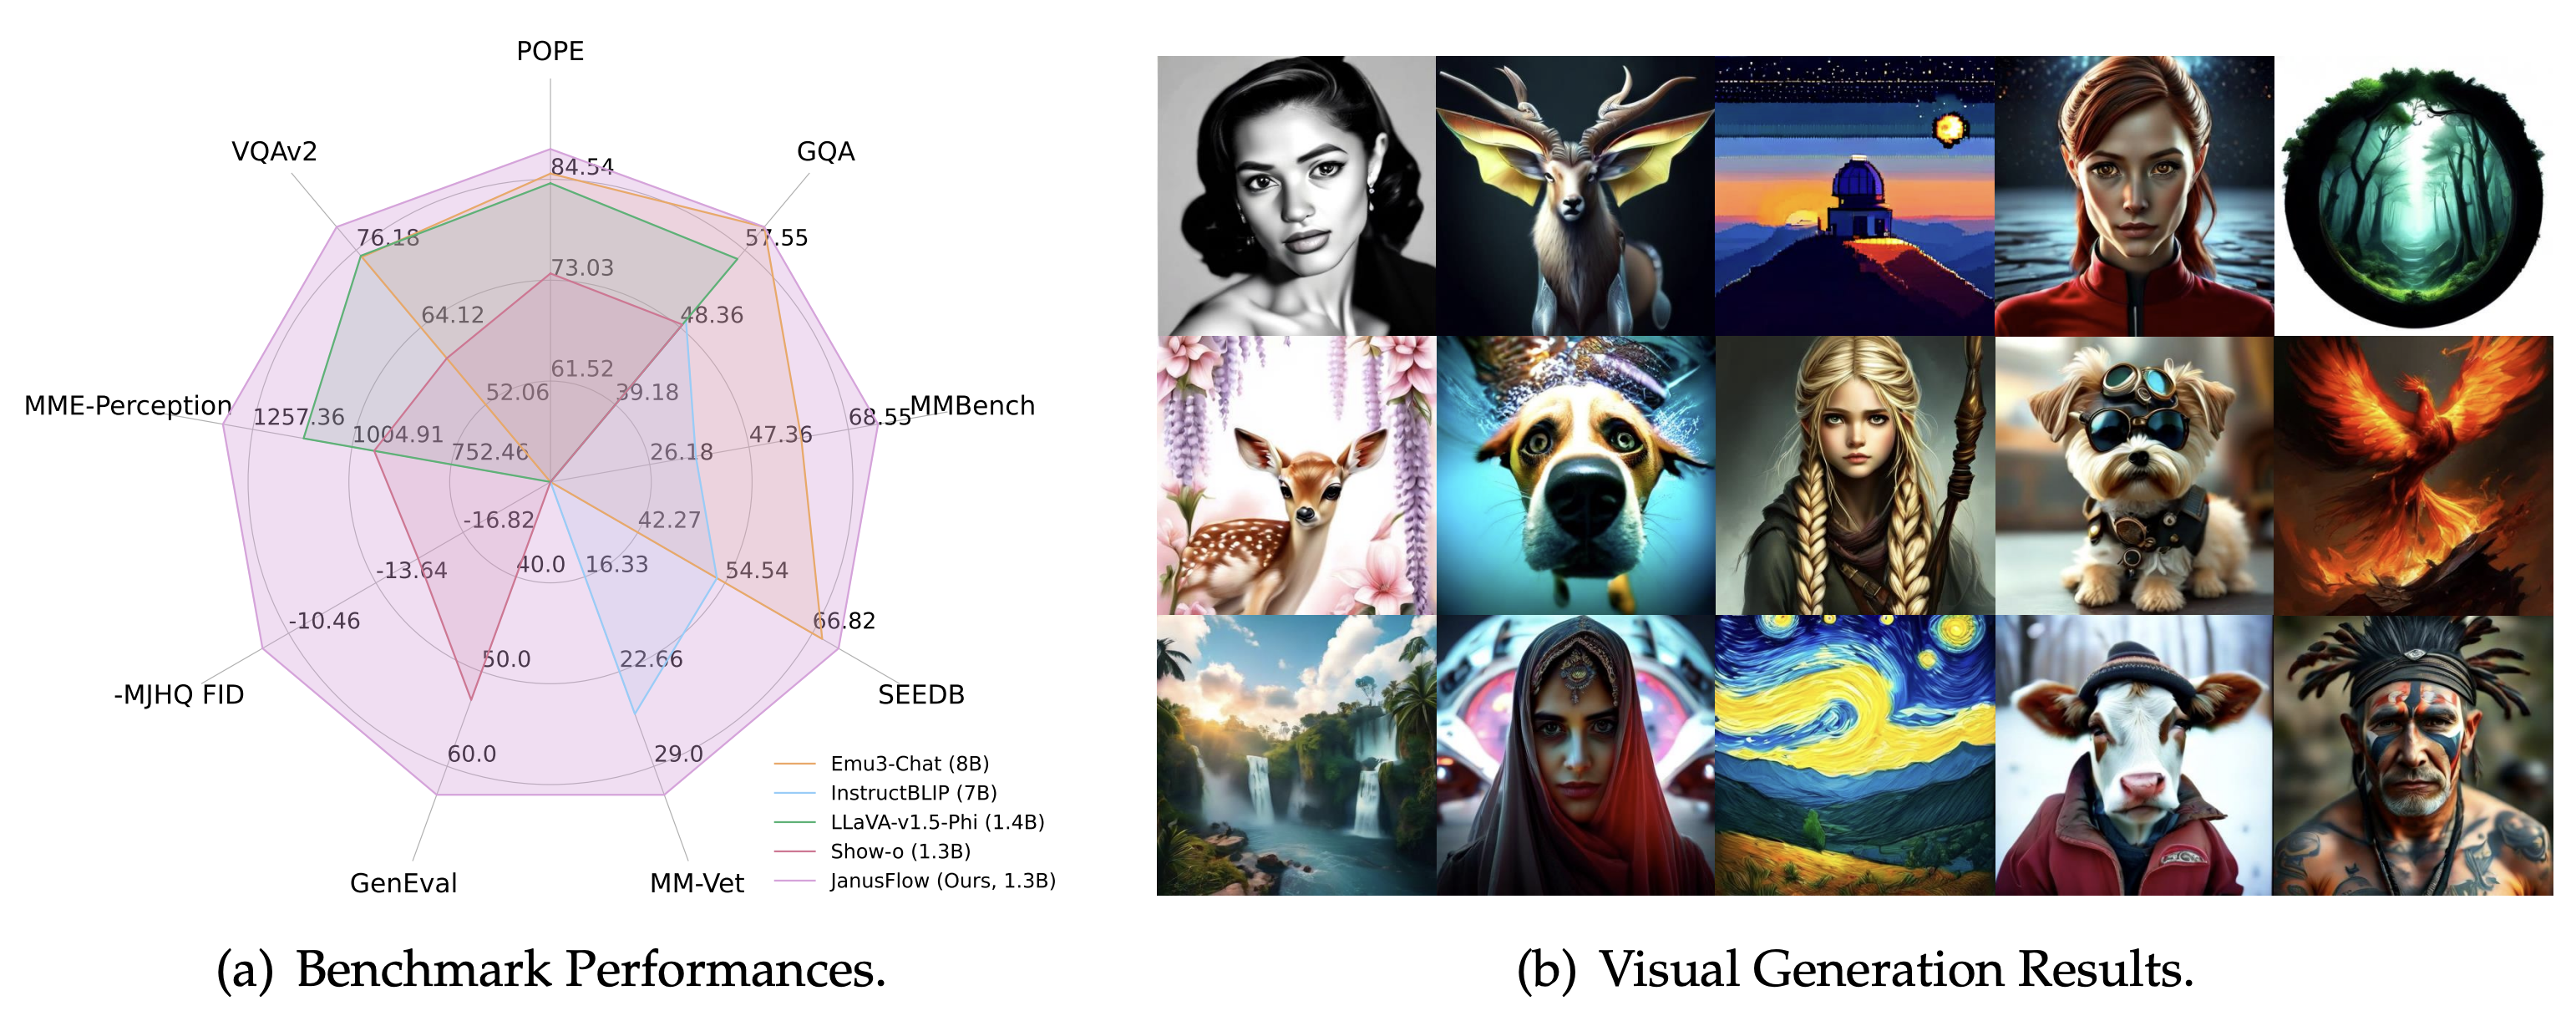
JanusFlow: Harmonizing Autoregression and Rectified Flow for Unified Multimodal Understanding and Generation
JanusFlow introduces a minimalist architecture that integrates autoregressive language models with rectified flow, a state-of-the-art method in generative modeling. Our key finding demonstrates that rectified flow can be straightforwardly trained within the large language model framework, eliminating the need for complex architectural modifications. Extensive experiments show that JanusFlow achieves comparable or superior performance to specialized models in their respective domains, while significantly outperforming existing unified approaches across standard benchmarks. This work represents a step toward more efficient and versatile vision-language models.
2. Model Download
We release Janus to the public to support a broader and more diverse range of research within both academic and commercial communities.
Please note that the use of this model is subject to the terms outlined in License section. Commercial usage is
permitted under these terms.
Huggingface
3. Quick Start
Janus-Pro
Installation
On the basis of Python >= 3.8 environment, install the necessary dependencies by running the following command:
pip install -e .
Simple Inference Example
Multimodal Understanding
import torch
from transformers import AutoModelForCausalLM
from janus.models import MultiModalityCausalLM, VLChatProcessor
from janus.utils.io import load_pil_images

# specify the path to the model
model_path = "deepseek-ai/Janus-Pro-7B"
vl_chat_processor: VLChatProcessor = VLChatProcessor.from_pretrained(model_path)
tokenizer = vl_chat_processor.tokenizer

vl_gpt: MultiModalityCausalLM = AutoModelForCausalLM.from_pretrained(
    model_path, trust_remote_code=True
)
vl_gpt = vl_gpt.to(torch.bfloat16).cuda().eval()

conversation = [
    {
        "role": "<|User|>",
        "content": f"<image_placeholder>\n{question}",
        "images": [image],
    },
    {"role": "<|Assistant|>", "content": ""},
]

# load images and prepare for inputs
pil_images = load_pil_images(conversation)
prepare_inputs = vl_chat_processor(
    conversations=conversation, images=pil_images, force_batchify=True
).to(vl_gpt.device)

# # run image encoder to get the image embeddings
inputs_embeds = vl_gpt.prepare_inputs_embeds(**prepare_inputs)

# # run the model to get the response
outputs = vl_gpt.language_model.generate(
    inputs_embeds=inputs_embeds,
    attention_mask=prepare_inputs.attention_mask,
    pad_token_id=tokenizer.eos_token_id,
    bos_token_id=tokenizer.bos_token_id,
    eos_token_id=tokenizer.eos_token_id,
    max_new_tokens=512,
    do_sample=False,
    use_cache=True,
)

answer = tokenizer.decode(outputs[0].cpu().tolist(), skip_special_tokens=True)
print(f"{prepare_inputs['sft_format'][0]}", answer)
Text-to-Image Generation
import os
import PIL.Image
import torch
import numpy as np
from transformers import AutoModelForCausalLM
from janus.models import MultiModalityCausalLM, VLChatProcessor


# specify the path to the model
model_path = "deepseek-ai/Janus-Pro-7B"
vl_chat_processor: VLChatProcessor = VLChatProcessor.from_pretrained(model_path)
tokenizer = vl_chat_processor.tokenizer

vl_gpt: MultiModalityCausalLM = AutoModelForCausalLM.from_pretrained(
    model_path, trust_remote_code=True
)
vl_gpt = vl_gpt.to(torch.bfloat16).cuda().eval()

conversation = [
    {
        "role": "<|User|>",
        "content": "A stunning princess from kabul in red, white traditional clothing, blue eyes, brown hair",
    },
    {"role": "<|Assistant|>", "content": ""},
]

sft_format = vl_chat_processor.apply_sft_template_for_multi_turn_prompts(
    conversations=conversation,
    sft_format=vl_chat_processor.sft_format,
    system_prompt="",
)
prompt = sft_format + vl_chat_processor.image_start_tag


@torch.inference_mode()
def generate(
    mmgpt: MultiModalityCausalLM,
    vl_chat_processor: VLChatProcessor,
    prompt: str,
    temperature: float = 1,
    parallel_size: int = 16,
    cfg_weight: float = 5,
    image_token_num_per_image: int = 576,
    img_size: int = 384,
    patch_size: int = 16,
):
    input_ids = vl_chat_processor.tokenizer.encode(prompt)
    input_ids = torch.LongTensor(input_ids)

    tokens = torch.zeros((parallel_size*2, len(input_ids)), dtype=torch.int).cuda()
    for i in range(parallel_size*2):
        tokens[i, :] = input_ids
        if i % 2 != 0:
            tokens[i, 1:-1] = vl_chat_processor.pad_id

    inputs_embeds = mmgpt.language_model.get_input_embeddings()(tokens)

    generated_tokens = torch.zeros((parallel_size, image_token_num_per_image), dtype=torch.int).cuda()

    for i in range(image_token_num_per_image):
        outputs = mmgpt.language_model.model(inputs_embeds=inputs_embeds, use_cache=True, past_key_values=outputs.past_key_values if i != 0 else None)
        hidden_states = outputs.last_hidden_state

        logits = mmgpt.gen_head(hidden_states[:, -1, :])
        logit_cond = logits[0::2, :]
        logit_uncond = logits[1::2, :]

        logits = logit_uncond + cfg_weight * (logit_cond-logit_uncond)
        probs = torch.softmax(logits / temperature, dim=-1)

        next_token = torch.multinomial(probs, num_samples=1)
        generated_tokens[:, i] = next_token.squeeze(dim=-1)

        next_token = torch.cat([next_token.unsqueeze(dim=1), next_token.unsqueeze(dim=1)], dim=1).view(-1)
        img_embeds = mmgpt.prepare_gen_img_embeds(next_token)
        inputs_embeds = img_embeds.unsqueeze(dim=1)


    dec = mmgpt.gen_vision_model.decode_code(generated_tokens.to(dtype=torch.int), shape=[parallel_size, 8, img_size//patch_size, img_size//patch_size])
    dec = dec.to(torch.float32).cpu().numpy().transpose(0, 2, 3, 1)

    dec = np.clip((dec + 1) / 2 * 255, 0, 255)

    visual_img = np.zeros((parallel_size, img_size, img_size, 3), dtype=np.uint8)
    visual_img[:, :, :] = dec

    os.makedirs('generated_samples', exist_ok=True)
    for i in range(parallel_size):
        save_path = os.path.join('generated_samples', "img_{}.jpg".format(i))
        PIL.Image.fromarray(visual_img[i]).save(save_path)


generate(
    vl_gpt,
    vl_chat_processor,
    prompt,
)
Gradio Demo
We have deployed online demo in Huggingface.
For the local gradio demo, you can run with the following command:
pip install -e .[gradio]

python demo/app_januspro.py
Have Fun!
Janus
Installation
On the basis of Python >= 3.8 environment, install the necessary dependencies by running the following command:
pip install -e .
Simple Inference Example
Multimodal Understanding
import torch
from transformers import AutoModelForCausalLM
from janus.models import MultiModalityCausalLM, VLChatProcessor
from janus.utils.io import load_pil_images

# specify the path to the model
model_path = "deepseek-ai/Janus-1.3B"
vl_chat_processor: VLChatProcessor = VLChatProcessor.from_pretrained(model_path)
tokenizer = vl_chat_processor.tokenizer

vl_gpt: MultiModalityCausalLM = AutoModelForCausalLM.from_pretrained(
    model_path, trust_remote_code=True
)
vl_gpt = vl_gpt.to(torch.bfloat16).cuda().eval()

conversation = [
    {
        "role": "User",
        "content": "<image_placeholder>\nConvert the formula into latex code.",
        "images": ["images/equation.png"],
    },
    {"role": "Assistant", "content": ""},
]

# load images and prepare for inputs
pil_images = load_pil_images(conversation)
prepare_inputs = vl_chat_processor(
    conversations=conversation, images=pil_images, force_batchify=True
).to(vl_gpt.device)

# # run image encoder to get the image embeddings
inputs_embeds = vl_gpt.prepare_inputs_embeds(**prepare_inputs)

# # run the model to get the response
outputs = vl_gpt.language_model.generate(
    inputs_embeds=inputs_embeds,
    attention_mask=prepare_inputs.attention_mask,
    pad_token_id=tokenizer.eos_token_id,
    bos_token_id=tokenizer.bos_token_id,
    eos_token_id=tokenizer.eos_token_id,
    max_new_tokens=512,
    do_sample=False,
    use_cache=True,
)

answer = tokenizer.decode(outputs[0].cpu().tolist(), skip_special_tokens=True)
print(f"{prepare_inputs['sft_format'][0]}", answer)
Text-to-Image Generation
import os
import PIL.Image
import torch
import numpy as np
from transformers import AutoModelForCausalLM
from janus.models import MultiModalityCausalLM, VLChatProcessor


# specify the path to the model
model_path = "deepseek-ai/Janus-1.3B"
vl_chat_processor: VLChatProcessor = VLChatProcessor.from_pretrained(model_path)
tokenizer = vl_chat_processor.tokenizer

vl_gpt: MultiModalityCausalLM = AutoModelForCausalLM.from_pretrained(
    model_path, trust_remote_code=True
)
vl_gpt = vl_gpt.to(torch.bfloat16).cuda().eval()

conversation = [
    {
        "role": "User",
        "content": "A stunning princess from kabul in red, white traditional clothing, blue eyes, brown hair",
    },
    {"role": "Assistant", "content": ""},
]

sft_format = vl_chat_processor.apply_sft_template_for_multi_turn_prompts(
    conversations=conversation,
    sft_format=vl_chat_processor.sft_format,
    system_prompt="",
)
prompt = sft_format + vl_chat_processor.image_start_tag


@torch.inference_mode()
def generate(
    mmgpt: MultiModalityCausalLM,
    vl_chat_processor: VLChatProcessor,
    prompt: str,
    temperature: float = 1,
    parallel_size: int = 16,
    cfg_weight: float = 5,
    image_token_num_per_image: int = 576,
    img_size: int = 384,
    patch_size: int = 16,
):
    input_ids = vl_chat_processor.tokenizer.encode(prompt)
    input_ids = torch.LongTensor(input_ids)

    tokens = torch.zeros((parallel_size*2, len(input_ids)), dtype=torch.int).cuda()
    for i in range(parallel_size*2):
        tokens[i, :] = input_ids
        if i % 2 != 0:
            tokens[i, 1:-1] = vl_chat_processor.pad_id

    inputs_embeds = mmgpt.language_model.get_input_embeddings()(tokens)

    generated_tokens = torch.zeros((parallel_size, image_token_num_per_image), dtype=torch.int).cuda()

    for i in range(image_token_num_per_image):
        outputs = mmgpt.language_model.model(inputs_embeds=inputs_embeds, use_cache=True, past_key_values=outputs.past_key_values if i != 0 else None)
        hidden_states = outputs.last_hidden_state

        logits = mmgpt.gen_head(hidden_states[:, -1, :])
        logit_cond = logits[0::2, :]
        logit_uncond = logits[1::2, :]

        logits = logit_uncond + cfg_weight * (logit_cond-logit_uncond)
        probs = torch.softmax(logits / temperature, dim=-1)

        next_token = torch.multinomial(probs, num_samples=1)
        generated_tokens[:, i] = next_token.squeeze(dim=-1)

        next_token = torch.cat([next_token.unsqueeze(dim=1), next_token.unsqueeze(dim=1)], dim=1).view(-1)
        img_embeds = mmgpt.prepare_gen_img_embeds(next_token)
        inputs_embeds = img_embeds.unsqueeze(dim=1)


    dec = mmgpt.gen_vision_model.decode_code(generated_tokens.to(dtype=torch.int), shape=[parallel_size, 8, img_size//patch_size, img_size//patch_size])
    dec = dec.to(torch.float32).cpu().numpy().transpose(0, 2, 3, 1)

    dec = np.clip((dec + 1) / 2 * 255, 0, 255)

    visual_img = np.zeros((parallel_size, img_size, img_size, 3), dtype=np.uint8)
    visual_img[:, :, :] = dec

    os.makedirs('generated_samples', exist_ok=True)
    for i in range(parallel_size):
        save_path = os.path.join('generated_samples', "img_{}.jpg".format(i))
        PIL.Image.fromarray(visual_img[i]).save(save_path)


generate(
    vl_gpt,
    vl_chat_processor,
    prompt,
)
Gradio Demo
We have deployed online demo in Huggingface.
For the local gradio demo, you can run with the following command:
pip install -e .[gradio]

python demo/app.py
Have Fun!
FastAPI Demo
It's easy to run a FastAPI server to host an API server running the same functions as gradio.
To start FastAPI server, run the following command:
python demo/fastapi_app.py
To test the server, you can open another terminal and run:
python demo/fastapi_client.py
JanusFlow
Installation
On the basis of Python >= 3.8 environment, install the necessary dependencies by running the following command:
pip install -e .
pip install diffusers[torch]
🤗 Huggingface Online Demo
Check out the demo in this link.
Simple Inference Example
Multimodal Understanding
import torch
from janus.janusflow.models import MultiModalityCausalLM, VLChatProcessor
from janus.utils.io import load_pil_images

# specify the path to the model
model_path = "deepseek-ai/JanusFlow-1.3B"
vl_chat_processor: VLChatProcessor = VLChatProcessor.from_pretrained(model_path)
tokenizer = vl_chat_processor.tokenizer

vl_gpt = MultiModalityCausalLM.from_pretrained(
    model_path, trust_remote_code=True
)
vl_gpt = vl_gpt.to(torch.bfloat16).cuda().eval()

conversation = [
    {
        "role": "User",
        "content": "<image_placeholder>\nConvert the formula into latex code.",
        "images": ["images/equation.png"],
    },
    {"role": "Assistant", "content": ""},
]

# load images and prepare for inputs
pil_images = load_pil_images(conversation)
prepare_inputs = vl_chat_processor(
    conversations=conversation, images=pil_images, force_batchify=True
).to(vl_gpt.device)

# # run image encoder to get the image embeddings
inputs_embeds = vl_gpt.prepare_inputs_embeds(**prepare_inputs)

# # run the model to get the response
outputs = vl_gpt.language_model.generate(
    inputs_embeds=inputs_embeds,
    attention_mask=prepare_inputs.attention_mask,
    pad_token_id=tokenizer.eos_token_id,
    bos_token_id=tokenizer.bos_token_id,
    eos_token_id=tokenizer.eos_token_id,
    max_new_tokens=512,
    do_sample=False,
    use_cach






 Janus 是 DeepSeek 推出的开源多模态 AI 模型系列(包括 Janus、Janus-Pro、JanusFlow)。一个模型既能理解图像和文字,又能根据文字提示生成图像。