

What is this?
 The official TensorFlow implementation of NeRF, the ECCV 2020 system (best paper honorable mention) that learns a neural representation of a single scene and renders new views of it.
The official TensorFlow implementation of NeRF, the ECCV 2020 system (best paper honorable mention) that learns a neural representation of a single scene and renders new views of it.Is this a library I import, or research code I run myself?Research code: Python scripts (run_nerf.py) plus Jupyter notebooks for demos and mesh extraction. You clone the repo, build its conda environment, and launch training from the command line — there is no pip package.
Research code: Python scripts (run_nerf.py) plus Jupyter notebooks for demos and mesh extraction. You clone the repo, build its conda environment, and launch training from the command line — there is no pip package.How do I get it running?Create the nerf conda environment from the bundled setup file, run the provided script to download example training data, kick off training, and watch the Fern scene train in Tensorboard at localhost:6006.
Create the nerf conda environment from the bundled setup file, run the provided script to download example training data, kick off training, and watch the Fern scene train in Tensorboard at localhost:6006.What do I need installed before starting?Python 3 with TensorFlow 1.15, matplotlib, numpy, imageio and configargparse — the conda file covers those. The LLFF data loader additionally needs ImageMagick, and training on your own real scenes requires the LLFF code plus COLMAP for camera poses.
Python 3 with TensorFlow 1.15, matplotlib, numpy, imageio and configargparse — the conda file covers those. The LLFF data loader additionally needs ImageMagick, and training on your own real scenes requires the LLFF code plus COLMAP for camera poses.How long until I actually see a trained scene?Budget serious time: the example runs take 200k iterations, about 15 hours at low resolution. A NeRF is also tied to a single scene, so every new scene means another full training run.
Budget serious time: the example runs take 200k iterations, about 15 hours at low resolution. A NeRF is also tied to a single scene, so every new scene means another full training run.Do I need a beefy GPU for this?Just one — the README says optimizing a NeRF only requires a single GPU. Rendering views from an optimized model is fast by comparison: under a second up to about 30 seconds per image.
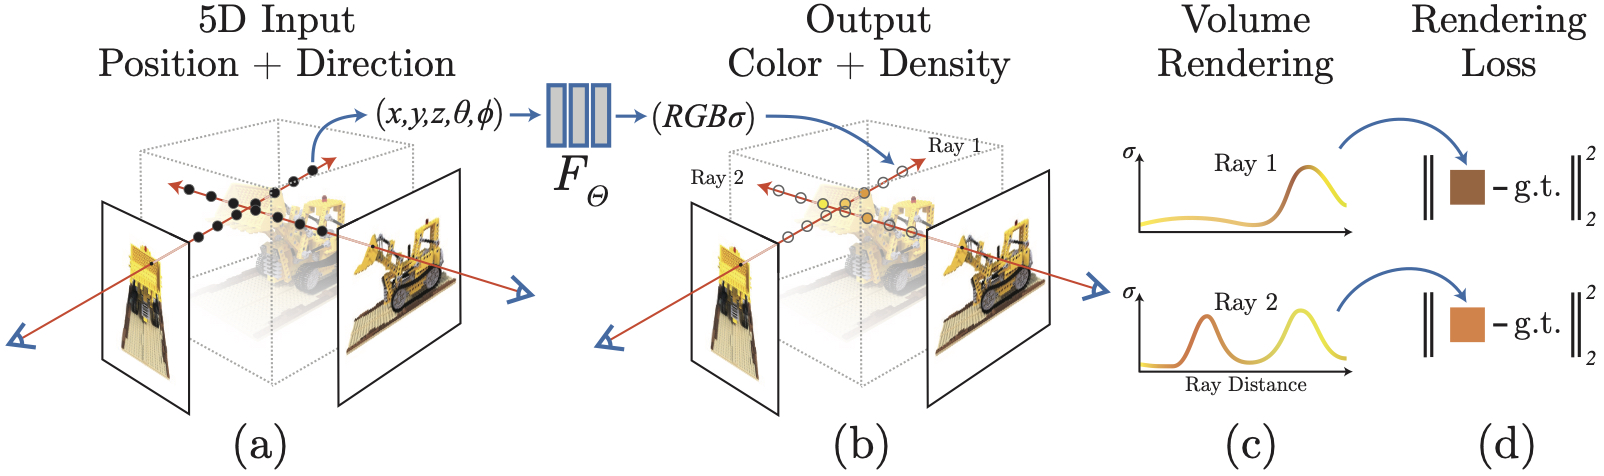
Just one — the README says optimizing a NeRF only requires a single GPU. Rendering views from an optimized model is fast by comparison: under a second up to about 30 seconds per image.What exactly is a neural radiance field?A small fully connected network (about 5MB of weights) that maps a 5D input — spatial location plus viewing direction — to color and opacity. Treated as a volume, it can be differentiably rendered to reproduce and synthesize new views of one scene.
A small fully connected network (about 5MB of weights) that maps a 5D input — spatial location plus viewing direction — to color and opacity. Treated as a volume, it can be differentiably rendered to reproduce and synthesize new views of one scene.Can I train it on my own photos?Yes. Compute camera poses with the imgs2poses.py script from the LLFF code (it uses COLMAP), then point the trainer at your folder with --datadir and --datasettype llff; for 360-degree captures add the --nondc --spherify --lindisp flags.
Yes. Compute camera poses with the imgs2poses.py script from the LLFF code (it uses COLMAP), then point the trainer at your folder with --datadir and --datasettype llff; for 360-degree captures add the --nondc --spherify --lindisp flags.Can I get an actual 3D mesh out of a trained NeRF?Yes — extractmesh.ipynb runs marching cubes to pull a triangle mesh from the trained network. It needs the PyMCubes package, plus trimesh and pyrender if you want to render the mesh in the notebook.
Yes — extractmesh.ipynb runs marching cubes to pull a triangle mesh from the trained network. It needs the PyMCubes package, plus trimesh and pyrender if you want to render the mesh in the notebook.Do I have to train from scratch to see results?No — the repo links a pretrained high-resolution NeRF for the Fern scene, and renderdemo.ipynb renders new views from it. For full paper-quality results, start from the configs in paperconfigs/.
No — the repo links a pretrained high-resolution NeRF for the Fern scene, and renderdemo.ipynb renders new views from it. For full paper-quality results, start from the configs in paperconfigs/.What are similar projects?instant-ngp, nerfstudio, Open3D, TRELLIS.2, gaussian-splatting, DeepLearningExamples, Virgilio, vggt
instant-ngp, nerfstudio, Open3D, TRELLIS.2, gaussian-splatting, DeepLearningExamples, Virgilio, vggtWhich topics is it in?3d-graphics, computer-graphics, numpy, tensorflow, rendering, jupyter notebook, 3d, computer-vision, deep-learning, research, gpu, machine-learning
3d-graphics, computer-graphics, numpy, tensorflow, rendering, jupyter notebook, 3d, computer-vision, deep-learning, research, gpu, machine-learning