It lands in ~/.local/bin — open a new shell so it's on your PATH.
Otherwise, installation instructions are on their website: Install uv
On every OS, use uv's official installer above — not pip install uv, which may not create the uvx command and can hide uv inside an environment your client can't see.
Warning: Do not proceed before installing uv.
Make your client find uvx
MCP clients started from a GUI (Claude Desktop, Cursor, VS Code from the Dock/Start menu) do not inherit your terminal's PATH, so a bare "command": "uvx" can fail with spawn uvx ENOENT even though uvx works in your terminal. If that happens:
Find uvx's full path — which uvx (macOS/Linux) or where uvx (Windows) — and use it as "command", e.g. /opt/homebrew/bin/uvx or C:\Users\<you>\.local\bin\uvx.exe.
On Windows you can instead wrap it: "command": "cmd", "args": ["/c", "uvx", "blender-mcp"].
After any PATH or config change, fully quit and relaunch the client (Windows: quit from the system tray, not just the window; macOS: Cmd+Q).
Pin the Python version
Avoid conda / pyenv / version conflicts.
uv chooses which Python runs the server. On machines with conda (auto-activated base), pyenv, or asdf — or with a newer CPython release that some dependencies do not have wheels for yet — uv can grab an interpreter that makes installation fail. Pin Python 3.11 and prefer uv-managed interpreters to avoid using whatever is on your PATH:
--python 3.11 still satisfies this package's requires-python >=3.10, and UV_PYTHON_PREFERENCE=only-managed keeps uv from selecting conda, pyenv, asdf, or system Python first. (The repo's .python-version is only a hint for contributors and does not affect uvx.)
If a previous failed attempt keeps replaying after a fix, clear the cache:
On locked-down machines you can skip uvx entirely with pipx, then point your client at the installed command:
pipx install blender-mcp
pipx ensurepath          # then restart your shell / client
Use the resulting absolute path as "command" (find it with which blender-mcp / where blender-mcp) and omit args.
Run with Docker
You can run the MCP server in a container instead of installing it. Blender itself still runs on your machine — the container only hosts the MCP server, which connects out to the Blender addon.
Build the image from the repo root:
docker build -t blender-mcp .
Then point your MCP client at it (the -i flag is required — the server talks to the client over stdin/stdout):
By default, the AI can run any Python code in Blender. Set BLENDER_MCP_SAFE_MODE=1 to check every script before it runs and block risky code — things like reading or writing files directly, running other programs, accessing the network, or installing code that keeps running after the script ends. Normal Blender work (modeling, materials, rendering, saving, import/export) still works. Blocked scripts are sent back to the AI with the reason, so it can try again with a corrected version.
Or in the Codex desktop app: Settings → MCP servers → Add server → name it blender, pick STDIO, enter uvx blender-mcp as the command, then Save and restart. If the app can't find uvx, use its full path instead — see Make your client find uvx.
Check it registered with codex mcp list — the blender server should show as enabled. The tools become available the next time you start Codex.
To set environment variables (e.g. a non-default Blender host/port), pass --env KEY=VALUE flags to codex mcp add, or add them in the config file:
This copies the addon into your Blender addons folder as blender_mcp.py. It prints where it wrote to, and keeps a .bak of any file it replaces.
Optional: uvx blender-mcp addon-paths lists detected Blender addons folders. Override the destination with BLENDERMCP_ADDONS_DIR=/path/to/scripts/addons.
2. Open Blender
3. Go to Edit → Preferences → Add-ons
4. Enable Interface: MCP for Blender (search "MCP for Blender"). If it doesn't appear yet, click Install… and select the copied blender_mcp.py / addon.py, or restart Blender.
5. Manual alternative — if the command above can't find your Blender install, or you prefer doing it by hand: download addon.py from this repo → in Blender, Edit → Preferences → Add-ons → Install… → select the downloaded addon.py → enable it.
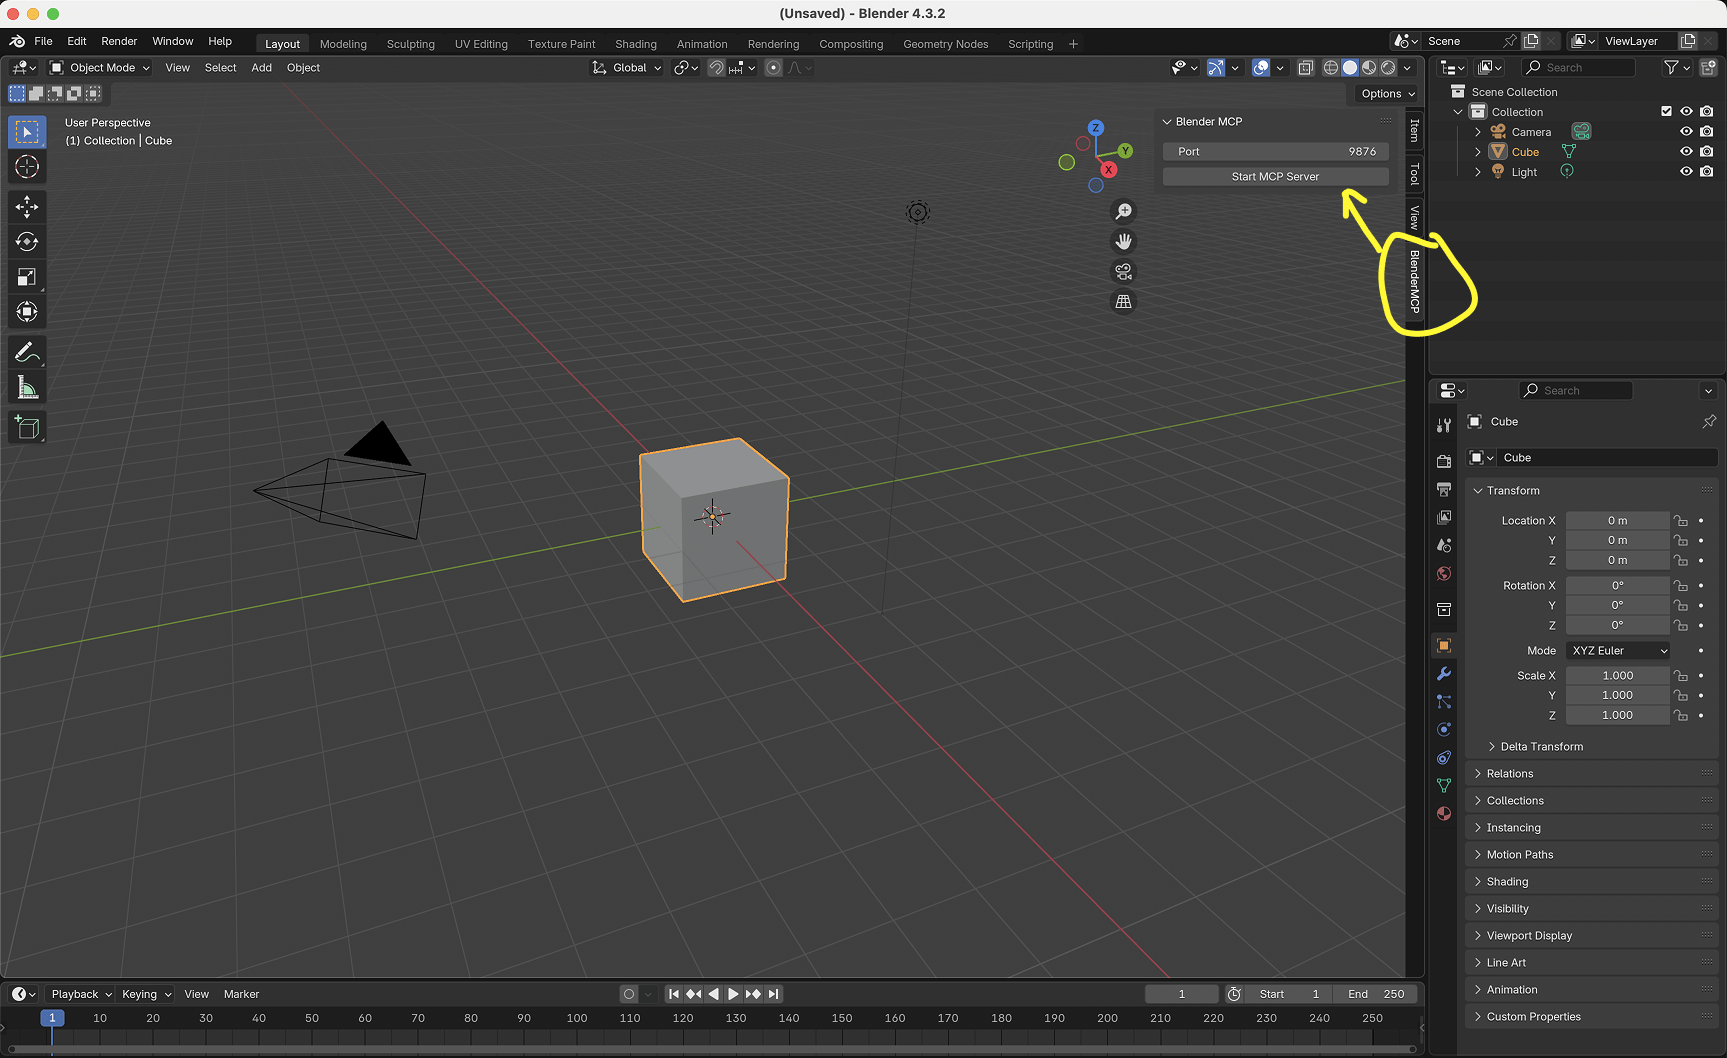
Then open the MCP for Blender tab in Blender's sidebar (press N in the 3D viewport) and click Start MCP Server. See Starting the Connection below.
Upgrading (existing users)
For newcomers, go straight to Quickstart. For existing users, see below.
2. In Blender: Preferences → Add-ons → disable and re-enable Interface: MCP for Blender (or restart Blender), then click Start MCP Server again.
3. Delete the MCP server from Claude and add it back again if the server package itself needs a refresh.
Note: the MCP server never modifies your Blender addon files on its own. When it starts, it checks whether the installed addon is behind the bundled copy and logs how to update; install-addon is what actually writes, and it keeps a .bak of the file it replaces. Trajectory capture still works on older loaded addons via an execute_code fallback.
Usage
Starting the Connection
In Blender, go to the 3D View sidebar (press N if not visible)
Find the MCP for Blender tab
Turn on the checkboxes you'd like to use (see more under Capabilities below)
Click Connect to Claude
Make sure the MCP server is running in your terminal
Using with Claude
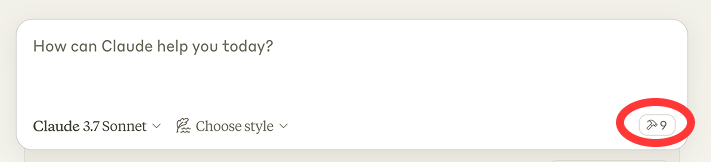
Once the config file has been set on Claude, and the addon is running on Blender, you will see a hammer icon with tools for MCP for Blender.
Capabilities
Get scene and object information
Create, delete and modify shapes
Apply or create materials for objects
Execute any Python code in Blender
Download the right models, assets and HDRIs through Poly Haven
Poly Pizza hosts roughly 10,600 free low-poly models, including the
rescued Google Poly archive. It is the best source for stylised game assets: every model is
a single self-contained .glb, and the geometry is far lighter than Sketchfab's.
In the 3D View sidebar, tick Use assets from Poly Pizza
Paste the key into the API Key field that appears (or store it permanently under
Edit → Preferences → Add-ons → MCP for Blender)
Worked example:
"Search Poly Pizza for a low-poly chair under a CC0 licence and import one at 1 metre tall"
Claude calls search_polypizza_models(query="chair", licence="CC0"), which returns each
match with its licence and triangle count, then
download_polypizza_model(model_id="...", normalize_size=True, target_size=1.0).
You can also filter by category ("Animals", "Furniture & Decor", "Transport",
"Nature", "Buildings", "People & Characters", "Food & Drink", "Weapons",
"Clutter", "Objects", "Scenes & Levels", "Other") or ask for animated models only.
Attribution: about 69% of the Poly Pizza catalogue is CC-BY, which requires you to
credit the creator wherever the model appears. On import, the ready-formatted credit line
is written onto each imported root object as the custom property polypizza_attribution
(alongside polypizza_id and polypizza_licence), so it is saved into your .blend and
survives the session. Filter with licence="CC0" if you would rather use models that need
no credit.
Example Commands
Here are some examples of what you can ask Claude to do:
Prompt
Demo
"Create a low poly scene in a dungeon, with a dragon guarding a pot of gold"
"Generate a 3D model of a garden gnome through Hyper3D"
"Fill this room with low-poly furniture from Poly Pizza"
"Make this car red and metallic"
"Create a sphere and place it above the cube"
"Make the lighting like a studio"
"Point the camera at the scene, and make it isometric"
Persistent API Credentials
MCP for Blender supports persistent credentials via Blender Add-on Preferences:
Edit → Preferences → Add-ons → MCP for Blender
You can store these values there so they survive Blender restarts:
Sketchfab API Key
Poly Pizza API Key
Hyper3D API Key
Hunyuan3D SecretId / SecretKey
Hunyuan3D API URL
For headless setups or CI, credentials can also be injected by environment variables:
Variable
BLENDERMCP_SKETCHFAB_API_KEY
BLENDERMCP_POLYPIZZA_API_KEY
BLENDERMCP_HYPER3D_API_KEY
BLENDERMCP_HUNYUAN3D_SECRET_ID
BLENDERMCP_HUNYUAN3D_SECRET_KEY
BLENDERMCP_HUNYUAN3D_API_URL
Troubleshooting
Problem
Fix
Connection issues
Make sure the Blender addon server is running, and the MCP server is configured on Claude. Do not run the uvx command in the terminal. Sometimes the first command won't go through, but after that it starts working.
Timeout errors
Try simplifying your requests or breaking them into smaller steps.
Poly Haven integration
Claude is sometimes erratic with its behaviour.
Poly Pizza download fails with a Cloudflare challenge
static.poly.pizza is behind bot protection and blocks datacenter, VPN and cloud IPs. Your API key is fine - the CDN never sees it. Retry from a normal connection, or download the .glb by hand and use File → Import → glTF 2.0.
Have you tried turning it off and on again?
If you're still having connection errors, try restarting both Claude and the Blender server.
Technical Details
Communication Protocol
The system uses a simple JSON-based protocol over TCP sockets:
Commands are sent as JSON objects with a type and optional params
Responses are JSON objects with a status and result or message
Limitations & Security Considerations
Warning: The execute_blender_code tool allows running arbitrary Python code in Blender, which can be powerful but potentially dangerous. Use with caution in production environments. ALWAYS save your work before using it.
Poly Haven requires downloading models, textures, and HDRI images. If you do not want to use it, please turn it off in the checkbox in Blender.
Complex operations might need to be broken down into smaller steps.
Telemetry Control
MCP for Blender collects anonymous usage data to help improve the tool. Telemetry consent is on by default, and you can turn it off in two ways:
1. In Blender — go to Edit → Preferences → Add-ons → MCP for Blender and uncheck the telemetry consent checkbox.
With consent (checked, the default): view the TnC for more details on data collected.
2. Environment Variable — completely disable all telemetry by running:
Что это такое?Интеграция от сообщества, которая связывает Blender с любой LLM через Model Context Protocol и позволяет ИИ-ассистенту заниматься 3D-моделированием, созданием и изменением сцен по текстовым запросам. Это сторонний проект, не связанный с Blender Foundation.
Это аддон для Blender или отдельный сервер?И то и другое. Аддон для Blender запускает внутри Blender socket-сервер, который принимает и выполняет команды, а отдельный MCP-сервер на Python реализует Model Context Protocol и соединяет ваш LLM-клиент с этим аддоном.
Как запустить всё это от начала до конца?Три шага: установите uv официальным установщиком (не через pip), укажите в своём MCP-клиенте команду 'uvx blender-mcp' — поддерживаются Claude Desktop, Claude Code, Codex, Cursor, VS Code, OpenCode и Antigravity — затем включите аддон в настройках Blender и нажмите Start MCP Server в боковой панели N.
Что нужно установить заранее, чтобы всё заработало?Blender 3.0 или новее, Python 3.10 или новее и менеджер пакетов uv. В README предупреждют: без uv не начинать и ставить его только официальным установщиком, потому что pip install uv может не создать команду uvx, которая нужна вашему клиенту.
Безопасно ли разрешать ИИ выполнять код в моём Blender?По умолчанию ИИ может выполнять в Blender любой Python-код. Если задать переменную BLENDERMCP_SAFE_MODE=1, каждый скрипт сначала проверяется, и рискованные блокируются — прямой доступ к файлам, запуск других программ, сетевые запросы, постоянная установка пакетов, — при этом обычное моделирование, работа с материалами и рендеринг продолжают работать.
Работает ли это на Windows, macOS и Linux?Да — в README есть инструкции по установке uv для macOS, Windows и Linux, а вариант с Docker сразу работает с Docker Desktop на macOS и Windows. Сам Blender всегда запускается на вашей машине; вне её может находиться только MCP-сервер.
Что ИИ на самом деле умеет делать внутри Blender?Создавать, изменять и удалять объекты, назначать материалы и цвета, изучать сцену и выполнять произвольный Python-код. Он также может подтягивать в сцену ассеты: модели и HDRI с Poly Haven, поиск по Sketchfab и Poly Pizza, а также модели, сгенерированные ИИ, через Hyper3D Rodin и Hunyuan3D.
Откуда берутся скачанные 3D-модели и можно ли пользоваться ими бесплатно?На Poly Pizza лежит около 10 600 бесплатных low-poly моделей, включая спасённый архив Google Poly; понадобится бесплатный API-ключ с poly.pizza/settings/api. Примерно 69% каталога под лицензией CC-BY, которая требует указывать авторство, но в поиске можно отфильтровать только модели с лицензией CC0.
Можно ли запустить MCP-сервер в Docker, а не ставить его локально?Да — соберите образ из корня репозитория и подключите к нему клиент с флагом -i, который обязателен, потому что сервер общается через stdin/stdout. Blender по-прежнему работает на вашей машине; на Linux хоста host.docker.internal не существует, поэтому вместо него используется host-сеть.
Каких ошибок при настройке стоит остерегаться?Графические клиенты вроде Claude Desktop или Cursor не наследуют PATH из вашего терминала, поэтому простая команда uvx может упасть с ошибкой 'spawn uvx ENOENT' — используйте полный путь из 'which uvx' или обёртку cmd /c на Windows, затем полностью закройте клиент и запустите заново. Также запускайте только один экземпляр MCP-сервера, а не два клиента сразу.





 Интеграция от сообщества, которая связывает Blender с любой LLM через Model Context Protocol и позволяет ИИ-ассистенту заниматься 3D-моделированием, созданием и изменением сцен по текстовым запросам. Это сторонний проект, не связанный с Blender Foundation.