The world's first AI assistant(OpenClaw) on a $5 chip. No Linux. No Node.js. Just pure C
MimiClaw turns a tiny ESP32-S3 board into a personal AI assistant. Plug it into USB power, connect to WiFi, and talk to it through Telegram — it handles any task you throw at it and evolves over time with local memory — all on a chip the size of a thumb.
Meet MimiClaw
Tiny — No Linux, no Node.js, no bloat — just pure C
Handy — Message it from Telegram, it handles the rest
Loyal — Learns from memory, remembers across reboots
Energetic — USB power, 0.5 W, runs 24/7
Lovable — One ESP32-S3 board, $5, nothing else
How It Works
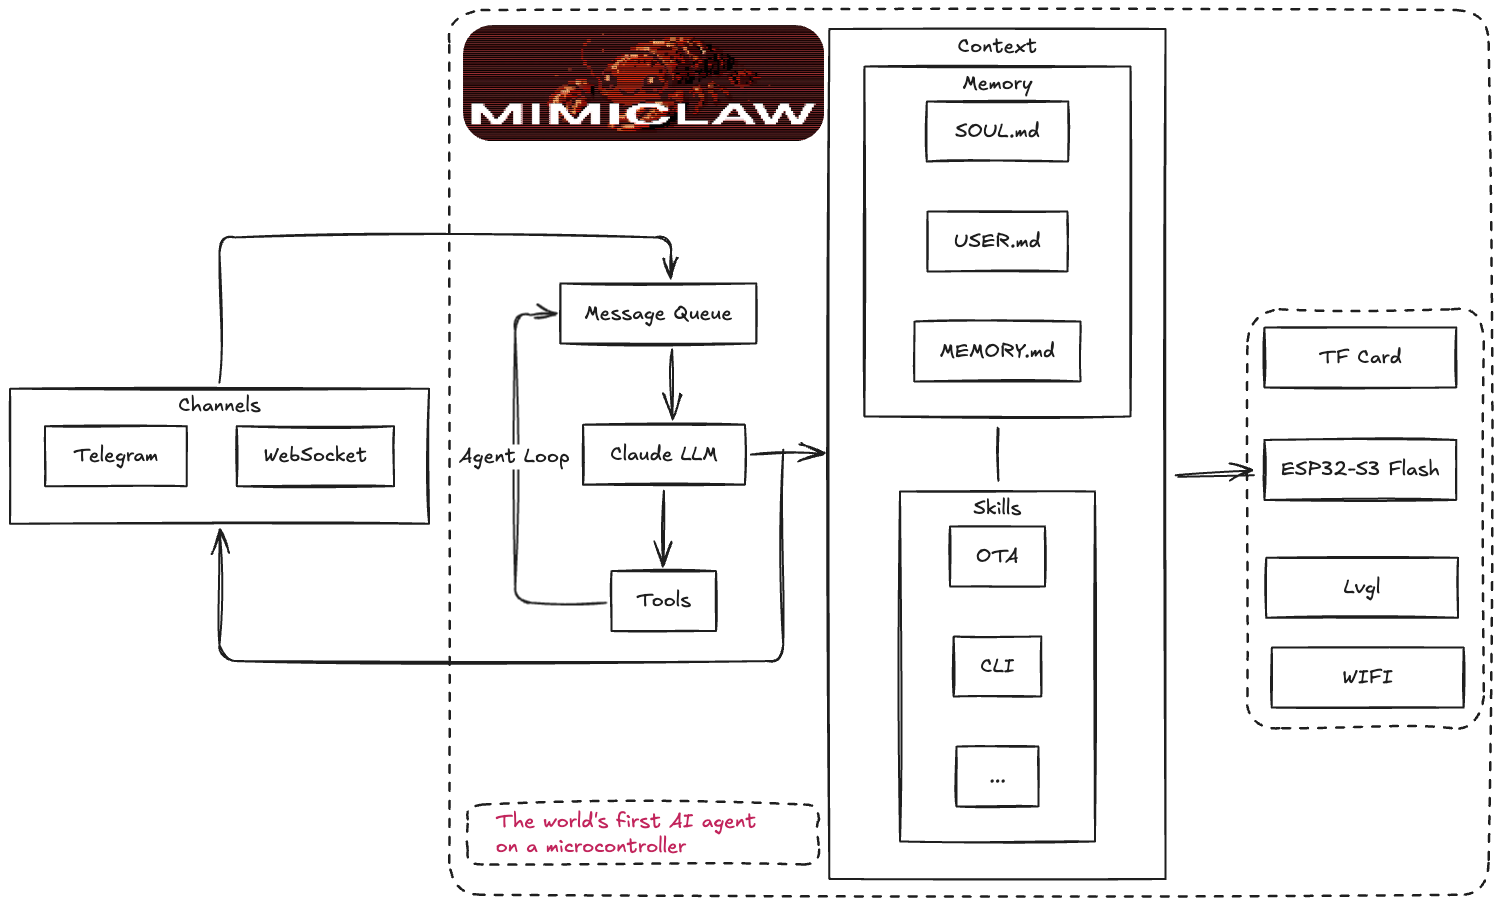
You send a message on Telegram. The ESP32-S3 picks it up over WiFi, feeds it into an agent loop — the LLM thinks, calls tools, reads memory — and sends the reply back. Supports both Anthropic (Claude) and OpenAI (GPT) as providers, switchable at runtime. Everything runs on a single $5 chip with all your data stored locally on flash.
Quick Start
What You Need
An ESP32-S3 dev board with 16 MB flash and 8 MB PSRAM (e.g. Xiaozhi AI board, ~$10)
A USB Type-C cable
A Telegram bot token — talk to @BotFather on Telegram to create one
MimiClaw uses a two-layer config system: build-time defaults in mimi_secrets.h, with runtime overrides via the serial CLI. CLI values are stored in NVS flash and take priority over build-time values.
# Clean build (required after any mimi_secrets.h change)
idf.py fullclean && idf.py build

# Find your serial port
ls /dev/cu.usb*          # macOS
ls /dev/ttyACM*          # Linux

# Flash and monitor (replace PORT with your port)
# USB adapter: likely /dev/cu.usbmodem11401 (macOS) or /dev/ttyACM0 (Linux)
idf.py -p PORT flash monitor
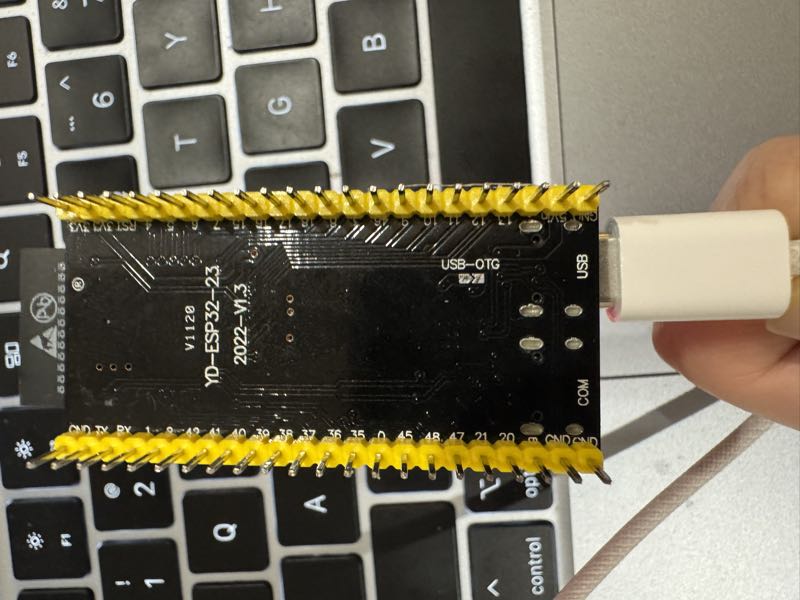
Important: Plug into the correct USB port! Most ESP32-S3 boards have two USB-C ports. You must use the one labeled USB (native USB Serial/JTAG), not the one labeled COM (external UART bridge). Plugging into the wrong port will cause flash/monitor failures.
Show reference photo
CLI Commands (via UART/COM port)
Connect via serial to configure or debug. Config commands let you change settings without recompiling — just plug in a USB cable anywhere.
Runtime config (saved to NVS, overrides build-time defaults):
mimi> wifi_set MySSID MyPassword   # change WiFi network
mimi> set_tg_token 123456:ABC...   # change Telegram bot token
mimi> set_api_key sk-ant-api03-... # change API key (Anthropic or OpenAI)
mimi> set_model_provider openai    # switch provider (anthropic|openai)
mimi> set_model gpt-4o             # change LLM model
mimi> set_proxy 127.0.0.1 7897  # set HTTP proxy
mimi> clear_proxy                  # remove proxy
mimi> set_search_key BSA...        # set Brave Search API key
mimi> set_tavily_key tvly-...      # set Tavily API key (preferred)
mimi> config_show                  # show all config (masked)
mimi> config_reset                 # clear NVS, revert to build-time defaults
Debug & maintenance:
mimi> wifi_status              # am I connected?
mimi> memory_read              # see what the bot remembers
mimi> memory_write "content"   # write to MEMORY.md
mimi> heap_info                # how much RAM is free?
mimi> session_list             # list all chat sessions
mimi> session_clear 12345      # wipe a conversation
mimi> heartbeat_trigger           # manually trigger a heartbeat check
mimi> cron_start                  # start cron scheduler now
mimi> restart                     # reboot
USB (JTAG) vs UART: Which Port for What
Most ESP32-S3 dev boards expose two USB-C ports:
Port
Use for
USB (JTAG)
idf.py flash, JTAG debugging
COM (UART)
REPL CLI, serial console
REPL requires the UART (COM) port. The USB (JTAG) port does not support interactive REPL input.
Port details & recommended workflow
Port
Label
Protocol
USB
USB / JTAG
Native USB Serial/JTAG
COM
UART / COM
External UART bridge (CP2102/CH340)
The ESP-IDF console/REPL is configured to use UART by default (CONFIG_ESP_CONSOLE_UART_DEFAULT=y).
If you have both ports connected simultaneously:
USB (JTAG) handles flash/download and provides secondary serial output
UART (COM) provides the primary interactive console for the REPL
macOS: both appear as /dev/cu.usbmodem* or /dev/cu.usbserial-* — run ls /dev/cu.usb* to identify
Linux: USB (JTAG) → /dev/ttyACM0, UART → /dev/ttyUSB0
Recommended workflow:
# Flash via USB (JTAG) port
idf.py -p /dev/cu.usbmodem11401 flash

# Open REPL via UART (COM) port
idf.py -p /dev/cu.usbserial-110 monitor
# or use any serial terminal: screen, minicom, PuTTY at 115200 baud
Memory
MimiClaw stores everything as plain text files you can read and edit:
File
What it is
SOUL.md
The bot's personality — edit this to change how it behaves
USER.md
Info about you — name, preferences, language
MEMORY.md
Long-term memory — things the bot should always remember
HEARTBEAT.md
Task list the bot checks periodically and acts on autonomously
cron.json
Scheduled jobs — recurring or one-shot tasks created by the AI
2026-02-05.md
Daily notes — what happened today
tg_12345.jsonl
Chat history — your conversation with the bot
Tools
MimiClaw supports tool calling for both Anthropic and OpenAI — the LLM can call tools during a conversation and loop until the task is done (ReAct pattern).
Tool
Description
web_search
Search the web via Tavily (preferred) or Brave for current information
get_current_time
Fetch current date/time via HTTP and set the system clock
cron_add
Schedule a recurring or one-shot task (the LLM creates cron jobs on its own)
cron_list
List all scheduled cron jobs
cron_remove
Remove a cron job by ID
To enable web search, set a Tavily API key via MIMI_SECRET_TAVILY_KEY (preferred), or a Brave Search API key via MIMI_SECRET_SEARCH_KEY in mimi_secrets.h.
Cron Tasks
MimiClaw has a built-in cron scheduler that lets the AI schedule its own tasks. The LLM can create recurring jobs ("every N seconds") or one-shot jobs ("at unix timestamp") via the cron_add tool. When a job fires, its message is injected into the agent loop — so the AI wakes up, processes the task, and responds.
Jobs are persisted to SPIFFS (cron.json) and survive reboots. Example use cases: daily summaries, periodic reminders, scheduled check-ins.
Heartbeat
The heartbeat service periodically reads HEARTBEAT.md from SPIFFS and checks for actionable tasks. If uncompleted items are found (anything that isn't an empty line, a header, or a checked - [x] box), it sends a prompt to the agent loop so the AI can act on them autonomously.
This turns MimiClaw into a proactive assistant — write tasks to HEARTBEAT.md and the bot will pick them up on the next heartbeat cycle (default: every 30 minutes).
Also Included
WebSocket gateway on port 18789 — connect from your LAN with any WebSocket client
OTA updates — flash new firmware over WiFi, no USB needed
Dual-core — network I/O and AI processing run on separate CPU cores
HTTP proxy — CONNECT tunnel support for restricted networks
Multi-provider — supports both Anthropic (Claude) and OpenAI (GPT), switchable at runtime
Cron scheduler — the AI can schedule its own recurring and one-shot tasks, persisted across reboots
Heartbeat — periodically checks a task file and prompts the AI to act autonomously
Tool use — ReAct agent loop with tool calling for both providers






 MimiClaw能把一块5美元的ESP32-S3微控制器变成个人AI助手,你可以通过Telegram与它对话,它还具备本地记忆和工具调用功能。整个系统完全运行在一块小芯片上,不需要Linux、Node.js,也不需要任何服务器。