exo connects all your devices into an AI cluster. Not only does exo enable running models larger than would fit on a single device, but with day-0 support for RDMA over Thunderbolt, makes models run faster as you add more devices.
Features
- Automatic Device Discovery: Devices running exo automatically discover each other - no manual configuration.
- RDMA over Thunderbolt: exo ships with day-0 support for RDMA over Thunderbolt 5, enabling 99% reduction in latency between devices.
- Topology-Aware Auto Parallel: exo figures out the best way to split your model across all available devices based on a realtime view of your device topology. It takes into account device resources and network latency/bandwidth between each link.
- Tensor Parallelism: exo supports sharding models, for up to 1.8x speedup on 2 devices and 3.2x speedup on 4 devices.
- MLX Support: exo uses MLX as an inference backend and MLX distributed for distributed communication.
- Multiple API Compatibility: Compatible with OpenAI Chat Completions API, Claude Messages API, OpenAI Responses API, and Ollama API - use your existing tools and clients.
- Custom Model Support: Load custom models from HuggingFace hub to expand the range of available models.
Dashboard
exo includes a built-in dashboard for managing your cluster and chatting with models.
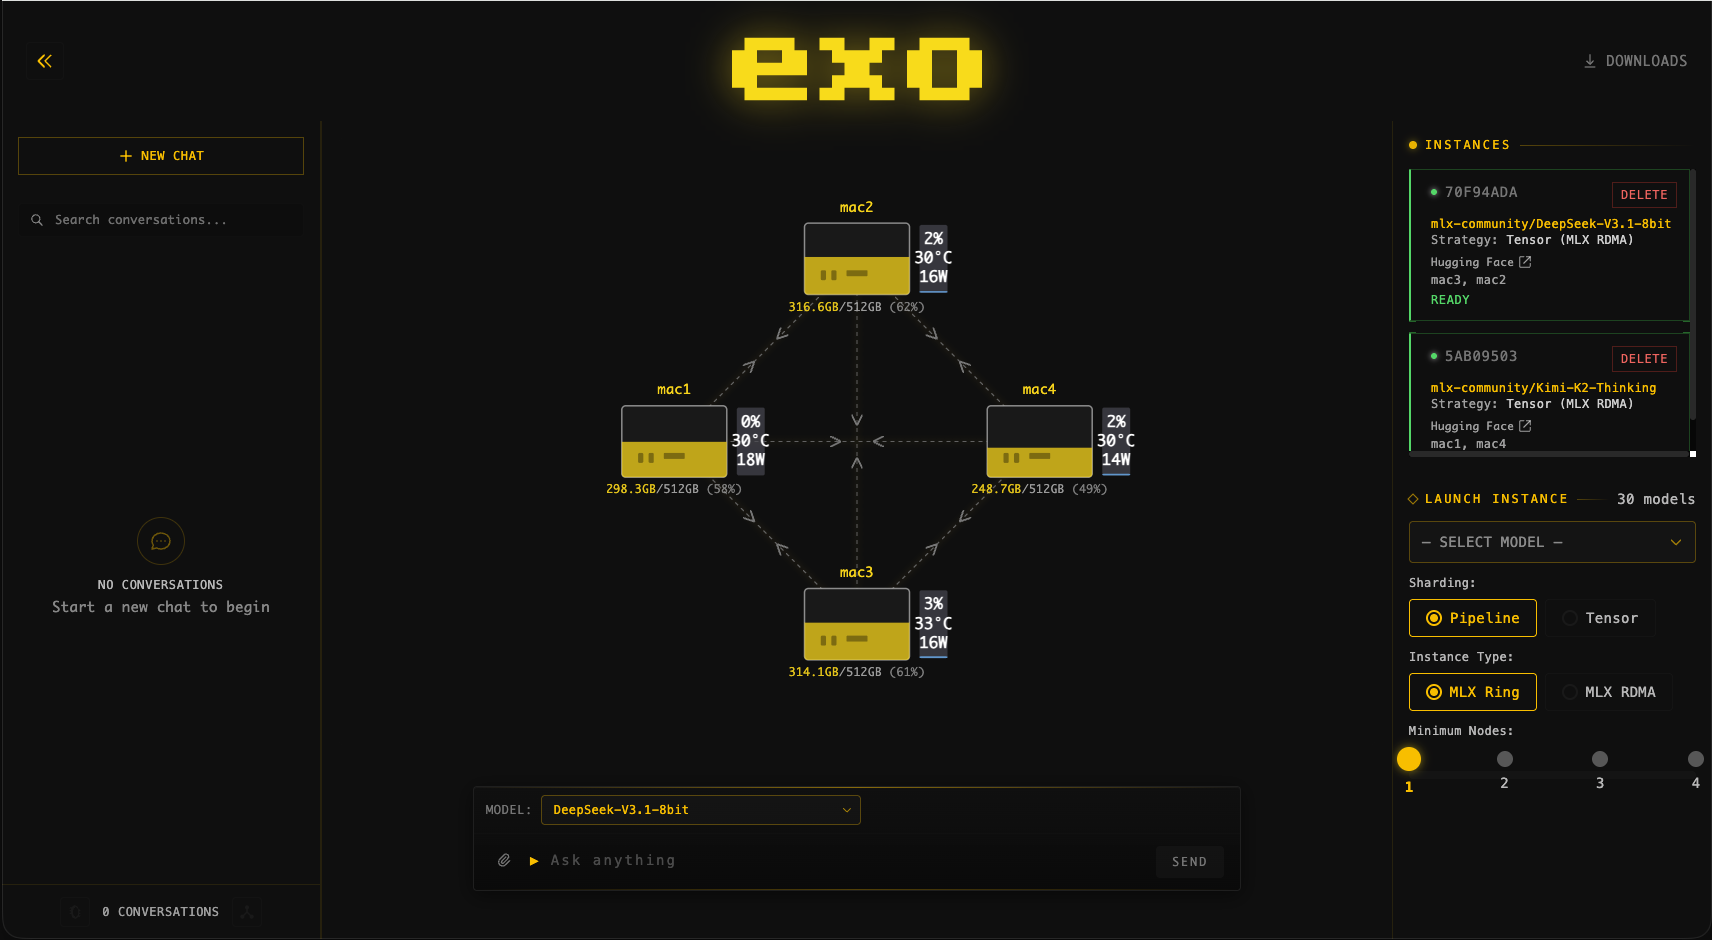
4 × 512GB M3 Ultra Mac Studio running DeepSeek v3.1 (8-bit) and Kimi-K2-Thinking (4-bit)
Benchmarks
Qwen3-235B (8-bit) on 4 × M3 Ultra Mac Studio with Tensor Parallel RDMA
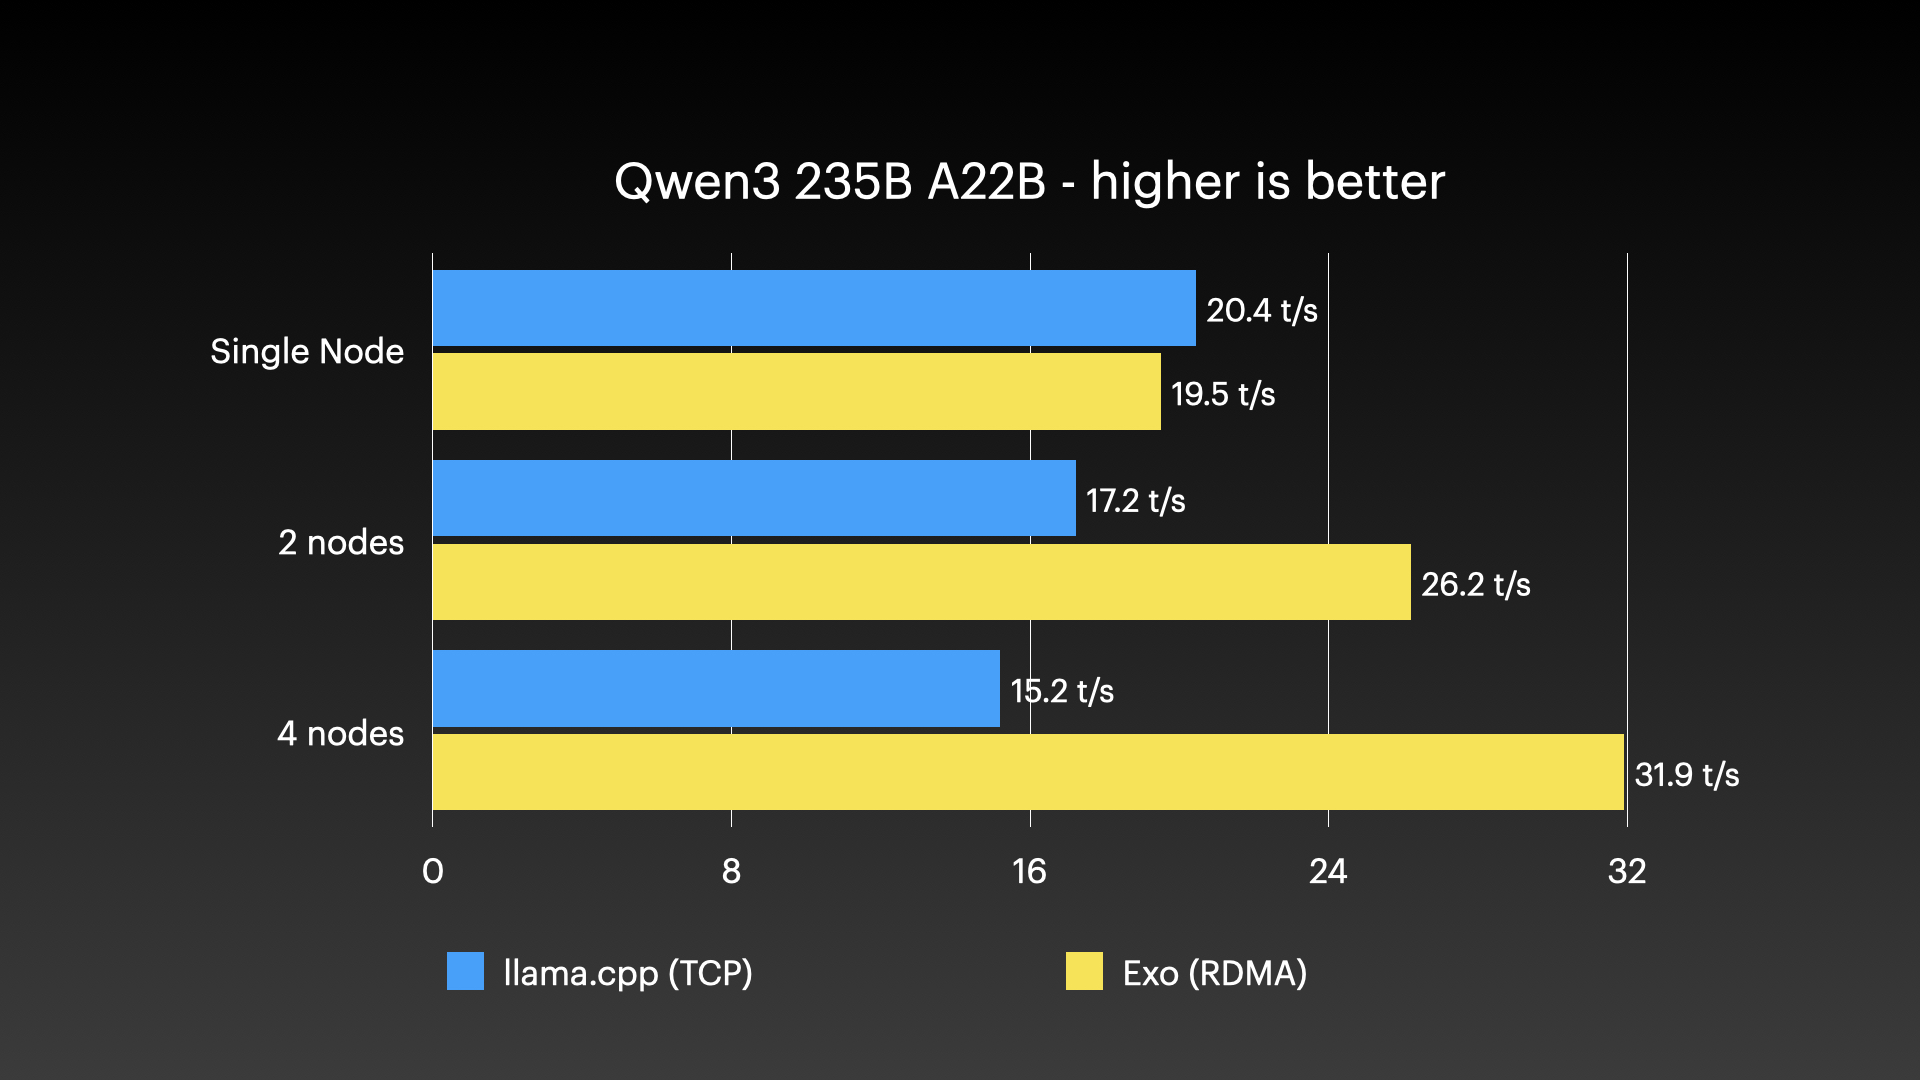
Source: Jeff Geerling: 15 TB VRAM on Mac Studio – RDMA over Thunderbolt 5
DeepSeek v3.1 671B (8-bit) on 4 × M3 Ultra Mac Studio with Tensor Parallel RDMA
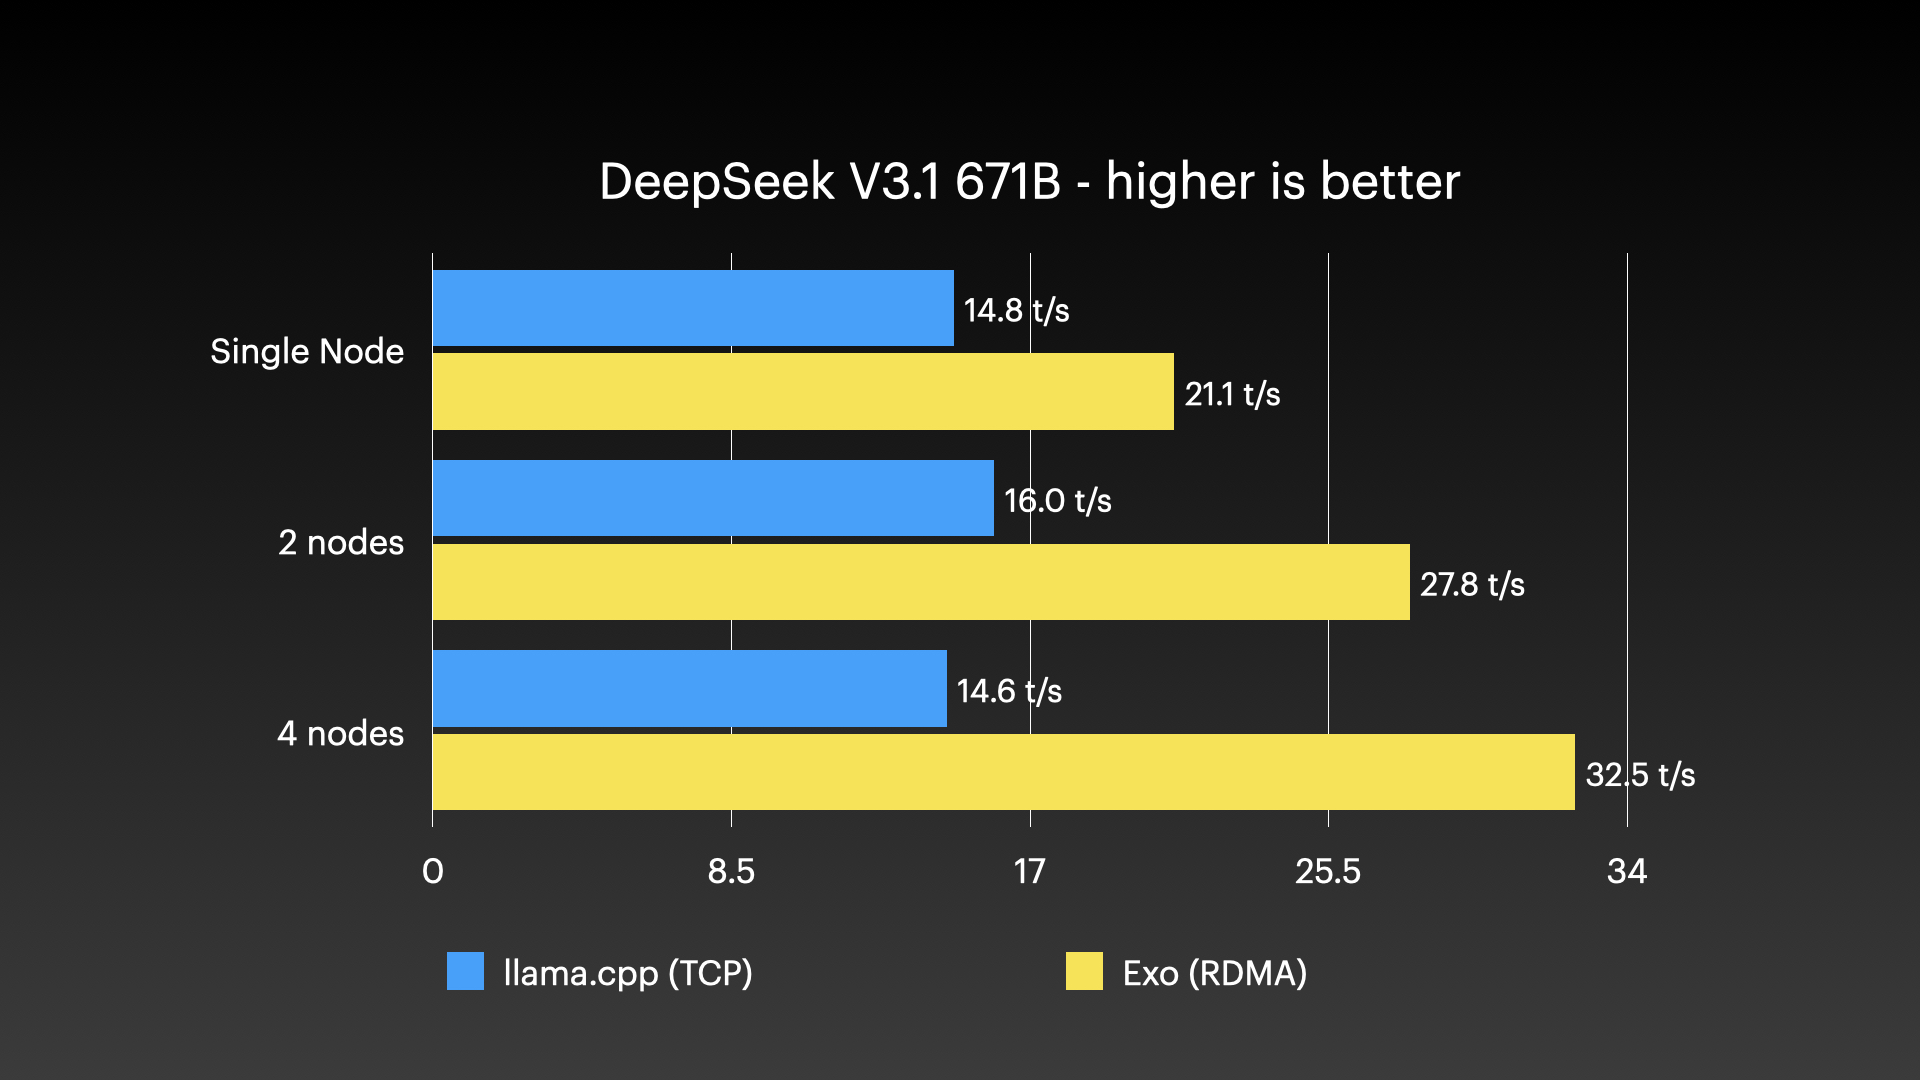
Source: Jeff Geerling: 15 TB VRAM on Mac Studio – RDMA over Thunderbolt 5
Kimi K2 Thinking (native 4-bit) on 4 × M3 Ultra Mac Studio with Tensor Parallel RDMA
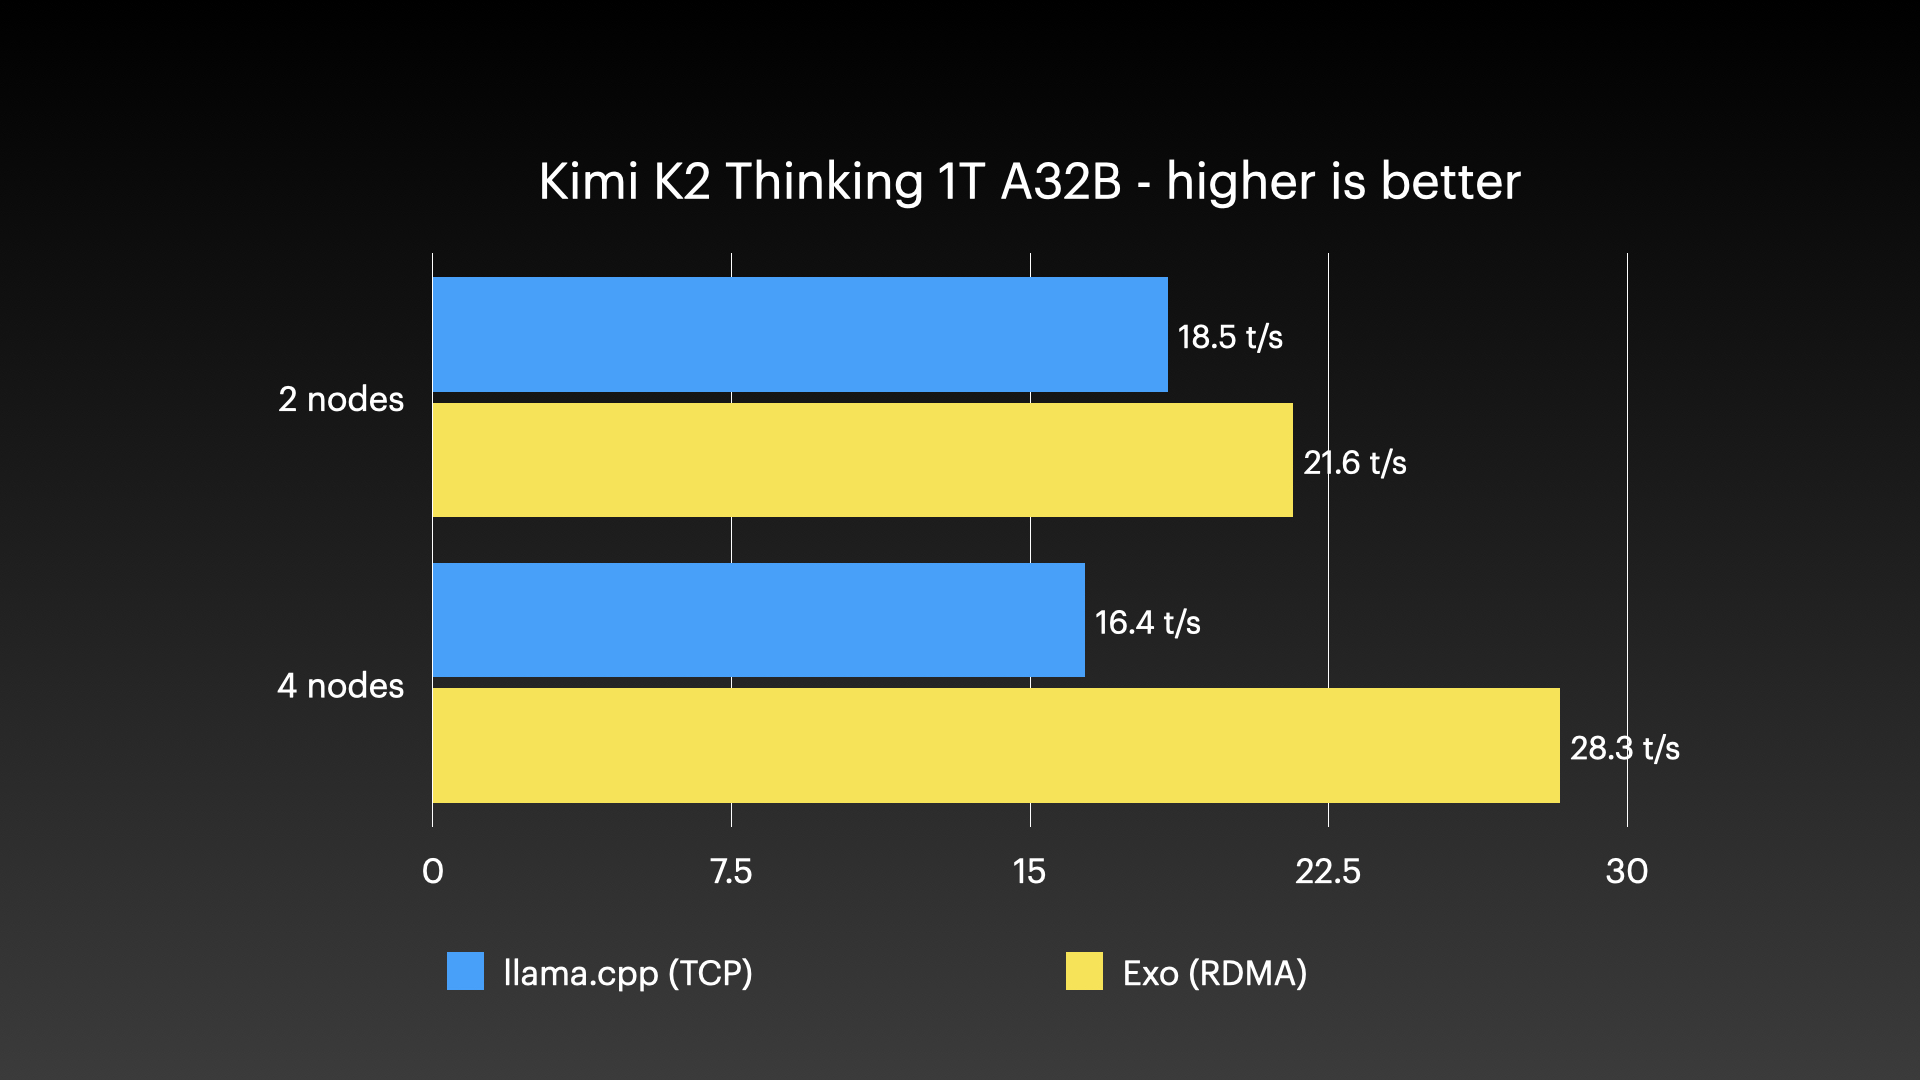
Source: Jeff Geerling: 15 TB VRAM on Mac Studio – RDMA over Thunderbolt 5
Quick Start
Devices running exo automatically discover each other, without needing any manual configuration. Each device provides an API and a dashboard for interacting with your cluster (runs at http://localhost:52415).
There are two ways to run exo:
Run from Source (macOS)
If you have Nix installed, you can skip most of the steps below and run exo directly:
nix run .#exo
Note: To accept the Cachix binary cache (and avoid the Xcode Metal ToolChain), add to /etc/nix/nix.conf:
trusted-users = root    (or your username)
experimental-features = nix-command flakes
Then restart the Nix daemon: sudo launchctl kickstart -k system/org.nixos.nix-daemon
Prerequisites:
Xcode (provides the Metal ToolChain required for MLX compilation)
brew (for simple package management on macOS)
/bin/bash -c "$(curl -fsSL https://raw.githubusercontent.com/Homebrew/install/HEAD/install.sh)"
uv (for Python dependency management)
node (for building the dashboard)
brew install uv node
rust (to build Rust bindings, nightly for now)
curl --proto '=https' --tlsv1.2 -sSf https://sh.rustup.rs | sh
rustup toolchain install nightly
macmon (for hardware monitoring on Apple Silicon)
Install the pinned fork revision used by this repo instead of Homebrew macmon.
Homebrew macmon 0.6.1 still crashes on Apple M5.
cargo install --git https://github.com/vladkens/macmon \
  --rev a1cd06b6cc0d5e61db24fd8832e74cd992097a7d \
  macmon \
  --force
Clone the repo, build the dashboard, install the dependencies, and run exo:
# Clone exo
git clone https://github.com/exo-explore/exo

# Build dashboard
cd exo/dashboard && npm install && npm run build && cd ..

# Install Python dependencies, including the MLX backend
uv sync --extra mlx

# Run exo
uv run exo
This starts the exo dashboard and API at http://localhost:52415/
Please view the section on RDMA to enable this feature on MacOS >=26.2!
Run from Source (Linux)
Prerequisites:
- uv (for Python dependency management)
- node (for building the dashboard) - version 18 or higher
- rust (to build Rust bindings, nightly for now)
Installation methods:
Option 1: Using system package manager (Ubuntu/Debian example):
# Install Node.js and npm
sudo apt update
sudo apt install nodejs npm

# Install uv
curl -LsSf https://astral.sh/uv/install.sh | sh

# Install Rust (using rustup)
curl --proto '=https' --tlsv1.2 -sSf https://sh.rustup.rs | sh
rustup toolchain install nightly
Option 2: Using Homebrew on Linux (if preferred):
# Install Homebrew on Linux
/bin/bash -c "$(curl -fsSL https://raw.githubusercontent.com/Homebrew/install/HEAD/install.sh)"

# Install dependencies
brew install uv node

# Install Rust (using rustup)
curl --proto '=https' --tlsv1.2 -sSf https://sh.rustup.rs | sh
rustup toolchain install nightly
Note: The macmon package is macOS-only and not required for Linux.
Clone the repo, build the dashboard, install the dependencies, and run exo:
# Clone exo
git clone https://github.com/exo-explore/exo

# Build dashboard
cd exo/dashboard && npm install && npm run build && cd ..

# Install Python dependencies with the MLX backend for your hardware
# (NVIDIA: --extra mlx-cuda13 or --extra mlx-cuda12)
uv sync --extra mlx-cpu

# Run exo
uv run exo
This starts the exo dashboard and API at http://localhost:52415/
Important note for Linux users: Currently, exo runs on CPU on Linux. GPU support for Linux platforms is under development. If you'd like to see support for your specific Linux hardware, please search for existing feature requests or create a new one.
Configuration Options:
--no-worker: Run exo without the worker component. Useful for coordinator-only nodes that handle networking and orchestration but don't execute inference tasks. This is helpful for machines without sufficient GPU resources but with good network connectivity.
uv run exo --no-worker
--legacy-daemon: Run exo as a legacy SysV-style background daemon using double-fork daemonization. This is intended for legacy init scripts; systemd and launchd should run exo in the foreground without this flag.
uv run exo --legacy-daemon
File Locations (Linux):
exo follows the XDG Base Directory Specification on Linux:
- Configuration files:
~/.config/exo/ (or $XDG_CONFIG_HOME/exo/)
- Data files:
~/.local/share/exo/ (or $XDG_DATA_HOME/exo/)
- Cache files:
~/.cache/exo/ (or $XDG_CACHE_HOME/exo/)
- Log files:
~/.cache/exo/exo_log/ (with automatic log rotation)
- Custom model cards:
~/.local/share/exo/custom_model_cards/
You can override these locations by setting the corresponding XDG environment variables.
macOS App
exo ships a macOS app that runs in the background on your Mac.
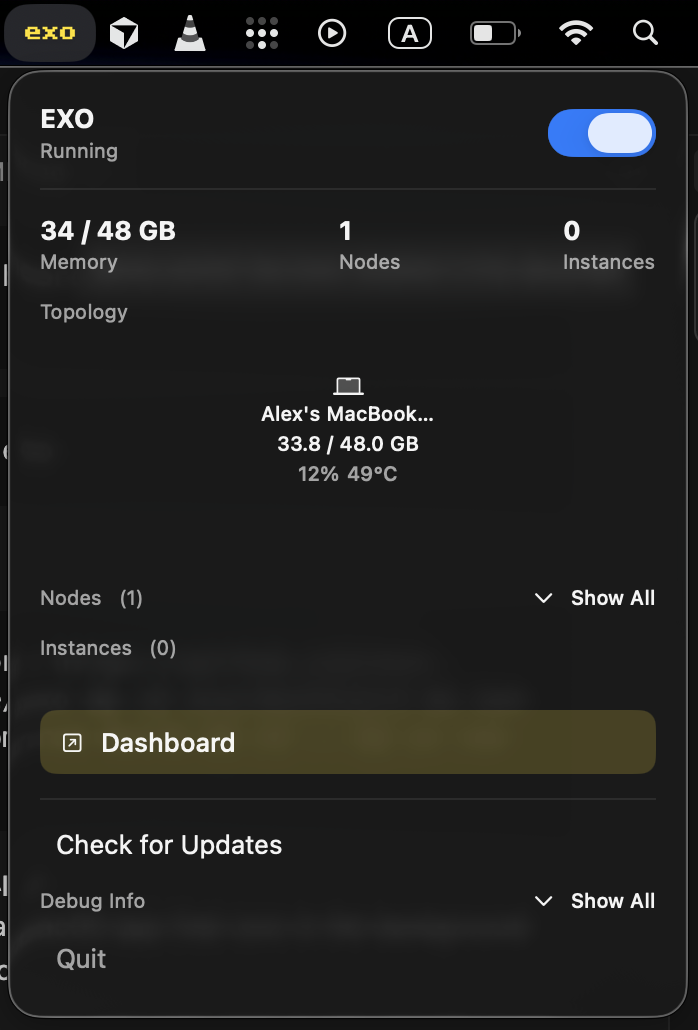
The macOS app requires macOS Tahoe 26.2 or later.
Download the latest build here: EXO-latest.dmg.
You can also install the latest build with Homebrew:
brew install --cask exo
The app will ask for permission to modify system settings and install a new Network profile. Improvements to this are being worked on.
Custom Namespace for Cluster Isolation:
The macOS app includes a custom namespace feature that allows you to isolate your exo cluster from others on the same network. This is configured through the EXO_LIBP2P_NAMESPACE setting:
The namespace is logged on startup for debugging purposes.
Uninstalling the macOS App
The recommended way to uninstall is through the app itself: click the menu bar icon → Advanced → Uninstall. This cleanly removes all system components.
If you've already deleted the app, you can run the standalone uninstaller script:
sudo ./app/EXO/uninstall-exo.sh
This removes:
- Network setup LaunchDaemon
- Network configuration script
- Log files
- The "exo" network location
Note: You'll need to manually remove EXO from Login Items in System Settings → General → Login Items.
Enabling RDMA on macOS
RDMA is a new capability added to macOS 26.2. It works on any Mac with Thunderbolt 5 (M4 Pro Mac Mini, M4 Max Mac Studio, M4 Max MacBook Pro, M3 Ultra Mac Studio).
Please refer to the caveats for immediate troubleshooting.
To enable RDMA on macOS, follow these steps:
- Shut down your Mac.
- Hold down the power button for 10 seconds until the boot menu appears.
- Select "Options" to enter Recovery mode.
- When the Recovery UI appears, open the Terminal from the Utilities menu.
- In the Terminal, type:
rdma_ctl enable
and press Enter.
- Reboot your Mac.
After that, RDMA will be enabled in macOS and exo will take care of the rest.
Important Caveats
- Devices that wish to be part of an RDMA cluster must be connected to all other devices in the cluster.
- The cables must support TB5.
- On a Mac Studio, you cannot use the Thunderbolt 5 port next to the Ethernet port.
- If running from source, please use the script found at
tmp/set_rdma_network_config.sh, which will disable Thunderbolt Bridge and set dhcp on each RDMA port.
- RDMA ports may be unable to discover each other on different versions of MacOS. Please ensure that OS versions match exactly (even beta version numbers) on all devices.
Environment Variables
exo supports several environment variables for configuration:
| Variable |
Description |
Default |
EXO_DEFAULT_MODELS_DIR |
Default directory for model downloads and caches. Always first in the writable dirs list. |
~/.local/share/exo/models (Linux) or ~/.exo/models (macOS) |
EXO_MODELS_DIRS |
Colon-separated additional writable directories for model downloads. Checked in order after the default; first with enough free space is used. |
None |
EXO_MODELS_READ_ONLY_DIRS |
Colon-separated read-only directories to search for pre-downloaded models (e.g., NFS mounts, shared storage). Models here cannot be deleted. |
None |
EXO_OFFLINE |
Run without internet connection (uses only local models) |
false |
EXO_ENABLE_IMAGE_MODELS |
Enable image model support |
false |
EXO_LIBP2P_NAMESPACE |
Custom namespace for cluster isolation |
None |
EXO_FAST_SYNCH |
Control MLX_METAL_FAST_SYNCH behavior (for JACCL backend) |
Auto |
EXO_TRACING_ENABLED |
Enable distributed tracing for performance analysis |
false |
Example usage:
# Use pre-downloaded models from NFS mount (read-only)
EXO_MODELS_READ_ONLY_DIRS=/mnt/nfs/models:/opt/ai-models uv run exo

# Download models to an external SSD (falls back to default dir if full)
EXO_MODELS_DIRS=/Volumes/ExternalSSD/exo-models uv run exo

# Run in offline mode
EXO_OFFLINE=true uv run exo

# Enable image models
EXO_ENABLE_IMAGE_MODELS=true uv run exo

# Use custom namespace for cluster isolation
EXO_LIBP2P_NAMESPACE=my-dev-cluster uv run exo
Using the API
exo provides multiple API-compatible interfaces for maximum compatibility with existing tools:
- OpenAI Chat Completions API - Compatible with OpenAI clients
- Claude Messages API - Compatible with Anthropic's Claude format
- OpenAI Responses API - Compatible with OpenAI's Responses format
- Ollama API - Compatible with Ollama and tools like OpenWebUI
If you prefer to interact with exo via the API, here is an example creating an instance of a small model (mlx-community/Llama-3.2-1B-Instruct-4bit), sending a chat completions request and deleting the instance.
1. Preview instance placements
The /instance/previews endpoint will preview all valid placements for your model.
curl "http://localhost:52415/instance/previews?model_id=llama-3.2-1b"
Sample response:
{
  "previews": [
    {
      "model_id": "mlx-community/Llama-3.2-1B-Instruct-4bit",
      "sharding": "Pipeline",
      "instance_meta": "MlxRing",
      "instance": {...},
      "memory_delta_by_node": {"local": 729808896},
      "error": null
    }
    // ...possibly more placements...
  ]
}
This will return all valid placements for this model. Pick a placement that you like.
To pick the first one, pipe into jq:
curl "http://localhost:52415/instance/previews?model_id=llama-3.2-1b" | jq -c '.previews[] | select(.error == null) | .instance' | head -n1
2. Create a model instance
Send a POST to /instance with your desired placement in the instance field (the full payload must match types as in CreateInstanceParams), which you can copy from step 1:
curl -X POST http://localhost:52415/instance \
  -H 'Content-Type: application/json' \
  -d '{
    "instance": {...}
  }'
Sample response:
{
  "message": "Command received.",
  "command_id": "e9d1a8ab-...."
}
This command is asynchronous. Before sending inference requests, wait until the
API sees the new instance for this model:
curl -N "http://localhost:52415/instance/await?model_id=mlx-community/Llama-3.2-1B-Instruct-4bit"
The endpoint returns an SSE stream. A successful wait emits a message with
"type": "ready" and the matching instance; a timeout emits "type": "timeout".
By default it waits indefinitely. Set timeout_seconds to a positive value to
bound the wait.
3. Send a chat completion
Now, make a POST to /v1/chat/completions (the same format as OpenAI's API):
curl -N -X POST http://localhost:52415/v1/chat/completions \
  -H 'Content-Type: application/json' \
  -d '{
    "model": "mlx-community/Llama-3.2-1B-Instruct-4bit",
    "messages": [
      {"role": "user", "content": "What is Llama 3.2 1B?"}
    ],
    "stream": true
  }'
4. Delete the instance
When you're done, delete the instance by its ID (find it via /state or /instance endpoints):
curl -X DELETE http://localhost:52415/instance/YOUR_INSTANCE_ID
Claude Messages API Compatibility
Use the Claude Messages API format with the /v1/messages endpoint:
curl -N -X POST http://localhost:52415/v1/messages \
  -H 'Content-Type: application/json' \
  -d '{
    "model": "mlx-community/Llama-3.2-1B-Instruct-4bit",
    "messages": [
      {"role": "user", "content": "Hello"}
    ],
    "max_tokens": 1024,
    "stream": true
  }'
OpenAI Responses API Compatibility
Use the OpenAI Responses API format with the /v1/responses endpoint:
curl -N -X POST http://localhost:52415/v1/responses \
  -H 'Content-Type: application/json' \
  -d '{
    "model": "mlx-community/Llama-3.2-1B-Instruct-4bit",
    "messages": [
      {"role": "user", "content": "Hello"}
    ],
    "stream": true
  }'
Ollama API Compatibility
exo supports Ollama API endpoints for compatibility with tools like OpenWebUI:
# Ollama chat
curl -X POST http://localhost:52415/ollama/api/chat \
  -H 'Content-Type: application/json' \
  -d '{
    "model": "mlx-community/Llama-3.2-1B-Instruct-4bit",
    "messages": [
      {"role": "user", "content": "Hello"}
    ],
    "stream": false
  }'

# List models (Ollama format)
curl http://localhost:52415/ollama/api/tags
Custom Model Loading from HuggingFace
You can add custom models from the HuggingFace hub:
curl -X POST http://localhost:52415/models/add \
  -H 'Content-Type: application/json' \
  -d '{
    "model_id": "mlx-community/my-custom-model"
  }'
Security Note:
Custom models requiring trust_remote_code in their configuration must be explicitly enabled (default is false) for security. Only enable this if you trust the model's remote code execution. Models are fetched from HuggingFace and stored locally as custom model cards.
Other useful API endpoints:*
- List all models:
curl http://localhost:52415/models
- List downloaded models only:
curl http://localhost:52415/models?status=downloaded
- Search HuggingFace:
curl "http://localhost:52415/models/search?query=llama&limit=10"
- Inspect instance IDs and deployment state:
curl http://localhost:52415/state
For further details, see:
Benchmarking
The exo-bench tool measures model prefill and token generation speed across different placement configurations. This helps you optimize model performance and validate improvements.
Prerequisites:
- Nodes should be running with
uv run exo before benchmarking





 exo объединяет несколько ваших устройств (Mac и компьютеры на Linux) в один ИИ-кластер, чтобы вы могли запускать большие ИИ-модели, которые не помещаются ни на одной машине, объединяя их память и вычислительные ресурсы.