




LivePortrait README

The project's README from github.com/KlingAIResearch/LivePortrait. As one markdown file: README.md.

LivePortrait: Efficient Portrait Animation with Stitching and Retargeting Control

Jianzhu Guo 1*†  Dingyun Zhang 1,2*  Xiaoqiang Liu 1  Zhizhou Zhong 1,3  Yuan Zhang 1 
Pengfei Wan 1  Di Zhang 1 
1 Kuaishou Technology  2 University of Science and Technology of China  3 Fudan University 
* Equal contributions † Project lead

Windows one-click installer  HuggingFace online demo

arXiv link  project homepage  HF space  Featured by HelloGitHub  GitHub stars

English | 简体中文

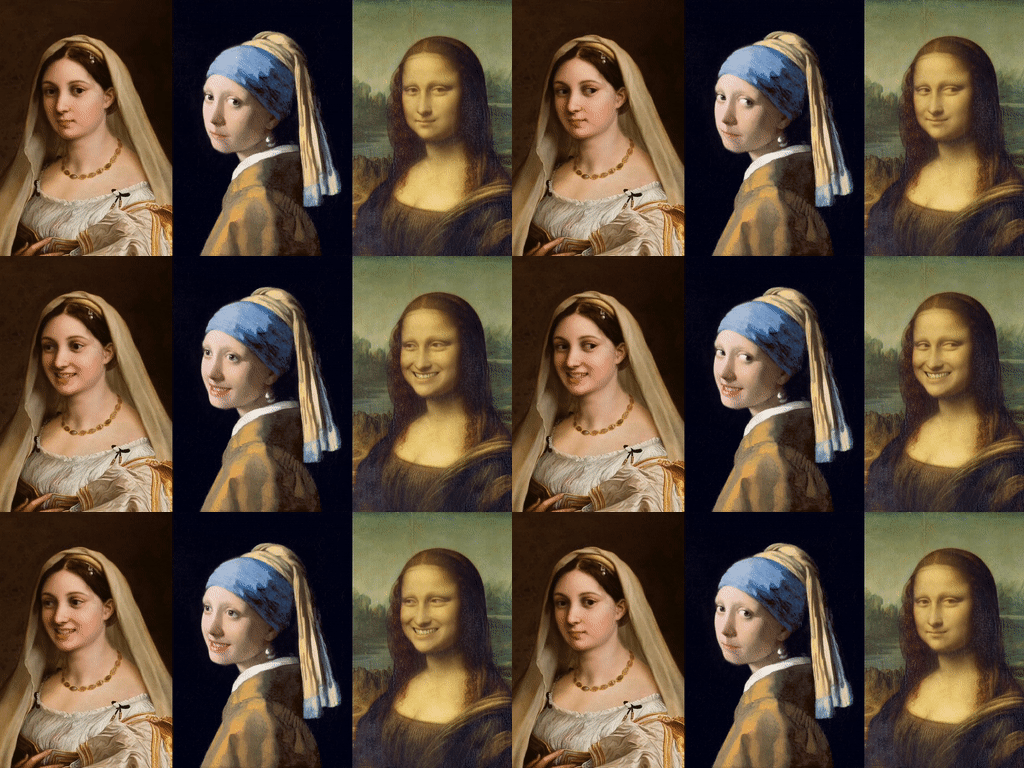
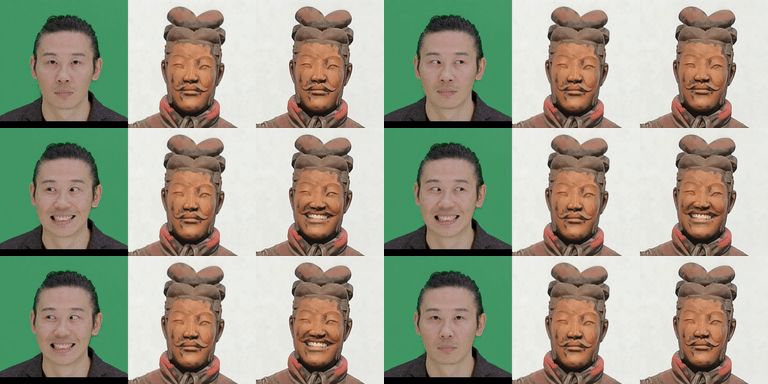
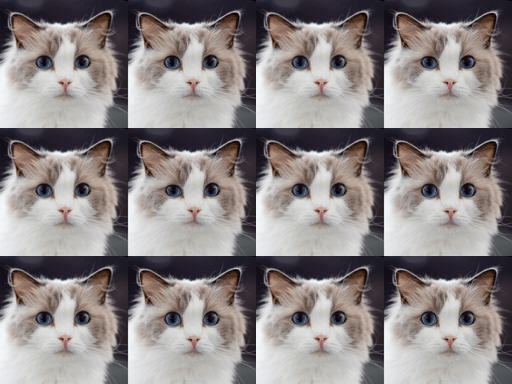
LivePortrait showcase GIF

🔥 For more results, visit our homepage 🔥

🔥 Updates

Introduction 📖

This repo, named LivePortrait, contains the official PyTorch implementation of our paper LivePortrait: Efficient Portrait Animation with Stitching and Retargeting Control. We are actively updating and improving this repository. If you find any bugs or have suggestions, welcome to raise issues or submit pull requests (PR) 💖.

Getting Started 🏁

1. Clone the code and prepare the environment 🛠️

[!Note] Make sure your system has git, conda, and FFmpeg installed. For details on FFmpeg installation, see how to install FFmpeg.

git clone https://github.com/KlingTeam/LivePortrait
cd LivePortrait

# create env using conda
conda create -n LivePortrait python=3.10
conda activate LivePortrait

For Linux 🐧 or Windows 🪟 Users

X-Pose, required by Animals mode, is a dependency that needs to be installed. The step of Check your CUDA versions is optional if you only want to run Humans mode.

Check your CUDA versions

Firstly, check your current CUDA version by:

nvcc -V # example versions: 11.1, 11.8, 12.1, etc.

Then, install the corresponding torch version. Here are examples for different CUDA versions. Visit the PyTorch Official Website for installation commands if your CUDA version is not listed:

# for CUDA 11.1
pip install torch==1.10.1+cu111 torchvision==0.11.2 torchaudio==0.10.1 -f https://download.pytorch.org/whl/cu111/torch_stable.html
# for CUDA 11.8
pip install torch==2.3.0 torchvision==0.18.0 torchaudio==2.3.0 --index-url https://download.pytorch.org/whl/cu118
# for CUDA 12.1
pip install torch==2.3.0 torchvision==0.18.0 torchaudio==2.3.0 --index-url https://download.pytorch.org/whl/cu121
# ...

Note: On Windows systems, some higher versions of CUDA (such as 12.4, 12.6, etc.) may lead to unknown issues. You may consider downgrading CUDA to version 11.8 for stability. See the downgrade guide by @dimitribarbot.

Finally, install the remaining dependencies:

pip install -r requirements.txt

For macOS  with Apple Silicon Users

The X-Pose dependency does not support macOS, so you can skip its installation. While Humans mode works as usual, Animals mode is not supported. Use the provided requirements file for macOS with Apple Silicon:

# for macOS with Apple Silicon users
pip install -r requirements_macOS.txt

2. Download pretrained weights 📥

The easiest way to download the pretrained weights is from HuggingFace:

# !pip install -U "huggingface_hub[cli]"
huggingface-cli download KlingTeam/LivePortrait --local-dir pretrained_weights --exclude "*.git*" "README.md" "docs"

If you cannot access to Huggingface, you can use hf-mirror to download:

# !pip install -U "huggingface_hub[cli]"
export HF_ENDPOINT=https://hf-mirror.com
huggingface-cli download KlingTeam/LivePortrait --local-dir pretrained_weights --exclude "*.git*" "README.md" "docs"

Alternatively, you can download all pretrained weights from Google Drive or Baidu Yun. Unzip and place them in ./pretrained_weights.

Ensuring the directory structure is as or contains this.

3. Inference 🚀

Fast hands-on (humans) 👤

# For Linux and Windows users
python inference.py

# For macOS users with Apple Silicon (Intel is not tested). NOTE: this maybe 20x slower than RTX 4090
PYTORCH_ENABLE_MPS_FALLBACK=1 python inference.py

If the script runs successfully, you will get an output mp4 file named animations/s6--d0_concat.mp4. This file includes the following results: driving video, input image or video, and generated result.

image

Or, you can change the input by specifying the -s and -d arguments:

# source input is an image
python inference.py -s assets/examples/source/s9.jpg -d assets/examples/driving/d0.mp4

# source input is a video ✨
python inference.py -s assets/examples/source/s13.mp4 -d assets/examples/driving/d0.mp4

# more options to see
python inference.py -h

Fast hands-on (animals) 🐱🐶

Animals mode is ONLY tested on Linux and Windows with NVIDIA GPU.

You need to build an OP named MultiScaleDeformableAttention first (refer to the Check your CUDA versions if needed), which is used by X-Pose, a general keypoint detection framework.

cd src/utils/dependencies/XPose/models/UniPose/ops
python setup.py build install
cd - # equal to cd ../../../../../../../

Then

python inference_animals.py -s assets/examples/source/s39.jpg -d assets/examples/driving/wink.pkl --driving_multiplier 1.75 --no_flag_stitching

If the script runs successfully, you will get an output mp4 file named animations/s39--wink_concat.mp4.

image

Driving video auto-cropping 📢📢📢

[!IMPORTANT] To use your own driving video, we recommend: ⬇️

  • Crop it to a 1:1 aspect ratio (e.g., 512x512 or 256x256 pixels), or enable auto-cropping by --flag_crop_driving_video.
  • Focus on the head area, similar to the example videos.
  • Minimize shoulder movement.
  • Make sure the first frame of driving video is a frontal face with neutral expression.

Below is an auto-cropping case by --flag_crop_driving_video:

python inference.py -s assets/examples/source/s9.jpg -d assets/examples/driving/d13.mp4 --flag_crop_driving_video

If you find the results of auto-cropping is not well, you can modify the --scale_crop_driving_video, --vy_ratio_crop_driving_video options to adjust the scale and offset, or do it manually.

Motion template making

You can also use the auto-generated motion template files ending with .pkl to speed up inference, and protect privacy, such as:

python inference.py -s assets/examples/source/s9.jpg -d assets/examples/driving/d5.pkl # portrait animation
python inference.py -s assets/examples/source/s13.mp4 -d assets/examples/driving/d5.pkl # portrait video editing

4. Gradio interface 🤗

We also provide a Gradio interface for a better experience, just run by:

# For Linux and Windows users (and macOS with Intel??)
python app.py # humans mode

# For macOS with Apple Silicon users, Intel not supported, this maybe 20x slower than RTX 4090
PYTORCH_ENABLE_MPS_FALLBACK=1 python app.py # humans mode

We also provide a Gradio interface of animals mode, which is only tested on Linux with NVIDIA GPU:

python app_animals.py # animals mode 🐱🐶

You can specify the --server_port, --share, --server_name arguments to satisfy your needs!

🚀 We also provide an acceleration option --flag_do_torch_compile. The first-time inference triggers an optimization process (about one minute), making subsequent inferences 20-30% faster. Performance gains may vary with different CUDA versions.

# enable torch.compile for faster inference
python app.py --flag_do_torch_compile

Note: This method is not supported on Windows and macOS.

Or, try it out effortlessly on HuggingFace 🤗

5. Inference speed evaluation 🚀🚀🚀

We have also provided a script to evaluate the inference speed of each module:

# For NVIDIA GPU
python speed.py

The results are here.

Community Resources 🤗

Discover the invaluable resources contributed by our community to enhance your LivePortrait experience.

Community-developed Projects

Repo Description Author / Links
AVTR-1 Real-time conversational talking-head model using dyadic audio conditioning and a LivePortrait-style portrait-warping renderer. @avaturn-live
ditto-talkinghead Real-time audio-driven talking head. ArXiv, Homepage
FasterLivePortrait Faster real-time version using TensorRT. @warmshao
AdvancedLivePortrait-WebUI Dedicated gradio based WebUI started from ComfyUI-AdvancedLivePortrait. @jhj0517
FacePoke A real-time head transformation app, controlled by your mouse! @jbilcke-hf
FaceFusion FaceFusion 3.0 integregates LivePortrait as expression_restorer and face_editor processors. @henryruhs
sd-webui-live-portrait WebUI extension of LivePortrait, adding atab to the original Stable Diffusion WebUI to benefit from LivePortrait features. @dimitribarbot
ComfyUI-LivePortraitKJ A ComfyUI node to use LivePortrait, with MediaPipe as as an alternative to Insightface. @kijai
ComfyUI-AdvancedLivePortrait A faster ComfyUI node with real-time preview that has inspired many other community-developed tools and projects. @PowerHouseMan
comfyui-liveportrait A ComfyUI node to use LivePortrait, supporting multi-faces, expression interpolation etc, with a tutorial. @shadowcz007

Playgrounds, 🤗 HuggingFace Spaces and Others

Video Tutorials

And so MANY amazing contributions from our community, too many to list them all 💖

Acknowledgements 💐

We would like to thank the contributors of FOMM, Open Facevid2vid, SPADE, InsightFace and X-Pose repositories, for their open research and contributions.

Ethics Considerations 🛡️

Portrait animation technologies come with social risks, particularly the potential for misuse in creating deepfakes. To mitigate these risks, it’s crucial to follow ethical guidelines and adopt responsible usage practices. At present, the synthesized results contain visual artifacts that may

LivePortrait (KlingAIResearch/LivePortrait)

Searching Database…

What is this?LivePortrait animates a still portrait photo using a driving video — the official PyTorch implementation of the paper 'Efficient Portrait Animation with Stitching and Retargeting Control' by Kuaishou Technology. It works on humans as well as cats and dogs.
Is this a finished app, or code I have to run myself?It's a Python codebase you run yourself: inference scripts plus a Gradio web UI, with pretrained model weights downloaded separately. Windows users can skip the setup with a one-click installer that even auto-updates.
How do I get it running?Clone the repo, install dependencies in a conda environment (git, conda and FFmpeg are required), download the pretrained weights from HuggingFace into ./pretrainedweights, then run the inference script or the Gradio interface script.
My results look off — what does a good driving video need?Crop the driving video to a 1:1 aspect ratio, make the first frame a frontal face with a neutral expression, focus on the head and minimize shoulder movement. An auto-crop flag (--flagcropdrivingvideo) plus scale and offset options help tune it.
Will it run on my Mac?Windows and Linux get full support; macOS works on Apple Silicon for Humans mode only, since the X-Pose dependency doesn't support macOS and Animals mode is not available there.
Can it animate cats and dogs too?Yes — there's a separate Animals model (a newer version shipped in January 2025), but it's only tested on Linux and Windows with an NVIDIA GPU and requires building the X-Pose keypoint-detection dependency first.
Can I try it without installing anything?Yes — the authors host an official HuggingFace Space you can open in a browser, and community playgrounds exist on Replicate, FAL and Poe.
Besides animating a photo from a video, what else can it do?It also does video-to-video portrait editing (v2v), image-driven animation, regional control, pose editing for the source portrait and precise portrait editing inside the Gradio interface.
Is this just a research demo, or do people actually use it?It's in production: the authors report adoption by major video platforms — Kuaishou, Douyin, Jianying and WeChat Channels — as well as many startups and creators.
Anything I should be careful about before using it?Yes — the authors flag deepfake misuse as a social risk and ask users to follow ethical guidelines, and they note the synthesized results still contain visual artifacts.
Size
38.7 MB
Stars
19.3K
Updated
CommitJun 01
Age
2y
Commits · 90 Days
