
SoftVC VITS Singing Voice Conversion
English | 中文简体


This round of limited time update is coming to an end, the warehouse will enter the Archieve state, please know
✨ A studio that contains visible f0 editor, speaker mix timeline editor and other features (Where the Onnx models are used) : MoeVoiceStudio
✨ A fork with a greatly improved user interface: 34j/so-vits-svc-fork
✨ A client supports real-time conversion: w-okada/voice-changer
This project differs fundamentally from VITS, as it focuses on Singing Voice Conversion (SVC) rather than Text-to-Speech (TTS). In this project, TTS functionality is not supported, and VITS is incapable of performing SVC tasks. It's important to note that the models used in these two projects are not interchangeable or universally applicable.
Announcement
The purpose of this project was to enable developers to have their beloved anime characters perform singing tasks. The developers' intention was to focus solely on fictional characters and avoid any involvement of real individuals, anything related to real individuals deviates from the developer's original intention.
Disclaimer
This project is an open-source, offline endeavor, and all members of SvcDevelopTeam, as well as other developers and maintainers involved (hereinafter referred to as contributors), have no control over the project. The contributors have never provided any form of assistance to any organization or individual, including but not limited to dataset extraction, dataset processing, computing support, training support, inference, and so on. The contributors do not and cannot be aware of the purposes for which users utilize the project. Therefore, any AI models and synthesized audio produced through the training of this project are unrelated to the contributors. Any issues or consequences arising from their use are the sole responsibility of the user.
This project is run completely offline and does not collect any user information or gather user input data. Therefore, contributors to this project are not aware of all user input and models and therefore are not responsible for any user input.
This project serves as a framework only and does not possess speech synthesis functionality by itself. All functionalities require users to train the models independently. Furthermore, this project does not come bundled with any models, and any secondary distributed projects are independent of the contributors of this project.
📏 Terms of Use
- This project is exclusively established for academic purposes, aiming to facilitate communication and learning. It is not intended for deployment in production environments.
- Any sovits-based video posted to a video platform must clearly specify in the introduction the input source vocals and audio used for the voice changer conversion, e.g., if you use someone else's video/audio and convert it by separating the vocals as the input source, you must give a clear link to the original video or music; if you use your own vocals or a voice synthesized by another voice synthesis engine as the input source, you must also state this in your introduction.
- You are solely responsible for any infringement issues caused by the input source and all consequences. When using other commercial vocal synthesis software as an input source, please ensure that you comply with the regulations of that software, noting that the regulations of many vocal synthesis engines explicitly state that they cannot be used to convert input sources!
- Engaging in illegal activities, as well as religious and political activities, is strictly prohibited when using this project. The project developers vehemently oppose the aforementioned activities. If you disagree with this provision, the usage of the project is prohibited.
- If you continue to use the program, you will be deemed to have agreed to the terms and conditions set forth in README and README has discouraged you and is not responsible for any subsequent problems.
- If you intend to employ this project for any other purposes, kindly contact and inform the maintainers of this repository in advance.
📝 Model Introduction
The singing voice conversion model uses SoftVC content encoder to extract speech features from the source audio. These feature vectors are directly fed into VITS without the need for conversion to a text-based intermediate representation. As a result, the pitch and intonations of the original audio are preserved. Meanwhile, the vocoder was replaced with NSF HiFiGAN to solve the problem of sound interruption.
🆕 4.1-Stable Version Update Content
- Feature input is changed to the 12th Layer of Content Vec Transformer output, And compatible with 4.0 branches.
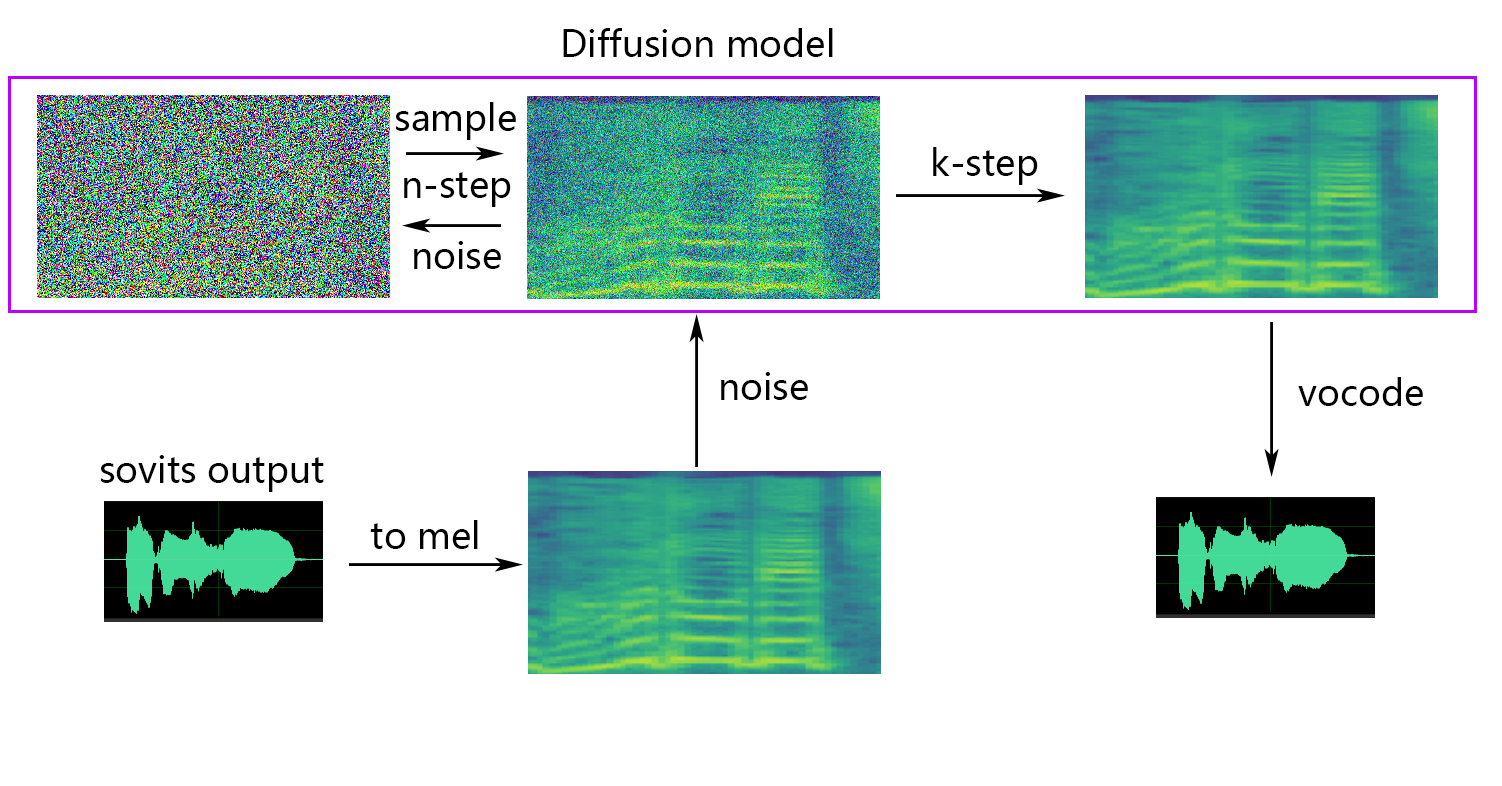
- Update the shallow diffusion, you can use the shallow diffusion model to improve the sound quality.
- Added Whisper-PPG encoder support
- Added static/dynamic sound fusion
- Added loudness embedding
- Added Functionality of feature retrieval from RVC
🆕 Questions about compatibility with the 4.0 model
- To support the 4.0 model and incorporate the speech encoder, you can make modifications to the
config.json file. Add the speech_encoder field to the "model" section as shown below:
  "model": {
    .........
    "ssl_dim": 256,
    "n_speakers": 200,
    "speech_encoder":"vec256l9"
  }
🆕 Shallow diffusion
💬 Python Version
Based on our testing, we have determined that the project runs stable on Python 3.8.9.
📥 Pre-trained Model Files
Required
You need to select one encoder from the list below
1. If using contentvec as speech encoder(recommended)
vec768l12 and vec256l9 require the encoder
Or download the following ContentVec, which is only 199MB in size but has the same effect:
- ContentVec: hubert_base.pt
- Change the file name to
checkpoint_best_legacy_500.pt and place it in the pretrain directory
# contentvec
wget -P pretrain/ https://huggingface.co/lj1995/VoiceConversionWebUI/resolve/main/hubert_base.pt -O checkpoint_best_legacy_500.pt
# Alternatively, you can manually download and place it in the hubert directory
2. If hubertsoft is used as the speech encoder
3. If whisper-ppg as the encoder
- download model at medium.pt, the model fits
whisper-ppg
- or download model at large-v2.pt, the model fits
whisper-ppg-large
- Place it under the
pretrain directory
4. If cnhubertlarge as the encoder
5. If dphubert as the encoder
6. If WavLM is used as the encoder
- download model at WavLM-Base+.pt, the model fits
wavlmbase+
- Place it under the
pretrain directory
7. If OnnxHubert/ContentVec as the encoder
- download model at MoeSS-SUBModel
- Place it under the
pretrain directory
List of Encoders
- "vec768l12"
- "vec256l9"
- "vec256l9-onnx"
- "vec256l12-onnx"
- "vec768l9-onnx"
- "vec768l12-onnx"
- "hubertsoft-onnx"
- "hubertsoft"
- "whisper-ppg"
- "cnhubertlarge"
- "dphubert"
- "whisper-ppg-large"
- "wavlmbase+"
Optional(Strongly recommend)
Get Sovits Pre-trained model from svc-develop-team(TBD) or anywhere else.
Diffusion model references Diffusion-SVC diffusion model. The pre-trained diffusion model is universal with the DDSP-SVC's. You can go to Diffusion-SVC's repo to get the pre-trained diffusion model.
While the pretrained model typically does not pose copyright concerns, it is essential to remain vigilant. It is advisable to consult with the author beforehand or carefully review the description to ascertain the permissible usage of the model. This helps ensure compliance with any specified guidelines or restrictions regarding its utilization.
Optional(Select as Required)
NSF-HIFIGAN
If you are using the NSF-HIFIGAN enhancer or shallow diffusion, you will need to download the pre-trained NSF-HIFIGAN model.
- Pre-trained NSF-HIFIGAN Vocoder: nsf_hifigan_20221211.zip
- Unzip and place the four files under the
pretrain/nsf_hifigan directory
# nsf_hifigan
wget -P pretrain/ https://github.com/openvpi/vocoders/releases/download/nsf-hifigan-v1/nsf_hifigan_20221211.zip
unzip -od pretrain/nsf_hifigan pretrain/nsf_hifigan_20221211.zip
# Alternatively, you can manually download and place it in the pretrain/nsf_hifigan directory
# URL: https://github.com/openvpi/vocoders/releases/tag/nsf-hifigan-v1
RMVPE
If you are using the rmvpe F0 Predictor, you will need to download the pre-trained RMVPE model.
- download model at rmvpe.zip, this weight is recommended.
- unzip
rmvpe.zip,and rename the model.pt file to rmvpe.pt and place it under the pretrain directory.
download model at rmvpe.pt
Place it under the pretrain directory
FCPE(Preview version)
FCPE(Fast Context-base Pitch Estimator) is a dedicated F0 predictor designed for real-time voice conversion and will become the preferred F0 predictor for sovits real-time voice conversion in the future.(The paper is being written)
If you are using the fcpe F0 Predictor, you will need to download the pre-trained FCPE model.
- download model at fcpe.pt
- Place it under the
pretrain directory
📊 Dataset Preparation
Simply place the dataset in the dataset_raw directory with the following file structure:
dataset_raw
├───speaker0
│   ├───xxx1-xxx1.wav
│   ├───...
│   └───Lxx-0xx8.wav
└───speaker1
    ├───xx2-0xxx2.wav
    ├───...
    └───xxx7-xxx007.wav
There are no specific restrictions on the format of the name for each audio file (naming conventions such as 000001.wav to 999999.wav are also valid), but the file type must be `WAV``.
You can customize the speaker's name as showed below:
dataset_raw
└───suijiSUI
    ├───1.wav
    ├───...
    └───25788785-20221210-200143-856_01_(Vocals)_0_0.wav
🛠️ Preprocessing
0. Slice audio
To avoid video memory overflow during training or pre-processing, it is recommended to limit the length of audio clips. Cutting the audio to a length of "5s - 15s" is more recommended. Slightly longer times are acceptable, however, excessively long clips may cause problems such as torch.cuda.OutOfMemoryError.
To facilitate the slicing process, you can use audio-slicer-GUI or audio-slicer-CLI
In general, only the Minimum Interval needs to be adjusted. For spoken audio, the default value usually suffices, while for singing audio, it can be adjusted to around 100 or even 50, depending on the specific requirements.
After slicing, it is recommended to remove any audio clips that are excessively long or too short.
If you are using whisper-ppg encoder for training, the audio clips must shorter than 30s.
1. Resample to 44100Hz and mono
python resample.py
Cautions
Although this project has resample.py scripts for resampling, mono and loudness matching, the default loudness matching is to match to 0db. This can cause damage to the sound quality. While python's loudness matching package pyloudnorm does not limit the level, this can lead to sonic boom. Therefore, it is recommended to consider using professional sound processing software, such as adobe audition for loudness matching. If you are already using other software for loudness matching, add the parameter -skip_loudnorm to the run command:
python resample.py --skip_loudnorm
2. Automatically split the dataset into training and validation sets, and generate configuration files.
python preprocess_flist_config.py --speech_encoder vec768l12
speech_encoder has the following options
vec768l12
vec256l9
hubertsoft
whisper-ppg
cnhubertlarge
dphubert
whisper-ppg-large
wavlmbase+
If the speech_encoder argument is omitted, the default value is vec768l12
Use loudness embedding
Add --vol_aug if you want to enable loudness embedding:
python preprocess_flist_config.py --speech_encoder vec768l12 --vol_aug
After enabling loudness embedding, the trained model will match the loudness of the input source; otherwise, it will match the loudness of the training set.
You can modify some parameters in the generated config.json and diffusion.yaml
keep_ckpts: Keep the the the number of previous models during training. Set to 0 to keep them all. Default is 3.
all_in_mem: Load all dataset to RAM. It can be enabled when the disk IO of some platforms is too low and the system memory is much larger than your dataset.
batch_size: The amount of data loaded to the GPU for a single training session can be adjusted to a size lower than the GPU memory capacity.
vocoder_name: Select a vocoder. The default is nsf-hifigan.
diffusion.yaml
cache_all_data: Load all dataset to RAM. It can be enabled when the disk IO of some platforms is too low and the system memory is much larger than your dataset.
duration: The duration of the audio slicing during training, can be adjusted according to the size of the video memory, Note: this value must be less than the minimum time of the audio in the training set!
batch_size: The amount of data loaded to the GPU for a single training session can be adjusted to a size lower than the video memory capacity.
timesteps: The total number of steps in the diffusion model, which defaults to 1000.
k_step_max: Training can only train k_step_max step diffusion to save training time, note that the value must be less than timesteps, 0 is to train the entire diffusion model, Note: if you do not train the entire diffusion model will not be able to use only_diffusion!
List of Vocoders
nsf-hifigan
nsf-snake-hifigan
3. Generate hubert and f0
python preprocess_hubert_f0.py --f0_predictor dio
f0_predictor has the following options
crepe
dio
pm
harvest
rmvpe
fcpe
If the training set is too noisy,it is recommended to use crepe to handle f0
If the f0_predictor parameter is omitted, the default value is rmvpe
If you want shallow diffusion (optional), you need to add the --use_diff parameter, for example:
python preprocess_hubert_f0.py --f0_predictor dio --use_diff
Speed Up preprocess
If your dataset is pretty large,you can increase the param --num_processes like that:
python preprocess_hubert_f0.py --f0_predictor dio --num_processes 8
All the worker will be assigned to different GPU if you have more than one GPUs.
After completing the above steps, the dataset directory will contain the preprocessed data, and the dataset_raw folder can be deleted.
🏋️ Training
Sovits Model
python train.py -c configs/config.json -m 44k
Diffusion Model (optional)
If the shallow diffusion function is needed, the diffusion model needs to be trained. The diffusion model training method is as follows:
python train_diff.py -c configs/diffusion.yaml
During training, the model files will be saved to logs/44k, and the diffusion model will be saved to logs/44k/diffusion
🤖 Inference
Use inference_main.py
# Example
python inference_main.py -m "logs/44k/G_30400.pth" -c "configs/config.json" -n "君の知らない物語-src.wav" -t 0 -s "nen"
Required parameters:
-m | --model_path: path to the model.-c | --config_path: path to the configuration file.-n | --clean_names: a list of wav file names located in the raw folder.-t | --trans: pitch shift, supports positive and negative (semitone) values.-s | --spk_list: Select the speaker ID to use for conversion.-cl | --clip: Forced audio clipping, set to 0 to disable(default), setting it to a non-zero value (duration in seconds) to enable.
Optional parameters: see the next section
-lg | --linear_gradient: The cross fade length of two audio slices in seconds. If there is a discontinuous voice after forced slicing, you can adjust this value. Otherwise, it is recommended to use the default value of 0.-f0p | --f0_predictor: Select a F0 predictor, options are

 An open-source AI singing voice conversion (SVC) framework: it trains PyTorch models that make one voice sing the lines of another, using SoftVC speech features fed into VITS with an NSF-HiFiGAN vocoder.