Minilytics
Revenue-first web analytics for your own websites, inspired by DataFast. It shows where visitors came from (which
tweet, article, Google page or AI assistant), what they did, and which source made you money. It runs on
Cloudflare's free plan.
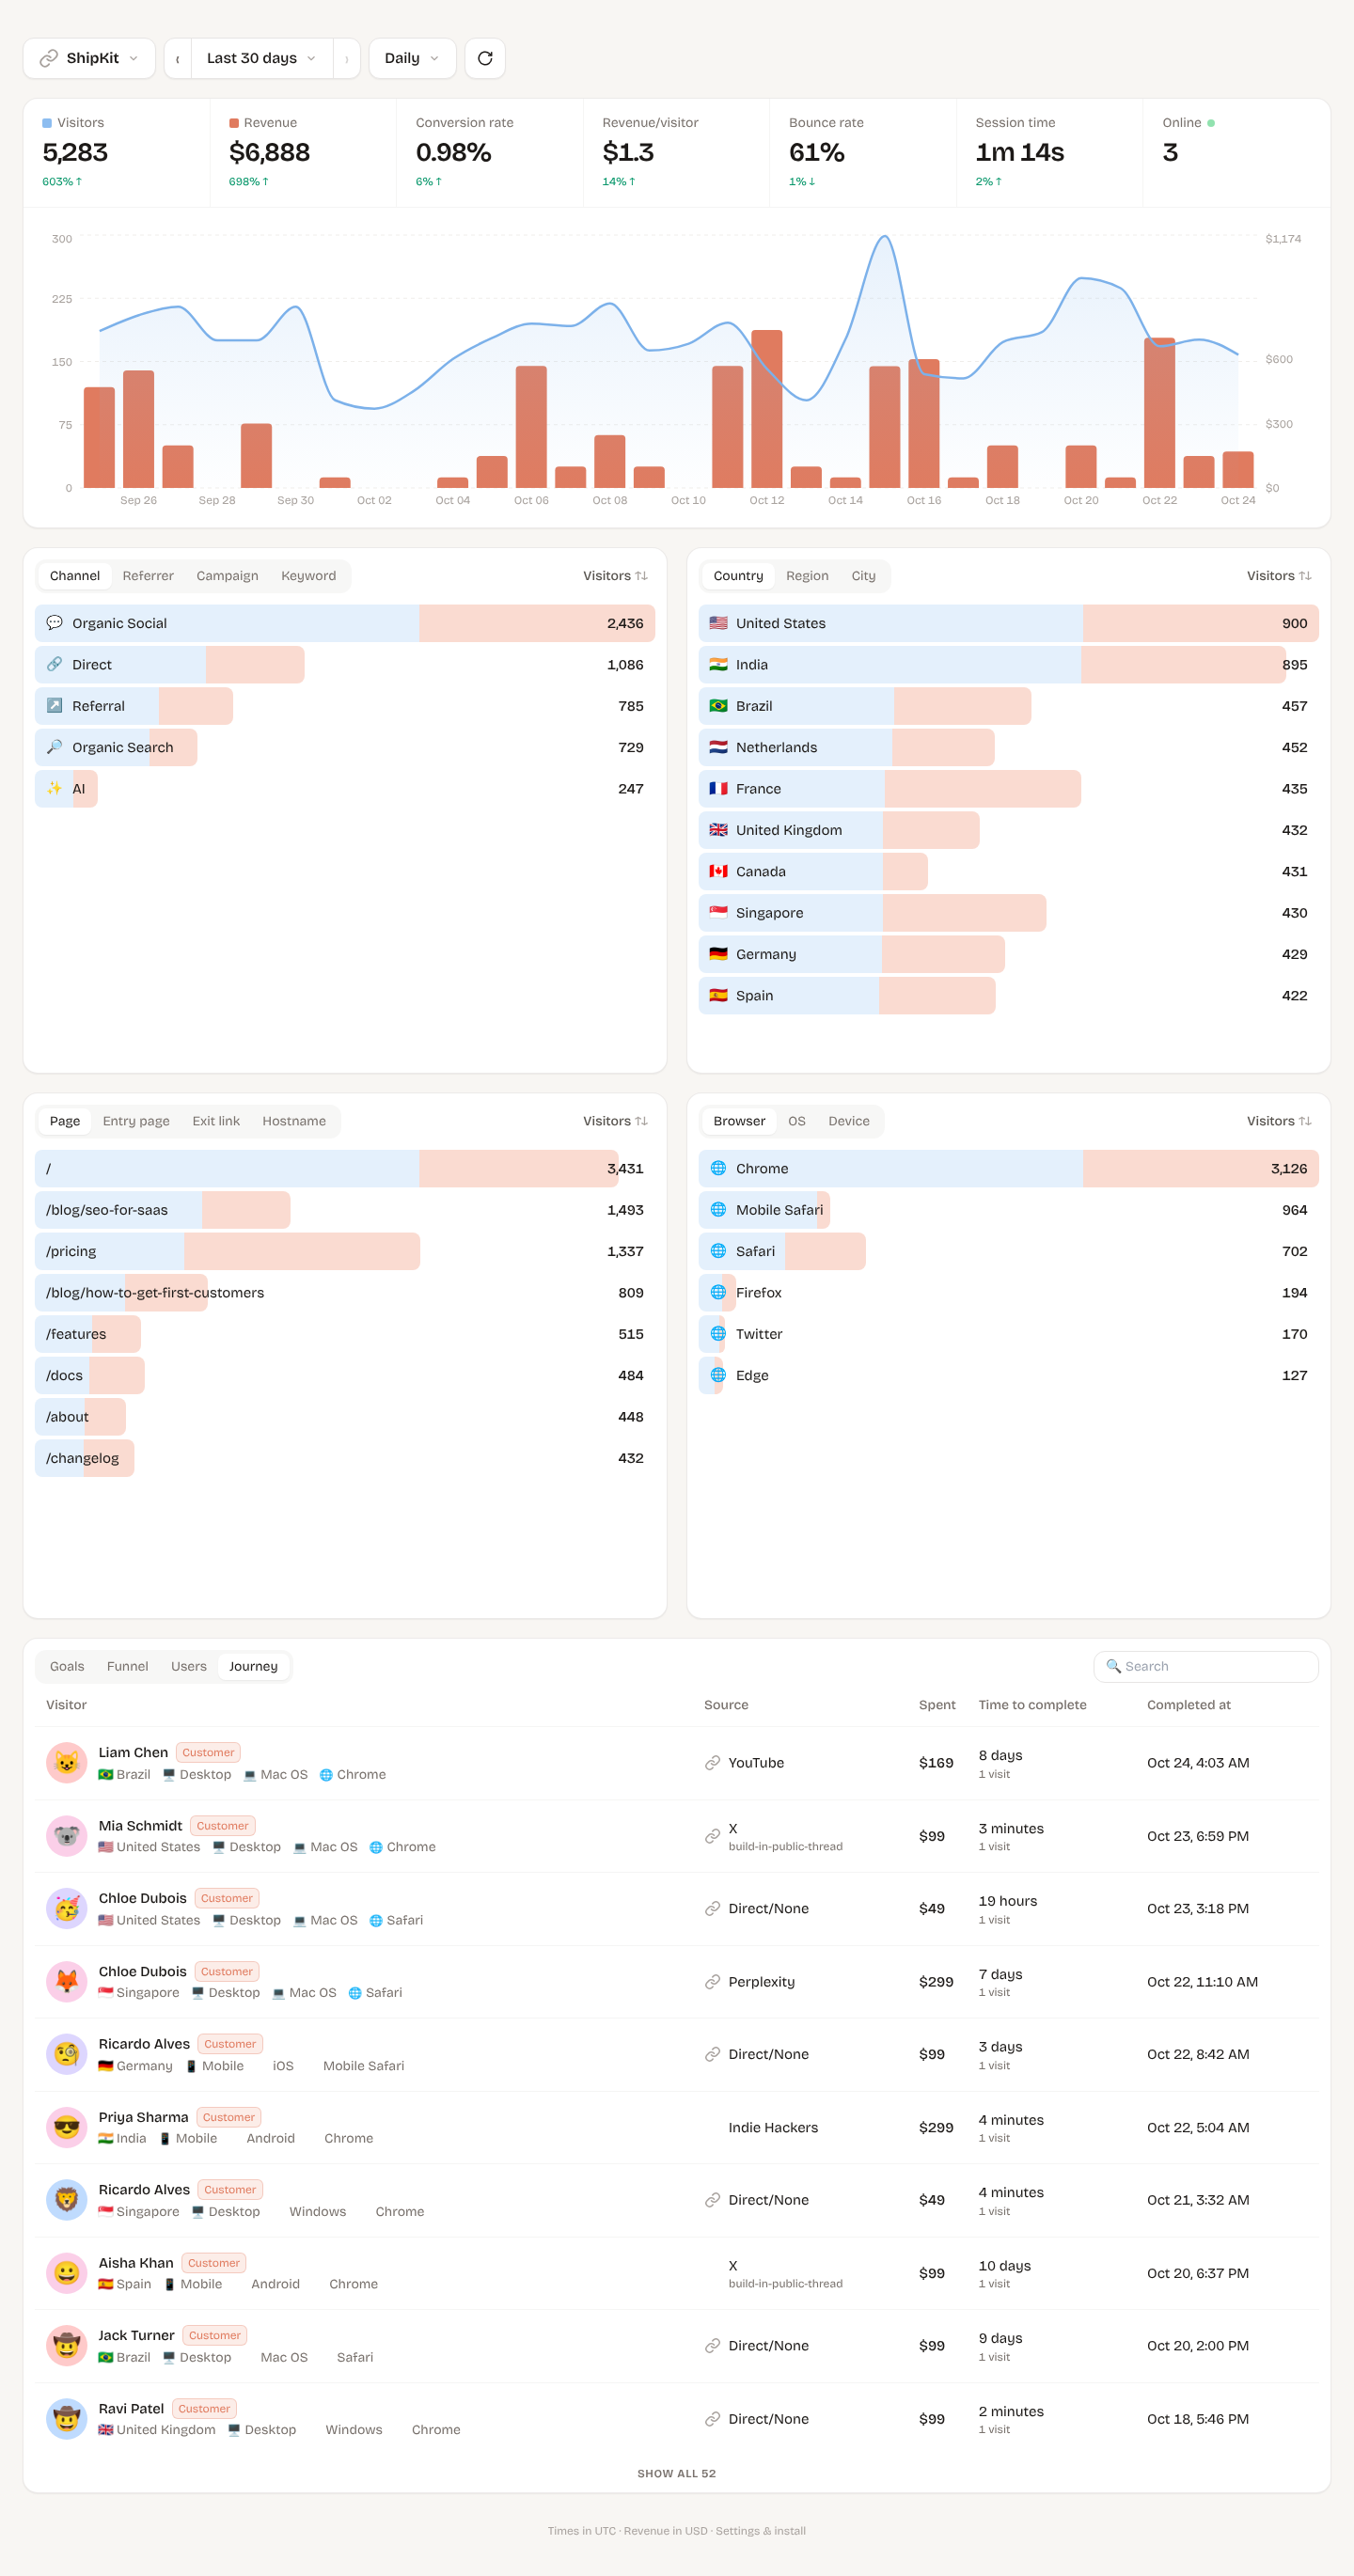

What it tracks
- Visitors, revenue, conversion rate, revenue per visitor, bounce rate, session time, online now, each with a % change against the previous period
- A chart of visitors (line) and revenue (bars), hourly, daily, weekly or monthly
- Date ranges: today, yesterday, last 24h, last 2 days, 7/30/90 days, 12 months, all time and custom, with ‹ › to step back and forward
- Where visitors come from: channel, referrer (X, Google, ChatGPT, Reddit…), campaign (
utm_campaign), keyword (utm_term), ?ref= tags
- Where they are and what they use: country, region, city, browser, OS, device
- What they did: pages, entry pages, exit links (outbound clicks), button clicks and custom goals, funnels
- Who paid: a Journey list of every customer with their source, amount, time to convert, and a full visitor timeline (visit → pages → clicks → payment)
- Live globe (press
M): every visitor on your site right now, on a 3D globe or 2D map, with a live feed of page views, goals and payments, optional sounds, light/dark map and fullscreen. Map tiles from OpenFreeMap, free with no API key
- Anonymous visitors get friendly, stable names like "brown fox"
- Click any row to filter the whole dashboard (for example "only visitors from the launch tweet")
- Multiple websites, one login
Deploy for free (about 10 minutes)
Every person deploys their own copy on their own free Cloudflare account. Your data stays on your account, and you
get your own dashboard with its own password.
You need a free Cloudflare account, Node.js 20+ and Git.
Run these commands in a terminal on your computer. You only do this once; afterwards the app runs on Cloudflare.
1. Download the code and log in to Cloudflare
git clone https://github.com/surendrapandar/minilytics.git
cd minilytics
npm install
npx wrangler login          # opens your browser; click "Allow"
2. Create the database
npx wrangler d1 create minilytics
If Wrangler asks "Would you like Wrangler to add it on your behalf?", answer No. Answer No to the optional
"Cloudflare skills" questions too. Then copy the printed database_id and paste it into wrangler.jsonc, replacing
00000000-0000-0000-0000-000000000000. There must be exactly one entry under d1_databases, with "binding": "DB".
3. Set your password and a signing secret
npx wrangler secret put ADMIN_PASSWORD     # the password you'll log in with (use a strong one)
npx wrangler secret put SESSION_SECRET     # any long random text, e.g. the output of: openssl rand -hex 32
Typing is hidden; that's normal. If asked "There doesn't seem to be a Worker called minilytics… create it?", answer Yes.
4. Deploy
npm run deploy
This builds the dashboard, creates the database tables and deploys. It prints your link, e.g.
https://minilytics.<you>.workers.dev. Open it, log in, add a website and copy its script tag. Each site's Settings
page also has a Copy AI prompt button that lets Claude Code / Cursor do the install in your codebase for you.
If you see fetch failed, it's a network hiccup (VPN, proxy, Wi-Fi). Run npm run deploy again.
You can attach a custom domain such as analytics.yourdomain.com in Cloudflare → Workers & Pages → minilytics →
Settings → Domains & Routes.
Updating later
git stash          # keeps your database_id edit in wrangler.jsonc safe
git pull
git stash pop
npm run deploy
What the free plan covers
| Cloudflare free limit |
What it means here |
| 100,000 Worker requests/day |
About 100k tracked events per day across all sites. The script and dashboard files are static and don't count. |
| 100,000 D1 rows written/day |
About 10k pageviews per day |
| 5M D1 rows read/day |
A dashboard load reads roughly 10 times the sessions in the range, so with 10k visitors/month that's hundreds of loads a day |
| 5 GB D1 storage |
Years of data at side-project traffic |
At 5–10k visitors a month you'll use a few percent of this. If you outgrow it, Cloudflare's Workers Paid plan is $5/month.
Run it as a hosted SaaS (optional)
By default Minilytics is single-user with a password. Set the Google values below and it becomes a hosted product:
a landing page with pricing, Sign in with Google, a paid plan through Dodo Payments, and every customer sees only
their own sites. Tracking stops (quietly) for sites whose owner's plan has ended.
npx wrangler secret put GOOGLE_CLIENT_ID        # Google Cloud → Credentials → OAuth client (Web)
npx wrangler secret put GOOGLE_CLIENT_SECRET    # redirect URI: https://YOUR-DOMAIN/api/auth/google/callback
npx wrangler secret put ADMIN_EMAILS            # your Google email(s): free, and you keep the existing sites
npx wrangler secret put PLAN_CHECKOUT_URL       # Dodo payment link for the plan
npx wrangler secret put PLAN_PRODUCT_ID         # that product's id (pdt_...)
npx wrangler secret put BILLING_WEBHOOK_SECRET  # Dodo webhook → https://YOUR-DOMAIN/api/billing/webhook
npx wrangler secret put PLAN_PRICE              # e.g. $29
npx wrangler secret put PLAN_INTERVAL           # lifetime | month | year
npx wrangler secret put PLAN_SPOTS              # e.g. 5 ("3 of 5 spots left"); optional
npx wrangler secret put PLAN_NEXT_PRICE         # e.g. $49 ("…, then $49"); optional
npx wrangler secret put PLAN_TIERS              # optional: "$29:5, $49:pdt_b:5, $100" steps the price up as spots sell
                                                # (one Dodo product per price; no pdt_ = sold out or only announced).
                                                # Replaces PRICE/SPOTS/NEXT_PRICE; sold-out prices show as "5 sold at $29"
npx wrangler secret put SUPPORT_EMAIL           # shown on pricing, billing and legal pages
npm run deploy
Subscribe the billing webhook to payment.succeeded, subscription.* and refund.succeeded. A one-time product
(PLAN_INTERVAL=lifetime) gives lifetime access; a subscription gives access until it expires or is refunded.
The Terms, Privacy and Refund pages (/terms, /privacy, /refund) are plain-language starting points: review them.
Install on a website
<script defer data-website-id="SITE_ID" src="https://YOUR-MINILYTICS-HOST/js/script.js"></script>
- Button clicks / goals:
<button data-ml-goal="signup_click">, or window.minilytics('goal', 'signup', { plan: 'pro' })
- Identify logged-in users:
window.minilytics('identify', { user_id, email, name })
- Ignore your own visits: open
https://yoursite.com/?ml_ignore=true once per browser
- Single-page apps (Next.js, React Router…) are handled automatically
- Subdomains:
app.yoursite.com and yoursite.com share the same visitor, because the cookie is set on the root domain
Tracking a specific tweet / article
X, Medium, LinkedIn and others hide which exact post sent someone; the referrer only says t.co or medium.com.
To see the exact post, tag each link. Settings has a link builder for this:
https://yoursite.com/?utm_source=x&utm_medium=social&utm_campaign=launch-tweet
https://yoursite.com/?ref=launch-tweet            (short version)
For SEO, Google never shares the search keyword, but Entry page with the Google referrer tells you which
article people found you through.
Revenue attribution
Pick your provider in site settings → Connect payments.
Dodo Payments
- In Dodo → Developer → Webhooks, add
https://YOUR-HOST/api/webhooks/dodo/SITE_ID and subscribe to
payment.succeeded and refund.succeeded. Paste the signing secret (whsec_…) into the site settings.
- Pass the visitor cookies as metadata when creating a checkout:
const jar = await cookies(); // next/headers
await dodo.checkoutSessions.create({
  product_cart: [{ product_id: 'pdt_xxx', quantity: 1 }],
  metadata: { ml_visitor_id: jar.get('ml_vid')?.value ?? '', ml_session_id: jar.get('ml_sid')?.value ?? '' },
});
Using Dodo payment links? The script adds metadata_ml_visitor_id / metadata_ml_session_id to any
checkout.dodopayments.com link when it's clicked. That metadata doesn't always reach the payment, so also do step 3.
- Recommended: set the checkout's return / redirect URL to a page on your site (e.g.
/thanks) that loads the
script. Dodo adds ?payment_id=… to it, and Minilytics uses that to link the payment to the exact visitor even when
metadata doesn't come through.
Stripe
- In Stripe → Developers → Webhooks, add
https://YOUR-HOST/api/webhooks/stripe/SITE_ID and subscribe to
checkout.session.completed, invoice.paid and charge.refunded. Paste the signing secret (whsec_…) into the
site settings.
- Pass the visitor cookies as metadata when creating a Checkout Session, and add
{CHECKOUT_SESSION_ID} to the success URL:
const jar = await cookies(); // next/headers
await stripe.checkout.sessions.create({
  // ...your existing options
  success_url: 'https://yoursite.com/thanks?session_id={CHECKOUT_SESSION_ID}',
  metadata: { ml_visitor_id: jar.get('ml_vid')?.value ?? '', ml_session_id: jar.get('ml_sid')?.value ?? '' },
});
Using Stripe Payment Links (buy.stripe.com)? The script puts the visitor in client_reference_id when the link is
clicked (unless you already set your own). Set the link's confirmation page to redirect to
https://yoursite.com/thanks?session_id={CHECKOUT_SESSION_ID} so the payment is also matched on the return page.
Subscription renewals (invoice.paid) are credited to the visitor who first subscribed. Refunds are subtracted.
One Stripe account selling for several of your sites? Point each site's webhook at Stripe as usual: a payment is
skipped by sites it clearly isn't for (the buyer was only seen on another site, or a renewal from a customer who only
paid on another site). To make it explicit, add ml_site_id: '<SITE_ID>' to the checkout's metadata.
How credit is given
A payment goes to the paying visitor's last visit that came from a real source (last non-direct
touch). So "clicked a tweet, came back directly 17 days later and paid" is credited to the tweet. If metadata is
missing, Minilytics tries, in order: the return page (?payment_id= / ?session_id=), an earlier payment by the same customer
(renewals), an email you identify()'d, and finally checkout timing (used only when exactly one visitor clicked a Dodo or
Stripe checkout link in the 3 hours before the payment). The Journey tab shows how each payment was matched, and Try
matching again re-runs this for older payments.
Refunds are subtracted from revenue.
Other providers (API)
Any other provider can use the generic API (the key is in site settings):
curl -X POST https://YOUR-HOST/api/v1/payments -H "Authorization: Bearer ml_..." -H "Content-Type: application/json" \
  -d '{"transaction_id":"txn_1","amount":29.99,"currency":"USD","visitor_id":"<ml_vid cookie>","email":"[email protected]"}'
Accuracy notes
No analytics tool is 100% accurate. These are the main gaps and how this project handles them:
- Ad blockers block some analytics domains. Proxy the script through your own domain (Settings shows a Next.js
rewrite). Payments are always recorded by the webhook, even when the visitor's browser blocked tracking.
- Safari keeps cookies set by JavaScript for at most 7 days. A Safari visitor who returns after more than a week counts as new. The
email fallback above recovers most of these payments.
- Bots are filtered by user agent and the
navigator.webdriver flag.
- Revenue in a different currency than the site's is converted only when Dodo gives a settlement amount in the site's currency.
Local development
cp .dev.vars.example .dev.vars        # password: change-me
npm run db:migrate:local
npm run build && npm run dev:api      # http://localhost:8787
npm run dev:web                       # optional: hot-reloading dashboard on http://localhost:5173

npm run seed                          # optional: 30 days of demo data ("ShipKit" site)
npm test                              # unit tests
npm run smoke                         # end-to-end test against the running dev server
node scripts/smoke-hosted.mjs         # hosted-mode test (see the comment at the top for how to start it)
How it's built
public/js/script.js: the tracker, 9 KB (about 3.5 KB gzipped). It handles cookies, pageviews, engaged time, goals, outbound links and Dodo link taggingsrc/worker: a Hono app on Cloudflare Workers that handles event ingestion, the Dodo webhook, the payments and goals API, and stats queries on D1 (SQLite)src/dashboard: the React dashboard (Vite, Tailwind, Recharts), served as static files by the same Workermigrations/: the database schema
Contributing
Issues and pull requests are welcome. Before opening a PR, run npm run typecheck && npm test.
License
MIT: free to use, modify and self-host, including commercially.






 Minilytics 是一款自托管的、以收入为核心的网站分析工具,面向独立开发者和个人创业者。它能显示访客从哪里来、在你的网站上做了什么,以及哪个流量来源真正带来了收入。