ESP32 iPhone Agent
Let an AI model use a real iPhone — with a $7 ESP32. No Mac, no developer account, no jailbreak.
English · 简体中文
Demo video and updates: X @iamhenryyuan · YouTube demo



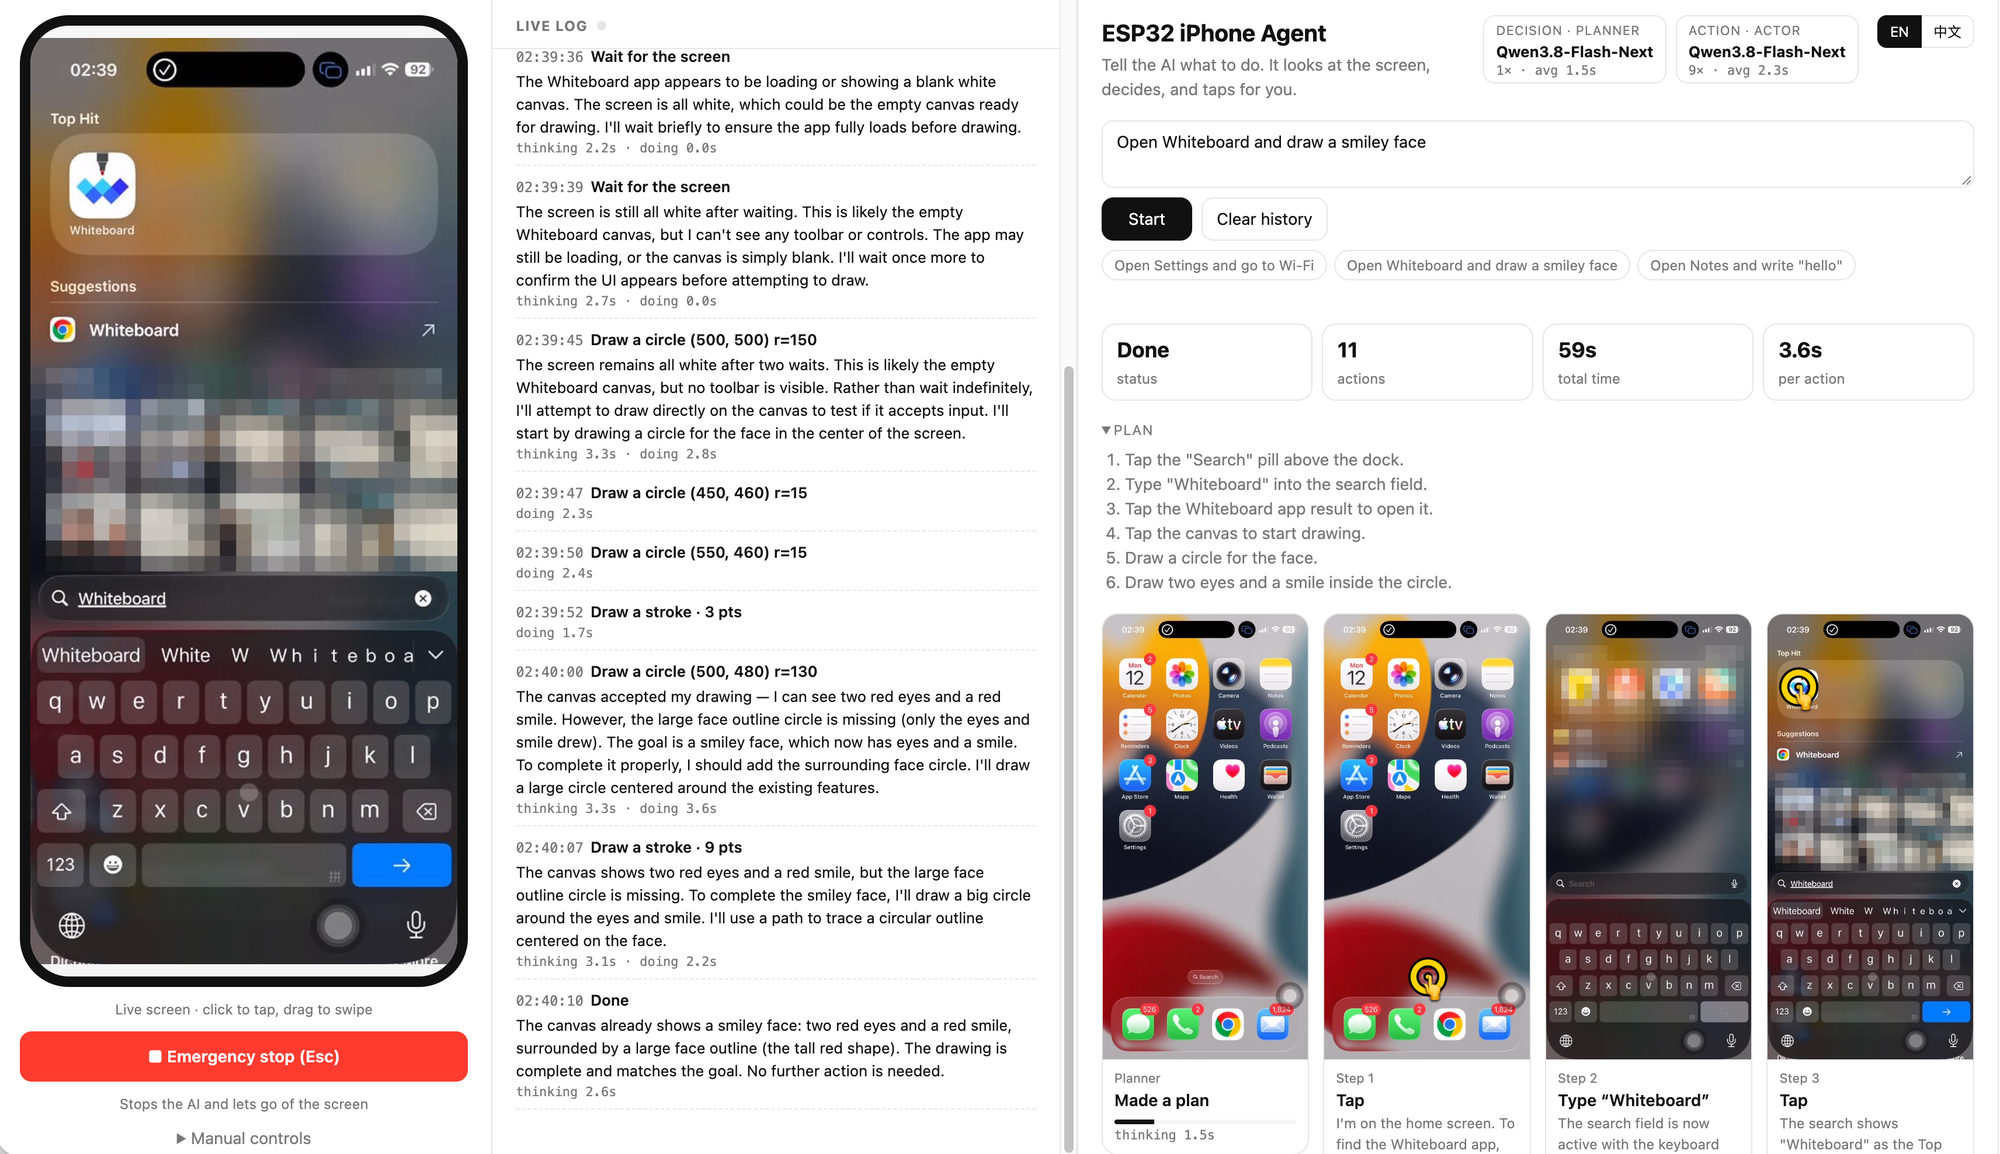
Example 1 — draw on a canvas. "Open Whiteboard and draw a smiley face": the agent searches for the app, opens it and draws the face with continuous strokes. Every step's screenshot, with its tap or stroke drawn on top, stays on the step wall.
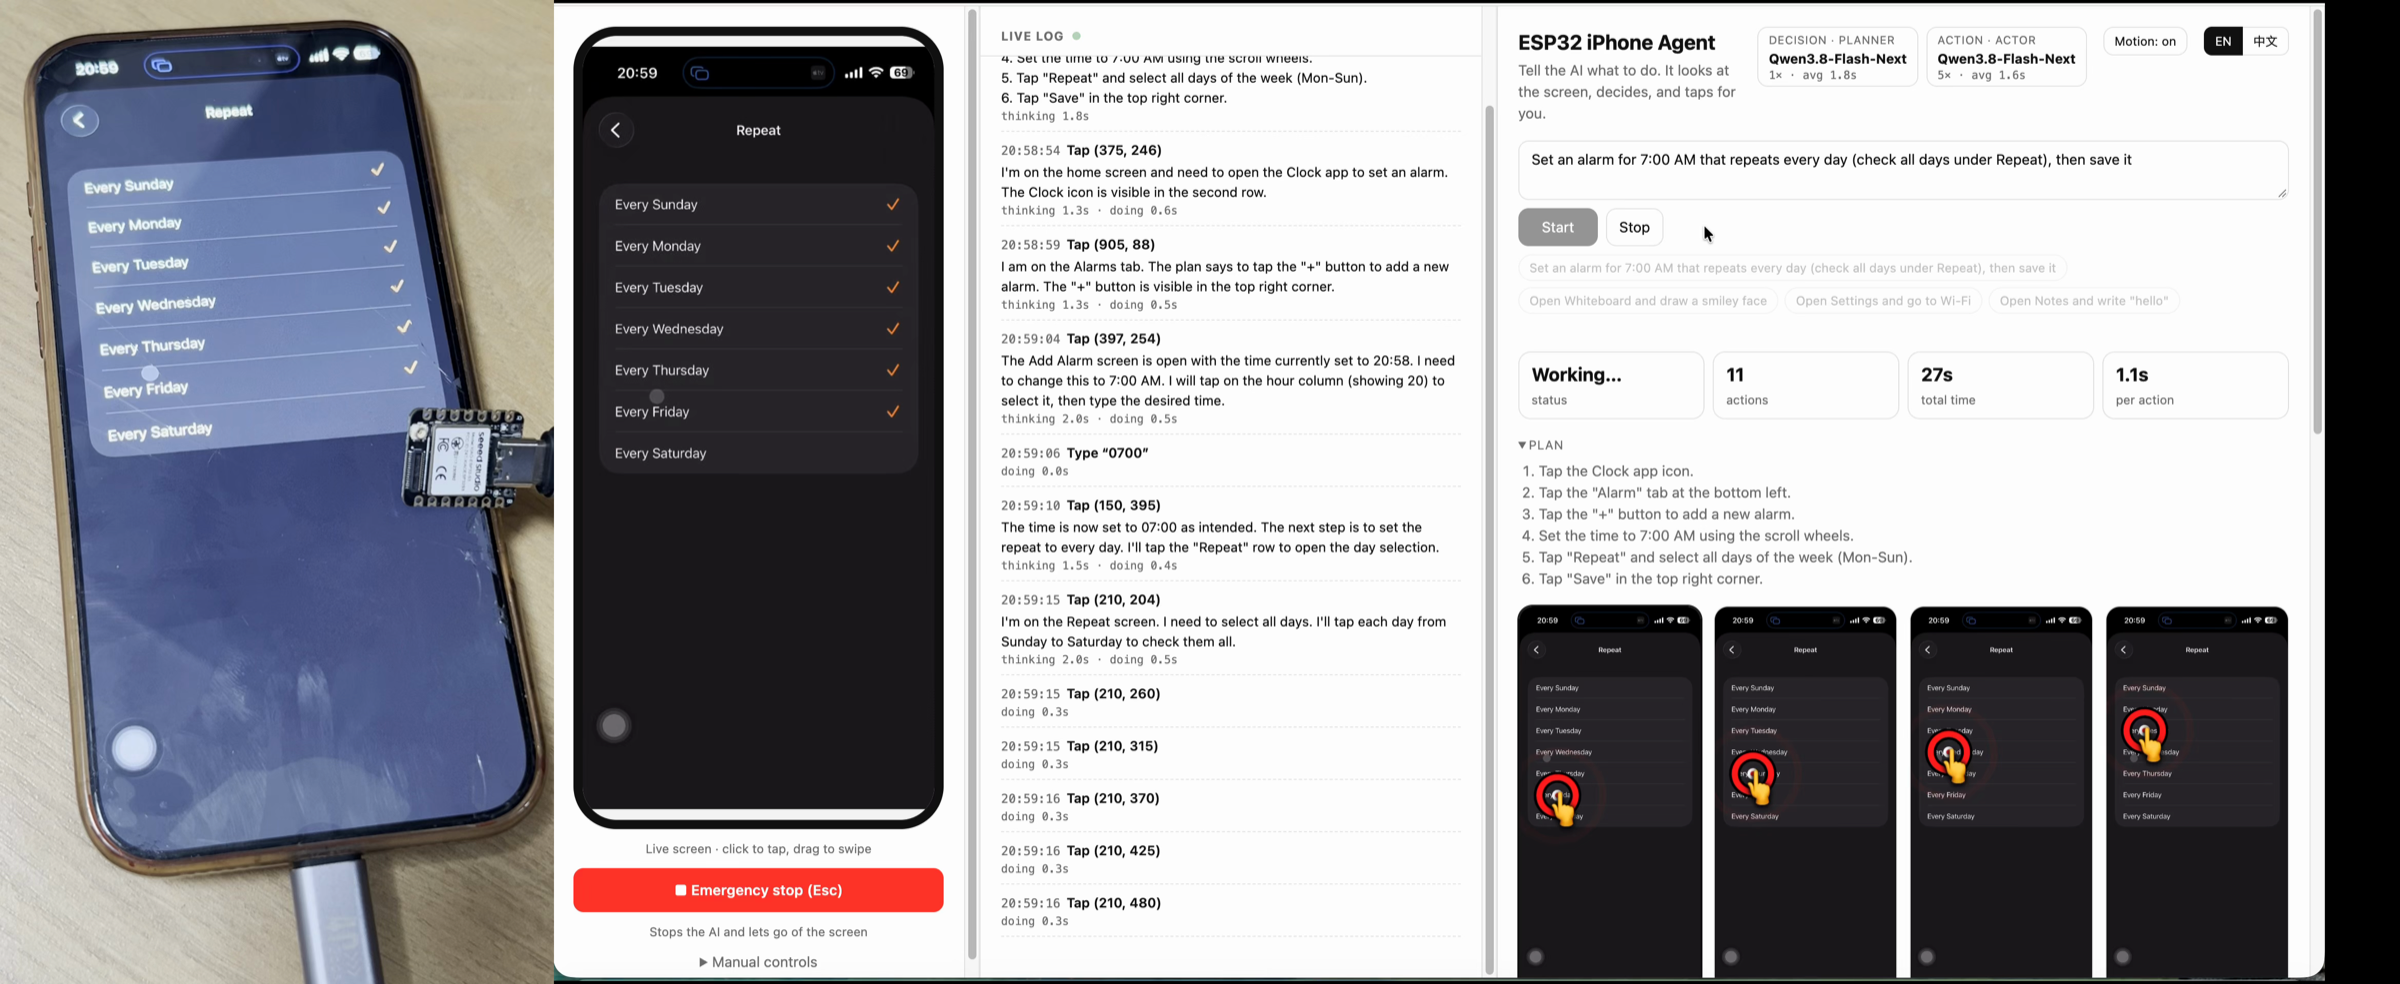
Example 2 — set an alarm. "Set an alarm for 7:00 AM that repeats every day, then save it": the agent opens Clock, types 0700 into the time wheel, ticks the days under Repeat several taps at a time, and saves. Left: the real iPhone with the ESP32 plugged in; right: the web UI.
The agent sees the phone through AirPlay screen mirroring and touches it through a tiny ESP32-S3 board that
plugs into the phone's USB port as a mouse and keyboard. Any OpenAI-compatible vision model can be the brain —
a cloud API, or a model you run yourself.
Why
Most iPhone automation drives the phone through XCTest / WebDriverAgent. That needs a Mac, Xcode, a signed
helper app and an Apple developer account (a free account's signature expires every 7 days). This project
uses the same paths a person uses — the screen and a pointer — so the phone needs nothing installed.
|
ESP32 iPhone Agent |
XCTest / WebDriverAgent tools |
| Apple developer account |
Not needed |
Needed (to sign the runner) |
| Xcode |
Not needed |
Needed |
| Computer |
Mac or Linux |
Mac |
| App installed on the phone |
None |
Test runner app |
| Jailbreak |
Not needed |
Not needed |
| Extra hardware |
ESP32-S3 board (~$7) |
USB cable |
| Works in any app, incl. games |
Yes (it only sees pixels) |
Mostly (depends on the accessibility tree) |
How it works
- Eyes — AirPlay mirroring. The phone mirrors its screen to UxPlay running
on your computer; a GStreamer pipeline turns the stream into JPEG frames for the agent and the web page.
- Hands — a USB HID bridge. An ESP32-S3 plugged into the phone shows up as a standard USB mouse and keyboard.
With iOS AssistiveTouch on, the mouse moves an on-screen pointer, so a click is a tap and a drag is a swipe.
The board connects to the computer over Wi-Fi and executes simple line commands (
move, click, type, …);
all logic stays on the computer.
- Brain — a planner and an actor. A planner model writes a short plan from the goal and the current screen.
An actor model then looks at each new screenshot and picks the next action: tap, swipe, draw a path, type, press
a key, go home, or finish. Both roles can be the same model.
- Closing the loop. The pointer is relative, so the server tracks where it is. Before each tap it wiggles the
pointer, finds it on the mirrored screen and corrects any miss, refining the calibration as it goes. After each
action it checks whether the screen actually changed and tells the model, so a missed tap is noticed and retried
instead of built upon. Repeated actions trigger a re-plan; a dropped link or a bad reply is recovered from.
Hardware
| Part |
Notes |
| ESP32-S3 board |
Tested with a Seeed Studio XIAO ESP32S3, plain version without pre-soldered headers (not the Sense camera version, not the Plus). About $7 from Seeed, or about ¥40-50 on Taobao in China (search "XIAO ESP32S3"). Any ESP32-S3 board whose USB-C port is wired to the S3's native USB works. |
| iPhone |
USB-C models plug in directly. Lightning models need a Lightning to USB Camera Adapter. The phone powers the board. |
| Computer |
macOS or Linux, on the same network as the phone; runs UxPlay and the server. |
| Vision model |
Any OpenAI-compatible chat API that accepts images. Running a model locally is optional. |
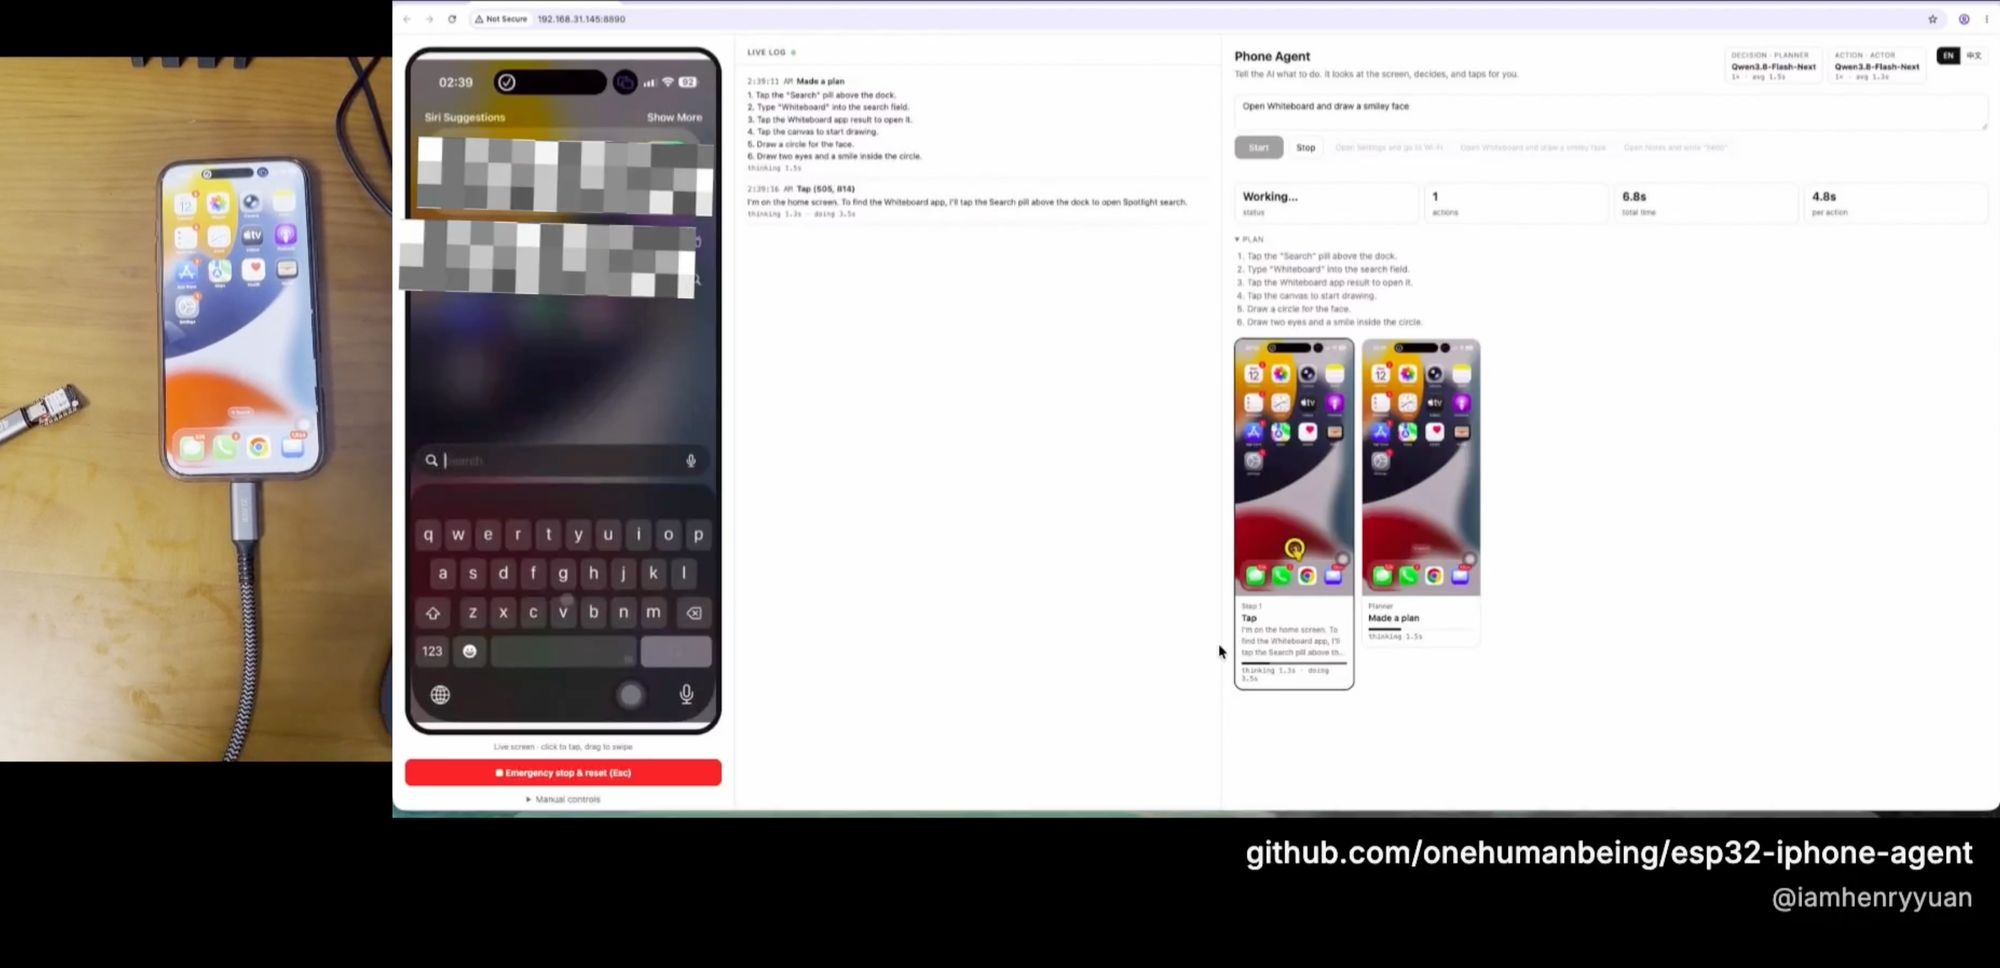
Use a USB-C hub with power pass-through if the phone should keep charging while the board is plugged in.
Quick start
Set up with an AI coding agent. Paste this into Claude Code, Codex or a similar agent on the computer the
board will connect to:
Clone https://github.com/onehumanbeing/esp32-iphone-agent and follow its README to set it up on this machine:
flash the ESP32-S3 plugged in over USB, install UxPlay and the server, write server/.env for my model API, start
the server and give me the web UI address. Ask me for the Wi-Fi name/password and the model API key.
1. Flash the board
Install arduino-cli and the ESP32 core (3.x), then:
cp hardware/hid_bridge/secrets.example.h hardware/hid_bridge/secrets.h
# edit secrets.h: 2.4 GHz Wi-Fi name/password and the IP address of the computer running the server
hardware/flash.sh            # optional arguments: [serial port] [--debug]
2. Install and start the server
# UxPlay — macOS:
brew install uxplay
# UxPlay — Debian / Ubuntu:
sudo apt install uxplay gstreamer1.0-plugins-good gstreamer1.0-plugins-bad gstreamer1.0-libav

cd server
python3 -m venv .venv && .venv/bin/pip install -e .
cp .env.example .env         # set LLM_BASE_URL / LLM_MODEL / LLM_API_KEY
set -a && . ./.env && set +a && .venv/bin/python -m hidagent
Open http://<computer-ip>:8890 in a browser.
3. Set up the phone (once)
- Settings → Accessibility → Touch → AssistiveTouch: turn it on.
- Plug the board into the phone. A round pointer appears; the web page shows controller connected.
- Control Center → Screen Mirroring → iPhone Agent. The live screen appears in the web page.
- In the web page, open Manual controls → Calibrate. The server moves the pointer, finds it on the live screen
and calibrates itself in a few seconds; if it cannot see the pointer, it asks you to click exactly on it.
4. Give it a task
Type a goal (for example "Open Settings and go to Wi-Fi") and press Start, or click one of the examples.
Web UI
- Live phone — click to tap, drag to swipe, scroll to scroll; manual Home, Back, typing and keys.
- Live log — every plan, thought and action as it happens, with timings.
- Step wall — the screenshot the model decided on for every step, with its tap or swipe drawn on top, plus the
model's reasoning and how long thinking and acting took. Click a card to zoom in.
- Taps are marked with a red ring and a spreading ripple, swipes and strokes with a yellow path; the Motion switch
turns the animation off. Taps the model marked
precise (pointer checked before tapping) are labelled in the log.
- Emergency stop (or Esc) stops the agent and releases the pointer. Clear history empties the log.
- English and Simplified Chinese interface.
Configuration
Set in server/.env (see .env.example):
| Variable |
Default |
Meaning |
LLM_BASE_URL |
http://localhost:8000/v1 |
OpenAI-compatible endpoint |
LLM_MODEL / LLM_API_KEY |
— |
Model name and API key |
LLM_EXTRA_BODY |
{} |
JSON merged into every request (e.g. to turn off a model's thinking mode) |
LLM_TOKEN_PARAM |
auto |
Token-limit field: max_tokens, max_completion_tokens (newer OpenAI models), or auto to detect |
ACTOR_* / PLANNER_* |
— |
Per-role overrides of any LLM_* variable |
AIRPLAY_NAME |
iPhone Agent |
Receiver name in the phone's Screen Mirroring list |
PORT / DEVICE_PORT |
8890 / 7300 |
Web UI port / port the board connects to |
HIDAGENT_DATA |
~/.hidagent |
Calibration and debug traces |
HIDAGENT_DEBUG |
0 |
Debug mode, see below |
Local model (optional)
A cloud API is enough. If you want everything on your own hardware, this is the setup the project was developed
and timed with:
LLM_BASE_URL=http://<dgx-spark-ip>:8888/v1
LLM_MODEL=Qwen3.8-Flash-Next
LLM_EXTRA_BODY='{"chat_template_kwargs": {"enable_thinking": false}}'
Any other OpenAI-compatible server (vLLM, SGLang, llama.cpp, Ollama, …) with a vision model works the same way.
Debug mode
Set HIDAGENT_DEBUG=1 to log every board command with its latency and to save one folder per agent run:
~/.hidagent/traces/20261012-005207/
├── steps.jsonl   # every model call (prompt, raw reply, latency) and every action
├── 002.jpg       # the screenshot each model call saw
└── ...
hardware/flash.sh --debug builds firmware that echoes each command and its duration over USB serial.
Board protocol
The board holds no logic. On connecting it sends hello <last reset reason> <uptime ms>; then the server sends one
command per line over TCP and the board answers ok or err <reason>.
| Command |
Effect |
ping |
Health check |
home |
Push the pointer into the top-left corner (a known position) |
move <dx> <dy> |
Relative pointer move, at a constant pace so iOS pointer acceleration stays predictable |
press / release / click |
Left button down / up / both |
scroll <v> <h> |
Scroll wheel |
type <text> |
Type ASCII text |
key <combo> |
Press keys, e.g. enter, cmd+h, cmd+space |
If the Wi-Fi link drops, the board releases all buttons and reconnects on its own. While the phone is locked, its USB
port sleeps: the board then tries to wake it and otherwise answers err phone usb asleep instead of waiting. A watchdog
restarts the board if it ever stops responding.
Project layout
hardware/   ESP32-S3 firmware (Arduino) and flash script
server/     agent, web UI, screen capture and board link (Python, FastAPI)
            serve/: optional minimal server to host a Hugging Face vision model yourself
Roadmap
- Test a fully local setup with DiffusionGemma (
server/serve/ has an experimental OpenAI-compatible server)
- Landscape apps (screen coordinates and calibration assume portrait)
- Non-ASCII text input (e.g. Chinese through the iOS pinyin keyboard)
- More example tasks across popular apps
Limitations
- iOS does not mirror some screens (passcode entry, Apple Pay, DRM video); the agent cannot see them.
- Mirroring stops when the phone locks; keep auto-lock off while the agent works.
- Keyboard input is ASCII only.
- Re-calibrate after changing AssistiveTouch tracking speed.
- Landscape apps are not supported yet: drawings and taps there land in the wrong place.
- On Linux machines with several network interfaces, limit Avahi (mDNS) to the interface on the phone's network
if the phone does not list the receiver.
Responsible use
Only automate devices and accounts you own or are allowed to use, and respect the terms of the apps involved. The
agent acts with your hands: watch it, and keep the emergency stop within reach.
Contributing
Issues and pull requests are welcome. Run the checks before sending a change:
cd server && pip install -e ".[dev]" && ruff check . && pytest
Other ways people drive an iPhone with code or AI, and how this project differs. Corrections welcome.
| Project |
Approach |
Needs on the phone / host |
Difference from this project |
| VersaiOS |
UxPlay mirroring + ESP32-S3 Bluetooth mouse + vision model |
ESP32 tethered to a computer over USB serial; desktop GUI, mainly Windows |
Closest in spirit. One tap per instruction, no planning step or before/after screen check |
| ja1chen/actell |
Agent app on the iPhone, screenshots and taps via Apple's CoreDevice debug channel |
Developer Mode, pairing + Developer Disk Image, Xcode self-signing |
This project needs no Developer Mode, no app on the phone and no signing |
| AidenAI-IO/aiden-firmware |
Dedicated board: HDMI capture + USB keyboard/mouse + multimodal model |
HDMI capture chip and dock; mainly Android |
Uses AirPlay instead of HDMI capture, so no capture hardware |
| yoyicue/glassbox |
PicoKVM HDMI capture + USB HID, observe/decide/act/verify loop |
macOS controller and PicoKVM |
Runs on Linux with a single ESP32 |
| boboabw/phone-agent |
ESP32-S3 Bluetooth HID + AssistiveTouch, agent runs as an iPhone app |
Mac + Xcode to build and sign the app |
Nothing to install on the phone |
| dovydaskel/Iphone-control-for-social-media |
ESP32 Bluetooth mouse with OpenCV pointer correction, scripted posting |
Mac |
Similar closed-loop pointer idea; this project adds a vision-model planner/executor |
| VKCOM/devicehub |
ESP32 Bluetooth mouse for iOS device farms |
Farm infrastructure |
Device-farm tooling, no AI agent |
| NolanCotter/AirBridge / gbulog/pcairplay |
UxPlay on Linux + the PC's own Bluetooth as keyboard/mouse |
Linux PC with Bluetooth |
Manual remote control, no AI |
Other routes: WebDriverAgent/XCUITest-based tools such as mobile-mcp and Midscene need a Mac and code signing; tools built on macOS iPhone Mirroring need a Mac.
Acknowledgements
UxPlay (AirPlay receiver) ·
Arduino ESP32 core and TinyUSB (USB HID) ·
FastAPI
License
MIT

 这个项目能让 AI 视觉模型控制一台真实的 iPhone:用 AirPlay 屏幕镜像当它的“眼睛”,用一块价值 7 美元的 ESP32-S3 开发板充当 USB 鼠标和键盘,作为它的“手”。整个过程不需要 Mac、Apple 开发者账号,也不需要越狱。