🇨🇳
🇰🇷
🇪🇸
🇻🇳
🇧🇷
🇷🇺

I was looking for a tutorial/book that would teach me how to start to use FFmpeg as a library (a.k.a. libav) and then I found the "How to write a video player in less than 1k lines" tutorial.
Unfortunately it was deprecated, so I decided to write this one.
Most of the code in here will be in C but don't worry: you can easily understand and apply it to your preferred language.
FFmpeg libav has lots of bindings for many languages like python, go and even if your language doesn't have it, you can still support it through the ffi (here's an example with Lua).
We'll start with a quick lesson about what is video, audio, codec and container and then we'll go to a crash course on how to use FFmpeg command line and finally we'll write code, feel free to skip directly to the section Learn FFmpeg libav the Hard Way.
Some people used to say that the Internet video streaming is the future of the traditional TV, in any case, the FFmpeg is something that is worth studying.
Table of Contents
Intro
video - what you see!
If you have a sequence series of images and change them at a given frequency (let's say 24 images per second), you will create an illusion of movement.
In summary this is the very basic idea behind a video: a series of pictures / frames running at a given rate.

Zeitgenössische Illustration (1886)
audio - what you listen!
Although a muted video can express a variety of feelings, adding sound to it brings more pleasure to the experience.
Sound is the vibration that propagates as a wave of pressure, through the air or any other transmission medium, such as a gas, liquid or solid.
In a digital audio system, a microphone converts sound to an analog electrical signal, then an analog-to-digital converter (ADC) — typically using pulse-code modulation (PCM) - converts the analog signal into a digital signal.

Source
codec - shrinking data
CODEC is an electronic circuit or software that compresses or decompresses digital audio/video. It converts raw (uncompressed) digital audio/video to a compressed format or vice versa.
https://en.wikipedia.org/wiki/Video_codec
But if we chose to pack millions of images in a single file and called it a movie, we might end up with a huge file. Let's do the math:
Suppose we are creating a video with a resolution of 1080 x 1920 (height x width) and that we'll spend 3 bytes per pixel (the minimal point at a screen) to encode the color (or 24 bit color, what gives us 16,777,216 different colors) and this video runs at 24 frames per second and it is 30 minutes long.
toppf = 1080 * 1920 //total_of_pixels_per_frame
cpp = 3 //cost_per_pixel
tis = 30 * 60 //time_in_seconds
fps = 24 //frames_per_second

required_storage = tis * fps * toppf * cpp
This video would require approximately 250.28GB of storage or 1.19 Gbps of bandwidth! That's why we need to use a CODEC.
container - a comfy place for audio and video
A container or wrapper format is a metafile format whose specification describes how different elements of data and metadata coexist in a computer file.
https://en.wikipedia.org/wiki/Digital_container_format
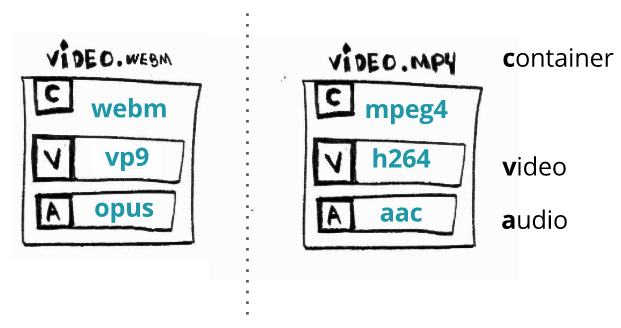
A single file that contains all the streams (mostly the audio and video) and it also provides synchronization and general metadata, such as title, resolution and etc.
Usually we can infer the format of a file by looking at its extension: for instance a video.webm is probably a video using the container webm.
FFmpeg - command line
A complete, cross-platform solution to record, convert and stream audio and video.
To work with multimedia we can use the AMAZING tool/library called FFmpeg. Chances are you already know/use it directly or indirectly (do you use Chrome?).
It has a command line program called ffmpeg, a very simple yet powerful binary.
For instance, you can convert from mp4 to the container avi just by typing the follow command:
$ ffmpeg -i input.mp4 output.avi
We just made a remuxing here, which is converting from one container to another one.
Technically FFmpeg could also be doing a transcoding but we'll talk about that later.
FFmpeg does have a documentation that does a great job of explaining how it works.
# you can also look for the documentation using the command line

ffmpeg -h full | grep -A 10 -B 10 avoid_negative_ts
To make things short, the FFmpeg command line program expects the following argument format to perform its actions ffmpeg {1} {2} -i {3} {4} {5}, where:
- global options
- input file options
- input url
- output file options
- output url
The parts 2, 3, 4 and 5 can be as many as you need.
It's easier to understand this argument format in action:
# WARNING: this file is around 300MB
$ wget -O bunny_1080p_60fps.mp4 http://distribution.bbb3d.renderfarming.net/video/mp4/bbb_sunflower_1080p_60fps_normal.mp4

$ ffmpeg \
-y \ # global options
-c:a libfdk_aac \ # input options
-i bunny_1080p_60fps.mp4 \ # input url
-c:v libvpx-vp9 -c:a libvorbis \ # output options
bunny_1080p_60fps_vp9.webm # output url
This command takes an input file mp4 containing two streams (an audio encoded with aac CODEC and a video encoded using h264 CODEC) and convert it to webm, changing its audio and video CODECs too.
We could simplify the command above but then be aware that FFmpeg will adopt or guess the default values for you.
For instance when you just type ffmpeg -i input.avi output.mp4 what audio/video CODEC does it use to produce the output.mp4?
Werner Robitza wrote a must read/execute tutorial about encoding and editing with FFmpeg.
Common video operations
While working with audio/video we usually do a set of tasks with the media.
Transcoding
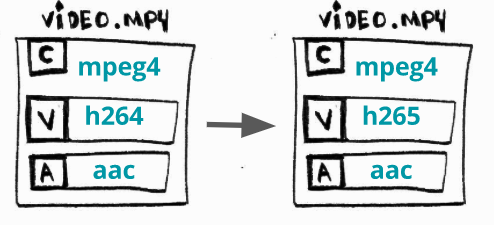
What? the act of converting one of the streams (audio or video) from one CODEC to another one.
Why? sometimes some devices (TVs, smartphones, console and etc) doesn't support X but Y and newer CODECs provide better compression rate.
How? converting an H264 (AVC) video to an H265 (HEVC).
$ ffmpeg \
-i bunny_1080p_60fps.mp4 \
-c:v libx265 \
bunny_1080p_60fps_h265.mp4
Transmuxing
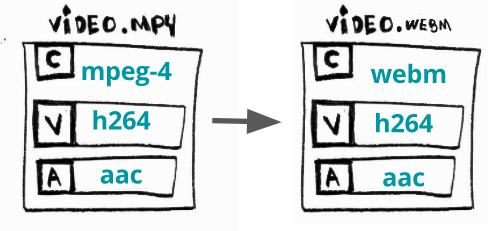
What? the act of converting from one format (container) to another one.
Why? sometimes some devices (TVs, smartphones, console and etc) doesn't support X but Y and sometimes newer containers provide modern required features.
How? converting a mp4 to a ts.
$ ffmpeg \
-i bunny_1080p_60fps.mp4 \
-c copy \ # just saying to ffmpeg to skip encoding
bunny_1080p_60fps.ts
Transrating
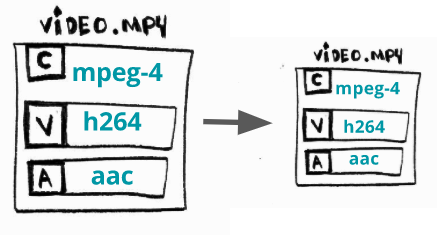
What? the act of changing the bit rate, or producing other renditions.
Why? people will try to watch your video in a 2G (edge) connection using a less powerful smartphone or in a fiber Internet connection on their 4K TVs therefore you should offer more than one rendition of the same video with different bit rate.
How? producing a rendition with bit rate between 964K and 3856K.
$ ffmpeg \
-i bunny_1080p_60fps.mp4 \
-minrate 964K -maxrate 3856K -bufsize 2000K \
bunny_1080p_60fps_transrating_964_3856.mp4
Usually we'll be using transrating with transsizing. Werner Robitza wrote another must read/execute series of posts about FFmpeg rate control.
Transsizing
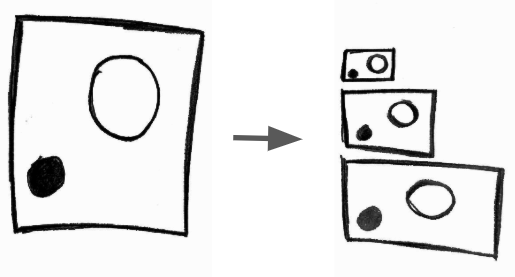
What? the act of converting from one resolution to another one. As said before transsizing is often used with transrating.
Why? reasons are about the same as for the transrating.
How? converting a 1080p to a 480p resolution.
$ ffmpeg \
-i bunny_1080p_60fps.mp4 \
-vf scale=480:-1 \
bunny_1080p_60fps_transsizing_480.mp4
Bonus Round: Adaptive Streaming

What? the act of producing many resolutions (bit rates) and split the media into chunks and serve them via http.
Why? to provide a flexible media that can be watched on a low end smartphone or on a 4K TV, it's also easy to scale and deploy but it can add latency.
How? creating an adaptive WebM using DASH.
# video streams
$ ffmpeg -i bunny_1080p_60fps.mp4 -c:v libvpx-vp9 -s 160x90 -b:v 250k -keyint_min 150 -g 150 -an -f webm -dash 1 video_160x90_250k.webm

$ ffmpeg -i bunny_1080p_60fps.mp4 -c:v libvpx-vp9 -s 320x180 -b:v 500k -keyint_min 150 -g 150 -an -f webm -dash 1 video_320x180_500k.webm

$ ffmpeg -i bunny_1080p_60fps.mp4 -c:v libvpx-vp9 -s 640x360 -b:v 750k -keyint_min 150 -g 150 -an -f webm -dash 1 video_640x360_750k.webm

$ ffmpeg -i bunny_1080p_60fps.mp4 -c:v libvpx-vp9 -s 640x360 -b:v 1000k -keyint_min 150 -g 150 -an -f webm -dash 1 video_640x360_1000k.webm

$ ffmpeg -i bunny_1080p_60fps.mp4 -c:v libvpx-vp9 -s 1280x720 -b:v 1500k -keyint_min 150 -g 150 -an -f webm -dash 1 video_1280x720_1500k.webm

# audio streams
$ ffmpeg -i bunny_1080p_60fps.mp4 -c:a libvorbis -b:a 128k -vn -f webm -dash 1 audio_128k.webm

# the DASH manifest
$ ffmpeg \
 -f webm_dash_manifest -i video_160x90_250k.webm \
 -f webm_dash_manifest -i video_320x180_500k.webm \
 -f webm_dash_manifest -i video_640x360_750k.webm \
 -f webm_dash_manifest -i video_640x360_1000k.webm \
 -f webm_dash_manifest -i video_1280x720_500k.webm \
 -f webm_dash_manifest -i audio_128k.webm \
 -c copy -map 0 -map 1 -map 2 -map 3 -map 4 -map 5 \
 -f webm_dash_manifest \
 -adaptation_sets "id=0,streams=0,1,2,3,4 id=1,streams=5" \
 manifest.mpd
PS: I stole this example from the Instructions to playback Adaptive WebM using DASH
Going beyond
There are many and many other usages for FFmpeg.
I use it in conjunction with iMovie to produce/edit some videos for YouTube and you can certainly use it professionally.
Learn FFmpeg libav the Hard Way
Don't you wonder sometimes 'bout sound and vision?
David Robert Jones
Since the FFmpeg is so useful as a command line tool to do essential tasks over the media files, how can we use it in our programs?
FFmpeg is composed by several libraries that can be integrated into our own programs.
Usually, when you install FFmpeg, it installs automatically all these libraries. I'll be referring to the set of these libraries as FFmpeg libav.
This title is a homage to Zed Shaw's series Learn X the Hard Way, particularly his book Learn C the Hard Way.
Chapter 0 - The infamous hello world
This hello world actually won't show the message "hello world" in the terminal :tongue:
Instead we're going to print out information about the video, things like its format (container), duration, resolution, audio channels and, in the end, we'll decode some frames and save them as image files.
FFmpeg libav architecture
But before we start to code, let's learn how FFmpeg libav architecture works and how its components communicate with others.
Here's a diagram of the process of decoding a video:
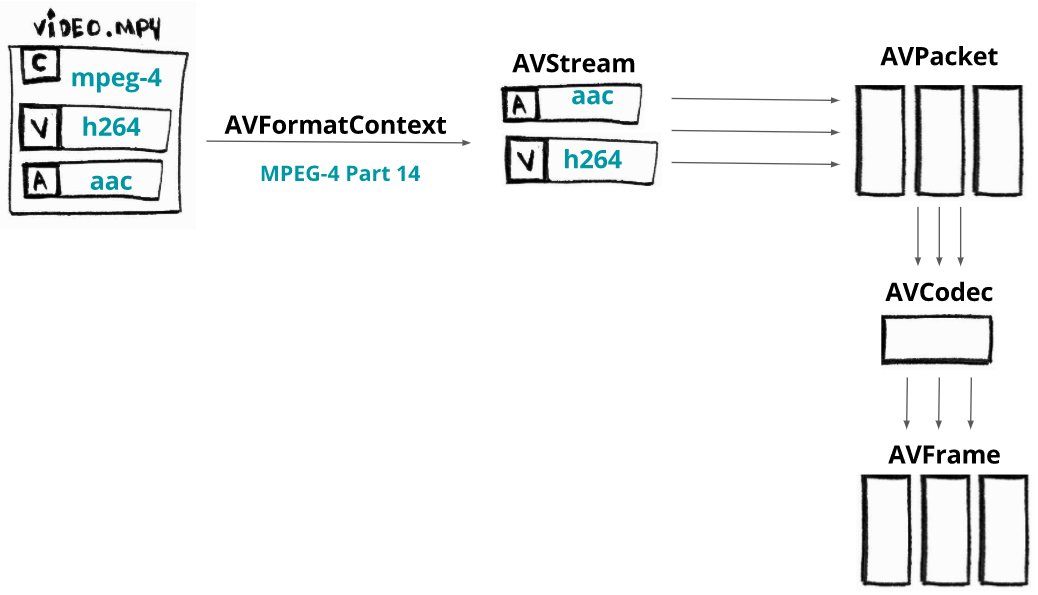
You'll first need to load your media file into a component called AVFormatContext (the video container is also known as format).
It actually doesn't fully load the whole file: it often only reads the header.
Once we loaded the minimal header of our container, we can access its streams (think of them as a rudimentary audio and video data).
Each stream will be available in a component called AVStream.
Stream is a fancy name for a continuous flow of data.
Suppose our video has two streams: an audio encoded with AAC CODEC and a video encoded with H264 (AVC) CODEC. From each stream we can extract pieces (slices) of data called packets that will be loaded into components named AVPacket.
The data inside the packets are still coded (compressed) and in order to decode the packets, we need to pass them to a specific AVCodec.
The AVCodec will decode them into AVFrame and finally, this component gives us the uncompressed frame. Noticed that the same terminology/process is used either by audio and video stream.
Requirements
Since some people were facing issues while compiling or running the examples we're going to use Docker as our development/runner environment, we'll also use the big buck bunny video so if you don't have it locally just run the command make fetch_small_bunny_video.
Chapter 0 - code walkthrough
TLDR; show me the code and execution.
$ make run_hello
We'll skip some details, but don't worry: the source code is available at github.
We're going to allocate memory to the component AVFormatContext that will hold information about the format (container).
AVFormatContext *pFormatContext = avformat_alloc_context();
Now we're going to open the file and read its header and fill the AVFormatContext with minimal information about the format (notice that usually the codecs are not opened).
The function used to do this is avformat_open_input. It expects an AVFormatContext, a filename and two optional arguments: the AVInputFormat (if you pass NULL, FFmpeg will guess the format) and the AVDictionary (which are the options to the demuxer).
avformat_open_input(&pFormatContext, filename, NULL, NULL);
We can print the format name and the media duration:
printf("Format %s, duration %lld us", pFormatContext->iformat->long_name, pFormatContext->duration);
To access the streams, we need to read data from the media. The function avformat_find_stream_info does that.
Now, the pFormatContext->nb_streams will hold the amount of streams and the pFormatContext->streams[i] will give us the i stream (an AVStream).
avformat_find_stream_info(pFormatContext, NULL);
Now we'll loop through all the streams.
for (int i = 0; i < pFormatContext->nb_streams; i++)
{
  //
}
For each stream, we're going to keep the AVCodecParameters, which describes the properties of a codec used by the stream i.
AVCodecParameters *pLocalCodecParameters = pFormatContext->streams[i]->codecpar;
With the codec properties we can look up the proper CODEC querying the function avcodec_find_decoder and find the registered decoder for the codec id and return an AVCodec, the component that knows how to enCOde and DECode the stream.
AVCodec *pLocalCodec = avcodec_find_decoder(pLocalCodecParameters->codec_id);
Now we can print information about the codecs.
// specific for video and audio
if (pLocalCodecParameters->codec_type == AVMEDIA_TYPE_VIDEO) {
  printf("Video Codec: resolution %d x %d", pLocalCodecParameters->width, pLocalCodecParameters->height);
} else if (pLocalCodecParameters->codec_type == AVMEDIA_TYPE_AUDIO) {
  printf("Audio Codec: %d channels, sample rate %d", pLocalCodecParameters->channels, pLocalCodecParameters->sample_rate);
}
// general
printf("\tCodec %s ID %d bit_rate %lld", pLocalCodec->long_name, pLocalCodec->id, pLocalCodecParameters->bit_rate);
With the codec, we can allocate memory for the AVCodecContext, which will hold the context for our decode/encode process, but then we need to fill this codec context with CODEC parameters; we do that with avcodec_parameters_to_context.
Once we filled the codec context, we need to open the codec. We call the function avcodec_open2 and then we can use it.
AVCodecContext *pCodecContext = avcodec_alloc_context3(pC

 A free, open-source tutorial — almost a small book — on using FFmpeg as a library (libav): from how video, audio, codecs and containers work to writing C code that remuxes and transcodes media.