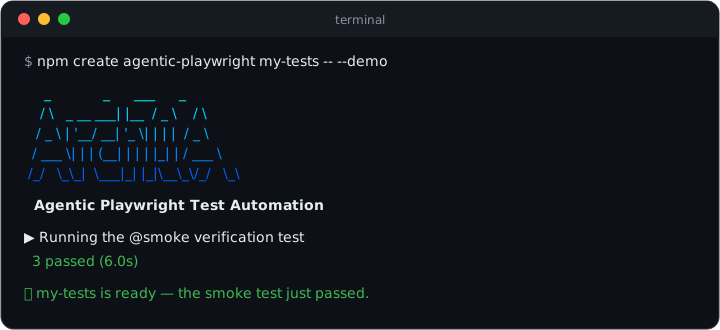
Agentic Playwright
Stop teaching your AI how to write tests. Hand it the rulebook.






Production-grade Playwright + TypeScript Scaffold for Agentic Testing.
A complete, running test framework — page objects, API contracts, data factories, CI —
plus the AI rules your assistant picks up automatically, from the very first prompt.
See it
From the (empty) directory your project should live in — the . means "scaffold right
here, and name the project after this folder" (a fresh git clone of an empty repo
works too). Prefer a new subfolder? Pass a name instead of .:
npm create agentic-playwright . -- --demo
Zero questions. Scaffolds the framework, installs dependencies and a browser, and ends
by running the smoke test against a live demo application — you see green before
writing a line. Under 5 minutes on normal broadband.
Full System Explained Live
Debbie O'Brien and Ivan Davidov will walk through the architecture at C3, "Orchestrating Agentic Test Automation with Playwright". October 21st, online, organized by Packt
Registrater here
Without the rulebook vs with it
The same prompt — "write a test for the product search" — to the same AI assistant:
// ❌ Unsupervised: XPath, hard waits, `any`, magic timeouts, no structure
test('search', async ({ page }) => {
    await page.goto('https://practicesoftwaretesting.com');
    await page.locator('//input[@id="search-query"]').fill('pliers');
    await page.locator('//button[@type="submit"]').click();
    await page.waitForTimeout(5000);
    const cards: any = await page.$$('.card');
    expect(cards.length > 0).toBe(true);
});
// ✅ With Agentic Playwright: fixtures, steps, web-first assertions
import { expect, test } from '../../../fixtures/pom/test-options';

test(
    'should show only matching products when searching',
    { tag: '@regression' },
    async ({ homePage }) => {
        await test.step('GIVEN the user is on the home page', async () => {
            await homePage.open();
        });

        await test.step('WHEN the user searches for "pliers"', async () => {
            await homePage.searchFor('pliers');
        });

        await test.step('THEN every result matches the search term', async () => {
            await expect(homePage.searchCaption).toContainText('pliers');
            await expect(homePage.productNames.first()).toContainText('Pliers');
        });
    }
);
Dependency-injected page objects, Given/When/Then steps, web-first assertions, no hard
waits, no any, one tag per test — enforced by a Constitution and 17 skills the
assistant loads automatically, with a write-time hook that blocks the forbidden
patterns outright.
Not affiliated with Microsoft. Playwright is an open-source project by Microsoft; this scaffold builds on it.
This is a scaffold, not a finished framework. The example files (AppPage, login.spec.ts, NavigationComponent, etc.) demonstrate the patterns and conventions you should follow. Replace them with your real application's pages, tests, and data as you build out your test suite.
Table of Contents
Features
- TypeScript -- Full type safety with strict mode enabled
- Page Object Model -- Maintainable and scalable test architecture
- Fixture-based Architecture -- Reusable test components with dependency injection
- API Testing -- Built-in
apiRequest fixture with Zod schema validation and helper fixtures for setup/teardown
- Multi-browser Support -- Chrome, Firefox, and WebKit configurations
- Environment Management -- Flexible
.env configuration with multi-environment support
- Authentication Handling -- Pre-configured storage state for authenticated tests
- Code Quality -- ESLint + Prettier + Husky pre-commit hooks
- Parallel Execution -- Fast test runs with configurable workers
- Comprehensive Reporting -- HTML reports with traces, screenshots, and videos
- AI-Assisted Development -- Modular orchestrator rules for Claude Code, Cursor, and GitHub Copilot with glob-scoped auto-loading. Each tool's rule tree (
.claude/, .cursor/, .github/instructions/) is self-contained and stands alone.
- Confidence-Gated Workflow -- The
ai-native-workflow skill is the sole entry-point router for non-trivial work. Every plan must include Confidence: <1-10>, Rationale, and Unknowns; below confidence 5 the agent is required to stop and ask the user for the missing primary input rather than emit a plan built on guesses.
- Constitution Enforcement Hook --
.claude/scripts/enforce_constitution.py is wired as a Claude Code PreToolUse hook in .claude/settings.json. It blocks any Write/Edit/MultiEdit that would introduce a mechanically-detectable WON'T violation (waitForTimeout, z.object in schemas, XPath, @playwright/test imports in specs, .json static data, the @functional tag, tags on test.describe()) before the file is ever written -- a hard backstop beneath the prompt-level rules.
- Version Single-Source -- the root
VERSION file is the one source of truth for the product version. npm run version:stamp writes it into package.json; npm run check:version asserts VERSION == package.json == the latest CHANGELOG.md heading and fails on drift. Gated in .husky/pre-commit (when a version surface is staged) and in CI (skill-lint.yml).
- Pre-Commit Drift Lints --
npm run check:skills-drift keeps Constitution rules anchored in their owning skill's Critical block; npm run check:skills-references walks all three rule trees (.claude/skills/, .cursor/skills/, .github/instructions/, .github/skills/) and catches broken pointers, orphan references, and broken section anchors between each SKILL.md and its references/ siblings. Both fire from .husky/pre-commit whenever any of those trees has files staged.
- Upstream Skill Sync --
skills-lock.json records the SHA-256 of the locally vendored copies of skill-creator (from anthropics/skills) and playwright-cli (from @playwright/cli). npm run skills:verify re-hashes the local files and exits non-zero on drift; npm run skills:reinstall fetches upstream, overwrites .claude/skills/<name>/SKILL.md and .cursor/skills/<name>/SKILL.md, and refreshes the lock; npm run skills:update re-locks after intentional local edits.
- Playwright CLI Exploration --
playwright-cli is the default browser exploration path for UI discovery, tracing, storage inspection, and flow capture
- Out-of-the-Box Anthropic Skills --
playwright-cli and skill-creator are reinstalled fresh from the upstream Anthropic packages and tracked via skills-lock.json for reproducible installs
- AI Task Workflows Playbook --
AI-WORKFLOWS.md maps the exact step sequence for every common flow (API suite for a controller, functional tests from a ticket, E2E suite, debugging, refactors, and more) to its owning skill and phase, with an anti-drift guardrails table -- so AI-assisted execution stays consistent across sessions
Prerequisites
- Node.js v22.x or later
- npm v10.x or later
Quick Start: npm create
The fastest path — scaffold a fresh project with everything wired, straight into the
directory you are standing in:
npm create agentic-playwright . -- --demo
Why the .? It scaffolds into the current directory and names the project
after the folder — the natural fit when you have already created (or cloned) an empty
repo for your tests. The directory must be empty apart from repo bookkeeping like
.git; if a git repo already exists there, the initializer detects it and skips
git init. Prefer a new subfolder instead? Pass a name:
npm create agentic-playwright my-tests -- --demo  # same, but in ./my-tests
npm create agentic-playwright .                   # interactive — 4 questions
npm create agentic-playwright . -- --bare         # your own app URLs
Useful flags: --no-claude / --no-cursor / --no-copilot (prune AI rule trees you
don't use), --yes, --skip-install, --skip-browsers, --skip-git, --skip-smoke.
Quick Start: Dev Container
The fastest way to get a fully working environment. Requires Docker Desktop and a Dev Containers extension for your editor:
Important: Make sure Docker Desktop is up and running before proceeding with the steps below. The Dev Container will fail to build if Docker is not started.
Clone the repository:
git clone <your-repository-url>   # replace with your fork/clone URL
cd playwright-scaffold
Open in Cursor/VS Code and accept the prompt to "Reopen in Container" (or run Dev Containers: Reopen in Container from the Command Palette).
Done. The Docker image ships with pre-warmed npm and playwright-cli browser caches, so postCreateCommand completes in seconds even on first start. The container provides Node.js, npm dependencies (on a fast named volume), Playwright test browsers, Python 3, Claude Code CLI, and playwright/playwright-cli linked into ~/.local/bin. Edit env/.env.dev with your app configuration and run npm test.
Version alignment: The Playwright Docker image tag in .devcontainer/Dockerfile must match the @playwright/test version in package.json. When upgrading Playwright, update both.
Claude Code Custom Status Line
The scaffold includes a custom Claude Code status line that displays git branch, PR status, model, duration, cost, lines changed, and context window usage directly in the terminal.
To enable it, add the following to your .claude/settings.local.json (create the file if it doesn't exist):
{
    "statusLine": {
        "type": "command",
        "command": "python3 .claude/scripts/status_line.py"
    }
}
This renders a rich status bar at the bottom of the Claude Code terminal:
✦ main ● | 📁 project | 🤖 Sonnet 4.6 | ⏳ 12m05s | 💰 $1.42 | + 85 | — 12 | [████████░░░░] 42.5% (85,012/200k)
The status line script lives at .claude/scripts/status_line.py and uses a Gruvbox Dark color palette. It shows:
| Segment |
Description |
| Git branch |
Current branch with dirty indicator (●) |
| PR status |
Review state emoji with clickable PR link (requires gh CLI) |
| Directory |
Current workspace folder |
| Model |
Active Claude model |
| Duration |
Session duration |
| Cost |
Cumulative API cost |
| Lines changed |
Lines added/removed in the session |
| Context bar |
Visual context window usage scaled to the autocompact threshold |
Note: Cost, lines changed, and context bar segments appear dynamically as you interact with Claude Code. A fresh session will only show git, directory, model, and duration.
Quick Start: Local Setup Script
For terminal-based workflows or if you prefer not to use Docker. Works on macOS and Linux (Windows users: use WSL2).
Clone the repository:
git clone <your-repository-url>   # replace with your fork/clone URL
cd playwright-scaffold
Run the setup script:
bash scripts/setup.sh
This automatically installs Node.js v22 (via nvm if needed), npm dependencies, Playwright browsers with system deps, Python 3.11+, links playwright and playwright-cli into ~/.local/bin, and installs a dedicated playwright-cli Chromium cache. If you already have Node.js v22+ installed, you can also run npm run setup — it is equivalent.
Ensure ~/.local/bin is on your PATH (if your shell does not already include it):
export PATH="$HOME/.local/bin:$PATH"
This is where the scaffold links playwright and playwright-cli. Add this line to your ~/.zshrc or ~/.bashrc to make it permanent.
Edit env/.env.dev with your app configuration and run npm test.
Manual Installation
If you prefer to install dependencies manually. Steps 1-3 and 5-6 are identical on all platforms; step 4 differs.
Clone the repository:
git clone <your-repository-url>   # replace with your fork/clone URL
cd playwright-scaffold
Install npm dependencies:
npm install
Install Playwright test browsers:
npx playwright install --with-deps
Link CLI commands and install playwright-cli browsers:
macOS / Linux:
bash scripts/link-cli.sh "$(pwd -P)"
npm run playwright-cli:install-browsers
Then ensure ~/.local/bin is on your PATH (add to ~/.zshrc or ~/.bashrc to make permanent):
export PATH="$HOME/.local/bin:$PATH"
Windows (PowerShell):
npm run playwright-cli:install-browsers
Set up environment variables:
macOS / Linux:
cp env/.env.example env/.env.dev
Windows (PowerShell):
Copy-Item env\.env.example env\.env.dev
Edit env/.env.dev with your application's configuration.
Run tests:
npm test
Verify Your Installation
After any setup method, confirm all tools are available:
macOS / Linux:
playwright --version
playwright-cli --version
Windows (PowerShell):
npx playwright --version
playwright-cli --version
Expected output (exact versions vary with your installed packages):
playwright --version      → Version 1.60.0
playwright-cli --version  → 0.1.13
Getting Started: Adapting the Scaffold
This scaffold ships with example files that demonstrate every pattern. Here's how to replace them with your real application code, step by step.
Edit env/.env.dev with your application's actual URLs and credentials:
APP_URL=https://your-real-app.com
API_URL=https://your-real-api.com
[email protected]
APP_PASSWORD=your-test-password
Step 2: Update Enums
Open enums/app/app.ts and replace the placeholder values with your app's actual messages, API endpoints, and storage state paths:
export enum Messages {
    LOGIN_SUCCESS = 'Your actual success message',
    LOGIN_ERROR = 'Your actual error message',
    // Add more messages as needed
}

export enum ApiEndpoints {
    LOGIN = '/your/actual/login/endpoint',
    // Add more endpoints as needed
}
Step 3: Create Your First Page Object
Replace pages/app/app.page.ts with a page object for your application's actual login page (or whichever page you're testing first). Use the existing file as a template:
- Update the locators to match your app's actual elements
- Update the action methods to match your app's actual behavior
- Keep the same patterns: getter locators, JSDoc comments,
Promise<void> return types
Tip: If using Cursor with AI, ask it to "navigate to [your-url] and create a page object" -- the AI rules will guide it to use playwright-cli by default to explore the page and generate accurate locators.
Step 4: Update Authentication Setup
Edit helpers/app/createStorageState.ts to match your app's actual login flow. The two functions to update:
createAppStorageState() -- Browser-based login for storage statesetUserAccessToken() -- API-based login for access tokens
Step 5: Write Your First Real Test
Replace the example tests in tests/app/functional/ with tests for your application. Follow the pattern in the example files:
import { expect, test } from '../../../fixtures/pom/test-options';

test.describe('Your Feature', () => {
    test(
        'should do something specific',
        { tag: '@smoke' },
        async ({ appPage }) => {
            await test.step('GIVEN precondition', async () => {
                /* ... */
            });
            await test.step('WHEN action is taken', async () => {
                /* ... */
            });
            await test.step('THEN expected result', async () => {
                /* ... */
            });
        }
    );
});
Step 6: Run and Verify
npm test
What to Keep vs. What to Replace
| Keep As-Is | Replace With Your App

 A production-grade Playwright + TypeScript scaffold for end-to-end and API testing that comes with AI rules (a Constitution and 17 skills) baked in, so Claude Code, Cursor, and GitHub Copilot automatically write tests that follow your team's patterns.