Open R1
A fully open reproduction of DeepSeek-R1. This repo is a work in progress, let's build it together!
Table of Contents
- Overview
- Plan of attack
- Installation
- Training models
- Evaluating models
- Reproducing Deepseek's evaluation results
- Data generation
- Contributing
Overview
The goal of this repo is to build the missing pieces of the R1 pipeline such that everybody can reproduce and build on top of it. The project is simple by design and mostly consists of:
src/open_r1: contains the scripts to train models as well as generate synthetic data:
grpo.py: trains a model with GRPO on a given dataset.sft.py: performs a simple SFT of a model on a dataset.generate.py: generates synthetic data from a model using Distilabel.
Makefile: contains easy-to-run commands for each step in the R1 pipeline leveraging the scripts above.
Plan of attack
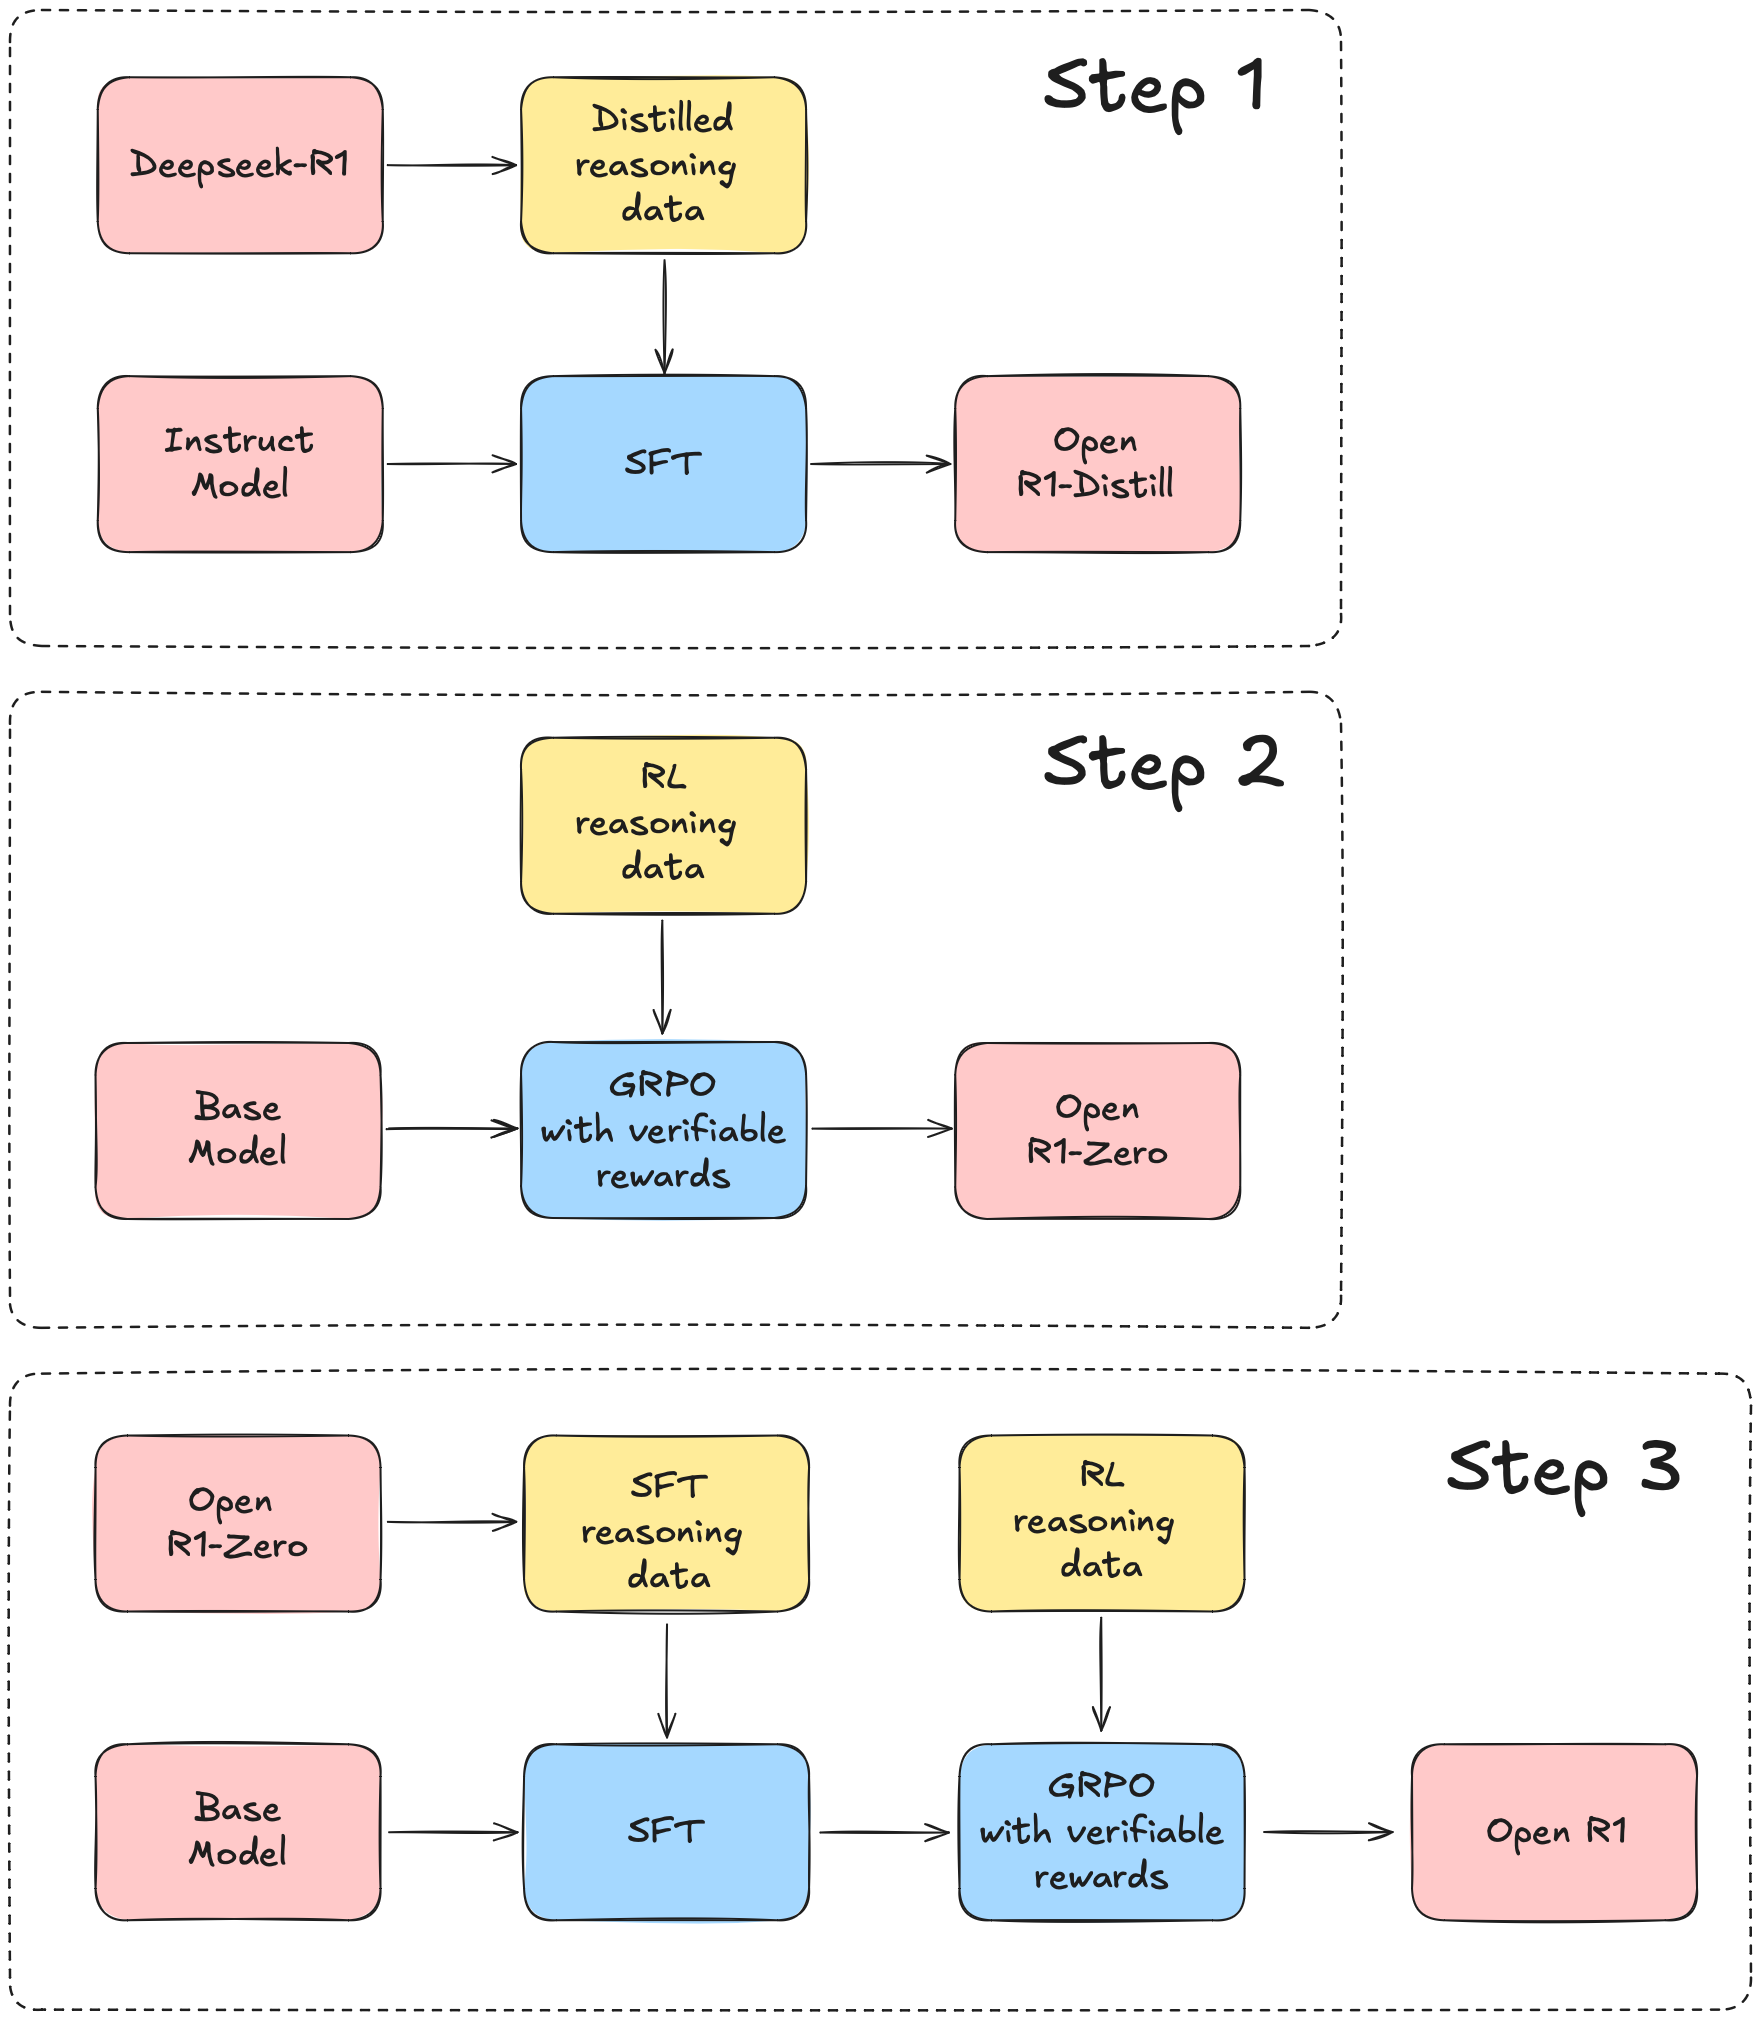
We will use the DeepSeek-R1 tech report as a guide, which can roughly be broken down into three main steps:
- Step 1: replicate the R1-Distill models by distilling a high-quality corpus from DeepSeek-R1.
- Step 2: replicate the pure RL pipeline that DeepSeek used to create R1-Zero. This will likely involve curating new, large-scale datasets for math, reasoning, and code.
- Step 3: show we can go from base model to RL-tuned via multi-stage training.
News 🗞️
- 🧑🍳 [2025/05/26] (Step 1 completed!) We release Mixture-of-Thoughts--a curated reasoning dataset of 350k verified traces distilled from R1. The dataset spans tasks in mathematics, coding, and science, and is designed to teach language models to reason step-by-step. We also provide a recipe to train OpenR1-Distill-7B, which replicates the reasoning capabilities of deepseek-ai/DeepSeek-R1-Distill-Qwen-7B and marks the completion of step 1 in the Open R1 project.
- ⚡️ [2025/03/11] (update #3): We release the CodeForces-CoTs dataset of 10k competitive programming problems and 100k solutions distilled from R1. We also release IOI24: a new benchmark of very hard problems from international olympiads. A 7B Qwen model trained on CodeForces-CoTs can outperform Claude 3.7 Sonnet on IOI24, while a 32B model can outperform R1 itself.
- ∞ [2025/02/10] (update #2): We release the OpenR1-Math-220k dataset of 220k traces distilled from R1 on a new version of NuminaMath. Models trained on this dataset match the performance of DeepSeek's distilled ones.
- 🔥 [2025/02/02] (update #1): We implement the first parts of the training, inference, and evaluation pipelines. Let's go!
Installation
[!CAUTION]
Libraries rely on CUDA 12.4. If you see errors related to segmentation faults, double check the version your system is running with nvcc --version.
To run the code in this project, first, create a Python virtual environment using e.g. uv.
To install uv, follow the UV Installation Guide.
[!NOTE]
As a shortcut, run make install to setup development libraries (spelled out below). Afterwards, if everything is setup correctly you can try out the Open-R1 models.
uv venv openr1 --python 3.11 && source openr1/bin/activate && uv pip install --upgrade pip
[!TIP]
For Hugging Face cluster users, add export UV_LINK_MODE=copy to your .bashrc to suppress cache warnings from uv
Next, install vLLM and FlashAttention:
uv pip install vllm==0.8.5.post1
uv pip install setuptools && uv pip install flash-attn --no-build-isolation
This will also install PyTorch v2.6.0 and it is very important to use this version since the vLLM binaries are compiled for it. You can then install the remaining dependencies for your specific use case via pip install -e .[LIST OF MODES]. For most contributors, we recommend:
GIT_LFS_SKIP_SMUDGE=1 uv pip install -e ".[dev]"
Next, log into your Hugging Face and Weights and Biases accounts as follows:
huggingface-cli login
wandb login
Finally, check whether your system has Git LFS installed so that you can load and push models/datasets to the Hugging Face Hub:
git-lfs --version
If it isn't installed, run:
sudo apt-get install git-lfs
Training models
[!NOTE]
The training commands below are configured for a node of 8 x H100s (80GB). For different hardware and topologies, you may need to tune the batch size and number of gradient accumulation steps.
We support training models with either DDP or DeepSpeed (ZeRO-2 and ZeRO-3). For example, to perform SFT on a dataset distilled from DeepSeek-R1 with reasoning traces such as open-r1/Mixture-of-Thoughts, run:
# Train via command line
accelerate launch --config_file=recipes/accelerate_configs/zero3.yaml src/open_r1/sft.py \
    --model_name_or_path open-r1/Qwen2.5-Math-7B-RoPE-300k \
    --dataset_name open-r1/Mixture-of-Thoughts \
    --dataset_config all \
    --eos_token '<|im_end|>' \
    --learning_rate 4.0e-5 \
    --num_train_epochs 5 \
    --max_seq_length 32768 \
    --per_device_train_batch_size 2 \
    --gradient_checkpointing \
    --bf16 \
    --use_liger_kernel \
    --output_dir data/OpenR1-Distill-7B

# Train via YAML config
accelerate launch --config_file recipes/accelerate_configs/zero3.yaml src/open_r1/sft.py \
    --config recipes/OpenR1-Distill-7B/sft/config_distill.yaml
Currently, the following tasks are supported:
- Supervised Fine-Tuning
sft
- Group Relative Policy Optimization
grpo
[!TIP]
If you scale up/down the number of GPUs, we recommend also scaling up the per-device batch size or number of gradient accumulation steps to keep the global batch size constant.
By default, these scripts will push each model to your Hugging Face Hub username, i.e. {username}/{model_name}-{task}. You can override the parameters in each YAML config by appending them to the command as follows:
# Change the base model to a smaller variant
accelerate launch --config_file recipes/accelerate_configs/zero3.yaml src/open_r1/sft.py \
    --config recipes/OpenR1-Distill-7B/sft/config_distill.yaml \
    --model_name_or_path Qwen/Qwen3-0.6B-Base \
    --hub_model_id OpenR1-Distill-0.6B \
    --output_dir data/OpenR1-Distill-0.6B
If you also wish to override the Weights and Biases default settings, you can do so as follows:
accelerate launch --config_file recipes/accelerate_configs/zero3.yaml src/open_r1/sft.py \
    --config recipes/OpenR1-Distill-7B/sft/config_distill.yaml
    --wandb_entity huggingface --wandb_project open-r1 --run_name Qwen2.5-1.5B-GRPO
🚨 WARNING 🚨
Most base models like meta-llama/Llama-3.2-1B do not have a chat template, so we set ChatML as the default during training. However, for Qwen base models like Qwen/Qwen2.5-1.5B, a chat template is pre-defined in the tokenizer, so the EOS token must be set accordingly, e.g.
# Align EOS token with chat template for Qwen base models
accelerate launch --config_file=recipes/accelerate_configs/zero3.yaml src/open_r1/sft.py \
    --model_name_or_path Qwen/Qwen2.5-1.5B \
+   --eos_token '<|im_end|>'
    --dataset_name open-r1/Mixture-of-Thoughts \
    --dataset_config all \
    --learning_rate 4.0e-5 \
    --num_train_epochs 1 \
    --max_seq_length 32768 \
    --per_device_train_batch_size 16 \
    --gradient_checkpointing \
    --bf16 \
    --use_liger_kernel \
    --output_dir data/Qwen2.5-1.5B-Open-R1-Distill
If you wish to use a custom chat template (e.g. Llama or Gemma), then the chat template and associated EOS token must be provided:
# Align EOS token with custom chat template
accelerate launch --config_file=recipes/accelerate_configs/zero3.yaml src/open_r1/sft.py \
    --model_name_or_path meta-llama/Llama-3.2-1B \
+   --chat_template "$(cat llama_chat_template.jinja)" \
+   --eos_token '<|eot_id|>' \
    --dataset_name open-r1/Mixture-of-Thoughts \
    --dataset_config all \
    --learning_rate 4.0e-5 \
    --num_train_epochs 1 \
    --max_seq_length 32768 \
    --per_device_train_batch_size 16 \
    --gradient_checkpointing \
    --bf16 \
    --use_liger_kernel \
    --output_dir data/Llama-3.2-1B-Open-R1-Distill
SFT distillation
We provide a recipe to reproduce the reasoning capabilities of deepseek-ai/DeepSeek-R1-Distill-Qwen-7B, starting from the same base model. To do so, run:
ACCELERATE_LOG_LEVEL=info accelerate launch --config_file recipes/accelerate_configs/zero3.yaml \
    src/open_r1/sft.py \
    --config recipes/OpenR1-Distill-7B/sft/config_distill.yaml
The result will be a model like open-r1/OpenR1-Distill-7B, with the following downstream performance:
| Model |
AIME 2024 |
MATH-500 |
GPQA Diamond |
LiveCodeBench v5 |
| OpenR1-Distill-7B |
52.7 |
89.0 |
52.8 |
39.4 |
| DeepSeek-R1-Distill-Qwen-7B |
51.3 |
93.5 |
52.4 |
37.4 |
You can adjust the YAML config to train on a different base model or dataset.
GRPO
We use TRL's vLLM backend to scale training to large models across multiple nodes. For single-node training of smol models across 8 GPUs, use vllm_mode="colocate" to run vLLM in the same process as the training script:
ACCELERATE_LOG_LEVEL=info \
    accelerate launch --config_file recipes/accelerate_configs/zero3.yaml \
    src/open_r1/grpo.py --config recipes/DeepSeek-R1-Distill-Qwen-1.5B/grpo/config_demo.yaml \
    --vllm_mode colocate
[!WARNING]
The chat template used in the distilled DeepSeek models omits the contents of the reasoning block within the <think> and </think> tags. It also prefills the assistant response with <think> which interferes with the format reward function. To handle that, it is important to override the chat template as done in e.g. recipes/DeepSeek-R1-Distill-Qwen-1.5B/grpo/config_demo.yaml.
For multi-node training on N+1 nodes, with 1 node running the vLLM server and N nodes running training, we provide an example Slurm script. For example, to run the above example on 1+1 nodes with data parallelism, run:
sbatch --nodes=2 slurm/train.slurm --model Qwen2.5-1.5B-Instruct --task grpo --config demo --accelerator zero2 --dp 8 --tp 1
See the Launching jobs on a Slurm cluster section for more details.
GRPO dataset filtering
We provide support to filter datasets by generating and computing pass rate on veriable tasks, see this README
👨💻 Training with a code interpreter
We provide a code reward function for executing code generated by the policy during training. Currently, this reward function targets code contests like Codeforces, where solutions are executed against a set of test cases and the overall success rate is returned as the final reward. To ensure safe execution, we support multiple sandbox providers:
- E2B - Fast, cloud-based sandboxes with focus on Python execution
- Morph - Cloud-based sandboxes with broader language support - Python/JS/C++/Rust
To use the code reward function, first install the necessary dependencies:
uv pip install -e '.[code]'
E2B Provider
To use E2B sandboxes, create a .env file and add your E2B API token:
E2B_API_KEY="e2b_xxx"
Morph Provider
To use Morph, first install the morphcloud package:
pip install morphcloud
Then add your Morph API token to the .env file:
MORPH_API_KEY="YOUR_MORPH_API_KEY"
To specify which provider to use, add the provider_type parameter in your configuration:
# For E2B
provider_type: e2b

# For Morph
provider_type: morph
Dataset Requirements
Make sure your dataset contains a verification_info column with the following schema (adopted from PrimeIntellect's excellent datasets of verifiable problems):
{
    "language": "python",  # Morph supports more languages including C++, Java, etc.
    "test_cases": [
        {
            "input": "4\n4\n0001\n1000\n0011\n0111\n3\n010\n101\n0\n2\n00000\n00001\n4\n01\n001\n0001\n00001\n",
            "output": "1\n3 \n-1\n0\n\n2\n1 2 \n",
            "type": "stdin_stdout",
        }
    ],
}
For example, to train a smol model on Python problems, start the vLLM server:
CUDA_VISIBLE_DEVICES=0 trl vllm-serve --model Qwen/Qwen2.5-1.5B-Instruct
Then run training with:
CUDA_VISIBLE_DEVICES=1,2,3,4,5,6,7 ACCELERATE_LOG_LEVEL=info \
    accelerate launch --config_file recipes/accelerate_configs/zero2.yaml --num_processes=7 \
    src/open_r1/grpo.py --config recipes/Qwen2.5-1.5B-Instruct/grpo/config_demo_code.yaml
Using Router Services
It is possible to be rate limited when too many scripts are executed on sandbox services. For both providers, we offer router scripts that can be launched on a CPU node:
For E2B:
sbatch slurm/e2b_router.slurm
For Morph:
sbatch slurm/morph_router.slurm
Then add the router URL in your training YAML config:
# For E2B
e2b_router_url: 1.2.3.4:8000

# For Morph
morph_router_url: 1.2.3.4:8000
The port should match the one used when launching the router.
All training jobs can share the same router IP which will ensure parallel executions are properly managed.
Competitive Programming problems: IOI & CodeForces
We provide ioi_code_reward and cf_code_reward reward functions for executing problems from IOI and CodeForces, respectively. You can use either piston or Morph (currently IOI only) as your execution provider.
Piston
To use Piston:
- Get piston workers running, see slurm/piston/README.md
- Set your environment variable
PISTON_ENDPOINTS to slurm or to a list of piston worker endpoints
For IOI:
- In your configuration, use
ioi_provider: "piston"
For CodeForces:
- Download the generated (hard) test cases:
# change PATH_TO_SAVE_TESTCASES. Increase --max-workers according to your machine's capacity
huggingface-cli download open-r1/codeforces --repo-type=dataset --include='generated_tests/*.parquet' --max-workers=8 --local-dir PATH_TO_SAVE_TESTCASES
- Save the path in .env:
CF_TESTS_FOLDER=PATH_TO_SAVE_TESTCASES
Morph
Morph is a cloud-based solution that provides sandboxed environments for running code. To use it:
- Install the Morph client:
pip install morphcloud
- Add your Morph API key to the
.env file: MORPH_API_KEY="your_key_here"
- In your configuration, use
ioi_provider: "morph"
Example recipes
For IOI:
See the example recipe for how to use the IOI reward function:
ACCELERATE_LOG_LEVEL=info accelerate launch --config_file recipes/accelerate_configs/zero2.yaml \
    --num_processes=7 src/open_r1/grpo.py \
    --config recipes/Qwen2.5-1.5B-Instruct/grpo/config_demo_code_ioi.yaml
For CodeForces:
sbatch --job-name=cf-grpo --nodes=2 slurm/train.slurm --model Qwen2.5-Coder-7B-Instruct --task grpo --config codeforces --accelerator zero3 --dp 8 --tp 1
Launching jobs on a Slurm cluster
If you have access to a Slurm cluster, we provide a slurm/train.slurm script that will automatically queue training jobs for you. Here's how you can use it:
sbatch --job-name=open_r1 --nodes=1 slurm/train.slurm --model {model_name} --task {task} --config {config_suffix} --accelerator {accelerator}
Here {model_name} and {task} are defined as above, while {config_suffix} refers to the specific config and {accelerator} refers to the choice of 🤗 Accelerate config in recipes/accelerate_configs. If you wish to override the default config parameters, you can provide them by appending a space-separated string like '--arg1=value1 --arg2=value2'. Here's a concrete example to run SFT on 1 node of 8 GPUs:
sbatch --job-name=open_r1 --nodes=1 slurm/train.slurm --model OpenR1-Distill-7B --task sft --config distill --accelerator zero3
You can scale the number of nodes by increasing the --nodes flag.
For GRPO, we use 1 node for the vLLM server and N nodes for training. For example, to run GRPO on 1+1 nodes with mixed data and tensor parallelism, run:
sbatch --job-name=open_r1 --nodes=2 slurm/train.slurm --model Qwen2.5-1.5B-Instruct --task grpo --config demo --accelerator zero2 --dp 4 --tp 2
[!NOTE]
The configuration in slurm/train.slurm is optimised for the Hugging Face Compute Cluster and may require tweaking to be adapted to your own compute nodes.
Customising the dataset mixture
To combine multiple datasets as a single training mixture, you can specify the dataset_mixture parameter in the YAML config file. Here's a template for how to do this:
dataset_mixture:
  datasets:                     # List of datasets to include in the mixture
    - id: dataset_1             # Hub dataset ID
      config: config_name_1     # Name of the dataset config
      split: split_1            # Split to use from the dataset
      columns:                  # Columns to keep
        - column_1
        - column_2
      weight: 0.25              # Fraction of dataset to use
    - id: dataset_2
      config: config_name_2
      split: split_2
      columns:
        - column_1
        - column_2
      weight: 0.5
  seed: 42                      # Seed for shuffling the combined dataset
  test_split_size: 0.1          # Fraction of mixture to use for a test split
Evaluating models
We use lighteval to evaluate models. For models which fit on a single GPU, run:
export VLLM_WORKER_MULTIPROC_METHOD=spawn # Required for vLLM
MODEL=deepseek-ai/DeepSeek-R1-Distill-Qwen-1.5B
MODEL_ARGS="model_name=$MODEL,dtype=bfloat16,max_model_length=32768,gpu_memory_utilization=0.8,generat

 Open R1 is a fully open effort to reproduce the training pipeline behind DeepSeek-R1, providing scripts to run SFT and GRPO training, generate synthetic reasoning data, and evaluate the resulting reasoning models.