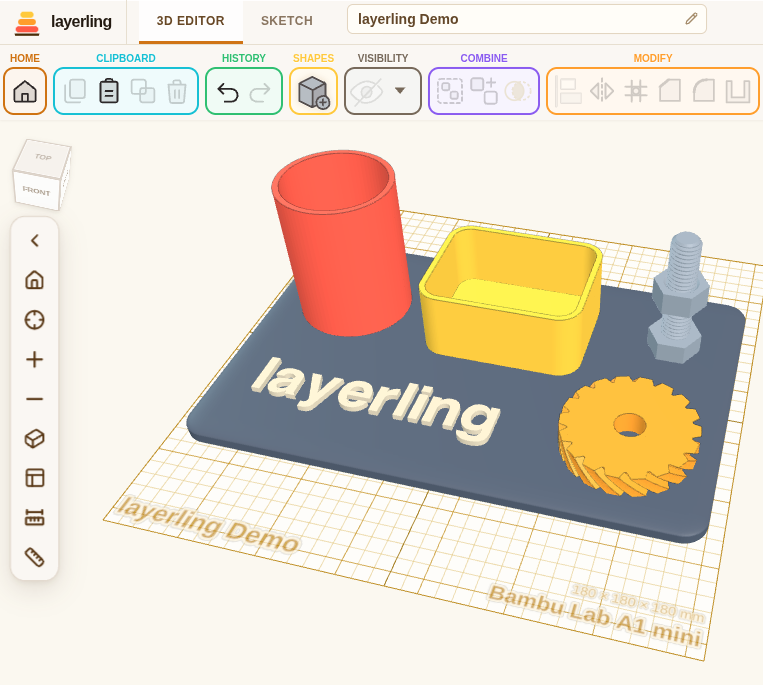
layerling in the browser
User guide, step by step and with pictures
Who It Is For
You own a 3D printer. You want a part that fits something, not a career in CAD.
layerling works the way you already think: put a shape on the plate, drag it to size, turn a second shape into a hole, group the two, export, print. There is nothing to learn before you start and nothing to sign up for – open the page and build. Your designs stay in your own browser by default: no account, no cloud, nothing uploaded anywhere. If you run your own copy, they can live in a folder on your server instead, so every device in the house sees the same ones.
Coming From Tinkercad?
layerling sits a step beyond Tinkercad towards Fusion 360: it is operated the same way, so you will recognise everything – the plate, the shapes, solids and holes, group and ungroup, bundle, Alt-drag for a copy – but it does not stop where Tinkercad does. Things you have been missing are waiting for you:
- Chamfer and fillet. Pick an edge and break it or round it – the one thing people ask for most once a printed part has to feel finished or slot into something. Applied edges stay changeable: take a treatment off again or press Edit to change its value on the same edges.
- Hollow, split, sketch, thread. Hollow a body to an even wall, split it with a plane or stretch it there, draw sketches with exact lengths and angles and extrude or revolve them, and add screws, nuts and tapped holes.
- Patterns and wrapping. Repeat a shape in a row, a grid of columns and rows, a circle or a spiral, or wrap a pattern or text around a cylinder.
- Hole patterns. Click a flat face, or the round wall of a cylinder or tube, and spread round, square, rectangular, hexagonal or slot holes over it, in a grid or staggered, with spacing, margin and depth - vents, speaker grilles and baskets in one step. Or set a ring of screw holes along its edge, with counterbores or countersinks if you like, or repeat a shape of your own over it, rivets or a diamond plate.
- Scale by percent. Make one or many parts larger or smaller by a percentage - together, so the layout grows with them, or each in place. Or bring them to a model scale such as 1:87 for H0, from the original's real size if you like (a tree 16 m tall becomes 184 mm).
- Match sizes. Hold Alt on an align dot and the parts stretch instead of moving: to the side of another part, or to its width, length or height - to swap a box for a cylinder of the same size, for instance.
- Equal gaps. Spread parts of different sizes so the space between them is the same everywhere - between the outer two, on a board with the same gap at its edges, or row by row, as for a peg puzzle; or type the gap.
- Measure and look inside. Tape measure, rulers, a section view that cuts the model open, and a history slider to look back at earlier states.
- Real geometry underneath. layerling keeps exact CAD shapes, not just a mesh, so a rounded edge stays a rounded edge – all the way into a STEP file for a full CAD program.
It is not a full CAD package: there is no parametric timeline and no assemblies. And you can run it yourself: install it as an app (it then starts without internet), or host your own copy on Windows, a NAS or a home server – see Getting Started.
An AI can build along with you. layerling ships an MCP server. An AI client such as Gemini, Claude or Codex sees an open
editor tab and works in it: add shapes, change measurements, group, cut, round edges, read the scene back, take pictures
of the viewport. You describe the part, the AI builds it, you watch it happen and step in whenever you want. This runs
locally, with nothing leaving the browser – see layerling MCP Skill for the setup.
What It Does
Building
- A real build plate – grid, snapping, handles for moving, resizing and rotating, and a panel with the exact numbers when you need them.
- Type a position – the Position card puts a body at exact X, Y and Z, measured from its middle or from its left and front edges, and parts can be parked beside the plate, as in Tinkercad.
- Axis arrows – red, green and blue arrows at the plate's front left corner show X, Y and Z the way the numbers count, as in Bambu Studio and OrcaSlicer; they can be switched off in the settings.
- Pivot that stays – set a pivot for one body and it stays with that body: it moves, turns and scales with it, is saved, and can be typed as X, Y and Z or dragged with the mouse, snapping to corners and edge midpoints, or with Shift to the centre of a face (the axis of a pin, the tip of a cone, even through transparent bodies) - for hinges and joints.
- Light and shadows to taste – shading contrast, shadow strength and softness, and the direction and height of the light, up to straight above as in Tinkercad, all in the settings. A "Tinkercad look" button sets colours, grid and light like there in one go, and the darker grid lines can come every centimetre in a colour of their own.
- Fast mode – for slower computers: one switch in the settings turns off shadows, edge lines and the camera's inertia and draws the view at screen resolution; the camera's inertia can also be switched off on its own, so the view stops the moment you let go.
- Align faces and see the angles – the Align faces tool brings a face of one part against a face of another, touching or flush, with an optional gap, puts a hole or pin on the axis of another hole, or moves a part straight so a corner or reference point lands on a point of another part, along X, Y and Z or only some of them, and with a second and third pair of points turns it into place, like aligning by three points; a turned body shows its angles about X, Y and Z under the selection, and the Rotation card in its settings takes them as numbers.
- Snap to other shapes – while moving, a shape locks its edges or centre onto the edges and centres of the shapes around it, with a guide line, so parts sit flush without typing numbers. The centre of the workplane counts too, to put a part in the middle of the plate. Alt during the drag pauses it; Shift keeps the move on one axis, and Alt held from the start drags a copy, as in Tinkercad. Resizing snaps too: a side handle stops at the edges of other shapes and at the wall it runs into, the inside wall of a box included, so a part fills a case from wall to wall.
- Set down on faces – like Cruise in Tinkercad: a new shape lies down on the face under the pointer, sloped ones too, and C picks the selection up and sets it down on another face the same way. Hold Shift while placing or carrying it and it sinks in instead, upright, its top flush with the face - for a countersink or a counterbore.
- Reference points – right-click a body to mark its centre, corners or edge middles with points that nothing prints and that dragged shapes snap to; drag a point or type its coordinates, and the marks are saved with the design. The tape measure can mark the middle of a measurement - the centre of a round hole, for one.
- Protractor – the protractor in the view bar measures the angle at a corner from three clicks, or between two flat faces (a 45° chamfer reads 45° · 135°); it snaps to corners and edges like the tape measure and follows the bodies.
- Notes the AI can read – tick For the AI on a note and an AI agent on the MCP bridge picks it up as a request: it reads the note, does the work and answers under your text. It can also put notes of its own on the model, to ask or report something at a spot. Ask it to watch your notes and it waits for them (
layerling_wait_for_notes): every request is picked up as soon as you tick the box, without going back to the agent's window.
- Interactive Help – press Shift+F1 or the question mark in the Help group, then click any button, field or window: a small window shows the part of the user guide about it and opens it on request.
- Command search – press Ctrl+K and type a tool, a shape or a command ("fillet", "mirror", "cylinder") to jump straight to it; it understands English and German words and shows the keyboard shortcuts beside each entry.
- Your own keys – put any command of the command search on a key you choose, in the keyboard shortcuts window: Center on workplane, the shapes panel or your favourite shape is then one key away.
- Your own ribbon – take the groups and buttons you never use out of the ribbon in the settings (Appearance); the command search and the keys still run them, and the order of the ribbon stays the same.
- Focus mode – on a small laptop screen, hide the editor's title row and footer with one button or Ctrl+Shift+F; a small bar over the view keeps the tabs, Home, the design's name, the command search and the settings. It also comes by itself while the browser is in full screen (F11).
- History view – look back at any earlier state of the project with a slider, without changing anything; export that state or start a new project from it. By @rmpel. Undo and Redo name the step they take back in their tooltip, with its measure ("Rounded the edges of Box (5 mm)"), and a list in the History view names every step, to jump to any of them with one click.
- Millimetres or inches – with Imperial units every measure is shown in inches, as fractions like Tinkercad (1 5/8) or as decimals, the snap grid steps from 1/64 to 1 inch, and the plate's grid is drawn in inches.
- Your printer's plate – pick one of more than 230 common printers and the plate takes its size - round for a delta printer such as an FLSun. Its name and build volume show in the corner of the workplane (a switch in the settings hides this and the design's name), and a warning appears when a body reaches past the edge.
- Several build plates – a design that holds more than one plate can print gets plates side by side, as large as the workplane: a body belongs to the plate it stands on, "Arrange on plates" lays the parts out row by row and adds plates as needed, each plate is checked against the printer on its own, and the export writes one plate, all of them, or one file per plate in a ZIP, to print them one after another.
- Overhangs and filament – "Show overhangs" hatches every face steeper than 45° (or your printer's own angle) that would need supports, and the export window shows volume, weight and metres of filament before you slice.
- Support rib – print a part tilted on one edge without the slicer's supports: click its lower face and a thin rib stands under it a gap away, on an oval foot, with bridges exactly one layer high and one line wide that hold the part and break off afterwards; nozzle and layers as in your slicer.
- Stencil bridges – print a stencil with text cut through it: the middle of letters like o, a and b gets small bridges to the plate, as wide and as high as you set (flush with the bottom, in the middle or at the top), grouped with the plate as ordinary boxes you can move or delete. After changing the text, run it again and the bridges are made anew.
- Shape library – boxes, cylinders, capsules (one end smaller if needed, say for a belt guard), spheres, cones, curved cones (flared like a trumpet or bulged like a dome), pyramids, wedges, text, roofs, half spheres, paraboloids, torus shapes, tubes, lofts from one outline to another (say square to round, solid or with a wall, straight or flaring smoothly, twisted or with a tilted top, or through up to twelve sections between), polygon prisms from three to twenty-four sides, coil springs and flat springs (round, zigzag or square waves, with an eye or a tab at each end), a print-in-place hinge (with screw holes, or as a finger hinge), screw bosses for heat-set inserts or self-tapping screws (M2 to M5, #2-56 to 1/4-20), snap-fit hooks with their catch, ribs and gussets, Gridfinity bins and baseplates, knurled grips (straight, crossed or round), port openings for USB-C, Micro-USB, USB-A, HDMI (also Mini and Micro), DisplayPort and RJ45 sockets, the XT30, XT60, MT60 and MPX plugs of model batteries, Anderson Powerpole blocks of 1 to 4 poles and the D-Sub 9 serial port with its screw hole, with extra clearance if needed, in a box wall, SBC boards true to size to build a case around (Raspberry Pi 5, 4, 3 B+ and Zero 2 W, BIGTREETECH Pi; grouped as a hole, they cut the openings for their connectors) and more.
- Vases, pots and lampshades – a Vase shape of its own: body form, cross-section (also drawn) with a second one to blend into, twist, patterns, drain holes, a foot, a saucer and a lid, solid for the slicer's vase mode or hollow. A teapot lid takes the vase's own top, so grooves and twist run on across the joint. By @marcus040473.
- Threads that fit – threaded rods, screws with a socket, countersunk, hex, square or flange head, a wing head or a star knob, and a hex, Torx, Phillips, slot or Robertson (square) drive (head diameter, drive size and depth to your measure, and a collar between head and thread, or on top of a nut, if you like), hex, square, flange and wing nuts and star knob nuts, washers to ISO 7089, finishing washers (rosettes) for countersunk screws and tapped holes. Counterbores and countersinks take their shaft and head from a screw size (ISO 273, DIN 974-1, ISO 15065), a blind hole can end in a drill point (118° or an angle of your own, the depth measured to the shoulder as in a drawing), and a hexagon becomes the pocket for an ISO 4032 nut. M2 to M12, UNC/UNF from #4 to one inch and the Whitworth pipe threads G1/16 to G4 (ISO 228-1) are one pick away, as are the tapered NPT pipe threads 1/16" to 4" (ASME B1.20.1), or set your own diameter and pitch, left-hand as well, and up to eight starts for a lead screw such as T8x8; an inch or G size asks for threads per inch instead of millimetres. The ends take a chamfer, and a tapped hole is a cutter: drop it into a part, group, and the hole comes out threaded.
- Gears that mesh – spur, helical, herringbone and bevel gears (also with spiral teeth), ring gears and racks with involute teeth, set by module and number of teeth like a gear generator, with pressure angle and backlash for printing - or with round teeth, forgiving on small printed gears and a smooth grip on knobs. Select two gears and the panel gives the centre distance they mesh at.
- Hirth joints – a disc with V-shaped teeth running out from the centre: a copy turned over locks into it at any multiple of one tooth and centres itself, for adjustable hinges, tripod heads and indexing knobs. Set the number of teeth, their height (down to the bottom if you like) and the bore, and choose symmetric or saw teeth like a ratchet, with the steep flank at up to 90° on either side; it is an exact body for the edge tools and STEP.
- GT2 pulleys – a timing belt pulley for a 2 mm GT2 belt, with the true GT2 groove made of arcs. Set the number of teeth (any number from 10 to 200, not just the sizes you can buy), the belt width, the flanges, the hub and the bore; the diameter follows from the teeth. It is an exact body for the edge tools and STEP.
- Solids and holes – turn shapes into cutters and group them into the final geometry. Edit group (E) lays a group's parts loose to change them and rebuilds it with Done – also a group inside a group, as deep as the design goes.
- Multicolor groups – a group can show every part in its own colour, also after holes were cut into it, and a 3MF or OBJ export keeps those colours, so the slicer can map the parts onto filaments.
- Bundle – Ctrl+B holds parts together like Tinkercad's bundle: they move, turn and scale as one, but keep their colours and stay separate bodies in the export – handy for multicolour prints.
- Intersection – keep only what two or more selected solids have in common, or where solids and holes overlap.
- Hull – wrap the selected shapes in their convex hull, the smallest body without dents round all of them: a half sphere on a cylinder becomes a dome, four posts a box with round corners. Holes in the selection are cut out afterwards.
- Cookie cutter – a wall and a flat rim round the outline of a sketch or an SVG, or of whatever a shape stands on, from one small window; the inside of an e or an a gets a wall of its own, held by bridges at the rim or by a plate over the whole outline, with small fillets so thin parts do not break off, and made lower it only presses a text into the dough instead of cutting it out. The outline is mirrored, so text and logos come out of the dough the right way round, and the wall runs up to a thin cutting edge. Wall thickness, cutting edge, height and rim are the sketch fill modes, so each can be changed afterwards.
- Flexi joints – cut a flat body you drew yourself, a fish, a snake or a dragon, into links with a joint printed in place at every cut: an upright knuckle with 45° cones held in a socket of the next link, so the figure moves once printed, without support or assembly. Number of joints, clearance, swing and joint size can be set. Or the links fold up and down instead, like a flexi keychain: every cut becomes a flat hinge of knuckles with cones, across the body at half its height.
- Loft sketches – two sketches or imported SVGs become one exact body, the outline of the lower one at the bottom and of the upper one at the top, with straight walls between them: a funnel, a square-to-round transition, or from two rings a tapered frame. Edit group opens the two sketches again.
- Split – cut solids or holes in two with a plane; a hollowed body keeps its cavity. Turn the plane for an angled cut, drag its arrow, or lay it on any face with "Pick face". Stretch makes a body longer or shorter at the plane instead: the part beyond moves and the cut through the body fills the gap, so a downloaded case grows through its straight walls while its compartments and rounded corners keep their size.
Refining
- Chamfer and fillet – break or round any edge of a solid, or scoop a straight edge out as a concave fillet, like the notched corners of a box, and remove or change the treatment again later; when a size is too large for the edge, one click finds the largest that fits.
- Sketches – draw outlines with lines, curves and ready-made shapes, draw freehand with a pen, a finger or the mouse (the line becomes a few points you can edit), set lines by length and angle as you draw ("50<30", Shift snaps in 15° steps), type lengths, angles, sizes and the position of a selected outline, point or curve handle (sums like "60+12.5" work in every number field), round or chamfer corners, snap to the outlines of other bodies, draw construction lines to snap to, and extrude, revolve or sweep them along a path into exact bodies. A revolve with a pitch winds the outline up as one continuous helical strand instead of rings, like filament on a spool. A sketch can also be built as a stroke: a closed outline becomes a frame, inside, outside or centred on the line, and an open line a stripe with flat, square or round ends. A drawing or photo laid under the sketch is traced into sketch lines with one click, its dark or its light part, at a threshold you set.
- Hollowing – turn a body into walls of one thickness, open on any sides you choose (top, bottom, front, back, left, right, in any combination) or closed – for boxes, cups and cases.
- Slope and narrow along – run the top of a box, cylinder, polygon, tube, wedge or round roof down to one end, or the sides of all but the tube in towards one end, straight or curved, by number or with a dot on the end: a roof sloping along its length, a ramp, a slanted pipe end, a boat's bow. A slope stays exact for chamfers, fillets and STEP, and so does a narrowed box, wedge or round roof. By @plazmabokor.
- Lids – the lid for a box, a pot or a tray that is open at the top, from its own outline, round or angular: pushed into the opening, put over the outside, gripping the wall from both sides like a food container or laid flat on it, with a tight, normal or loose fit (0.1, 0.2 or 0.3 mm per side) or a gap of your own, lid thickness and the depth and wall of the lip. It comes out beside the body, turned over with its plate down, ready to print without support.
- Offset and cut out – grow or shrink an exact body along all its faces by 0.01 to 10 mm, or only sideways so it keeps its height, for the clearance of a press fit or a snap joint, or cut one part out of another with a gap all round in one step, the part staying where it is.
- Punch – cut the outline of one body straight through another, along X, Y or Z, wherever the punch stands in front of it: a teapot's silhouette through a sign, a logo through a lid. The punch stays to be moved and used again, a clearance lets a printed part pass through, and the opening is an exact sketch body.
- Check clearance – before printing parts that should move, a hinge printed in place, a flexi toy, a lid in its box, check the selection or every visible object pair by pair: overlapping, touching, too tight or fine against a minimum gap you set, between layers or side by side; a click on a pair shows the spot. By @marcus040473.
- Surface texture – lay a relief onto any body, for grip or for looks: grooves, knurling, honeycomb, bumps, Voronoi cells, bricks, knitting, rope, basket weave, carbon fibre, tree bark, wood grain, cracks, a picture as a height map, tiled or pressed on once, or text, around round bodies or flat along an axis. Up to six patterns go on one body, each on faces of its own: bricks round the walls and knurling on top. For a print in two colours, the pattern can also become a part of its own, in a colour of its own. By @marcus040473.
- Delete face – click the faces of a fillet, a hole or a boss and delete them: the faces around them grow to close the gap, and the body stays exact for more fillets and the STEP export.
- Custom shapes – keep bodies you need again and again at the top of the shape library and insert them into any design with a click or by dragging; in the browser, or with the shared store on the server for every device. "Back up all" takes them along.
- Hole pattern – perforate a flat face of a body or the round wall of a cylinder, tube or bore (every hole pointing at the axis, the rows going all the way round): pick the face, choose round, square, rectangular, hexagonal or slot holes, set size, spacing, grid, staggered or a ring along the edge (by spacing or by number, a hole on every corner), plain holes, counterbores or countersinks (with metric screw sizes) or a shape of your own from the scene (rivets, a diamond plate, raised or cut in), the margin to the edge and the depth (through the whole part or a set depth), and see the holes as a preview before creating them. They stay ordinary holes grouped with the body, so ungrouping frees them again.
- Face – push a flat face of a body out or cut a pocket into it: pick the face, choose Out or In, set an inset from the edge, a corner radius and the depth, and see the result as a preview. It works on imported STLs too, and what it adds stays an ordinary sketch body grouped with the body.
- Wrap around a cylinder – lay an SVG pattern, a logo or lettering onto the wall of a cup or tube, raised or engraved, and centre it on the cylinder.
Files
- Fonts of your own – use any TrueType, OpenType or WOFF font for text, or in Chrome and Edge a font installed on the computer. A design keeps only the outlines of the letters it uses, so it opens anywhere. Arabic and Hebrew run right to left, Arabic letters join up.
- Bring your own models – import STL, OBJ, 3MF, STEP, SVG or DXF and build around it. A DXF part outline, as a laser cutting shop or a supplier sends it, comes in as a body with its holes as holes of their own, arcs and circles kept true. An SVG comes in as a sketch body: an area, a stroke outside or inside its lines, a silhouette without its holes, or the drawing widened all round - together a cookie cutter from one file, or the layers of a multicolour logo. The Text shape has the same fill modes, can stack its letters top to bottom, on an arc draws them narrower or wider, and turns into a text block of several lines, aligned left, centred or right; the shape library has a name tag: a text in coloured layers for a multicolour print, with an optional key ring hole and a rounded or chamfered edge on the letters, and an icon tag: an SVG icon in the same coloured layers, with a count and "as many as fit" to fill a plate. A coloured OBJ – from layerling, or from Tinkercad as a ZIP with its
.mtl – or a coloured 3MF, slicer projects included, comes in as one body per colour, and a 3MF with several objects as one body per object. A STEP file with several solids comes in as one body each, under its name and in its colour.
- Meshes made exact – an STL, OBJ or 3MF from Printables or Thingiverse is only triangles; Make exact finds its planes, cylinders, cones, spheres and tori and rebuilds it as an exact CAD body, so a bore is one real cylinder: fillets and chamfers follow clean edges, faces can be deleted, and STEP carries the real faces. Simplify mesh keeps sharp edges and the rims of holes exactly while it thins out flat faces.
- Export what your slicer wants – STL, 3MF with names and colours, or OBJ with colours, for the selection or the whole scene (hidden parts stay out), plus STEP if the design should travel on into a full CAD program, and the top view as SVG or as DXF with true arcs and circles for a laser cutter, with optional stencil bridges that hold the middle of an o or a b in place. PNG saves a clean picture of the view, at twice the resolution and with a transparent background if you like.
- Drawing export – select a part, or clear the selection for the whole visible design, then choose Export → Drawing → PDF or SVG. Generates front, top and right-side views in first-angle layout on a bordered engineering sheet with zone numbers and a lower-right title block, with overall dimensions, hidden edges, and diameter/position tables for axis-aligned circular bores. Views are 1:1 in millimetres; the sheet uses the smallest fitting ISO landscape size (or a larger custom size). Print at 100% / actual size. Positions are measured from each view's lower-left overall corner. Hole tables use nominal mesh geometry and do not automatically dimension angled/non-circular holes, threads, depths or tolerances. The projection engine is adapted from Cadverix-3D's drawing work.
- Update notice – on the published program an open page notices a new version by itself and offers to save and reload, listing what is new.
- Delete several designs at once – Select on the start page chooses designs by a click on their cards (or all of them), and one question deletes the whole choice; it works in the server folder too.
- Folders for your designs – sort the designs on the start page into folders (and folders into folders) by dragging them or with "Move to …"; the search looks through all of them, and "Back up all" keeps them.
- Projects as files – save a whole project, history, sketches and groups included, as a
.lyl file and carry on elsewhere. In Chrome and Edge you choose the folder yourself and Ctrl+S saves into that same file again; other browsers download it. Older .skf files from earlier versions still open; saving then writes a .lyl beside them.
- Earlier versions – before Save writes over a
.lyl file, layerling keeps the file as it was, and while you work a state of the design every few minutes; each opens again as a new design. How many stay is set under Settings → Backups, and in Chrome and Edge they can also go into a folder of your own. A notice on the start page and in the editor reminds you to back up all designs into a file and keep it in a second place: your designs, your backup.
- Bug report – one link in the footer saves a ZIP with the design as a
.lyl and a text with the version, browser and last messages, ready to attach in the forum or on GitHub, which refuse a bare .lyl.
- Designs you recognise – each design with a thumbnail, in your own browser or in the server folder.
- Attachments – keep notes, a photo of the printed part or a datasheet inside the design:
.md and .txt files, .png, .jpg and .webp pictures and PDF files travel with the .lyl file. The eye opens a text or a picture in a window; a PDF is downloaded. SVG is not accepted, since it can carry scripts.
Viewing
- Perspective or straight-on – switch between the normal view and a flat, orthographic one with the cube button beside the zoom controls, or by pressing O. Your viewing direction and framing are kept.
- Turn the view at the cube – dragging the view cube turns the view like the right mouse button, with one finger on a tablet; a click still jumps to that side, and a click on a corner or an edge looks from there. Keys 1–6 jump too, and Shift+1–6 also zoom to the selection.
- Four saved views per design – Shift+7, 8, 9 or 0 saves the view exactly as it is (angle, pan, zoom), and the key alone brings it back. Each design keeps its own, and a saved
.lyl file carries them along.
- Look straight onto the workplane – P, or the button next to Place workplane in the view bar, turns the view square onto the workplane, on a sloped face too, with its origin in the middle.
- The view cube in any corner – Settings > Appearance > View cube position puts the cube in the top left, top right, bottom left or bottom right; in any corner but the top left, the view bar moves up into its place.
- In your language – the program and its user guide come in English, German and 18 more languages; the language list is at the very top right.
- Look from below – the eye over a grid in the view bar hides the plate, so the underside of a design can be seen without it in the way.
- A second view in its own window – a button in the view bar opens a second window that shows the same design through a camera of its own, with its own view cube and view bar, and follows every change. It opens where you last left it.
- Panels where you want them – the object list, the settings, the section view, the tape measure and the tool panels for edges, hollowing and patterns move by their title bar and open there again; a double-click docks them.
- Right-click menu – a short right click on a body brings up the most used commands: duplicate, hole or solid, group, chamfer, fillet and hollow for one body, mirror and scale by percent, hide, lock, lock shape (it still moves, turns and groups, but keeps its size and settings), drop to the workplane, delete. Dragging with the right button still turns the view.
- Hide others and invert selection – to work on a few parts deep inside a design, select them and hide everything else in one step (right-click menu or the Visibility menu; Ctrl+Z or Ctrl+Shift+H brings it back), or turn the selection round so every other visible part is selected.
- Section view – cut the view open along a plane across X, Y or Z to look at walls, cavities and parts that fit into each other, with a coarse and a fine slider. Only the view is cut: the design and every export stay whole. The cut is hatched like a drawing, a body inside another the other way; it can also be filled plain or left open. "Section as SVG" saves the cut itself at 1:1, for a laser or a template, "Measure" reads wall thickness and gaps right on the cut, snapping square to the wall, and "Sketch from cut" starts a sketch right on the cut with its outlines in it (holes as true circles), for a lid, an insert or a gasket that fits.
- Workplane on any face – press W and click a face to build on it; a click near a corner puts it exactly on the corner, near an edge on the edge with the grid running along it, and on the empty plate where you click. An eye hides the plane for a clear view while it keeps applying. An AI can set it on a face too.
- Mouse buttons as in your slicer, and a 3D mouse – in the settings, the mouse buttons can work as in Bambu Studio and OrcaSlicer: a left drag on empty space turns the view, the right button shifts it, and Shift with a left drag draws the selection box. A SpaceMouse or another 3D mouse turns, shifts and zooms the view in Chrome and Edge once it is connected there.
- On a tablet – one finger works the design, exactly as the left mouse button does: tap to select, drag to move, drag on empty space for a selection box. Two fingers belong to the view: spread or pinch them to zoom, move them together to shift the workplane. Putting a second finger down takes back whatever the first one had started, so a pinch never nudges a part. Turning the view has no gesture of its own; the view bar carries a switch for it, shown only on a touch screen, and while it is on, one finger orbits instead of selecting. Number fields hand you their whole value when you tap them, ready to be overwritten – a decimal keypad has no arrow keys to move the caret with. A finger reaches a little further to sketch points, lines, handles, measuring points and edges than a mouse does, but a stylus is the better tool on a tablet: finer, and it does not cover what you aim at.
Videos
Made by others, not by this project:
- Layerling Tutorials – HL ModTech (English). A playlist by a Tinkercad user, so far with a look at layerling of about 23 minutes (free, browser-based CAD that extends Tinkercad), a deeper dive into its features and a short update on printed threads.
- Layerling – Playlist – Making Layers (English). A series about layerling, so far with "Tinkercad alternative / upgrade? Introducing Layerling!", an overview for people coming from Tinkercad, and "Layerling Sketch Tools!" on the sketch tools.
- Layerling – TECHNOBENTO (English). A playlist about layerling, so far with “A new way to sketch in Layerling”.
- Layerling CAD Videos – Printology (English). A playlist about layerling, so far with “I'm 100% In on Layerling - The Next Big Free CAD” and “Layerling Features That Blow Tinkercad Out Of The Water”.
- I Tried Layerling After Tinkercad… Is It REALLY Better? – Maker Mates Studio 3D Printing (English). Someone coming from Tinkercad tries layerling and compares the two.
- Print by Layer – Print N Repeat (English). A playlist about layerling, so far with “The EASIEST Way to Design Hinges in Layerling” and “The EASIEST Way to 3D Model Threads!”.
- Tinkercad Too Basic? Fusion 360 Too Much? Meet Layerling for 3D Printing – 3D Jesus | 3D Printing & Design (English). A first test of layerling without any manual: fillets and chamfers, hollowing, threads, sketches, revolved bodies, patterns, import and printer profiles.
- Layerling en español | Del primer contacto al proyecto completo – Random Maker (Spanish). A playlist in Spanish, from a first look at layerling to complete projects: how it differs from Tinkercad, a point-by-point comparison and moving projects over.
- Proyectos en Layerling – Fulcro 1900 (Spanish). A playlist of projects in layerling, so far with an introduction to layerling as a free tool more complete than Tinkercad, desk accessories (three models), a phone case, and a threaded rod, nut and screw.
- Layerling – Werkplaats Marc (Dutch). A playlist about layerling, so far with a first look for Tinkercad users (“Layerling - De Gratis Tussenstap van Tinkercad naar Fusion 360”) and a tutorial on sketches: tracing a photo, revolve and sweep along a path (“Schetsen Uitgelegd”).
Getting Started
The shortest way is the hosted version. Nothing to install, nothing to sign up for – open it and build:
https://layerling.com/
The rest of this section is about running your own copy: on your computer, or on a machine in the workshop that everyone opens in their browser. Wherever the app is served from, nothing is sent to anyone else: designs stay in the browser they were made in (or in the server folder you set up yourself), and exports download straight to the person's own computer.
Windows Quickstart
Never used a terminal before? On a Windows 11 (or current Windows 10) machine with nothing installed yet, open
PowerShell (search for it in the Start menu, no administrator rights needed) and paste this one line:
irm https://raw.githubusercontent.com/henmedia/layerling/main/scripts/windows-quickstart.ps1 | iex
It installs Git and Node.js if they are missing, downloads layerling into %USERPROFILE%\layerling, and opens it in
your browser at http://127.0.0.1:3000/. Leave the PowerShell window open while you use layerling; Ctrl+C in that
window stops it.
Run the very same line again whenever you want to update layerling – it notices the existing folder and pulls the
latest version instead of downloading it a second time. The script itself lives at
scripts/windows-quickstart.ps1, so you can read exactly what it does before
running it, or download it and run it locally instead of piping it into PowerShell.
Opening It Again Later
The one-liner above also leaves a shortcut named “Start layerling” on your desktop. Double-click it whenever you
want to open layerling again – no PowerShell, no re-installing, no re-downloading, just the server starting and your
browser opening on its own. It also updates layerling first (when the folder has no changes of your own) and opens the
browser only once the server is really ready. If layerling is already running, it starts no second server and does not
update underneath the running one - it just opens the page. Wanted layerling somewhere else, say on another drive? Run the script with
the folder you want:
& ([scriptblock]::Create((irm https://raw.githubusercontent.com/henmedia/layerling/main/scripts/windows-quickstart.ps1))) -InstallPath "D:\3DPrinter\Layerling"
If your shortcut was made by an older version of the script, run the one-liner once more; it replaces the shortcut with the new one.
Prefer doing it by hand? Open PowerShell and run:
cd $env:USERPROFILE\layerling
npm run dev
then open http://127.0.0.1:3000/ yourself. Ctrl+C in that window stops it either way.
macOS Quickstart
On a Mac, open the Terminal app (press Cmd+Space, type Terminal, press Enter) and paste this one line:
curl -fsSL https://raw.githubusercontent.com/henmedia/layerling/main/scripts/mac-quickstart.sh | sh
It needs Git and Node.js 22.18 or newer. If one is missing, the script says what to install (macOS offers the developer tools with Git in a window, Node.js comes as an installer from nodejs.org; with Homebrew it installs them itself) and stops, so you can run the same line again. Then it downloads layerling into ~/layerling, puts "Start layerling" on your desktop and opens layerling in your browser at http://127.0.0.1:3000/. Leave the Terminal window open while you use layerling; Ctrl+C in that window stops it.
Run the same line again whenever you want to update: the existing folder is kept, and starting layerling pulls the latest version first. The script lives at scripts/mac-quickstart.sh, so you can read what it does before you run it. For another folder: LAYERLING_DIR=~/3D/layerling sh mac-quickstart.sh (after downloading the script). It has not been tried on a real Mac yet; if something goes wrong, please tell us in the discussions.
Docker
To run layerling on a computer, NAS (Synology, Unraid, etc.) or home server without installing Node.js, use the ready-made image henmedia/layerling on Docker Hub (also at ghcr.io/henmedia/layerling, the same image). Every release publishes it for amd64 and arm64 (Raspberry Pi, ARM NAS) under its version number and as latest. The app listens on port 3000.
New to Docker? Running layerling in Docker, step by step starts from nothing on Windows, macOS or Linux: it installs Docker, starts layerling and saves your designs as files in a folder on your computer.
The quickest way is a single command:
docker run -d --name layerling -p 3000:3000 -v layerling-thumbnails:/app/.codex/project-thumbnails --restart unless-stopped ghcr.io/henmedia/layerling:latest
The -v option keeps the preview pictures of the start page in a Docker volume named layerling-thumbnails, so they survive an update; without it they are inside the container and gone each time it is created again (the designs themselves are not affected: they live in the browser or in the server folder). On a NAS with a container manager (Synology Container Manager, Unraid, Portainer), search for henmedia/layerling in its registry (Docker Hub) or enter henmedia/layerling:latest, map port 3000, and add a volume for /app/.codex/project-thumbnails. To update, pull the image again and recreate the container (or let Watchtower do it). On Unraid, layerling is also in the Community Applications store: search for “Layerling” and install it with a few clicks; the template, maintained by jbat66, already sets up server storage on an Unraid share.
The image tags are plain version numbers without a "v": ghcr.io/henmedia/layerling:1.42.0, while the GitHub release is called v1.42.0. A pull only fetches the new image; a container that already exists keeps running the old one until it is removed and created again:
docker pull ghcr.io/henmedia/layerling:latest
docker stop layerling
docker rm layerling
docker run -d --name layerling -p 3000:3000 -v layerling-thumbnails:/app/.codex/project-thumbnails --restart unless-stopped ghcr.io/henmedia/layerling:latest
docker inspect layerling | grep image.version shows which version the container really runs. If you mounted a folder for the server storage, add the same -v option again.
To build the image yourself instead, use the included Dockerfile and compose.yml:
- Install Docker. On Windows or macOS, install and start Docker Desktop. On Linux or a NAS you need Docker with Compose (
docker compose or the standalone docker-compose).
- Get the files. Either download the repository as a ZIP (Code → Download ZIP) and extract it, or clone it:
git clone https://github.com/henmedia/layerling.git
cd layerling
- Start it. In the project folder, open a terminal (e.g. PowerShell on Windows) and run:
docker compose -f docker/compose.yml up -d --build
With the older standalone binary, write docker-compose instead of docker compose. Docker builds the image and runs the container in the background (-d); the first build takes about 2–3 minutes. Without --build, the same command pulls the ready-made image instead.
- Open it. On the same computer at
http://localhost:3000/, from other devices on your network at http://<YOUR-SERVER-IP>:3000/.
Everyday commands:
- Stop:
docker compose -f docker/compose.yml down
- Restart:
docker compose -f docker/compose.yml up -d
- Update (after pulling new code or extracting a new ZIP):
docker compose -f docker/compose.yml up -d --build; with the ready-made image docker compose -f docker/compose.yml pull and then up -d
Installing as an app and offline use need https, and the static export. A browser installs an app and keeps it for offline use only on https:// or on localhost; on a plain http://192.168.x.x:3000 address it offers neither (layerling hides its install hint there). Even with https, the offline files (sw.js) are written only into the static export (see Static Hosting), not into this image, which runs the server version. For installing and offline use on a network, serve the static export over https; for an https address in front of the container, use a reverse proxy such as Caddy or nginx with a certificate (for example from mkcert).
The image runs node apps/web/server.js in production mode, so the MCP bridge is off there unless you switch it on (see Letting an AI client reach a copy on a NAS or server). To offer a shared project folder, bind a writable directory and set LAYERLING_SHARED_PROJECTS_DIR in compose.yml to the path inside the container where it is mounted, for example ./shared-projects:/shared-projects with LAYERLING_SHARED_PROJECTS_DIR: "/shared-projects" (see Shared Designs on a Network). The container runs as the user with the number 999, so that user must be allowed to write to the folder: sudo chown 999:999 ./shared-projects, or add user: "1000:1000" to the service (your own user and group numbers, id -u and id -g show them) so that the container runs as you. Without it the folder shows up on the start page but nothing can be saved there. After changing it, run docker compose up -d: docker compose restart keeps the old setting. docker exec <container> printenv LAYERLING_SHARED_PROJECTS_DIR shows the one in use.
To keep every design in that folder and none in the browser, there is a complete guide in English and German with its own compose file and an update script that checks the configuration, backs up the folder and rolls back a failed update: docs/docker, written by Jürgen Keller. With LAYERLING_NEW_DESIGNS_ON_SERVER: "always", everything that makes a design goes to the server folder: the tile, opening or importing a file, restoring a backup (with its folders), duplicating and a state taken from the history, and New folder on the start page makes a server folder.
To choose the colour theme people get on their first visit, set LAYERLING_DEFAULT_THEME to system, light, dark or graphite (the same way, in compose.yml or in the environment of npm run start). Anyone who has opened layerling before keeps the theme their browser already has, and anyone can still change it with the theme switch. Without the setting the theme follows the system. A copy served as plain files has no server to read it, so it does not apply there.
For a class or a workshop with children, LAYERLING_SIMPLE_MODE starts layerling in its simple mode: the ribbon keeps the tools a workshop uses, the shape library a short list, the buttons are larger, and the start page shows the designs and no news, no welcome text and no links out of layerling. true is the start for people who have not chosen (the settings have a switch, and leaving the mode there takes a press held for two seconds), always holds for everyone and takes the switch away. A link ending in ?mode=simple switches it on for the device that opens it, and ?mode=full off again. It is set the same way as the others, and a copy served as plain files has no server to read it (the link and the setting still work there).
With the shared folder on, LAYERLING_NEW_DESIGNS_ON_SERVER makes new designs start on the server: true is the start for people who have not chosen (they can untick New designs on the server on the start page), always holds for everyone and locks the tick. It is set the same way, and a copy served as plain files has no server to read it.
Behind a reverse proxy with a domain, the proxy has to pass on the original Host and X-Forwarded-Proto (nginx: proxy_set_header Host $host; and proxy_set_header X-Forwarded-Proto $scheme;), otherwise saving to the server is refused with "Shared projects only accept requests from this site.". If the proxy rewrites the host and you cannot change that, list the address people use in LAYERLING_ALLOWED_ORIGINS (comma-separated, for example https://layerling.example.com).
Static Hosting: Plain Files on a Web Server
Any web server can serve layerling as plain files; no Node.js runs on it. Build the files once on a computer that has Node.js (see What You Need):
npm install
npm run export
The finished site is in apps/web/.next-export/. Copy the contents of that folder (not the folder itself) into the web server's document root, so that index.html lies directly in it.
Four things to know:
- layerling needs an address of its own. The files refer to each other with paths that start at the root (
/_next/...), so layerling must be served at the root of an address, such as https://layerling.example.com/ or http://192.168.0.5:8080/. It does not work in a subfolder (https://example.com/layerling/) and cannot be opened from disk (file://). If you only see a block of plain text without any styling, the script and style files did not load: open the browser's developer tools (F12), look at the Network tab for red /_next/... entries and compare their address with where you put the files.
- Folders that start with an underscore must be served. Some servers hide them (GitHub Pages does without a
.nojekyll file, for example), and _next holds the whole program.
- A quick test on your own computer:
npx serve apps/web/.next-export and open the address it prints.
- Installing as an app and offline use need https. The export holds the offline files (
sw.js), but a browser uses them only on an https:// address or on localhost, not on a plain http:// address in your network.
Editor profiles
An optional editor profile changes the 3D ribbon and selected tool options for this page. To try the example profile in a local checkout:
LAYERLING_EDITOR_PROFILE="$(cat docs/examples/editor-profile.json)" npm run dev
Open the editor, add a box, and select it. The simple ribbon uses the usual icon size. Print check is visible and Lid and Flexi joints are hidden. Open Fillet to see a starting radius of 2 mm on a box large enough for it. The Only visible edges option is hidden and on.
version must be 1. An optional base of simple or full selects that layout for this page, ahead of the browser choice and the Node server default. Omit it to keep the ordinary mode switch.- Set
enlargeInSimpleMode: false to use the same toolbar, shape menu and control sizing as in full mode. The browser’s toolbar size choice still applies.
- Under
tools, visible: true or false overrides the layout for tools in the clipboard, history, combine, modify and arrange sections of the 3D ribbon, as well as import. Use the tool's ID (the data-layerling-tool attribute on regular ribbon buttons). The Ribbon settings can still hide or reorder the tools available in the active profile. A visible tool still needs the usual selection. Unknown entries have no effect.
- Under
tools.fillet.options, amount.default is a radius in millimetres. A valid remembered radius takes precedence, and the tool's own starting value is used when neither fits the body. onlyVisibleEdges accepts visible, a boolean default, and locked. A lock requires a default and takes precedence over the remembered value.
- Profiles affect the ribbon and the connected dialog options. Context menus, keyboard shortcuts, shapes and the camera retain their normal behavior. Use the host's authorization for access to projects.
LAYERLING_EDITOR_PROFILE is read by the layout when the HTML is generated. Set it before starting the development server or building production HTML, including a static export. Hosts that generate HTML themselves may instead provide one <script type="application/json" id="layerling-editor-profile">…</script> in the document head before Layerling's scripts. Escape literal < in the serialized JSON as \u003c. Profiles are independent of project files and browser settings and are read once per page load. For per-account profiles, serve the personalized HTML from a private, uncached page outside the static service worker’s offline cache, such as a PHP entry point.
Shared Designs on a Network
layerling itself is only files, so the shared folder needs something on the server that can write. There are two ways, and you need just one of them: Node or Docker (this section, with LAYERLING_SHARED_PROJECTS_DIR), or a plain web server with PHP (the store folder, further down). A web server that serves the files without either of them – npx serve, nginx or Apache without PHP – shows layerling fine, but has no server folder.
If you run layerling with npm run dev or npm run start on a machine other people open in their browser, it can offer a
shared folder for .lyl designs. npm run start serves what npm run build made, so run that once first. Point LAYERLING_SHARED_PROJECTS_DIR at a directory the user who starts layerling may write to (a folder under /srv often belongs to root, make one of your own or change its owner) and start:
LAYERLING_SHARED_PROJECTS_DIR=/srv/layerling-projects npm run start
The start page then shows the designs in two tabs, Server for the shared folder and Browser for the designs of
this browser. With the Server tab open, Create new 3D design starts a design in the server folder you are in, New
folder makes a subfolder, and a trail under the tabs says where you are and leads back out. Designs move by dragging
them onto a folder or onto a step of the trail – or through Move to … in their menu. A design from your browser goes
onto the server by dragging its card onto the Server tab, or with Put on the server in its menu; a folder goes the
same way, with everything in it, and stays a folder on the server. The way back is
Put in this browser in the menu of a server design, or dragging its card onto the Browser tab: the design then lives
only in this browser and leaves the server folder, also for the others.
Two buttons on the start page save the trouble of moving designs one by one: Put all on the server moves every design of this browser into the server folder in one go, in the same folders, and the tick New designs on the server makes each new design start in the server folder, so it is saved there from the first change on. A design whose name is already taken on the server stays in the browser.
The search box at the top searches the whole server folder, not just the one you are standing in. Every hit says
which folder holds it, and that folder is a button: one click and you are there, with the search cleared. Folders are
found by name too. While you are searching, the server tile on the start page says how many matches are waiting over
there.
Duplicate in a design's menu makes a copy of it. On the server the file itself is copied, next to the original and
under a free name, picture and all – nothing is repacked, so the copy carries exactly the geometry of the original. In
your browser the copy becomes a design of its own, with the same shapes, the same history and its own preview picture,
and it belongs to nobody on the server.
Open a copy in the same menu does the same and opens the copy right away, for trying something out: the original
stays as it was, whatever you do in the copy.
A design that lives on the server saves itself back there, five seconds after the last change and when you leave the
editor. Thumbnails land beside the files in .thumbnails. Designs that are only in your browser stay there, untouched.
Custom shapes saved to the server go into a folder named Custom shapes at the top of the store, one .lyl with its
picture each. layerling creates it with the first such shape; it is an ordinary folder, so it shows on the start page and
a shape in it opens and saves like any design. Neither the Node route nor store.php needs anything extra for it.
The settings saved with "Make default" in the workspace settings are kept in the store too, as .settings/default.json
(a hidden folder the start page does not list). A browser that has lost its own, because its data was cleared or it is
another browser, picks them up when the start page loads, so a new design starts with them again. There is one default for
the whole store; the last one saved in any browser wins. Delete the file to go back to each browser's own.
Opening a design from the server gives you a private local working copy. Saving back checks the revision on the server
first; if someone else changed the file in the meantime, layerling refuses to overwrite it and asks you to reload or save
under a different name. This is shared file storage, not simultaneous editing.
Behind an authenticating reverse proxy (such as Authelia, oauth2-proxy, Cloudflare Access, or HTTP Basic Auth), set LAYERLING_USER_HEADER to the header your proxy sets (e.g. LAYERLING_USER_HEADER=X-Forwarded-Email or in Apache SetEnv LAYERLING_USER_HEADER Remote-User) to isolate each user's designs into .users/<user>/. This is only safe when layerling can be reached through the proxy alone, so nobody can send arbitrary headers directly to the server.
Without Node: the store Folder
An installation served as a static export – plain files on a web server – cannot write anything by itself. For that case
store.php travels with the export. Create a folder named store next to index.html that the web server may write to,
and layerling offers the same shared storage as above, folders and all. Without the folder the feature stays invisible,
and the short guide in the editor explains how to switch it on. The web server needs PHP.
PHP limits uploads by default (upload_max_filesize and post_max_size, a few megabytes), and a large design or a backup of
many designs can be bigger. store.php then says which limit it ran into and what it stands at; raise both in php.ini, or in the
Docker image with a file such as uploads.ini in /usr/local/etc/php/conf.d/ (upload_max_filesize = 512M, post_max_size = 512M).
The folder has no login: whoever can reach the page can read, write and delete what is in it. On a home network or in
a workshop that is the point; on a publicly reachable site, protect it or leave it out.
Nothing in the folder is meant to be opened by its address: layerling reads and writes it only through store.php.
On Apache, store.php writes a .htaccess into the folder that refuses every direct request. Apache reads it only where
AllowOverride lets it (Debian's default for /var/www is None, which ignores it), and nginx and other servers never
do, so deny access to store/ there yourself (in Apache: <Directory /var/www/html/store> Require all denied </Directory>,
in nginx: location /store/ { deny all; }). store.php also checks every export it saves, so a file that could run in a
browser is refused either way.
The folder can also live outside the web root, where no address reaches it at all, .htaccess or not: set
LAYERLING_SHARED_PROJECTS_DIR, the same setting the Node server reads, to its path – in Apache with
SetEnv LAYERLING_SHARED_PROJECTS_DIR /var/layerling-projects, in nginx with
fastcgi_param LAYERLING_SHARED_PROJECTS_DIR /var/layerling-projects;, in Docker as an environment variable of the
container. That folder then takes the place of store; it too has to exist and be writable for the web server.
One thing to remember when deploying: if you mirror the export with an option that removes anything extra – rsync --delete, robocopy /MIR, WinSCP -delete – exclude store explicitly, or every update will wipe the projects.
Working on layerling
Take this path if you want to change the code.
What You Need
- Node.js 22.18 or newer (the guide and font scripts load TypeScript files directly, which older versions cannot); 24 works too, the Docker image uses it
- npm, included with Node.js
Check your versions with node -v and npm -v. If those commands do not work, install Node.js from the official
Node.js website and reopen your terminal.
Install and Run
git clone https://github.com/henmedia/layerling.git
cd layerling
npm install
npm run dev
No Git? Press the green Code button on the GitHub page, choose Download ZIP, extract it, open a terminal in the
extracted folder and start with npm install.
Then open http://127.0.0.1:3000/. Leave the terminal open while you use the app; Ctrl+C stops the development server.
To open the development server from another computer by a name, such as http://myhost.local:3000/, list that name in the environment variable LAYERLING_ALLOWED_DEV_ORIGINS before you start (several names separated by commas, *.local for every name ending in .local). Without it, the development server answers only to localhost and 127.0.0.1. The static export and npm run start do not need it.
On Linux and macOS, scripts/start-layerling.sh does the daily start for you: it updates the checkout first (skipped if you changed files in it), starts the server, waits until it answers and then opens the browser. Run it from anywhere, for example ~/layerling/scripts/start-layerling.sh. It needs Git and Node.js, as above. If layerling already runs on that port, it only opens the browser instead of starting a second server. Port 3000 taken by something else? Start it with PORT=3100 scripts/start-layerling.sh. It has been tried on Debian Linux (without a desktop, so the browser step only prints the address) and in a Windows shell; macOS is untested – if it misbehaves on your system, please tell us in the discussions.
Developing in a Container
Prefer not to install Node.js? Develop in a container instead. You need a container engine with Compose –
docker compose or podman compose (rootless Podman on SELinux works too; the :z flag in the compose file handles
the file labels):
docker compose -f docker/compose.dev.yml up
Open http://127.0.0.1:3000/. The first start installs dependencies; later starts go straight to the dev server with
hot reload. Stop it with Ctrl+C. If you update dependencies and something looks stale, delete node_modules/ in the
project folder and start again.
Running the production container from docker/compose.yml at the same time? It uses port 3000 as well – change the
host-side port on one of them (e.g. "3100:3000").
Useful Commands
| Command |
What it does |
npm run typecheck |
TypeScript checks |
npm run test |
Unit tests |
npm run test:e2e |
End-to-end tests |
npm run build |
Production build (npm run start serves it) |
npm run export |
Static export for plain web hosting |
npm run guide |
Build the user guide pages from docs/guide (the export and npm run dev do this too) |
npm run guide:images |
Retake the guide's pictures from the running program (needs npm run dev -- -p 3010; see docs/guide/README.md) |
npm run printers:update |
Refresh the printer presets from OrcaSlicer's profiles |
npm run mcp:layerling |
Start the MCP server for AI clients (see below) |
layerling MCP Skill
layerling includes a local MCP server for AI clients that support MCP tools. It lets an agent inspect and control a live
editor tab: list open editors, read the scene, create, update and select objects, group, cut and separate parts, list CAD
edge ids, apply chamfer or fillet, hollow a body, inspect errors and capture viewport images.
It works against a local development server. In production builds and static hosting the MCP route is disabled, unless the
server switches it on with an access token (see below); on layerling.com it is always off.
- Start layerling from the project folder with
npm run dev (see Install and Run).
- Open an editor tab, e.g.
http://127.0.0.1:3000/?editor=1 - or leave it out: when no editor is open, the first tool that needs one starts your browser with an editor (not for a copy on a NAS or server; LAYERLING_MCP_OPEN_EDITOR=0 switches it off).
- Connect your AI client as described below. It starts the MCP server itself with
node scripts/layerling-mcp-server.mjs.
The main tool names are layerling_list_editors, layerling_read_scene, layerling_list_objects,
layerling_create_shape, layerling_update_object, layerling_list_edges, layerling_apply_edge_treatment,
layerling_hollow_object, layerling_make_lid, layerling_offset_object, layerling_cut_out, layerling_punch, layerling_array_objects, layerling_set_section_view and layerling_capture_image.
Claude Code
Nothing to install: the repo already ships .mcp.json, which registers the MCP server for this project, and a copy of the
skill at .claude/skills/layerling-mcp-skill, which is where Claude Code looks for one. Open the layerling folder in
Claude Code and ask:
Use the layerling MCP tools to list my open layerling editors and inspect the current scene.
Claude Desktop
Claude Desktop does not read a project's .mcp.json or skill files, but it can use the same MCP server through its own
config. Add the server there, using docs/mcp/claude-desktop-config.example.json
as the template and replacing the script path with the absolute path on your machine. After restarting Claude Desktop, ask:
Use the layerling MCP tools to list open editors, inspect the scene, and modify the selected object.
Codex
Copy the skill from docs/skills/layerling-mcp-skill into your Codex skills folder.
Windows PowerShell:
New-Item -ItemType Directory -Force "$env:USERPROFILE\.codex\skills" | Out-Null
Copy-Item -Recurse -Force "docs\skills\layerling-mcp-skill" "$env:USERPROFILE\.codex\skills\layerling-mcp-skill"
macOS or Linux:
mkdir -p ~/.codex/skills
cp -R docs/skills/layerling-mcp-skill ~/.codex/skills/
Then add an MCP server entry to your Codex config, using docs/mcp/codex-config.example.toml
as the template and replacing the script path with the absolute path on your machine. Restart Codex and ask:
Use $layerling-mcp-skill to list my open layerling editors and inspect the current scene.
Gemini & Antigravity
For Antigravity, the repo ships a copy of the skill at .agents/skills/layerling-mcp-skill, which Antigravity discovers automatically. For Gemini CLI, copy the skill from docs/skills/layerling-mcp-skill into your global skills folder.
Windows PowerShell:
New-Item -ItemType Directory -Force "$env:USERPROFILE\.gemini\skills" | Out-Null
Copy-Item -Recurse -Force "docs\skills\layerling-mcp-skill" "$env:USERPROFILE\.gemini\skills\layerling-mcp-skill"
macOS or Linux:
mkdir -p ~/.gemini/skills
cp -R docs/skills/layerling-mcp-skill ~/.gemini/skills/
Then add the server to your Gemini CLI settings.json or Antigravity mcp_config.json, using docs/mcp/gemini-config.example.json as the template and replacing the script path with the absolute path on your machine. Restart the client and ask:
Use the layerling MCP tools to list my open layerling editors and inspect the current scene.
Letting an AI client reach a copy on a NAS or server
A copy you host yourself (the Docker image on a NAS, a home server) can let an AI client drive its open editors over the
network. It is off by default, because whoever can drive the bridge can read and change the open designs. Switch it
on with two settings on the server, read when it starts - the ready-made image needs no rebuild:
environment:
  LAYERLING_MCP_REMOTE: "true"
  LAYERLING_MCP_TOKEN: "a-long-random-secret-of-at-least-16-characters"
Without a token of at least 16 characters the bridge stays closed. Then:
- Open an editor tab of that copy in a browser, e.g.
http://nas:3000/?editor=1, and keep it open.
- Give the MCP client the address and the same token: set
LAYERLING_URL=http://nas:3000 and
LAYERLING_MCP_TOKEN=<the token> in its configuration (see the examples in docs/mcp).
The token protects the commands: only a client that sends it can list or drive the editors. The editor pages need none,
but they only count when they are pages of that copy, opened by an address or a name that only someone in your own
network can use (an IP address, a name without a dot, or one ending in .local or .lan). This keeps a web page on the
internet from reaching your NAS through your browser. If you open the copy under a real domain, for example behind a
reverse proxy, list it in LAYERLING_MCP_ALLOWED_HOSTS (comma-separated). Use this on a network you trust, and use HTTPS
for anything beyond it: the token travels in a header.
Contributing
Contributions are welcome, and you do not have to be a 3D printing person to help – a clearer sentence in this README
counts. Good places to start:
- editor bug fixes
- geometry and boolean test cases
- import and export edge cases (STL, OBJ, 3MF, STEP, SVG, DXF)
- UI polish
- documentation screenshots and videos
- accessibility and performance improvements
Read .github/CONTRIBUTING.md before opening a pull request. What changed in each version is in
the changelog.
Security
Please do not open public issues for security-sensitive reports. Read .github/SECURITY.md for the
reporting process.
Where This Comes From
layerling is a fork of SketchForge-3D by Formsmith746 and the SketchForge
contributors. The fork started on 16 September 2026 from SketchForge 1.0.9. SketchForge remains an excellent project and
the reason this one exists.
Trademarks
Tinkercad is a trademark of Autodesk, Inc. layerling is an independent project and is not affiliated with, endorsed or sponsored by Autodesk.
License
Copyright (C) 2026 layerling contributors.
Copyright (C) 2026 SketchForge contributors.
layerling is a modified version of SketchForge-3D and is licensed under the GNU Affero General Public License v3.0 only
(AGPL-3.0-only) – the same licence as the original. See LICENSE.
If you modify layerling and let people use the modified version over a network, section 13 of the licence requires you to
offer them the corresponding source code. The dashboard carries a Source link for exactly that: set
NEXT_PUBLIC_SOURCE_CODE_URL at build time to the public URL of the source your build came from.






 Layerling 是一款免费的、基于浏览器的 3D CAD 工具,用于设计 3D 打印零件。你可以把形状拖到打印平台上,挖孔、圆化边缘、编组零件并导出,无需账户,也不需要 CAD 基础。