🦉 OWL: Optimized Workforce Learning for General Multi-Agent Assistance in Real-World Task Automation
[![Documentation][docs-image]][docs-url]
[![Discord][discord-image]][discord-url]
[![X][x-image]][x-url]
[![Reddit][reddit-image]][reddit-url]
[![Wechat][wechat-image]][wechat-url]
[![Wechat][owl-image]][owl-url]
[![Hugging Face][huggingface-image]][huggingface-url]
[![Star][star-image]][star-url]
[![Package License][package-license-image]][package-license-url]

中文阅读 |
Community |
Installation |
Examples |
Paper |
Citation |
Contributing |
CAMEL-AI |
🏆 OWL achieves 69.09 average score on GAIA benchmark and ranks 🏅️ #1 among open-source frameworks! 🏆
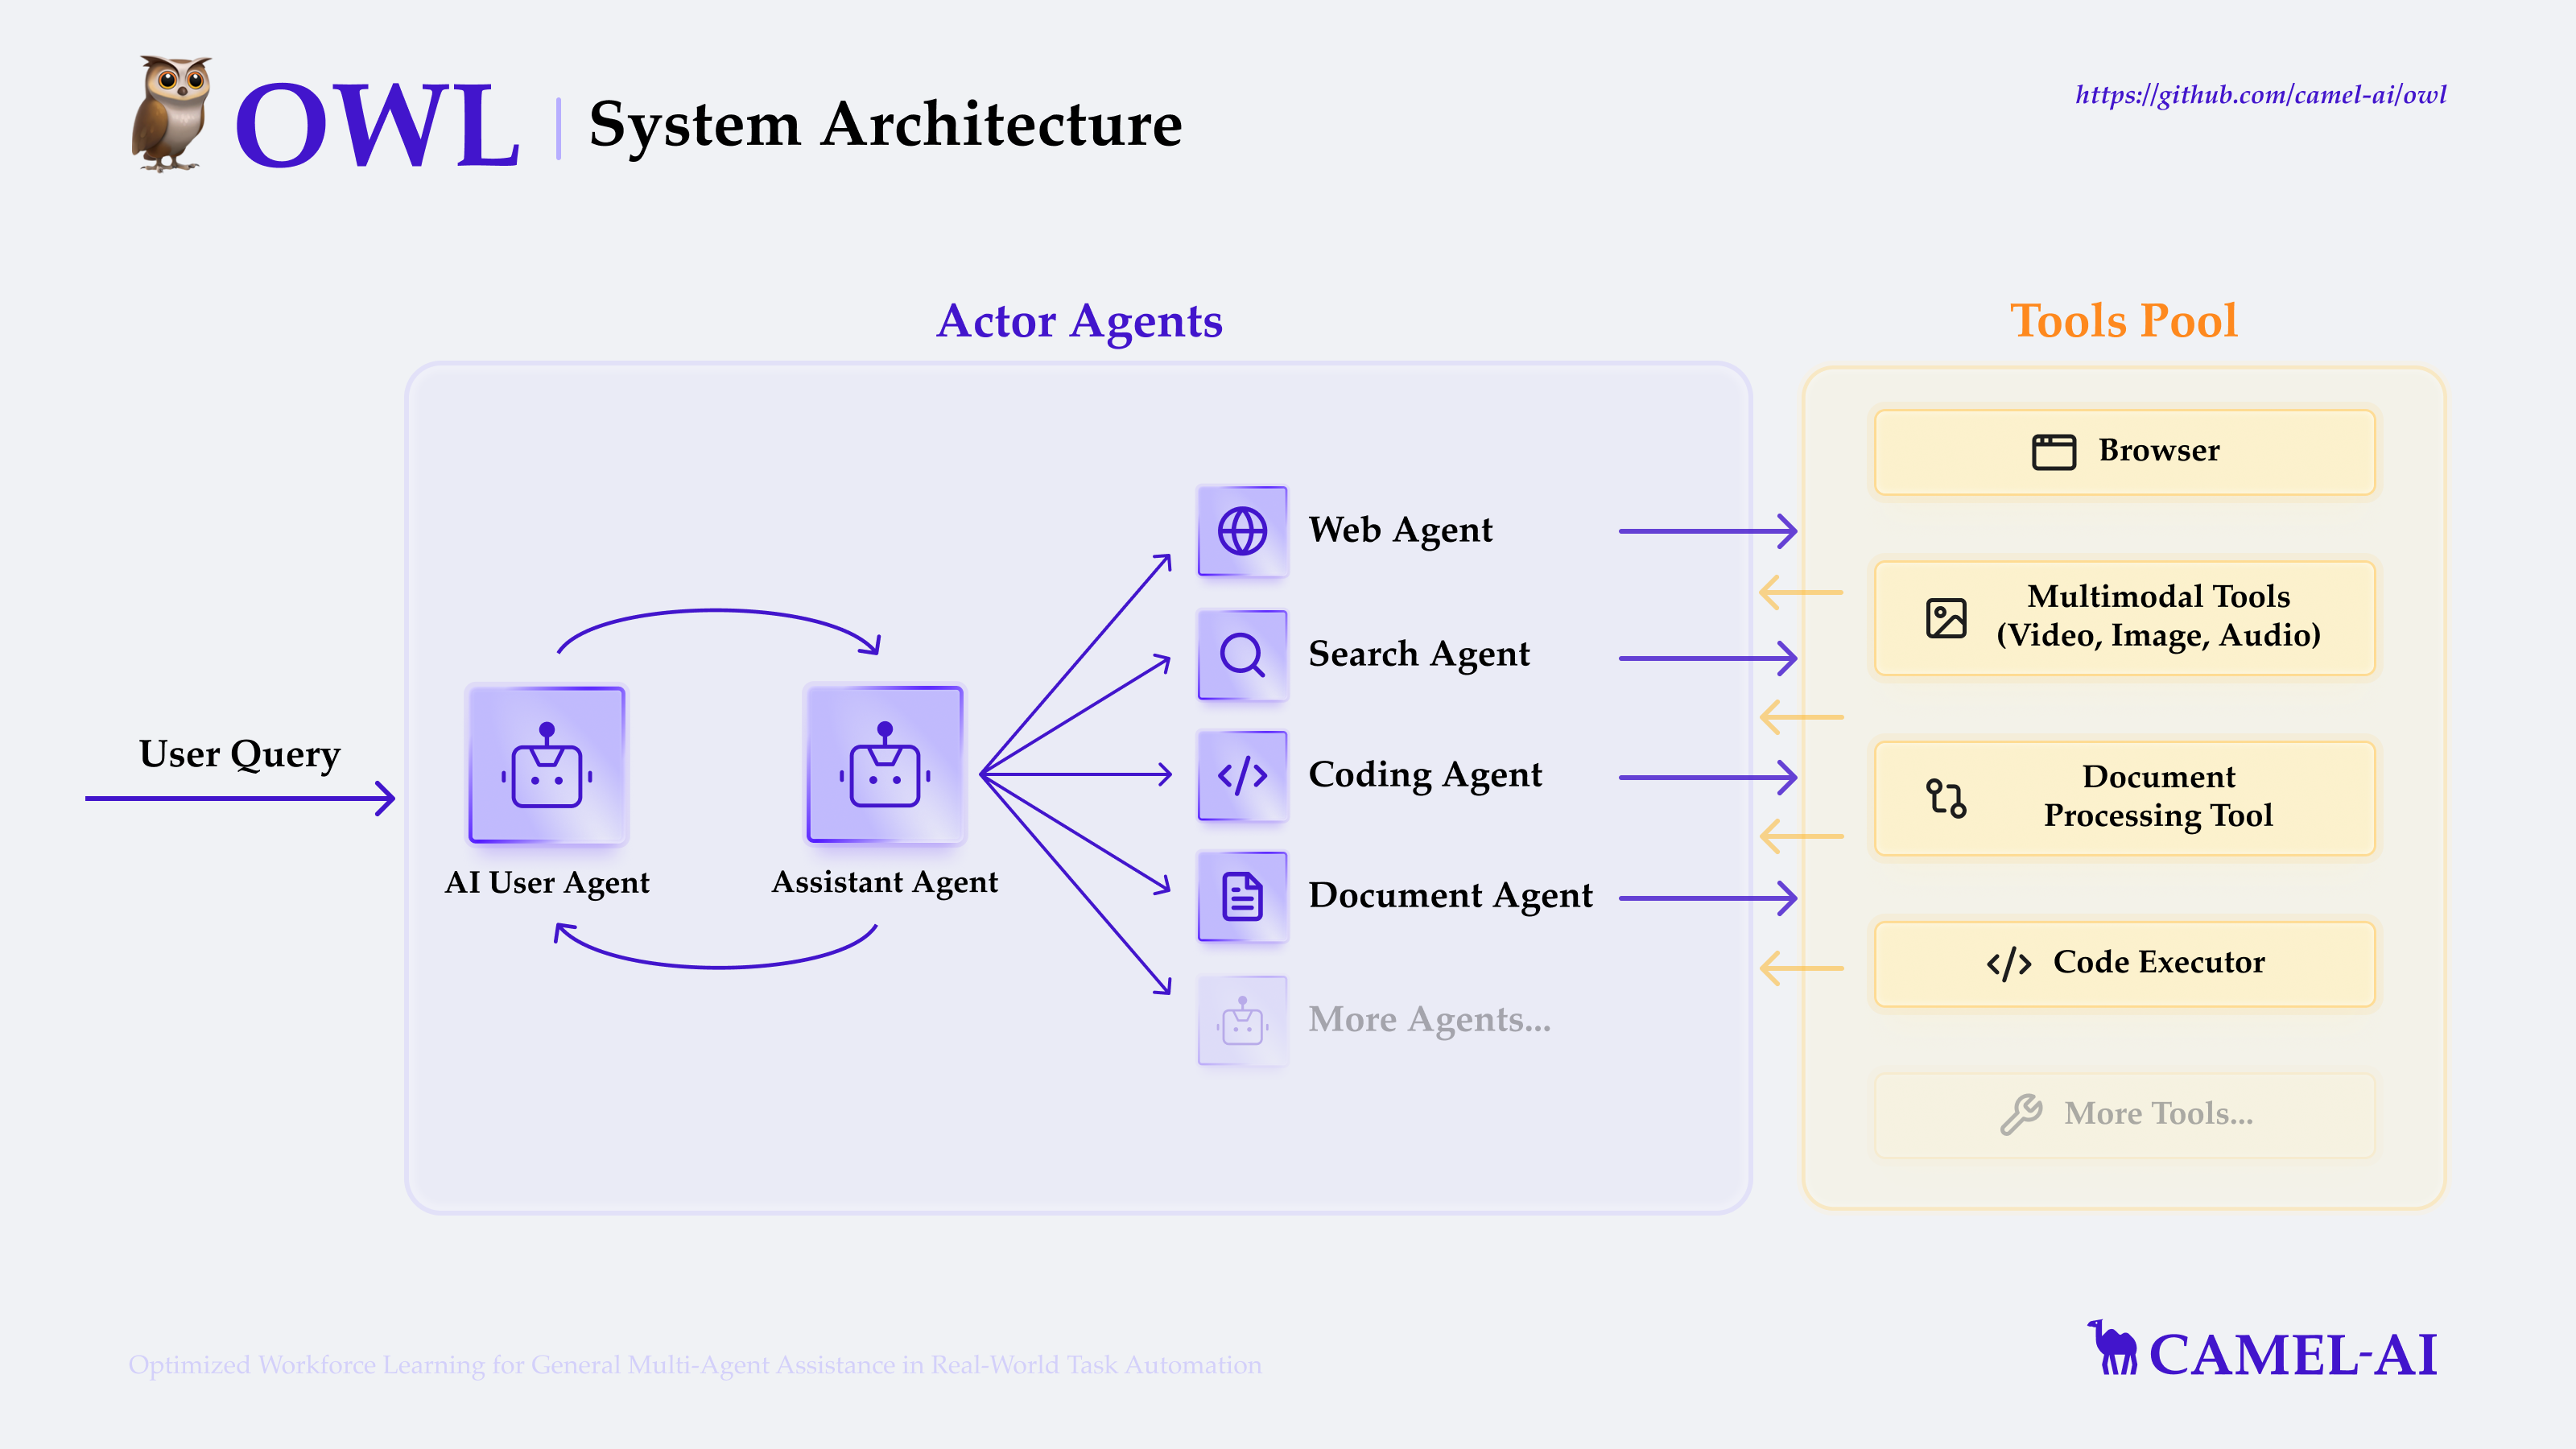
🦉 OWL is a cutting-edge framework for multi-agent collaboration that pushes the boundaries of task automation, built on top of the CAMEL-AI Framework.
Our vision is to revolutionize how AI agents collaborate to solve real-world tasks. By leveraging dynamic agent interactions, OWL enables more natural, efficient, and robust task automation across diverse domains.
If you find this repo useful, please consider citing our work (citation).
📋 Table of Contents
🔥 News
🧩 NEW: COMMUNITY AGENT CHALLENGES! 🧩
Showcase your creativity by designing unique challenges for AI agents!
Join our community and see your innovative ideas tackled by cutting-edge AI.
View & Submit Challenges
- [2025.09.22]: Exicited to announce that OWL has been accepted by NeurIPS 2025!🚀 Check the latest paper here.
- [2025.07.21]: We open-sourced the training dataset and model checkpoints of OWL project. Training code coming soon. huggingface link.
- [2025.05.27]: We released the technical report of OWL, including more details on the workforce (framework) and optimized workforce learning (training methodology). paper.
- [2025.05.18]: We open-sourced an initial version for replicating workforce experiment on GAIA here.
- [2025.04.18]: We uploaded OWL's new GAIA benchmark score of 69.09%, ranking #1 among open-source frameworks. Check the technical report here.
- [2025.03.27]: Integrate SearxNGToolkit performing web searches using SearxNG search engine.
- [2025.03.26]: Enhanced Browser Toolkit with multi-browser support for "chrome", "msedge", and "chromium" channels.
- [2025.03.25]: Supported Gemini 2.5 Pro, added example run code
- [2025.03.21]: Integrated OpenRouter model platform, fix bug with Gemini tool calling.
- [2025.03.20]: Accept header in MCP Toolkit, support automatic playwright installation.
- [2025.03.16]: Support Bing search, Baidu search.
- [2025.03.12]: Added Bocha search in SearchToolkit, integrated Volcano Engine model platform, and enhanced Azure and OpenAI Compatible models with structured output and tool calling.
- [2025.03.11]: We added MCPToolkit, FileWriteToolkit, and TerminalToolkit to enhance OWL agents with MCP tool calling, file writing capabilities, and terminal command execution.
- [2025.03.09]: We added a web-based user interface that makes it easier to interact with the system.
- [2025.03.07]: We open-sourced the codebase of the 🦉 OWL project.
- [2025.03.03]: OWL achieved the #1 position among open-source frameworks on the GAIA benchmark with a score of 58.18.
🎬 Demo Video
https://github.com/user-attachments/assets/2a2a825d-39ea-45c5-9ba1-f9d58efbc372
https://private-user-images.githubusercontent.com/55657767/420212194-e813fc05-136a-485f-8df3-f10d9b4e63ec.mp4
This video demonstrates how to install OWL locally and showcases its capabilities as a cutting-edge framework for multi-agent collaboration: https://www.youtube.com/watch?v=8XlqVyAZOr8
✨️ Core Features
- Online Search: Support for multiple search engines (including Wikipedia, Google, DuckDuckGo, Baidu, Bocha, etc.) for real-time information retrieval and knowledge acquisition.
- Multimodal Processing: Support for handling internet or local videos, images, and audio data.
- Browser Automation: Utilize the Playwright framework for simulating browser interactions, including scrolling, clicking, input handling, downloading, navigation, and more.
- Document Parsing: Extract content from Word, Excel, PDF, and PowerPoint files, converting them into text or Markdown format.
- Code Execution: Write and execute Python code using interpreter.
- Built-in Toolkits: Access to a comprehensive set of built-in toolkits including:
- Model Context Protocol (MCP): A universal protocol layer that standardizes AI model interactions with various tools and data sources
- Core Toolkits: ArxivToolkit, AudioAnalysisToolkit, CodeExecutionToolkit, DalleToolkit, DataCommonsToolkit, ExcelToolkit, GitHubToolkit, GoogleMapsToolkit, GoogleScholarToolkit, ImageAnalysisToolkit, MathToolkit, NetworkXToolkit, NotionToolkit, OpenAPIToolkit, RedditToolkit, SearchToolkit, SemanticScholarToolkit, SymPyToolkit, VideoAnalysisToolkit, WeatherToolkit, BrowserToolkit, and many more for specialized tasks
🛠️ Installation
Prerequisites
Install Python
Before installing OWL, ensure you have Python installed (version 3.10, 3.11, or 3.12 is supported):
Note for GAIA Benchmark Users: When running the GAIA benchmark evaluation, please use the gaia58.18 branch which includes a customized version of the CAMEL framework in the owl/camel directory. This version contains enhanced toolkits with improved stability specifically optimized for the GAIA benchmark compared to the standard CAMEL installation.
# Check if Python is installed
python --version

# If not installed, download and install from https://www.python.org/downloads/
# For macOS users with Homebrew:
brew install [email protected]

# For Ubuntu/Debian:
sudo apt update
sudo apt install python3.10 python3.10-venv python3-pip
Installation Options
OWL supports multiple installation methods to fit your workflow preferences.
Option 1: Using uv (Recommended)
# Clone github repo
git clone https://github.com/camel-ai/owl.git

# Change directory into project directory
cd owl

# Install uv if you don't have it already
pip install uv

# Create a virtual environment and install dependencies
uv venv .venv --python=3.10

# Activate the virtual environment
# For macOS/Linux
source .venv/bin/activate
# For Windows
.venv\Scripts\activate

# Install CAMEL with all dependencies
uv pip install -e .
Option 2: Using venv and pip
# Clone github repo
git clone https://github.com/camel-ai/owl.git

# Change directory into project directory
cd owl

# Create a virtual environment
# For Python 3.10 (also works with 3.11, 3.12)
python3.10 -m venv .venv

# Activate the virtual environment
# For macOS/Linux
source .venv/bin/activate
# For Windows
.venv\Scripts\activate

# Install from requirements.txt
pip install -r requirements.txt --use-pep517
Option 3: Using conda
# Clone github repo
git clone https://github.com/camel-ai/owl.git

# Change directory into project directory
cd owl

# Create a conda environment
conda create -n owl python=3.10

# Activate the conda environment
conda activate owl

# Option 1: Install as a package (recommended)
pip install -e .

# Option 2: Install from requirements.txt
pip install -r requirements.txt --use-pep517
Option 4: Using Docker
Using Pre-built Image (Recommended)
# This option downloads a ready-to-use image from Docker Hub
# Fastest and recommended for most users
docker compose up -d

# Run OWL inside the container
docker compose exec owl bash
cd .. && source .venv/bin/activate
playwright install-deps
xvfb-python examples/run.py
Building Image Locally
# For users who need to customize the Docker image or cannot access Docker Hub:
# 1. Open docker-compose.yml
# 2. Comment out the "image: mugglejinx/owl:latest" line
# 3. Uncomment the "build:" section and its nested properties
# 4. Then run:
docker compose up -d --build

# Run OWL inside the container
docker compose exec owl bash
cd .. && source .venv/bin/activate
playwright install-deps
xvfb-python examples/run.py
Using Convenience Scripts
# Navigate to container directory
cd .container

# Make the script executable and build the Docker image
chmod +x build_docker.sh
./build_docker.sh

# Run OWL with your question
./run_in_docker.sh "your question"
Setup Environment Variables
OWL requires various API keys to interact with different services.
Setting Environment Variables Directly
You can set environment variables directly in your terminal:
macOS/Linux (Bash/Zsh):
export OPENAI_API_KEY="your-openai-api-key-here"
# Add other required API keys as needed
Windows (Command Prompt):
set OPENAI_API_KEY=your-openai-api-key-here
Windows (PowerShell):
$env:OPENAI_API_KEY = "your-openai-api-key-here"
Note: Environment variables set directly in the terminal will only persist for the current session.
Alternative: Using a .env File
If you prefer using a .env file instead, you can:
Copy and Rename the Template:
# For macOS/Linux
cd owl
cp .env_template .env

# For Windows
cd owl
copy .env_template .env
Alternatively, you can manually create a new file named .env in the owl directory and copy the contents from .env_template.
Configure Your API Keys:
Open the .env file in your preferred text editor and insert your API keys in the corresponding fields.
Note: For the minimal example (examples/run_mini.py), you only need to configure the LLM API key (e.g., OPENAI_API_KEY).
MCP Desktop Commander Setup
If using MCP Desktop Commander within Docker, run:
npx -y @wonderwhy-er/desktop-commander setup --force-file-protocol
For more detailed Docker usage instructions, including cross-platform support, optimized configurations, and troubleshooting, please refer to DOCKER_README.md.
🚀 Quick Start
Basic Usage
After installation and setting up your environment variables, you can start using OWL right away:
python examples/run.py
Running with Different Models
Model Requirements
Tool Calling: OWL requires models with robust tool calling capabilities to interact with various toolkits. Models must be able to understand tool descriptions, generate appropriate tool calls, and process tool outputs.
Multimodal Understanding: For tasks involving web interaction, image analysis, or video processing, models with multimodal capabilities are required to interpret visual content and context.
Supported Models
For information on configuring AI models, please refer to our CAMEL models documentation.
Note: For optimal performance, we strongly recommend using OpenAI models (GPT-4 or later versions). Our experiments show that other models may result in significantly lower performance on complex tasks and benchmarks, especially those requiring advanced multi-modal understanding and tool use.
OWL supports various LLM backends, though capabilities may vary depending on the model's tool calling and multimodal abilities. You can use the following scripts to run with different models:
# Run with Claude model
python examples/run_claude.py

# Run with Qwen model
python examples/run_qwen_zh.py

# Run with Deepseek model
python examples/run_deepseek_zh.py

# Run with other OpenAI-compatible models
python examples/run_openai_compatible_model.py

# Run with Gemini model
python examples/run_gemini.py

# Run with Azure OpenAI
python examples/run_azure_openai.py

# Run with Ollama
python examples/run_ollama.py
For a simpler version that only requires an LLM API key, you can try our minimal example:
python examples/run_mini.py
You can run OWL agent with your own task by modifying the examples/run.py script:
# Define your own task
task = "Task description here."

society = construct_society(question)
answer, chat_history, token_count = run_society(society)

print(f"\033[94mAnswer: {answer}\033[0m")
For uploading files, simply provide the file path along with your question:
# Task with a local file (e.g., file path: `tmp/example.docx`)
task = "What is in the given DOCX file? Here is the file path: tmp/example.docx"

society = construct_society(question)
answer, chat_history, token_count = run_society(society)
print(f"\033[94mAnswer: {answer}\033[0m")
OWL will then automatically invoke document-related tools to process the file and extract the answer.
Example Tasks
Here are some tasks you can try with OWL:
- "Find the latest stock price for Apple Inc."
- "Analyze the sentiment of recent tweets about climate change"
- "Help me debug this Python code: [your code here]"
- "Summarize the main points from this research paper: [paper URL]"
- "Create a data visualization for this dataset: [dataset path]"
Model Context Protocol (MCP)
OWL's MCP integration provides a standardized way for AI models to interact with various tools and data sources:
Before using MCP, you need to install Node.js first.
Install Node.js
Windows
Download the official installer: Node.js.
Check "Add to PATH" option during installation.
Linux
sudo apt update
sudo apt install nodejs npm -y
Mac
brew install node
Install Playwright MCP Service
npm install -g @executeautomation/playwright-mcp-server
npx playwright install-deps
Try our comprehensive MCP examples:
examples/run_mcp.py - Basic MCP functionality demonstration (local call, requires dependencies)examples/run_mcp_sse.py - Example using the SSE protocol (Use remote services, no dependencies)
Important: Effective use of toolkits requires models with strong tool calling capabilities. For multimodal toolkits (Web, Image, Video), models must also have multimodal understanding abilities.
OWL supports various toolkits that can be customized by modifying the tools list in your script:
# Configure toolkits
tools = [
    *BrowserToolkit(headless=False).get_tools(),  # Browser automation
    *VideoAnalysisToolkit(model=models["video"]).get_tools(),
    *AudioAnalysisToolkit().get_tools(),  # Requires OpenAI Key
    *CodeExecutionToolkit(sandbox="subprocess").get_tools(),
    *ImageAnalysisToolkit(model=models["image"]).get_tools(),
    SearchToolkit().search_duckduckgo,
    SearchToolkit().search_google,  # Comment out if unavailable
    SearchToolkit().search_wiki,
    SearchToolkit().search_bocha,
    SearchToolkit().search_baidu,
    *ExcelToolkit().g

 OWL (Optimized Workforce Learning) — это опенсорсный фреймворк для взаимодействия нескольких агентов, который автоматизирует реальные задачи. Он построен поверх фреймворка CAMEL-AI и занимает первое место среди опенсорсных фреймворков в бенчмарке GAIA со средним баллом 69,09.