https://github.com/user-attachments/assets/6f93deb4-9854-4f1e-8097-53b0c3378a0d
🔥 News
- [2026.04.23] 🚀 AutoFigure-Edit v1.1 is now available. This release primarily adds user-supplied stage-1 figure import, official OpenAI model support including
gpt-image-2 and gpt-5.5, Bianxie AI / custom OpenAI-compatible routing, and a bilingual configuration workflow. See the full release notes.
- [2026.03.24] 🧠 Our sister project DeepScientist v1.5 is now officially released. It is a local-first open-source autonomous research system for end-to-end scientific discovery. Explore it on GitHub or read the ICLR 2026 paper.
- [2026.03.11] 📄 Our AutoFigure-Edit paper is now available on arXiv and featured in 🤗Hugging Face Daily Papers! If you find our work helpful, please consider giving us an upvote on Hugging Face and citing our paper. Thank you! ❤️
- [2026.02.17] 🚀 The AutoFigure-Edit online platform is now live! It is free for all scholars to use. Try it out at deepscientist.cc.
- [2026.01.26] 🎉 AutoFigure has been accepted to ICLR 2026! You can read the paper on arXiv.
🆕 V1.1 (2026.04.23)
AutoFigure-Edit v1.1 is published as tag v1.1. This release focuses on two practical workflows that were still awkward in earlier public builds: starting from a user-supplied stage-1 academic figure, and running the pipeline cleanly with official OpenAI models or OpenAI-compatible gateways.
- User-supplied stage-1 figure import: You can now upload an existing academic raster figure, skip step 1 image generation, and continue directly from SAM + SVG reconstruction in both the web UI and CLI workflow.
- Official OpenAI model support: Step 1 can now use the OpenAI Images API with
gpt-image-2, while the OpenAI Responses path is documented and exposed for text plus multimodal SVG reconstruction with gpt-5.5 as the default SVG model.
- Bianxie AI and
custom OpenAI-compatible routing: The CLI and web UI expose bianxie as a built-in compatible route with https://api.bianxie.ai/v1, while custom remains available for user-supplied OpenAI-compatible /v1 base URLs. The openai_response route can inherit the same compatible base_url and api_key by default.
- Bilingual setup and onboarding: The main page, import page, canvas, and guide now support in-page Chinese / English switching, and the built-in guide explains workflow choices, fields, SAM backends, and recommended presets.
Full release notes: releases/v1.1.md
✨ Features
| Feature |
Description |
| 📝 Text-to-Figure |
Generate a draft figure directly from method text. |
| 🧠 SAM3 Icon Detection |
Detect icon regions from multiple prompts and merge overlaps. |
| 🎯 Labeled Placeholders |
Insert consistent AF-style placeholders for reliable SVG mapping. |
| 🧩 SVG Generation |
Produce an editable SVG template aligned to the figure. |
| 🖥️ Embedded Editor |
Edit the SVG in-browser using the bundled svg-edit. |
| 📦 Artifact Outputs |
Save PNG/SVG outputs and icon crops per run. |
🎨 Gallery: Editable Vectorization & Style Transfer
AutoFigure-edit introduces two breakthrough capabilities:
- Fully Editable SVGs (Pure Code Implementation): Unlike raster images, our outputs are structured Vector Graphics (SVG). Every component is editable—text, shapes, and layout can be modified losslessly.
- Style Transfer: The system can mimic the artistic style of reference images provided by the user.
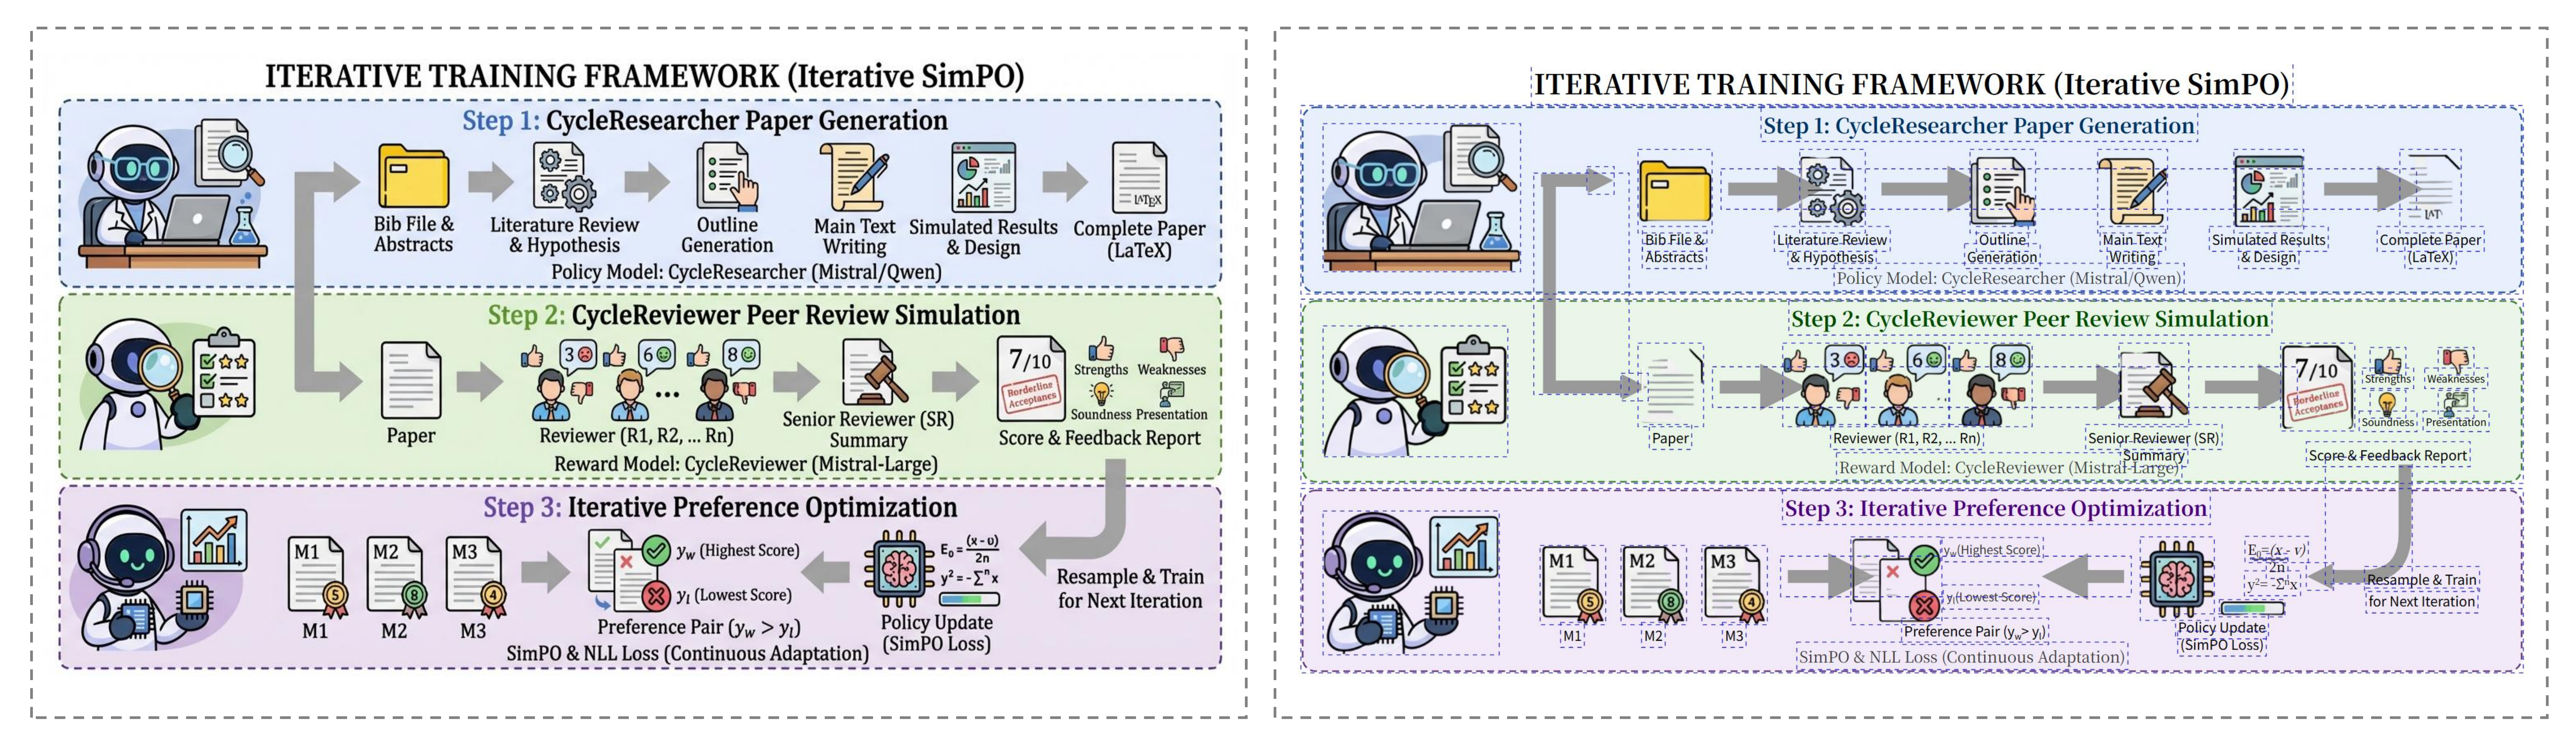
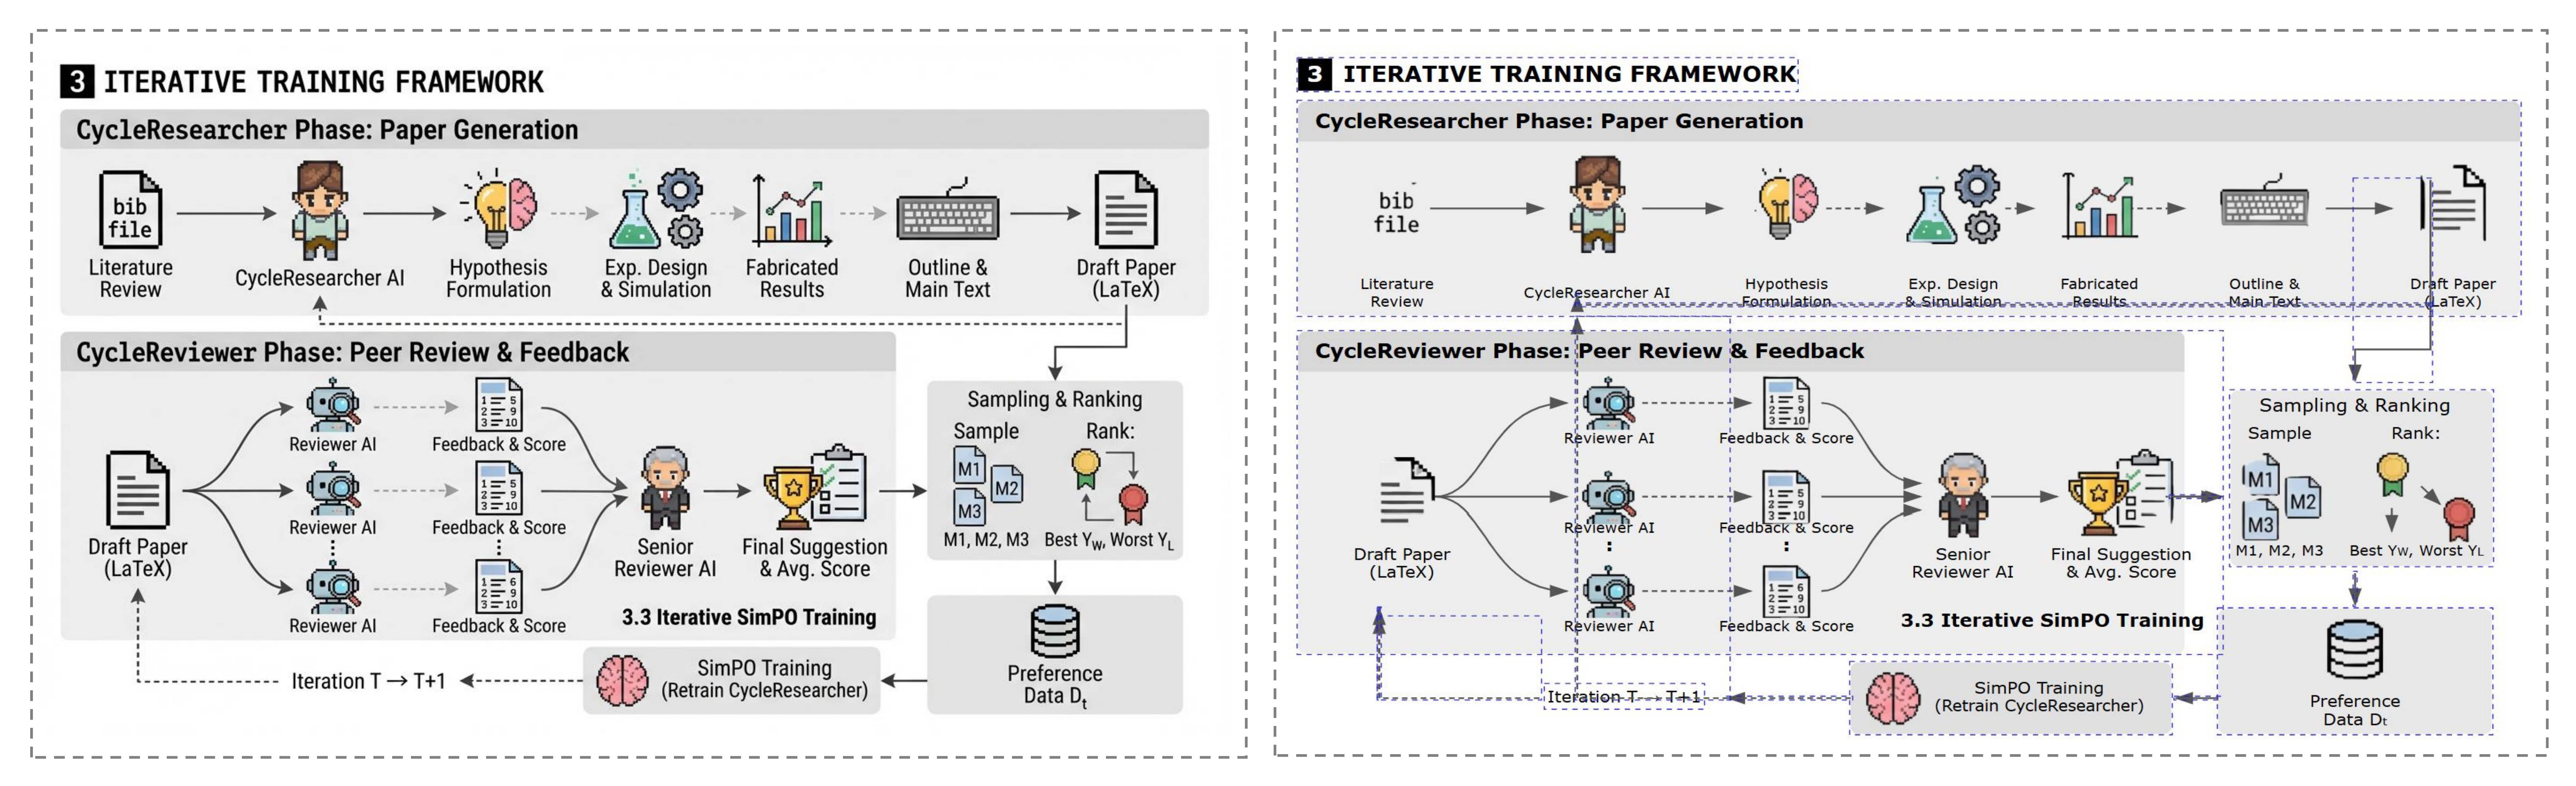
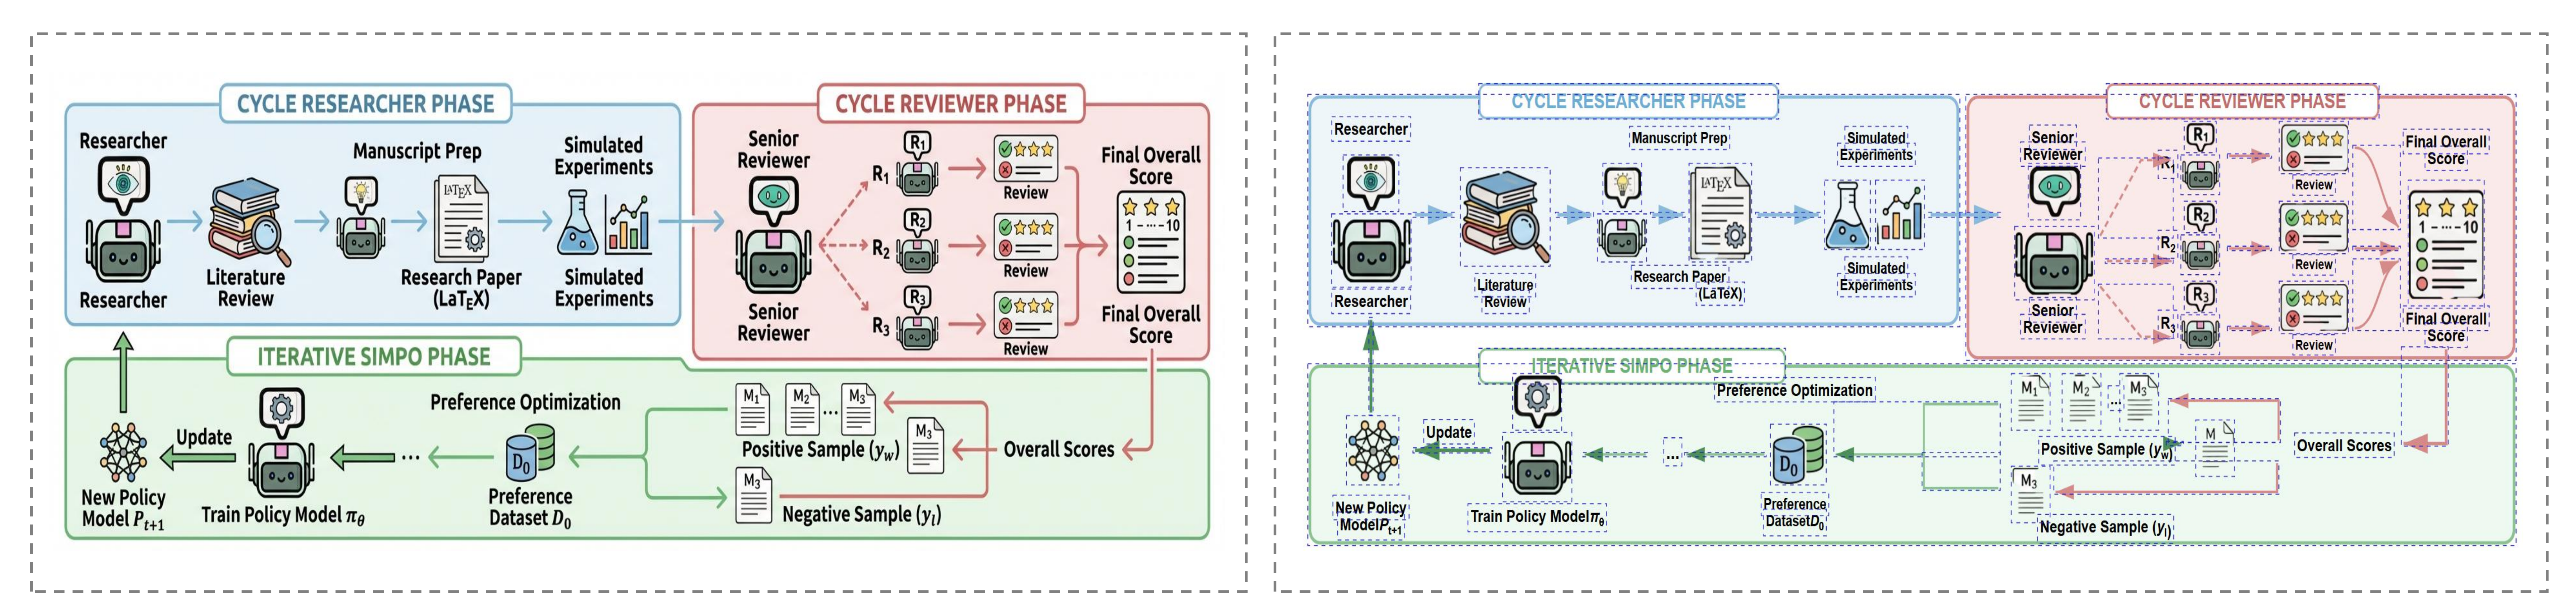
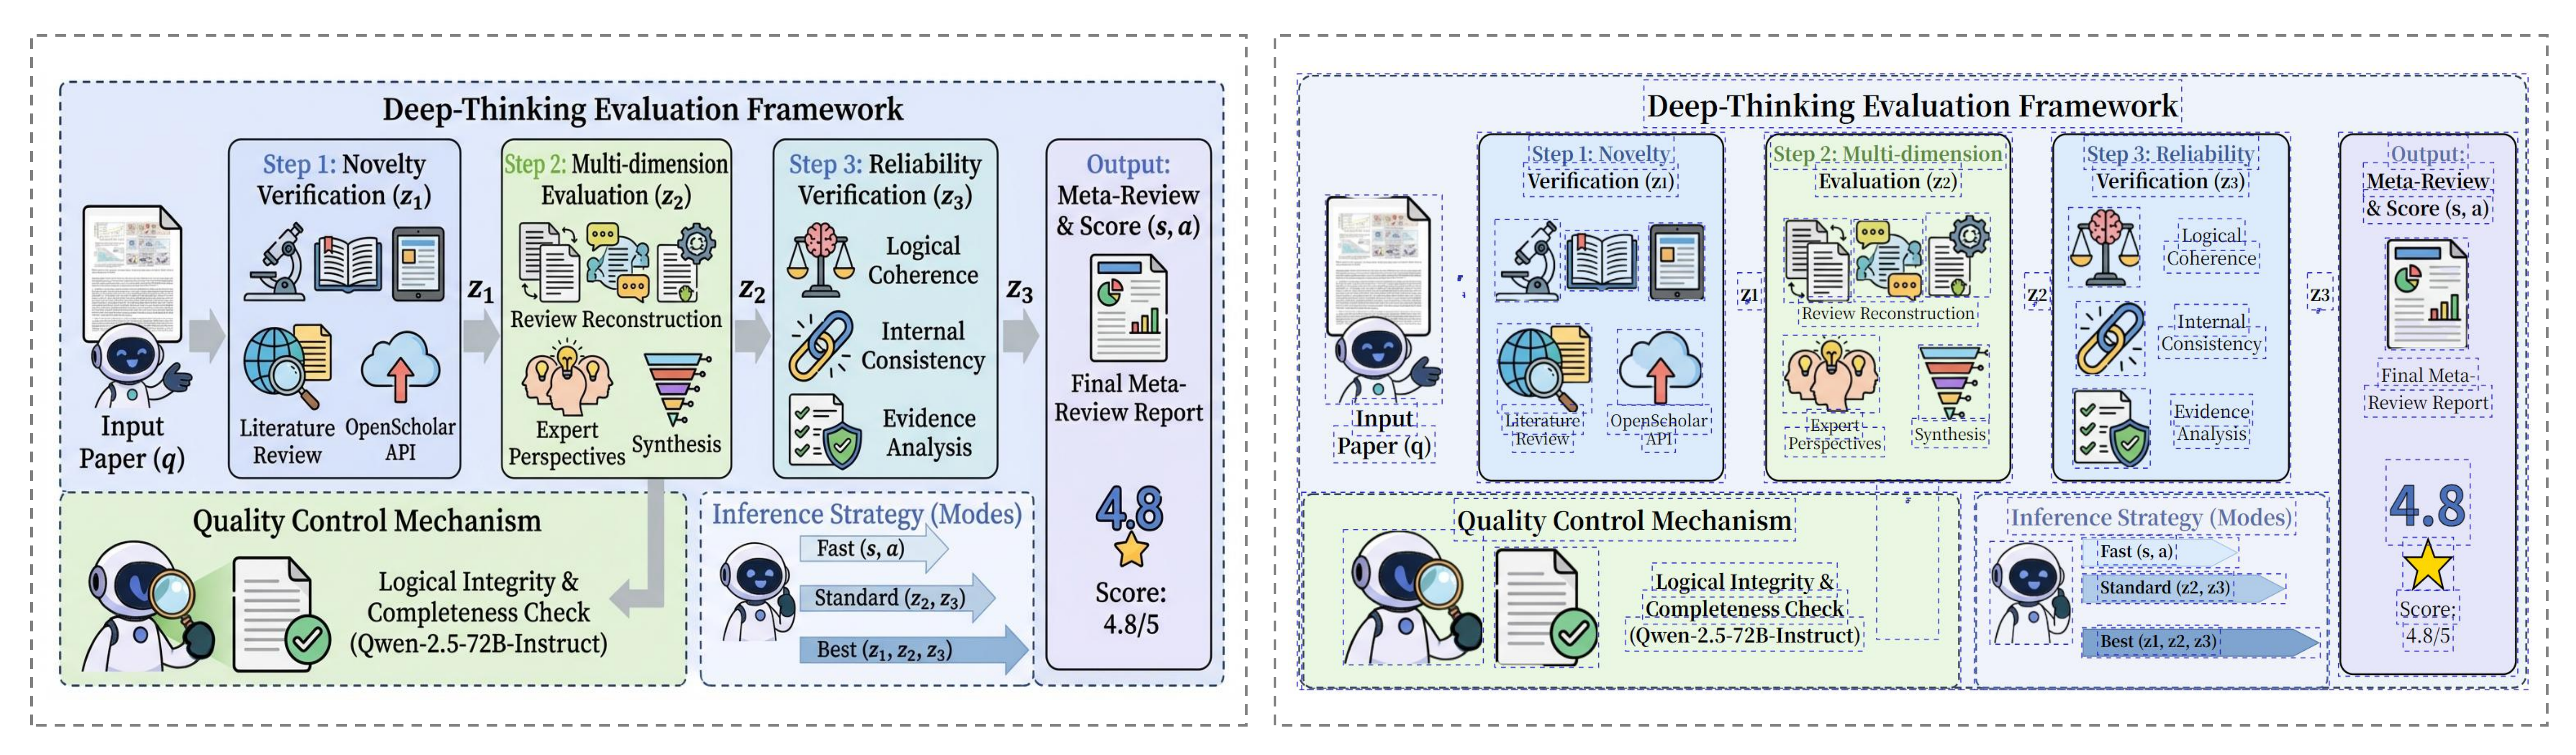
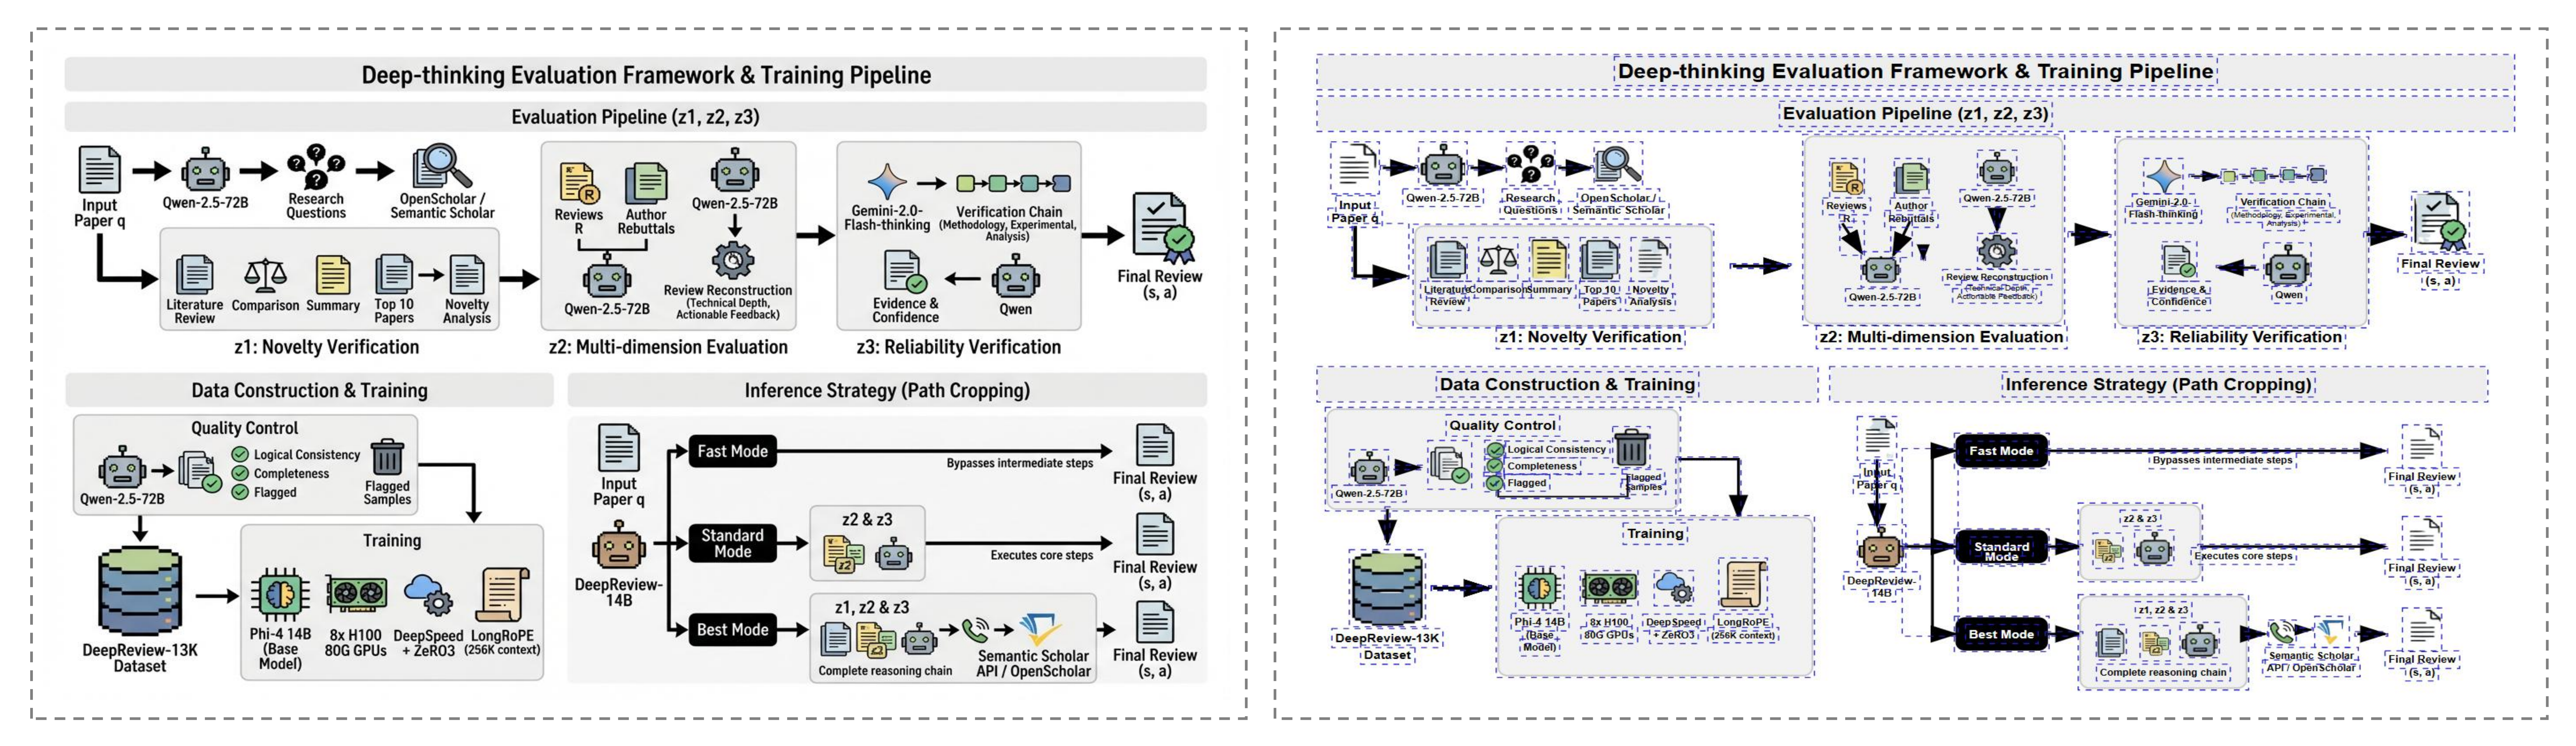
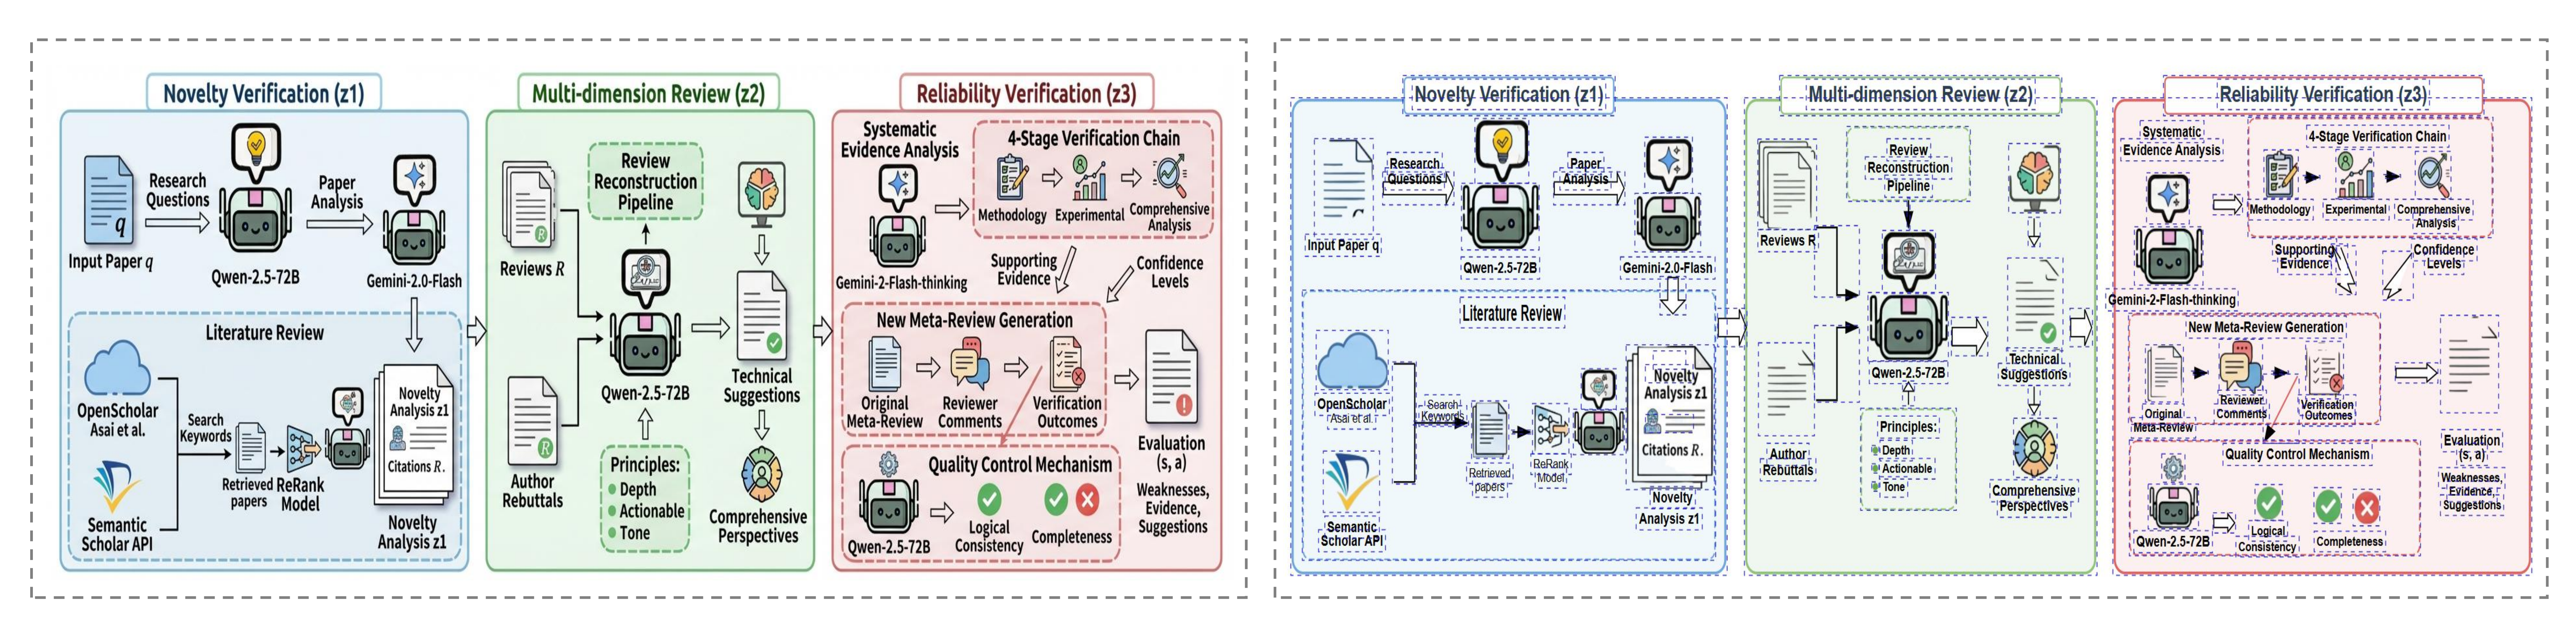
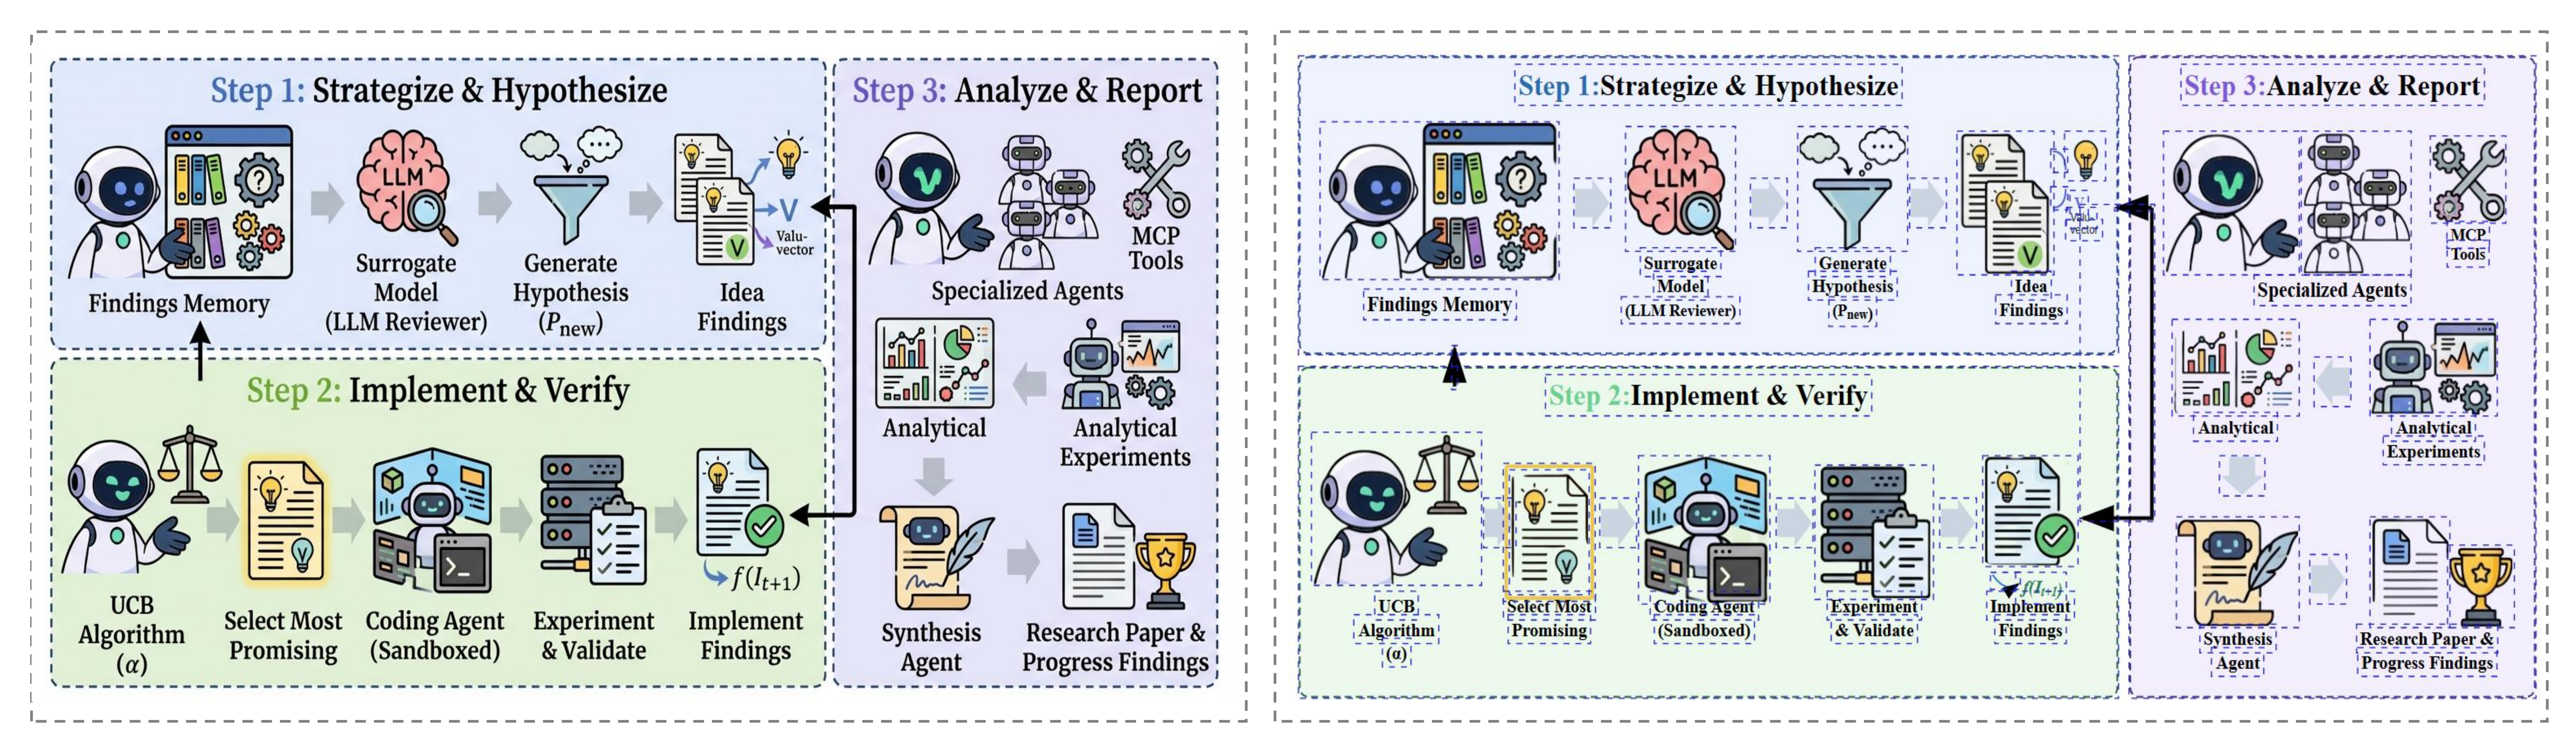
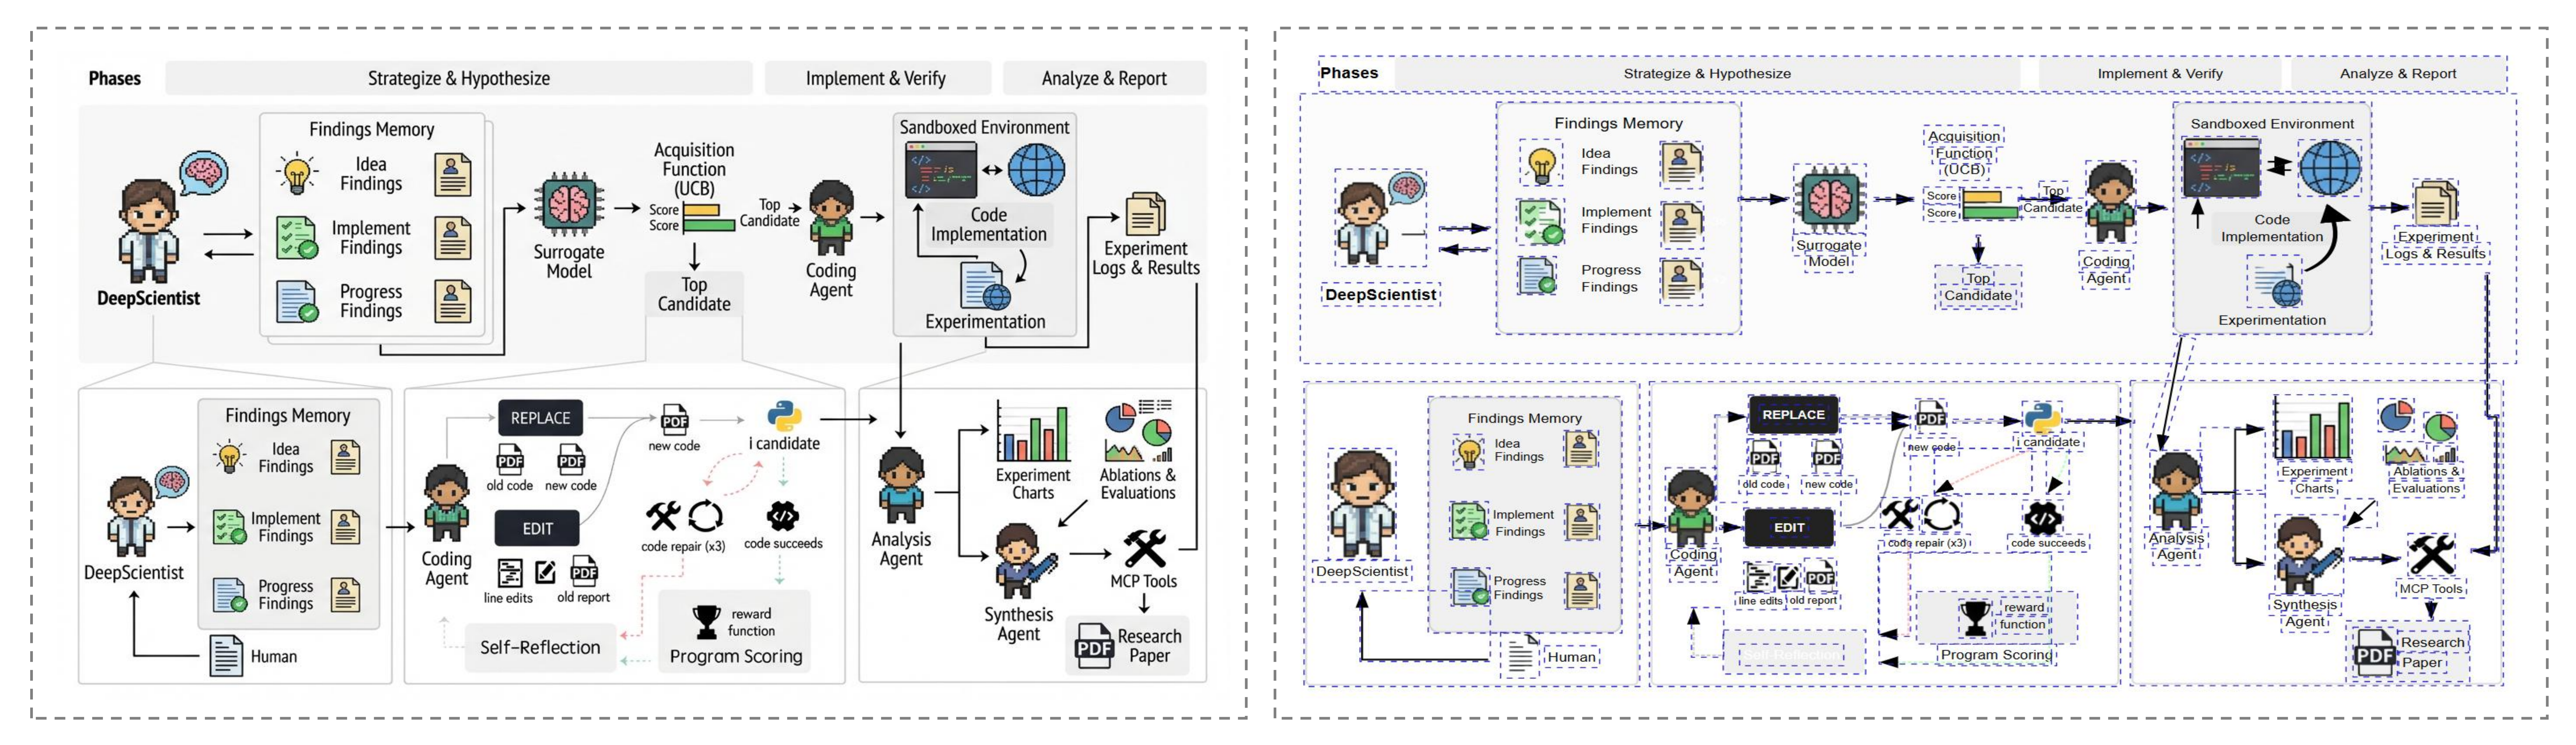
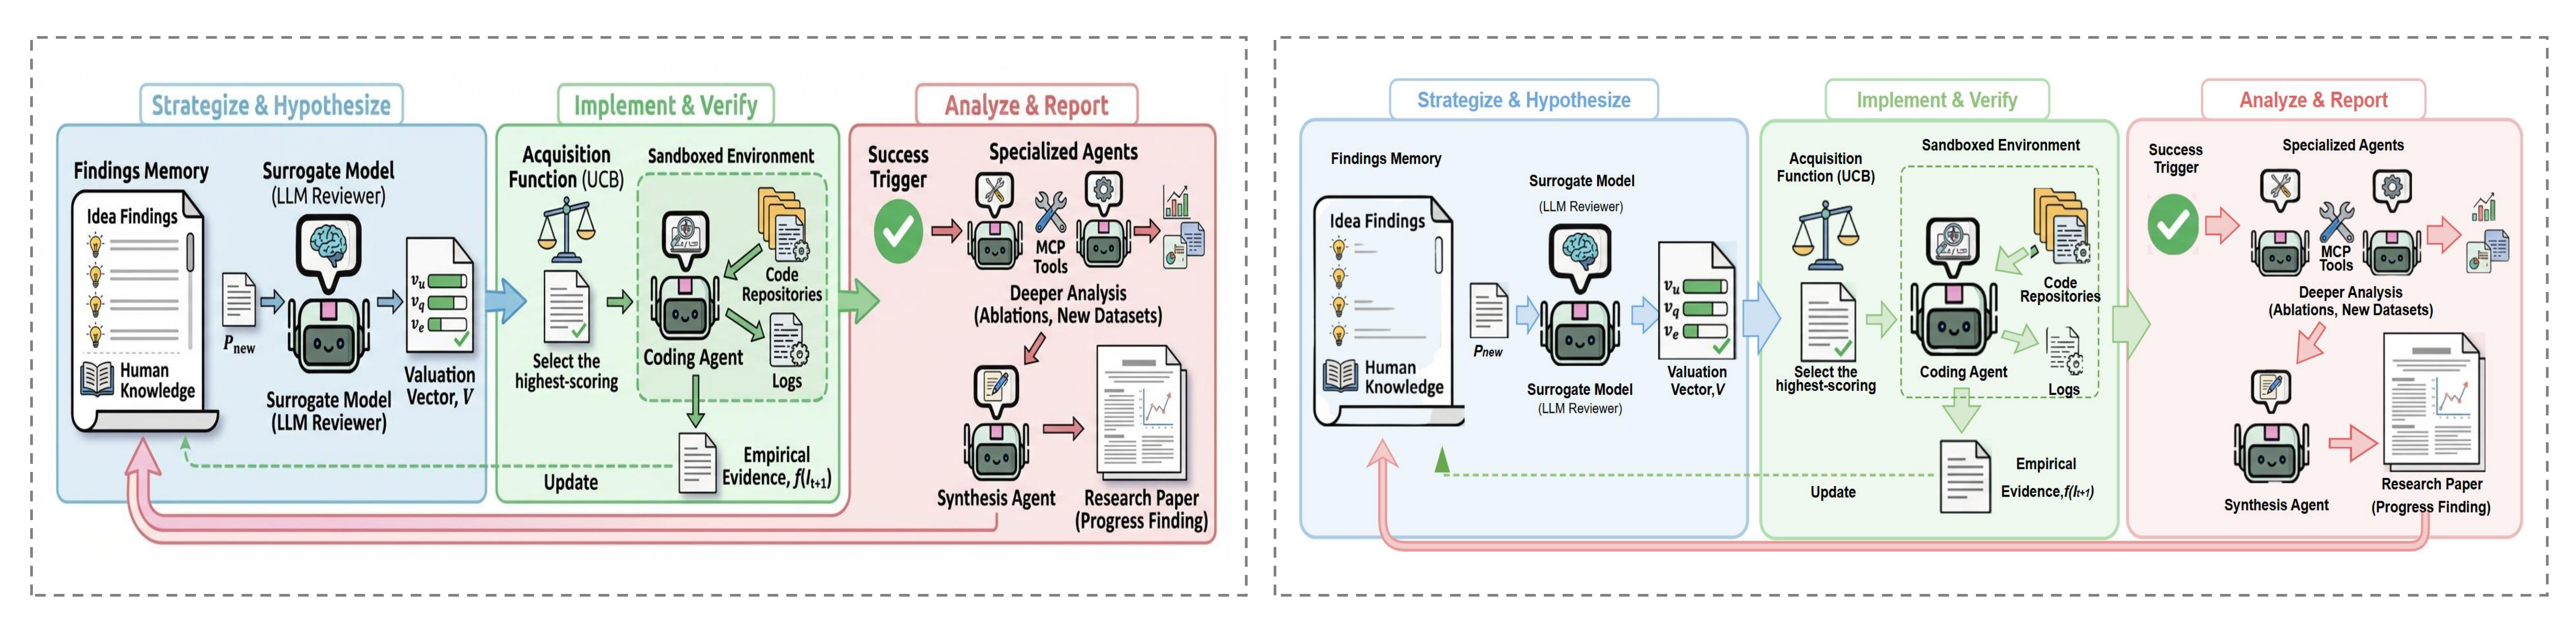
Below are 9 examples covering 3 different papers. Each paper is generated using 3 different reference styles.
(Each image shows: Left = AutoFigure Generation | Right = Vectorized Editable SVG)
🚀 How It Works
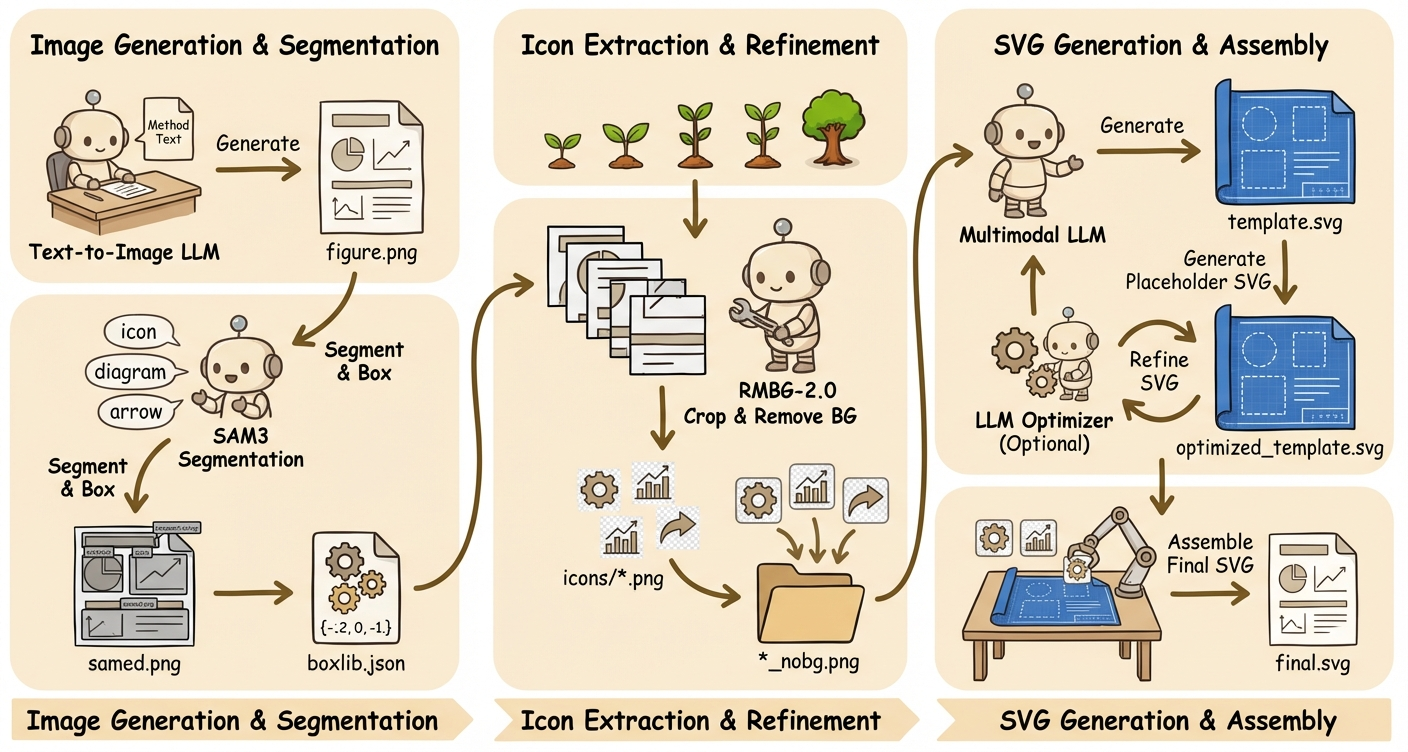
The AutoFigure-edit pipeline transforms a raw generation into an editable SVG in four distinct stages:
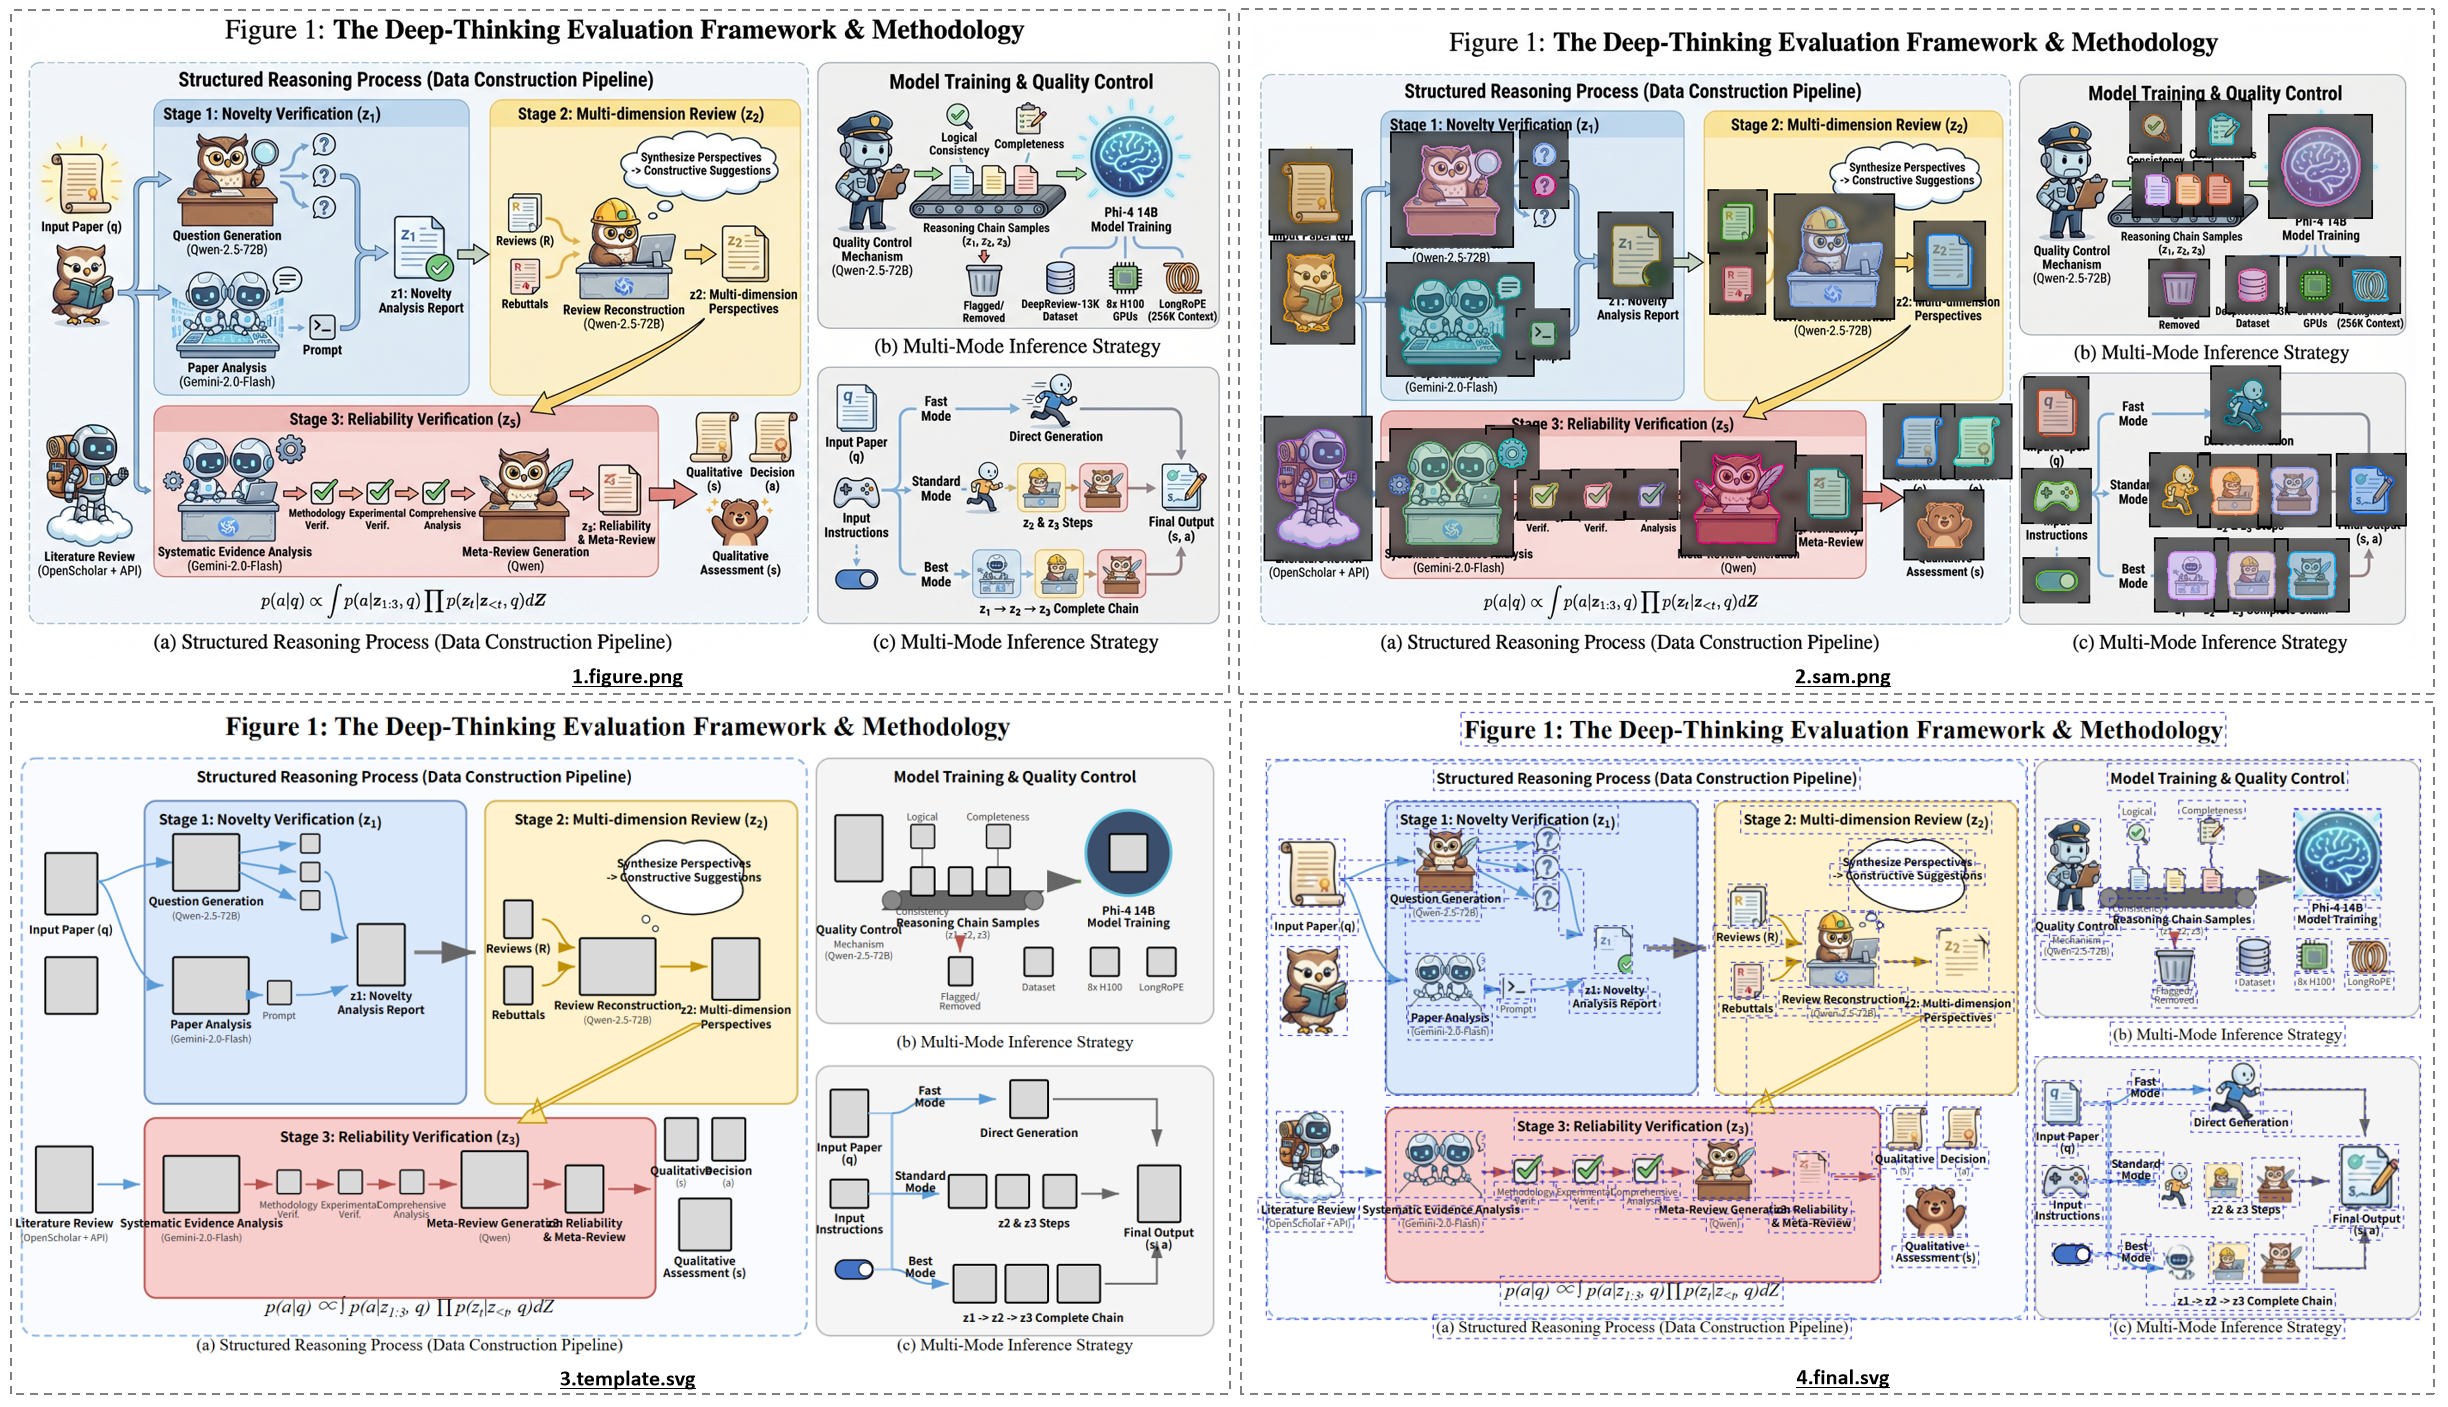 (1) Raw Generation → (2) SAM3 Segmentation → (3) SVG Layout Template → (4) Final Assembled Vector
- Generation (
figure.png): The LLM generates a raster draft based on the method text.
- Segmentation (
sam.png): SAM3 detects and segments distinct icons and text regions.
- Templating (
template.svg): The system constructs a structural SVG wireframe using placeholders.
- Assembly (
final.svg): High-quality cropped icons and vectorized text are injected into the template.
View Detailed Technical Pipeline
AutoFigure2’s pipeline starts from the paper’s method text and first calls a text‑to‑image LLM to render a journal‑style schematic, saved as figure.png. The system then runs SAM3 segmentation on that image using one or more text prompts (e.g., “icon, diagram, arrow”), merges overlapping detections by an IoU‑like threshold, and draws gray‑filled, black‑outlined labeled boxes on the original; this produces both samed.png (the labeled mask overlay) and a structured boxlib.json with coordinates, scores, and prompt sources.
Next, each box is cropped from the original figure and passed through RMBG‑2.0 for background removal, yielding transparent icon assets under icons/*.png and *_nobg.png. With figure.png, samed.png, and boxlib.json as multimodal inputs, the LLM generates a placeholder‑style SVG (template.svg) whose boxes match the labeled regions.
Optionally, the SVG is iteratively refined by an LLM optimizer to better align strokes, layouts, and styles, resulting in optimized_template.svg (or the original template if optimization is skipped). The system then compares the SVG dimensions with the original figure to compute scale factors and aligns coordinate systems. Finally, it replaces each placeholder in the SVG with the corresponding transparent icon (matched by label/ID), producing the assembled final.svg.
Key configuration details:
- Placeholder Mode: Controls how icon boxes are encoded in the prompt (
label, box, or none).
- Optimization:
optimize_iterations=0 allows skipping the refinement step to use the raw structure directly.
⚡ Quick Start
Option 0: Docker Deployment Guide (Recommended)
Use Docker for a reproducible one-command setup without local Python/SAM3 installation.
0) Prerequisites
1) Prepare .env
# Linux/macOS
cp .env.example .env

# Windows PowerShell
Copy-Item .env.example .env
At minimum, set this in .env:
HF_TOKEN=hf_xxx
Optional but recommended:
# SAM3 API backend (Docker default in UI is Roboflow)
ROBOFLOW_API_KEY=your_roboflow_key

# Step-4 multimodal retry tuning (OpenRouter)
OPENROUTER_MULTIMODAL_RETRIES=3
OPENROUTER_MULTIMODAL_RETRY_DELAY=1.5

# DNS override for Roboflow name-resolution issues
DOCKER_DNS_1=223.5.5.5
DOCKER_DNS_2=119.29.29.29
For restricted networks, you can also set build mirrors:
BASE_IMAGE=docker.m.daocloud.io/library/python:3.11-slim
PIP_INDEX_URL=https://pypi.tuna.tsinghua.edu.cn/simple
PIP_EXTRA_INDEX_URL=
2) Build and start
docker compose up -d --build
Open http://localhost:8000.
3) Verify service health
docker compose ps
curl http://localhost:8000/healthz
Expected health response: {"status":"ok"}.
4) Daily operations
# Stream logs
docker compose logs -f autofigure-edit

# Restart service
docker compose restart autofigure-edit

# Rebuild from scratch (no cache)
docker compose build --no-cache
docker compose up -d

# Stop and remove container
docker compose down
5) Persistence and defaults
- Persistent outputs:
./outputs, ./uploads
- Persistent HuggingFace cache: Docker volume
hf_cache (/app/.cache/huggingface)
- Docker/Web default SAM backend:
roboflow
- Default SAM prompt:
icon,person,robot,animal
- Current default models:
openrouter: image google/gemini-3.1-flash-image-preview, svg google/gemini-3.1-pro-previewbianxie: image gpt-image-2, svg gemini-3.1-pro-preview (built-in base URL https://api.bianxie.ai/v1)custom: image gemini-3.1-flash-image-preview, svg gemini-3.1-pro-preview (requires your own OpenAI-compatible /v1 base URL)gemini: image gemini-3.1-flash-image-preview, svg gemini-3.1-pro-previewopenai_response: image gpt-image-2 (step 1 fallback), svg gpt-5.5 via Responses API
- Optional step-1 override:
--image_provider openai: image gpt-image-2 via the official OpenAI Images API
6) Common Docker networking issues
Temporary failure in name resolution (Roboflow): set DOCKER_DNS_1/2 in .env, then docker compose up -d --build.- Cannot reach Docker Hub auth (
auth.docker.io): set BASE_IMAGE and PIP_INDEX_URL mirrors in .env.
- Optional Roboflow endpoint override:
ROBOFLOW_API_URL=<your_reachable_roboflow_endpoint>ROBOFLOW_API_FALLBACK_URLS=<comma_separated_backup_endpoints>
Option 1: CLI
# 1) Install dependencies
pip install -r requirements.txt

# 2) Install SAM3 separately (not vendored in this repo)
git clone https://github.com/facebookresearch/sam3.git
cd sam3
pip install -e .
Run:
python autofigure2.py \
  --method_file paper.txt \
  --output_dir outputs/demo \
  --provider bianxie \
  --api_key YOUR_KEY
Use OpenAI only for step 1 image generation while keeping SVG reconstruction on the original provider:
python autofigure2.py \
  --method_file paper.txt \
  --output_dir outputs/demo \
  --provider gemini \
  --api_key GEMINI_KEY \
  --image_provider openai \
  --image_api_key OPENAI_KEY \
  --image_model gpt-image-2
Use the OpenAI Responses API for text + multimodal SVG reconstruction:
python autofigure2.py \
  --method_file paper.txt \
  --output_dir outputs/demo \
  --provider openai_response \
  --api_key OPENAI_KEY
Continue from an existing stage-1 figure and skip image generation:
python autofigure2.py \
  --input_figure_path ./my_stage1_figure.png \
  --output_dir outputs/import_demo \
  --provider openai_response \
  --api_key OPENAI_KEY \
  --svg_model gpt-5.5
Option 2: Web Interface
python server.py
Then open http://localhost:8000.
🖥️ Web Interface Demo
AutoFigure-edit provides a visual web interface designed for seamless generation and editing.
1. Configuration Page
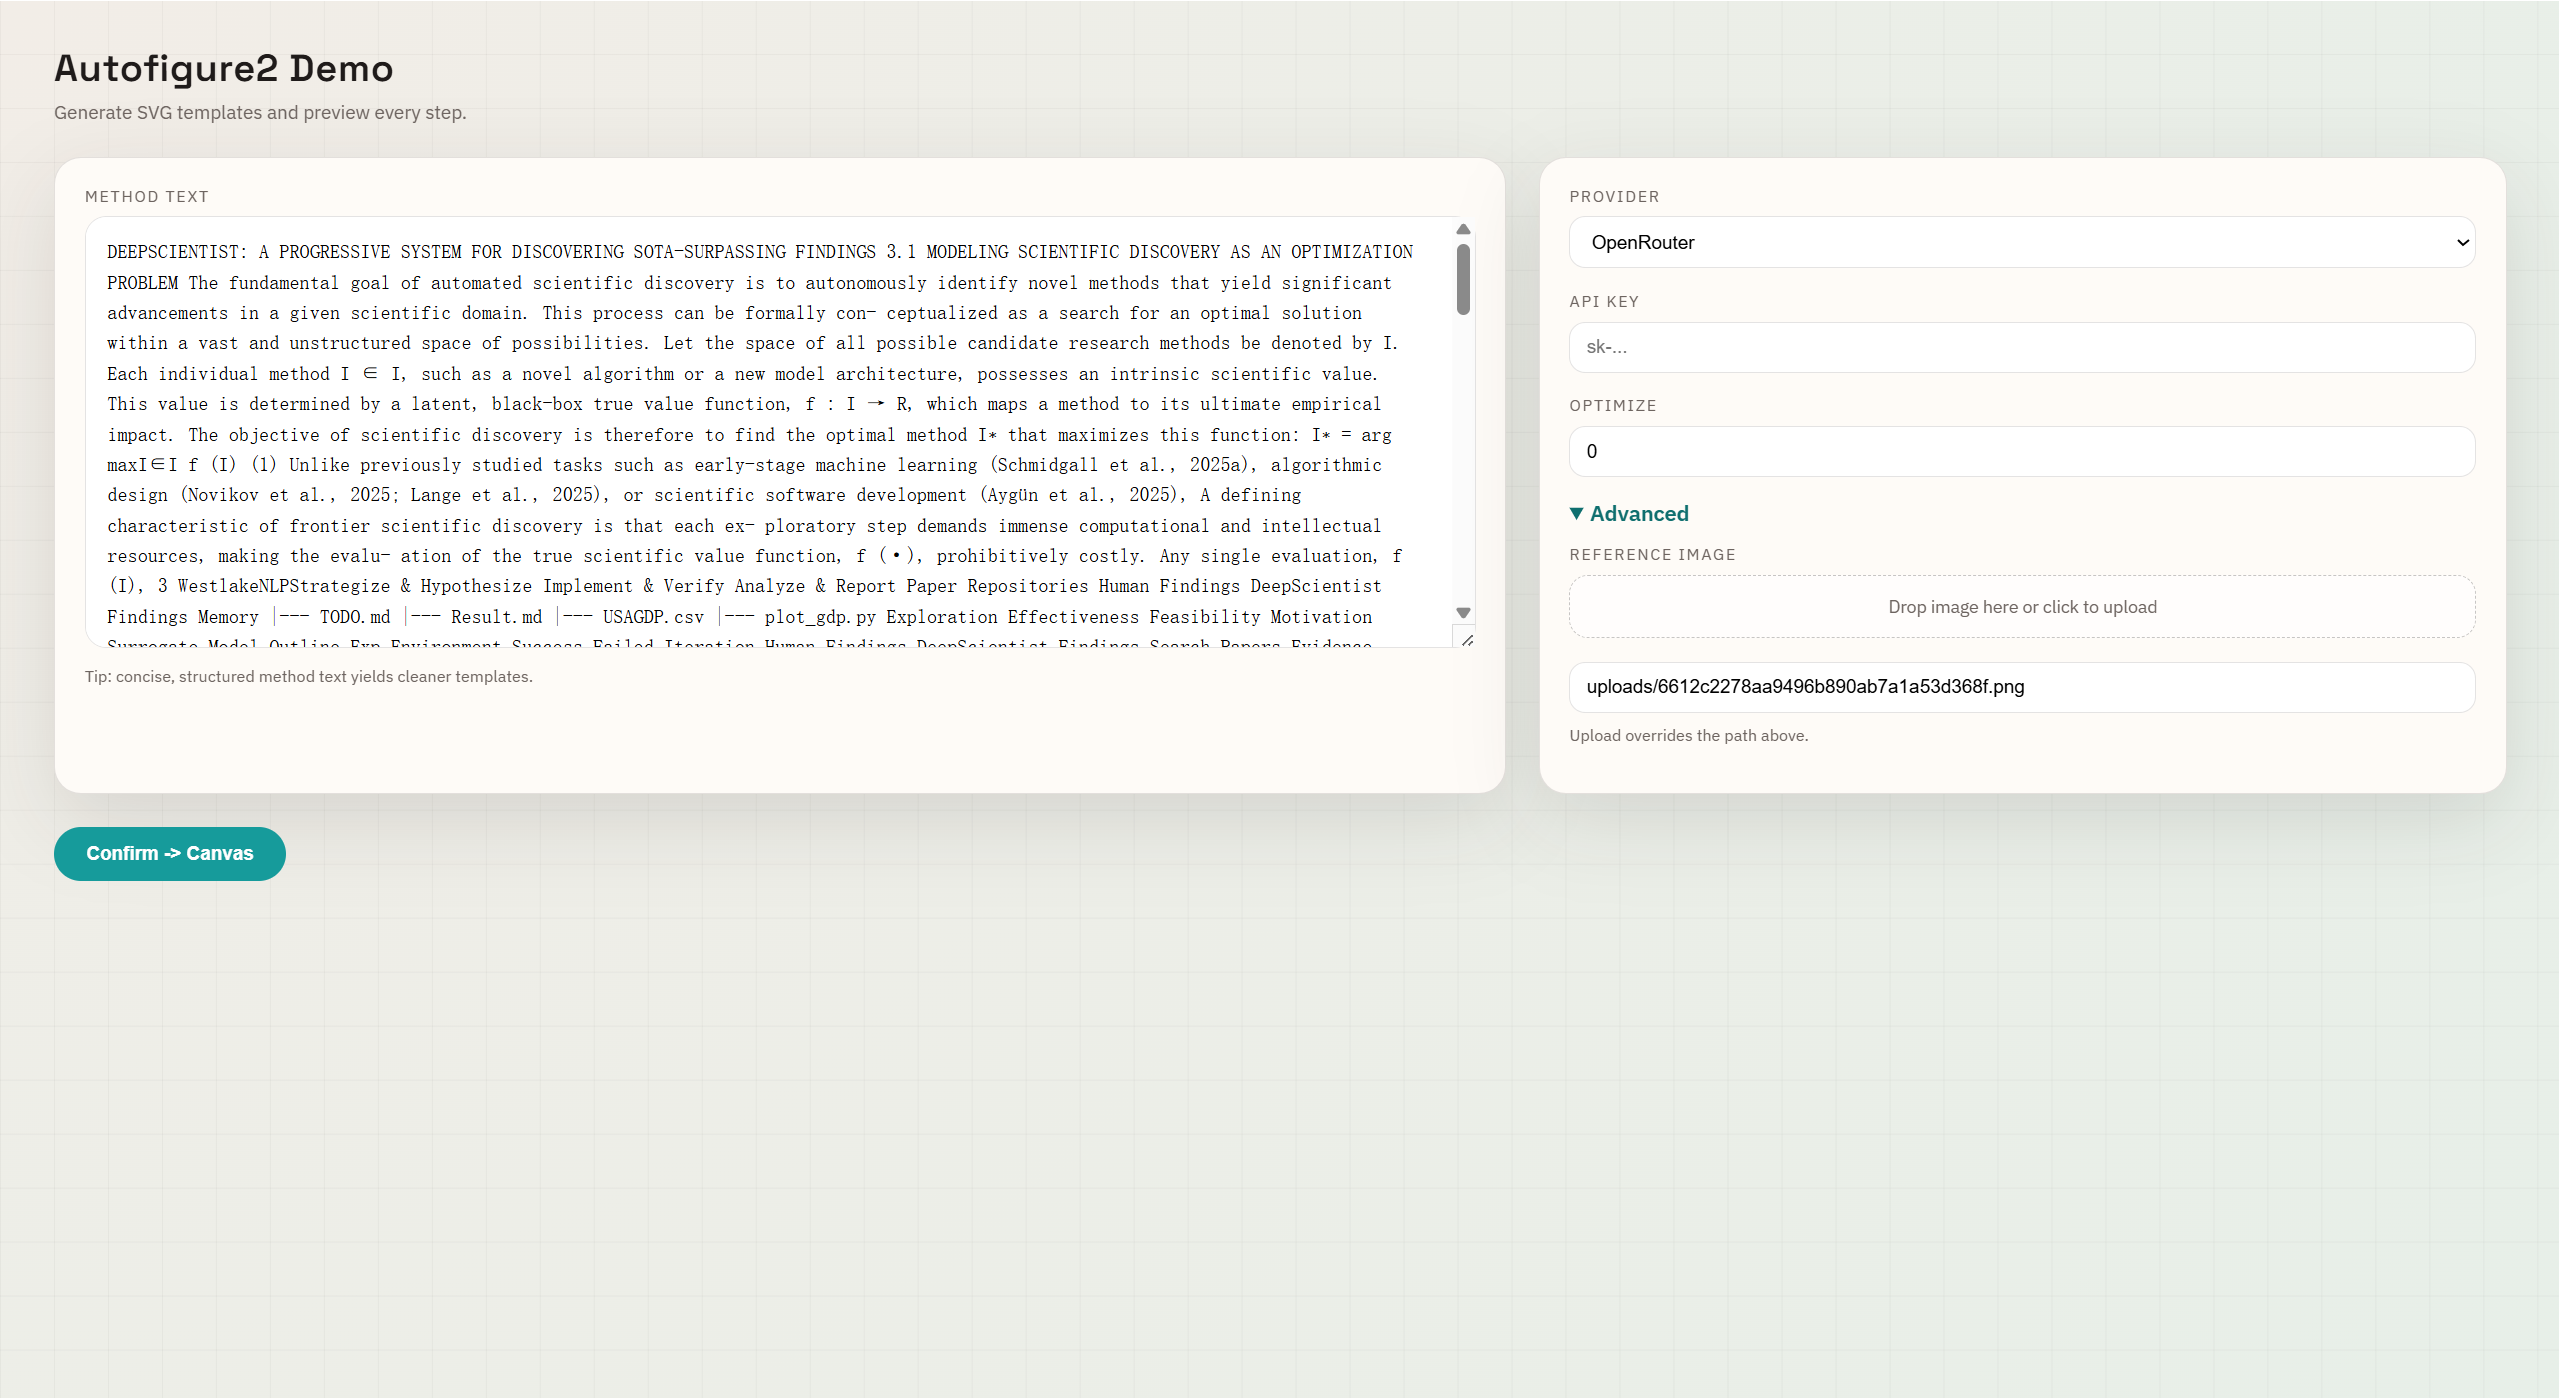
On the start page, paste your paper's method text on the left. On the right, configure your generation settings:
- Provider: Select your LLM provider (Bianxie AI, OpenRouter, Custom, Gemini, or OpenAI Responses).
- Image Provider: Optionally override step 1 only to use OpenAI GPT-Image.
- Optimize: Set SVG template refinement iterations (recommend
0 for standard use).
- Image Size: Available when the effective step-1 image provider is Gemini. Choose
1K, 2K, or 4K.
- Auto Upscale: Enabled by default. Upscales
figure.png to a 4K long edge (3840px) while preserving aspect ratio.
- Reference Image: Upload a target image to enable style transfer.
- SAM3 Backend: Choose local SAM3 or the fal.ai API (API key optional).
If you already have the first-stage raster figure, use the black button in the top-right corner:
- I already have the stage-1 figure: Opens a dedicated import page where you upload an existing academic figure and continue directly from SAM + SVG reconstruction.
2. Canvas & Editor
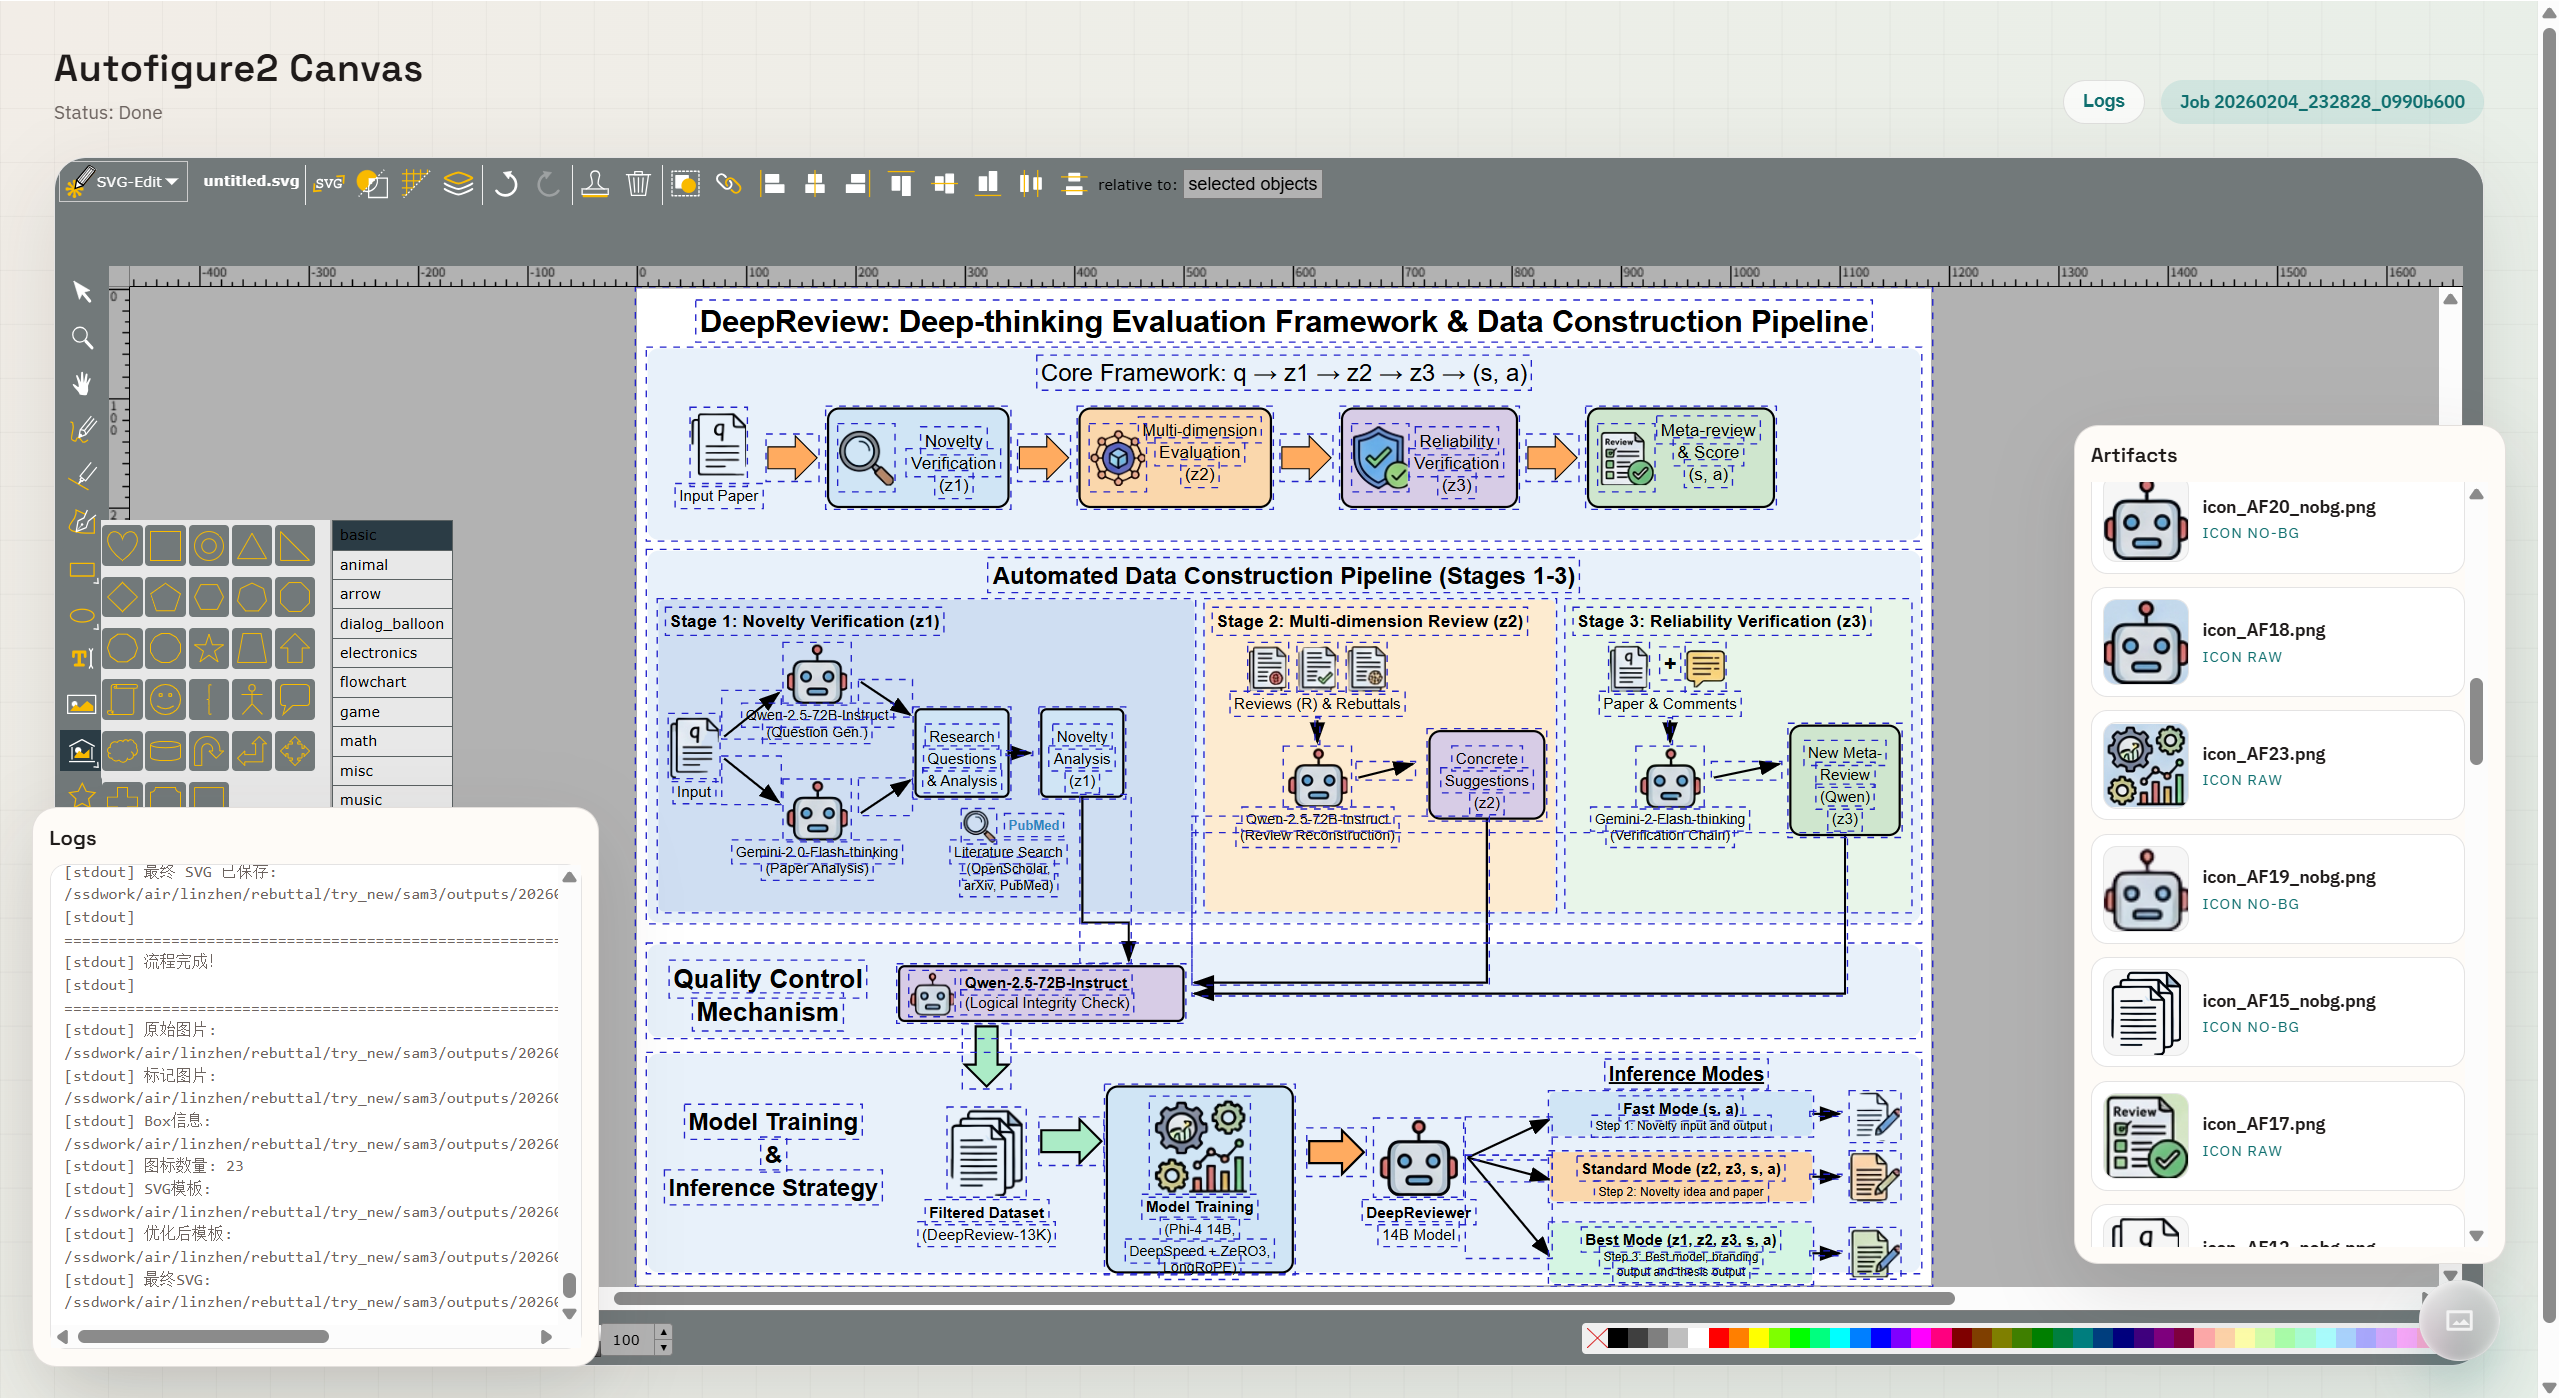
The generation result loads directly into an integrated SVG-Edit canvas, allowing for full vector editing.
- Status & Logs: Check real-time progress (top-left) and view detailed execution logs (top-right button).
- Artifacts Drawer: Click the floating button (bottom-right) to expand the Artifacts Panel. This contains all intermediate outputs (icons, SVG templates, etc.). You can drag and drop any artifact directly onto the canvas for custom composition.
- History: Open the History button to browse saved runs from
outputs/ and reopen an older result in the canvas.
🧩 SAM3 Installation Notes
AutoFigure-edit depends on SAM3 but does not vendor it. Please follow the
official SAM3 installation guide and prerequisites. The upstream repo currently
targets Python 3.12+, PyTorch 2.7+, and CUDA 12.6 for GPU builds.
SAM3 checkpoints are hosted on Hugging Face and may require you to request
access and authenticate (e.g., huggingface-cli login) before download.
SAM3 API Mode (No Local Install)
If you prefer not to install SAM3 locally, you can use an API backend (also supported in the Web demo). We recommend using Roboflow as it is free to use.
Option A: fal.ai
export FAL_KEY="your-fal-key"
python autofigure2.py \
  --method_file paper.txt \
  --output_dir outputs/demo \
  --provider bianxie \
  --api_key YOUR_KEY \
  --sam_backend fal
Option B: Roboflow
export ROBOFLOW_API_KEY="your-roboflow-key"
python autofigure2.py \
  --method_file paper.txt \
  --output_dir outputs/demo \
  --provider bianxie \
  --api_key YOUR_KEY \
  --sam_backend roboflow
Optional CLI flags (API):
--sam_api_key (overrides FAL_KEY/ROBOFLOW_API_KEY)--sam_max_masks (default: 32, fal.ai only)
⚙️ Configuration
Supported LLM Providers
| Provider |
Base URL |
Notes |
| OpenRouter |
openrouter.ai/api/v1 |
Supports Gemini/Claude/others |
| Bianxie AI |
api.bianxie.ai/v1 |
Built-in OpenAI-compatible aggregate API; supports GPT-image-2 and Gemini-3.1-Pro access for mainland China users without a foreign credit card |
| Custom |
<your-compatible-endpoint>/v1 (required) |
Vendor-neutral OpenAI-compatible API |
| Gemini (Google) |
generativelanguage.googleapis.com/v1beta |
Official Google Gemini API (google-genai) |
| OpenAI Responses |
api.openai.com/v1 |
Uses the official OpenAI Responses API for text + multimodal |
Common CLI flags:
--method_text, --method_file, or --input_figure_path--provider (openrouter | bianxie | custom | gemini | openai_response)--image_provider (openrouter | bianxie | custom | gemini | openai, optional step-1 override)--image_api_key, --image_base_url--image_model, --svg_model--image_size (1K | 2K | 4K, Gemini only)--disable_auto_upscale (disable the default 4K aspect-ratio-preserving upscale after step 1)--sam_prompt (comma-separated prompts)--sam_backend (local | fal | roboflow | api)--sam_api_key (API key override; falls back to FAL_KEY or ROBOFLOW_API_KEY)--sam_max_masks (fal.ai max masks, default 32)--merge_threshold (0 disables merging)--optimize_iterations (0 disables optimization)--reference_image_path (optional)
Custom Provider / Custom Base URL
If you want to use a self-hosted or third-party OpenAI-compatible endpoint, use:
--provider custom--base_url <your_openai_compatible_v1_root>--image_model <image_model_id>--svg_model <svg_model_id>
You can also set AUTOFIGURE_CUSTOM_BASE_URL instead of passing --base_url every time.
base_url must be the OpenAI-compatible /v1 root:
https://your-provider.example/v1
Do not pass a concrete endpoint path such as:
https://your-provider.example/v1/chat/completions
For text reasoning and SVG reconstruction, the Custom route calls:
POST /chat/completions
Authorization: Bearer <api_key>
Text-only requests use the no







 AutoFigure-Edit превращает текст раздела «Методы» научной статьи в полностью редактируемую научную иллюстрацию в SVG, со встроенным SVG-редактором для доработки.