English ·
中文
ComfyUI Minimax H3 Latent Upscaler
Neural Latent Upscaler for Minimax H3 Video Generation
Learned · High-fidelity · 2D & 3D Variants
📰 News
- [2026-08-28] 🚀 New node combo — MMH3 Split Upscale: three new nodes (
MMH3 Temporal Split Params, MMH3 Spatial Split Params, MMH3 Split Upscale) perform a tiled, hires-fix style latent re-sampling upscale for H3 video. Decomposed and optimized from the Comfyui-MMH3-UltimateUpscale project — splitting the AV latent into temporal chunks and spatial tiles, resampling each piece, and stitching with seam denoise, two-level color matching and temporal anchors. Key upgrades vs. original: more stable seams (seam_denoise + probe-gated seam polish), zero color drift (two-level matching + first-block/every-chunk pin-source), triple temporal anchors (frame-0/motion/identity), easier use (spatial params simplified to overlap/fade percentages snapping to the latent grid), and a lighter footprint (built-in upscale model removed in favor of an external pre-upscaled latent).
- [2026-08-26] 🚀 3D node memory & UX optimizations: zero-copy model loading plus ComfyUI's native
soft_empty_cache and explicit .contiguous() calls reduce RAM/VRAM spikes during load and inference; the post-inference CPU offload is now an optional force_unload toggle (default on); enable_chunking is renamed to enable_temporal_chunking and its effective chunk stride raised from 24 to 32; model files can now live in subfolders (PR #30); target dimensions and megapixels upper limits raised to 8192 px and 16 MP.
- [2026-08-23] 🚀 3D node improvements: added an
enable_chunking toggle (turn off for short clips to use full-context inference); fixed temporal-chunk edge artifacts with replicate padding and weighted overlap blending, eliminating end-frame flicker; added ROCm (AMD GPU) backend support via the new rocm device option.
- [2026-08-21] 🚀 3D node optimization: The model is automatically offloaded to CPU after execution to free VRAM for subsequent second-pass sampling; width and height are independently aligned to the align grid (default 32), fixing the bottom light band issue; normalization/denormalization is changed from in-place operations to standard operations; temporal chunking is retained to support long videos.
- [2026-08-19] 🚀 3D node overhaul: all three resize modes (
scale by multiplier, target dimensions, megapixels) merged into a single node; fixed aspect-ratio mismatch in certain modes and edge artifacts at specific sizes; added a new example workflow and expanded the usage notes.
- [2026-08-18] 🔥 Precision selector: both 2D and 3D nodes now support
fp32 / fp16 / bf16 inference.
- [2026-08-17] 🎉 Initial release: Minimax H3 Latent Upscaler 2D + 3D nodes with bilingual README and inline examples.
A custom ComfyUI node that upscales Minimax H3 VAE latents (24 channels) with a trained
neural network instead of naive interpolation. Its main purpose is to accelerate
high-resolution video generation and improve quality:
- Skip the slow decode → pixel-upscale → encode round-trip. Minimax H3 ships a heavy
~5B-parameter VAE, so decoding and re-encoding latents is expensive. Upscaling directly in
latent space avoids that costly round-trip entirely.
- Enable a faster generation pipeline: generate at low resolution (far fewer latent tokens),
upscale the latent with this node, then refine at the target resolution.
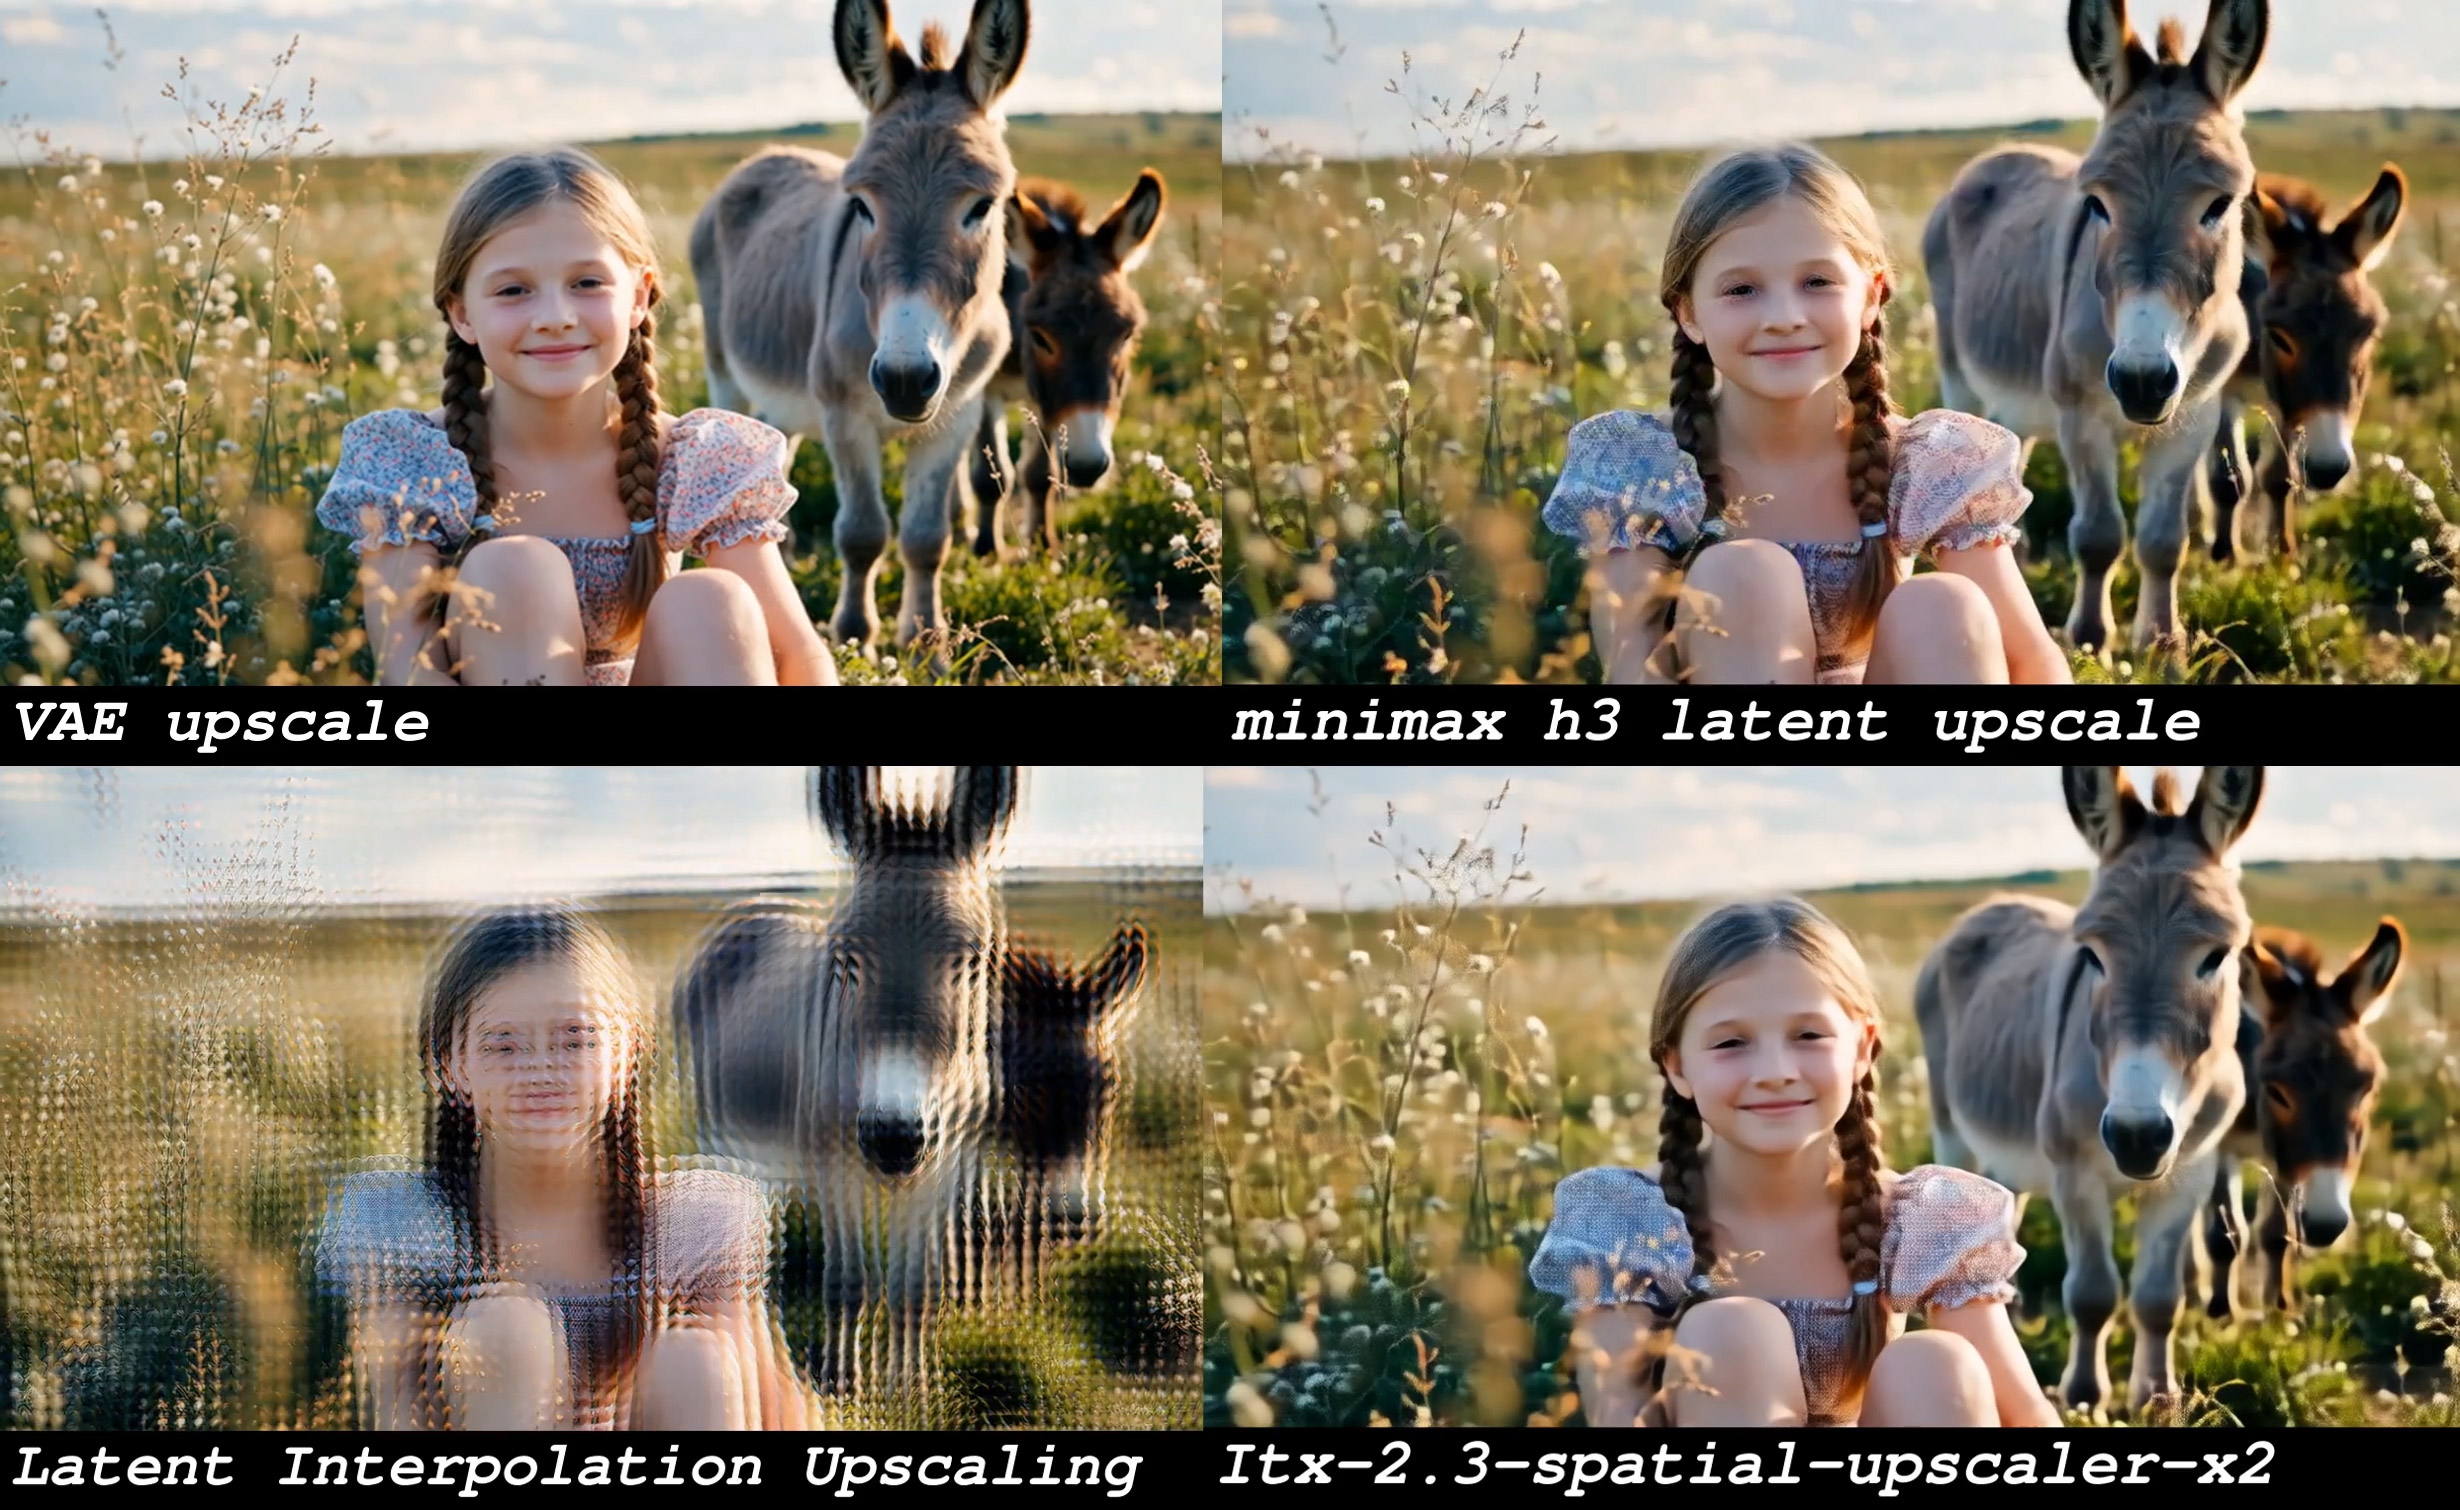
It also avoids the ghosting / double-image artifacts that naive latent interpolation
(bilinear/bicubic) introduces, and plays a role similar to the latent upscaler in LTX2.3.
⚠️ This saves time, not VRAM — the refinement pass still runs at the target resolution, so
peak memory is comparable to generating high-res directly. The win is purely speed.
Two node variants are provided, both registered under the video/MinimaxH3 category:
- Minimax H3 Latent Upscaler (2D) — a 2D ResBlock backbone with Temporal 3D-Conv layers
inserted for temporal consistency. Spatial (H×W) upscaling; the time dimension is preserved.
Lightweight and fast. Uses a simple
scale factor (1.0×–4.0×).
- Minimax H3 Latent Upscaler (3D) — a fully 3D-convolution backbone (3D ResBlocks +
TemporalConv + trilinear interpolation). Processes the spatiotemporal volume jointly for
stronger temporal coherence; heavier on compute/memory. Supports three resize modes in one
node:
scale by multiplier — classic scale factor (1.0×–4.0×).target dimensions — directly set target pixel width/height.megapixels — set a target total pixel count in megapixels (e.g. 1.2); keeps aspect ratio.
Both target dimensions and megapixels modes align the output to a configurable pixel grid and
derive the effective scale automatically.
The 3D node computes the equivalent scale internally for the size-based modes and feeds it to
the same trained model, so any target between 1.0×–4.0× works.
Both nodes support upscaling only (effective scale >= 1.0). scale = 1.0 returns the input
unchanged; an effective scale below 1.0 raises an error.
MMH3 Split Upscale (combo)
Origin: this combo is a decomposed and re-optimized version of the
Comfyui-MMH3-UltimateUpscale project. The original monolithic node was broken into three composable nodes (temporal split /
spatial split / main upscaler), and the enhancements below were layered on top of the original tiling
logic to improve seam stability, color consistency, temporal coherence, usability, and footprint.
A separate three-node combo that does a tiled, hires-fix style re-sampling upscale directly
inside the diffusion sampler — instead of a pre-trained upscaler network. It takes the H3 AV
latent (nested video 24ch + audio 32ch), splits it into temporal chunks and spatial tiles,
runs the sampler on each piece, then stitches them back seamlessly with seam-denoise, two-level color
matching and temporal anchors so seams and ghosting don't appear. The two * Split Params nodes
configure the splitting and feed the main MMH3 Split Upscale node (both optional — leave them
unconnected for a single full-frame pass). It requires a model + conditioning + sampler/sigmas,
i.e. it re-runs sampling at the higher resolution.
Key enhancements vs. the original project:
- 🧩 More stable seams (Seam / Ghosting): a seam-neighborhood denoise cap (
seam_denoise) plus a probe-gated second-pass seam polish (seam_polish) remove seams and ghosting; even under high denoise + fast motion, moving objects are no longer sliced ("broken limbs").
- 🎨 Zero color drift (Color Zero-Drift): spatial + temporal two-level color matching, with a global color reference pinned to the first block and to every chunk (
grade_pin) — eliminates inter-tile flicker and the localized cyan/green tint (e.g. top-left corner).
- ⏱️ Stronger temporal continuity: a triple temporal anchor —
frame-0 anchor + motion anchor + identity anchor — automatically backs up identity consistency under high denoise, so subjects don't drift.
- 🖱️ Easier to use: spatial parameters cut from 9 fields down to percentages (overlap ratio / fade ratio) that auto-snap to the latent grid;
negative sits right next to conditioning for a more intuitive layout.
- 🪶 Lighter footprint: the built-in upscale model was removed in favor of an external pre-upscaled latent input — more controllable VRAM, and a node that stays focused on its job.
Modules added / optimized (relative to the original project):
| Module |
What it adds / optimizes |
| Prevention (预防) |
Freeze-prefill overlap band + triple temporal anchors (frame-0 anchor + motion anchor + identity anchor) + cross-fade stitching — stops seams and forks from forming in the first place. |
| Correction (校正) |
Two-level (spatial + temporal) color matching + first-block source reference + per-chunk global pin-source (grade_pin) — keeps color & brightness consistent across tiles and chunks, killing inter-tile flicker and localized cyan/green tint. |
| Anti-forking (抗分叉) |
seam_denoise cap — under high denoise + fast motion, the seam neighborhood is re-sampled at medium denoise so moving objects aren't sliced ("broken limbs"); combined with the probe-gated second-pass seam polish, seams and ghosting are both eliminated (suggested 0.5–0.8; 1.0 = off). |
| Fixes (修复) |
Per-tile independent Guider + cropped keyframes, and a fixed probe-gated seam polish (seam_polish) — each tile gets correctly-scoped conditioning/keyframes, and the polish gating no longer over/under-applies. |
| Simplification (简化) |
overlap / fade are now percentage parameters (overlap ratio / fade ratio, resolution-independent) instead of absolute pixels, and auto-snap to the latent grid; negative sits next to conditioning for a more intuitive layout. |
📸 Examples
Video upscale comparison
Image upscale comparison
📁 Project Structure
Comfyui_Minimax_h3_latent_Upscaler/
├── examples/
│   ├── Minimax_h3_latent_Upscaler_001.mp4
│   └── Minimax_h3_latent_Upscaler_002.jpg
├── workflow_templates/
│   └── minimax_h3_r2v_Latent Upscaler example workflow.json  # example workflow for ComfyUI templates
├── nodes/
│   ├── __init__.py                       # merges 2D/3D/Split node mappings
│   ├── minimax_h3_latent_upscaler_2d.py  # 2D backbone + Temporal 3D Conv (scale mode)
│   ├── minimax_h3_latent_upscaler_3d.py  # pure 3D convolution with 3 resize modes
│   └── MMH3_Split_Upscale.py             # MMH3 Split Upscale combo (decomposed from Comfyui-MMH3-UltimateUpscale)
├── README.md
├── README_zh.md
└── __init__.py
The model weights are not included in this repo. Place them in your ComfyUI models folder
(see Model Placement below).
🚀 Key Features
- ✅ Learned latent upscaling — neural network trained for Minimax H3 latents, far sharper
than bilinear/bicubic interpolation.
- ✅ Two backbones — pick the fast 2D variant or the temporally-coherent 3D variant.
- ✅ Three ways to set output size on the 3D node —
scale by multiplier, target dimensions,
or megapixels, all with pixel-grid alignment and aspect-ratio lock.
- ✅ Tiled hires-fix upscaler (MMH3 Split Upscale combo) — re-sample the H3 AV latent at higher
resolution by splitting into temporal chunks + spatial tiles, with seam-denoise, two-level color
matching and temporal anchors to avoid seams and ghosting.
- ✅ 24-channel Minimax H3 latent — uses the exact per-channel mean/std normalization from
training.
- ✅ Auto architecture detection — reads
in_channels, block counts, temporal config and
kernel size straight from the checkpoint; no manual config needed.
- ✅ Robust weight loader — supports
.safetensors and .pth; auto-converts FP8→FP16;
tolerates the upscaler. prefix in merged checkpoints.
- ✅ Flexible precision/device —
cuda/cpu and fp32/fp16/bf16 options.
- ✅ Plug-and-play — standard ComfyUI node, no changes to your existing workflow.
Inference forces attention off (attn=False) for speed and stability. Loaded models are
cached by (name, device, precision) so repeated runs stay cheap.
📦 Installation
Clone this repository into ComfyUI's custom_nodes folder:
cd ComfyUI/custom_nodes
git clone https://github.com/LBH-123-AI/Comfyui_Minimax_h3_latent_Upscaler.git
Required dependencies (torch, einops, safetensors) are already present in a standard
ComfyUI environment — no extra install needed.
Restart ComfyUI.
🤖 Model Placement
The nodes scan and load weights from:
ComfyUI/models/latent_upscale_models/
Put your Minimax H3 latent upscaler checkpoint (.safetensors or .pth) there. It will appear
automatically in the node's model_name dropdown.
Pre-trained checkpoints are available at:
huggingface.co/LBH-123-AI/Minimax_h3_latent_Upscaler
The loader auto-detects the architecture, so a single checkpoint works for both the 2D and 3D
nodes as long as the stored structure matches.
🧩 Usage
Add the node you need from the video/MinimaxH3 menu, connect a LATENT, pick the model, set the
resize mode / scale, and decode.
Typical workflow:
- Quick preview:
[Minimax H3 Latent] → [H3 Latent Upscaler] → [VAE Decode]
- High quality / time-saving (recommended):
[Low-res Latent] → [H3 Latent Upscaler] → [Refine / Re-sample] → [VAE Decode]
Compared to the naive approach [Latent] → [VAE Decode] → [Pixel Upscaler] → [VAE Encode] → …,
upscaling directly in latent space skips the expensive VAE decode/encode round-trip. Minimax H3's
~5B-parameter VAE makes decode and re-encode notably slow, so this is where most of the time is
saved. It also avoids the ghosting / double-image artifacts that direct latent interpolation
(bilinear/bicubic) causes.
⚠️ Saves time, not VRAM: the refinement still runs at the target resolution, so peak memory is
roughly the same as generating high-res directly. The benefit is purely faster turnaround.
Node Reference — 2D
| Parameter |
Type |
Default |
Range / Options |
Description |
latent |
LATENT |
— |
— |
Input Minimax H3 latent (B,C,T,H,W) or (B,C,H,W) |
model_name |
dropdown |
auto |
scanned files |
Checkpoint in latent_upscale_models/ |
scale |
FLOAT |
2.0 |
1.0 – 4.0 (step 0.1) |
Spatial upscale factor |
device |
dropdown |
cuda |
cuda / cpu |
Inference device |
precision |
dropdown |
fp32 |
fp32 / fp16 / bf16 |
Inference precision |
Output: LATENT — the upscaled latent, ready for VAE decode.
Node Reference — 3D
| Parameter |
Type |
Default |
Range / Options |
Description |
latent |
LATENT |
— |
— |
Input Minimax H3 latent (B,C,T,H,W) or (B,C,H,W) |
model_name |
dropdown |
auto |
scanned files |
Checkpoint in latent_upscale_models/ |
mode |
dropdown |
scale by multiplier |
scale by multiplier / target dimensions / megapixels |
How the output size is chosen |
scale |
FLOAT |
2.0 |
1.0 – 4.0 (step 0.05) |
Used when mode is scale by multiplier |
width |
INT |
1280 |
64 – 8192 (step 8) |
Target pixel width (used by target dimensions) |
height |
INT |
704 |
64 – 8192 (step 8) |
Target pixel height (used by target dimensions) |
megapixels |
FLOAT |
1.0 |
0.1 – 16.0 (step 0.1) |
Target total megapixels (used by megapixels); keeps aspect ratio |
align |
INT |
32 |
1 – 512 |
Pixel-grid alignment: output W/H are independently rounded to multiples of this value (e.g. 16/32/64) |
enable_temporal_chunking |
BOOLEAN |
True |
True / False |
Split long videos into temporal chunks to cap VRAM; disable for short clips for full-context inference |
force_unload |
BOOLEAN |
True |
True / False |
Unload model to CPU after inference to free VRAM for subsequent nodes; disable if you reuse this node repeatedly to avoid reload overhead |
device |
dropdown |
cuda |
cuda / rocm / cpu |
Inference backend (ROCm needs a HIP-enabled PyTorch build) |
precision |
dropdown |
fp32 |
fp32 / fp16 / bf16 |
Inference precision |
Output: LATENT — the upscaled latent.
Which node to pick? Use 2D for speed and when frames are already temporally stable; use
3D when you need stronger motion/temporal coherence or prefer specifying output size by
target dimensions / megapixels.
Node Reference — MMH3 Split Upscale (combo)
A tiled, hires-fix style re-sampling upscaler for H3 video, decomposed and optimized from the
Comfyui-MMH3-UltimateUpscale project. Unlike the 2D/3D nodes (which use a
pre-trained upscaler network), this combo re-runs the diffusion sampler on a higher-resolution
version of the latent, split into pieces so it fits in VRAM. It operates on the H3 AV latent
(nested video 24ch + audio 32ch) and requires model + conditioning + sampler/sigmas.
MMH3 Temporal Split Params — how to cut the clip along time (H3's native 5+17·m frame/token grid):
| Parameter |
Type |
Default |
Range / Options |
Description |
chunk_frames |
INT |
73 |
5 – 100000 |
Chunk length in frames (snapped to H3 token grid) |
temporal_overlap_frames |
INT |
22 |
0 – 100000 |
Overlap between consecutive chunks |
anchor_strength |
FLOAT |
0.999 |
0.0 – 1.0 |
Temporal anchor strength |
motion_anchor_frames |
dropdown |
22 |
0 / 5 / 22 / 39 |
Motion anchor length in frames |
identity_anchor_frames |
INT |
24 |
0 – 240 |
Spacing of identity anchors |
Output: temporal_split_param (custom type, feeds the main node).
MMH3 Spatial Split Params — how to cut each frame into tiles:
| Parameter |
Type |
Default |
Range / Options |
Description |
tile_width |
INT |
512 |
64 – 16384 (step 32) |
Tile width in pixels |
tile_height |
INT |
512 |
64 – 16384 (step 32) |
Tile height in pixels |
overlap_ratio |
FLOAT |
0.25 |
0.0 – 0.90 |
Overlap as a fraction of the tile |
fade_ratio |
FLOAT |
0.50 |
0.0 – 1.0 |
Fade band width within the overlap |
min_tile_size |
INT |
256 |
0 – 16384 (step 32) |
Minimum tile edge; avoids tiny edge tiles |
seam_denoise |
FLOAT |
1.0 |
0.1 – 1.0 |
Seam-neighborhood denoise cap; <1 prevents fast objects being cut at seams (suggest 0.5–0.8) |
Outputs: spatial_split_param (custom type) + grid_preview (string, shows the computed tile/overlap grid).
MMH3 Split Upscale — the main orchestrator:
| Parameter |
Type |
Default |
Range / Options |
Description |
model |
MODEL |
— |
— |
Diffusion model used for re-sampling |
conditioning |
CONDITIONING |
— |
— |
Positive conditioning |
negative |
CONDITIONING |
— |
optional |
Negative conditioning |
latent |
LATENT |
— |
— |
Input H3 AV latent (nested video 24ch + audio 32ch); batch 1 only |
noise |
NOISE |
— |
— |
Noise source for the sampler |
sampler |
SAMPLER |
— |
— |
Sampler |
sigmas |
SIGMAS |
— |
— |
Sigma schedule |
cfg |
FLOAT |
1.0 |
0.0 – 100.0 |
Classifier-free guidance scale |
temporal_split_param |
custom |
— |
optional |
From MMH3 Temporal Split Params |
spatial_split_param |
custom |
— |
optional |
From MMH3 Spatial Split Params |
seam_polish |
dropdown |
off |
off / auto / all |
Extra de-seam pass on detected seams |
color_match |
BOOLEAN |
True |
True / False |
Two-level color matching across tiles/chunks |
Output: LATENT — the upscaled H3 AV latent, ready for VAE decode.
Notes: Both * Split Params nodes are optional — leave them unconnected for a single
full-frame pass (no temporal/spatial splitting). The combo re-runs the sampler at the higher
resolution, so it trades extra compute for VRAM headroom on long / high-res clips.
🧪 Model / Architecture
- Latent format: 24-channel Minimax H3 VAE latent, normalized per-channel with the training
mean/std before inference and de-normalized after.
- **D

 Кастомная нода для ComfyUI, которая апскейлит видеолатенты Minimax H3 (24 канала) обученной нейросетью вместо наивной билинейной/бикубической интерполяции, чтобы можно было генерировать в низком разрешении и увеличивать в латентном пространстве перед уточнением.