ccgui is an open-source multi-engine AI coding desktop client. In plain words: it brings command-line AI coding runtimes — Claude Code, Codex CLI, Kimi CLI, Grok CLI, Pi CLI, OMP CLI, and DeepSeek Harness (DSH) — into one graphical interface.
No more staring at a black terminal. Open ccgui, pick a project, and chat with AI to write code, fix bugs, and commit to Git. Streaming output, thinking traces, and tool calls are visible as they happen; token usage appears when the engine reports it.
The app is built with Tauri 2 + React 18 + TypeScript + Rust and runs on macOS, Windows, and Linux. Settings and state are persisted locally. Content sent to an AI provider follows the boundary of the channel you configured for that CLI.
What can ccgui do?
One client, seven AI engines
- Registers runtime adapters for Claude Code, Codex CLI, Kimi CLI, Grok CLI, Pi CLI, OMP CLI, and DeepSeek Harness — pick the engine per session from the composer.
- Provider channels are written to each CLI's own native config files (no parallel credential store), with curated presets for GLM, Kimi, DeepSeek, MiniMax, MiMo, Bailian, LongCat, OpenCode Go, OpenRouter, and more. Claude / Codex / Grok channels can be imported from CC Switch.
- Pi-family engines (Pi / OMP) support API-key and OAuth sign-in flows from inside Settings.
- Per-tab model and effort overrides: different tabs in the same window can run different models or thinking levels.
- Session history survives restarts; the history scanner reads each CLI's native session files and keeps titles in sync.
A chat box designed for coding
- Streaming replies are revealed per animation frame with cached syntax highlighting — long outputs stay smooth instead of re-parsing markdown on every token.
- Thinking streams merge with the reply text, auto-fold when they settle, and expand to full text on demand.
- Tool calls show as live rows with expandable parameters and results, including beautified Git Diff and Bash viewers and per-run completion metadata.
- A Run Status Strip mirrors the engine's live progress (including todo snapshots), and a message anchor rail lets you jump between user messages.
- Pasted images become attachments; file mentions are backed by a
.gitignore-aware project file index; file links in replies handle URL-encoded paths and have a right-click menu.
- Permission denials can be resolved inline by granting the engine extra directories; prompt history and an optional Codex Fast toggle live in the composer.
Not just chat — a full set of dev panels
- File tree: virtualized, with Git status colors, nested-repository badges, context menus, and drag-and-drop — plus a built-in CodeMirror editor pane with Markdown preview.
- Built-in terminal: a real PTY-backed terminal dock (xterm + WebGL), no need to switch windows.
- Git panel: stage, commit, search branches, inspect diffs and history.
- Command palette: one keyboard-driven box for the app's commands.
Plugin system
- First-party plugin SDK (
@ccgui/plugin-sdk) plus an in-app runtime, manager UI, and trust boundary.
- Declarative plugins can add settings sections and config-driven UI without shipping frontend code; builtin app surfaces (including the settings page itself) are registered through the same extension points.
- See docs/plugin-development-guide.zh-CN.md for the full authoring guide.
Settings, network, and updates
- Proxy settings for the app and engine traffic.
- LAN web access: serve the UI to other devices on your network over a token-authenticated WebSocket bridge, with a QR-code entry in Settings.
- Workspace management: group projects and switch between them.
- In-app auto-update (Tauri updater against GitHub Releases), a changelog dialog, and signed macOS builds.
- Bilingual UI: Chinese and English.
Download
Grab the installer for your platform from the Releases page:
| Platform |
Installer |
| macOS (Apple Silicon, signed) |
aarch64.dmg |
| Windows |
.exe (NSIS) |
| Linux |
.AppImage |
After installing, open Settings, configure a provider channel for the CLI you want (or sign in), add a project folder, and start chatting.
Using DeepSeek Harness (DSH)
- Install the DSH CLI on your machine and configure its models and API keys in DSH itself — not as a separate vendor preset inside ccgui.
- In Settings → DeepSeek Harness, ccgui can adopt a running local
dsh web host or auto-start one.
- Select DeepSeek Harness in the composer engine picker. Chat runs through DSH's headless profile; models and credentials stay in DSH.
Getting it running (setup guide)
Want to build it yourself or contribute? Three steps.
Step 1: Prepare your environment
| Tool |
Version |
What for |
| Node.js |
20 or newer |
Runs the frontend toolchain |
| pnpm |
10 (pinned via packageManager) |
Installs dependencies |
| Rust |
stable (install via rustup) |
Compiles the backend |
Each OS also needs the standard Tauri prerequisites — see the official Tauri guide:
- macOS:
xcode-select --install.
- Windows: Microsoft C++ Build Tools and WebView2 (Windows 11 ships with WebView2).
- Linux:
webkit2gtk and friends — copy the commands from the Tauri docs.
Step 2: Install dependencies
git clone https://github.com/zhukunpenglinyutong/desktop-cc-gui.git
cd desktop-cc-gui
pnpm install
Note: this is a pnpm workspace (the plugin SDK lives in packages/plugin-sdk); the lockfile is pnpm-lock.yaml.
Step 3: Start it
pnpm dev
A few tips:
- The first launch compiles the entire Rust backend and can take a few minutes — go grab a coffee. Later launches use incremental builds and are fast.
- The frontend dev server runs on port
1420.
Building installers
pnpm build:mac                 # macOS signed build (scripts/build-signed-macos.sh)
pnpm build:mac:skip-notarize   # same, skipping notarization
Windows and Linux installers are produced by the CI workflows under .github/workflows/ (release.yml, build-windows-artifact.yml).
How to work on the code (development guide)
Tech stack at a glance
| Part |
Technology |
| UI |
React 18 + TypeScript + Tailwind CSS 4 + zustand |
| Build |
Vite 6 |
| Desktop shell |
Tauri 2 (Rust backend: git2, rusqlite, portable-pty, axum) |
| Tests |
Vitest (frontend) + cargo test (Rust) |
Directory layout
desktop-cc-gui/
├── src/                    # Frontend code
│   ├── features/           # ★ Feature modules: chat / files / git / terminal /
│   │                       #   settings / plugins / commands / update / open-app
│   ├── components/         # Shared UI components (incl. engine brand icons)
│   ├── i18n/               # zh + en locale bundles
│   ├── styles/             # Global styles
│   └── lib/ utils/         # Utility functions
├── src-tauri/              # Rust backend
│   └── src/                # engine/ (one module per CLI), history/, plugins/,
│                           # git.rs, terminal.rs, web.rs (LAN bridge), ...
├── packages/plugin-sdk/    # @ccgui/plugin-sdk — plugin authoring kit
├── tests/                  # Frontend integration-style tests (Vitest)
├── scripts/                # Build and packaging scripts
└── docs/                   # Plugin development guide, engine mode notes
The typical workflow for changing a feature
- UI-only change: find the matching module under
src/features/ and edit there. New components live inside that feature's own folder.
- Needs backend support: add a
#[tauri::command] in the matching src-tauri/src/ module and call it from the frontend via the Tauri API.
- Changed any UI text: route it through i18n and keep both bundles (
src/i18n/zh.ts, src/i18n/en.ts) synchronized — hardcoded UI text is not allowed.
Everyday commands
| Command |
What it does |
pnpm dev |
Start the full app (Tauri dev mode) |
pnpm build |
TypeScript check + frontend production build |
pnpm test |
Run the Vitest suite |
pnpm preview |
Preview the production frontend build |
cargo test --manifest-path src-tauri/Cargo.toml |
Run Rust tests |
Writing tests
- Frontend tests use Vitest — colocated
xxx.test.ts(x) files next to the source, plus heavier suites under tests/.
- Rust tests live in their modules as usual and run with
cargo test --manifest-path src-tauri/Cargo.toml.
Coding rules
Not many rules, but each exists for a reason:
- Run the big three before opening a PR:
pnpm build (typecheck) and pnpm test green locally, plus cargo test if you touched Rust.
- UI text must go through i18n: every user-visible string comes from
src/i18n/, and both shipped locale bundles must stay synchronized.
- Keep components close to home: new components start inside their own feature folder; promote to
src/components/ only once they're genuinely reused across features.
- TypeScript strict: don't paper over things with
any; write real types.
- Extend through the plugin SDK where possible: new settings sections and surfaces should register through the same extension points the builtin ones use.
- Never commit secrets: API keys and tokens must never appear in code or commit history.
Writing commit messages
Use Conventional Commits with a Chinese action phrase by default: type(scope): 中文动宾短句.
| type |
When to use |
feat |
New feature |
fix |
Bug fix |
refactor |
Refactoring (no behavior change) |
docs |
Documentation |
test |
Adding/updating tests |
chore |
Housekeeping (version bumps, deps, scripts) |
perf / style / ci |
Performance / formatting / CI |
Real examples from this repo:
feat(chat): 支持工具调用参数与结果展开、Git Diff/Bash美化及完成元数据展示
fix(codex): Windows .cmd shim 下多行提示词只送达第一行
perf(chat): reveal streamed text per frame without reparsing markdown
No emoji in commit messages, and no AI-generated signatures.
Submitting your code (contribution flow)
- Fork the repo and clone it locally.
- Branch off
main, named like feat/xxx or fix/xxx.
- Make your changes and get
pnpm build + pnpm test green locally.
- Open a PR against this repo's
main branch. Title in commit format; in the description, explain what changed, why, and how you verified it.
Not sure where to start? Browse the Issues and pick one that interests you. Found a bug or have an idea? Open an issue and let's talk.
Want to dig deeper?
License
MIT
Friendship Link
Thanks for the support and feedback from the friends at LINUX DO.
Contributors
Thanks to all the contributors who help make ccgui better.

Acknowledgements
This project originally started from CodexMonitor. Since v1.0.0 the codebase has been rewritten from scratch — no CodexMonitor code remains, but the original inspiration is gratefully acknowledged.
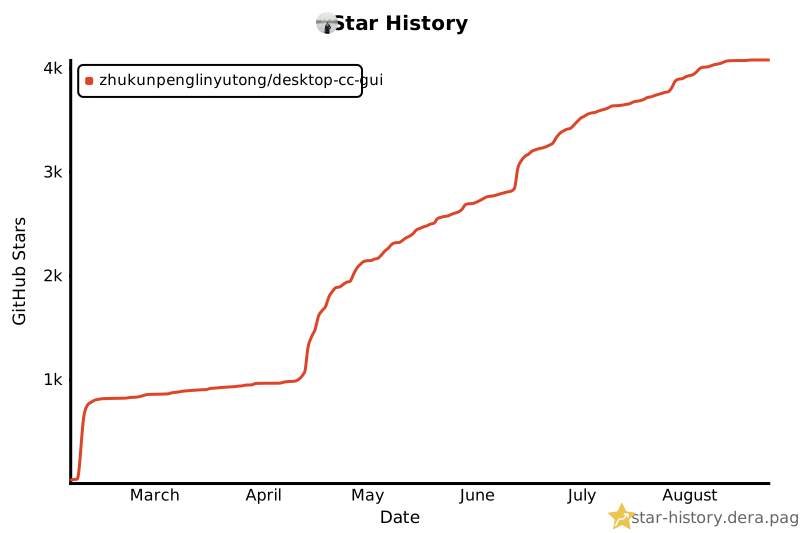
Star History


 ccgui 是一个桌面图形界面,把命令行 AI 编程工具(Claude Code、Codex CLI、Kimi CLI、Grok CLI、Pi CLI、OMP CLI 和 DeepSeek Harness)集中到同一个图形界面里,你可以直接和 AI 智能体对话来写代码、修 bug、提交到 Git,而不必盯着光秃秃的终端。