






Что это?
 Пошаговый учебный курс, который показывает, как с нуля написать собственное ядро встраиваемой операционной системы на Rust для Raspberry Pi 3 и 4.
Пошаговый учебный курс, который показывает, как с нуля написать собственное ядро встраиваемой операционной системы на Rust для Raspberry Pi 3 и 4.Это готовая ОС или учебный курс?Это учебный курс из последовательных уроков. Каждый урок содержит самостоятельный загрузочный бинарный файл ядра, который опирается на предыдущий, а также diff с предыдущим уроком, чтобы можно было точно увидеть, что изменилось.
Это учебный курс из последовательных уроков. Каждый урок содержит самостоятельный загрузочный бинарный файл ядра, который опирается на предыдущий, а также diff с предыдущим уроком, чтобы можно было точно увидеть, что изменилось.Как мне запустить ядро из урока?Установите Docker Engine, подготовьте набор инструментов Rust (в основном он настраивается автоматически через rust-toolchain.toml), затем соберите и запустите ядро в QEMU. Начиная с урока 5, его также можно загрузить на настоящую Raspberry Pi через UART.
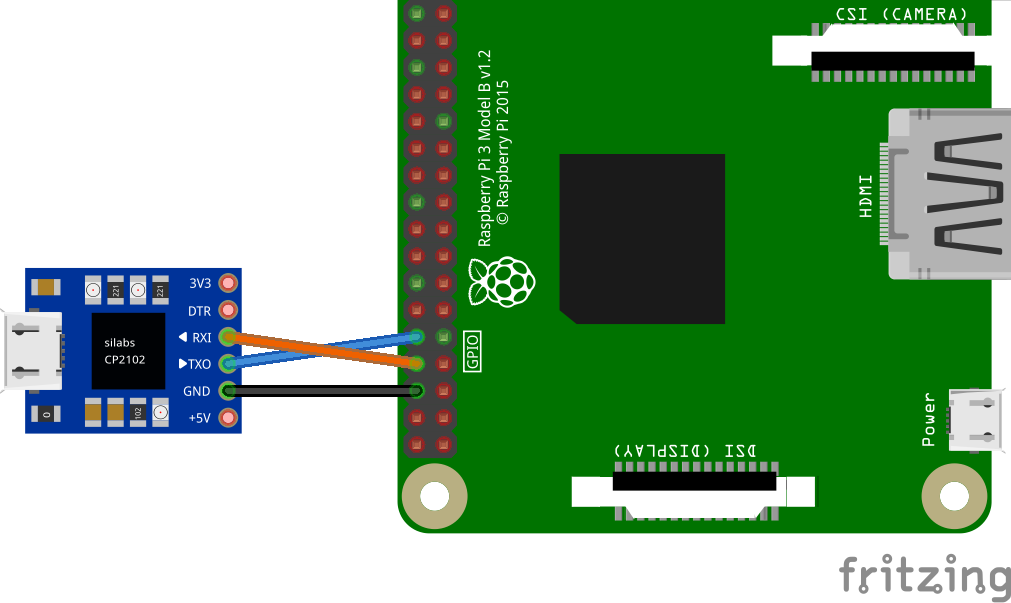
Установите Docker Engine, подготовьте набор инструментов Rust (в основном он настраивается автоматически через rust-toolchain.toml), затем соберите и запустите ядро в QEMU. Начиная с урока 5, его также можно загрузить на настоящую Raspberry Pi через UART.Какие инструменты мне нужны, помимо самого Rust?Нужен Docker (проект загружает контейнер с предустановленными QEMU, OpenOCD и GDB), rustup для кросс-компиляции, а на macOS — пара гемов Ruby. Для работы с реальным оборудованием рекомендуется USB-to-serial кабель (желательно на базе CP2102).
Нужен Docker (проект загружает контейнер с предустановленными QEMU, OpenOCD и GDB), rustup для кросс-компиляции, а на macOS — пара гемов Ruby. Для работы с реальным оборудованием рекомендуется USB-to-serial кабель (желательно на базе CP2102).Одинаково ли это работает на macOS и Linux?Уроки в первую очередь рассчитаны на Linux. Поддержка macOS пока экспериментальная, а уроки 1-5 — подготовительная часть, предназначенная для запуска только в QEMU, а не на реальном оборудовании.
Уроки в первую очередь рассчитаны на Linux. Поддержка macOS пока экспериментальная, а уроки 1-5 — подготовительная часть, предназначенная для запуска только в QEMU, а не на реальном оборудовании.Для кого этот курс?Для энтузиастов, которые пишут операционные системы в свободное время, которые незнакомы с 64-битной архитектурой ARMv8-A и хотят получить пошаговое введение в написание кода уровня ядра на Rust.
Для энтузиастов, которые пишут операционные системы в свободное время, которые незнакомы с 64-битной архитектурой ARMv8-A и хотят получить пошаговое введение в написание кода уровня ядра на Rust.Какие темы на самом деле охватывает серия?Типичные задачи ОС, например вывод в последовательную консоль, настройка виртуальной памяти и обработка аппаратных исключений, которые реализуются пошагово с использованием механизмов безопасности Rust.
Типичные задачи ОС, например вывод в последовательную консоль, настройка виртуальной памяти и обработка аппаратных исключений, которые реализуются пошагово с использованием механизмов безопасности Rust.Нужно ли мне специальное оборудование, чтобы следовать курсу?Нет. Первые пять уроков — подготовительная часть, которая полностью работает в QEMU. Начиная с урока 5, ядро можно прошить на настоящую Raspberry Pi 3 или 4 и смотреть вывод через USB-кабель для последовательного порта.
Нет. Первые пять уроков — подготовительная часть, которая полностью работает в QEMU. Начиная с урока 5, ядро можно прошить на настоящую Raspberry Pi 3 или 4 и смотреть вывод через USB-кабель для последовательного порта.Можно ли портировать это на другую плату или архитектуру?Да. Автор специально построил код модульно, чтобы упростить портирование на другие архитектуры процессоров и платы, и даже приглашает участников попробовать портировать его на RISC-V.
Да. Автор специально построил код модульно, чтобы упростить портирование на другие архитектуры процессоров и платы, и даже приглашает участников попробовать портировать его на RISC-V.What are similar projects?raspberry-pi-os, linux, lytlnyblOS, redox, mu300-linux, flash-linux0.11-talk, sherpa-onnx, zxdesk
raspberry-pi-os, linux, lytlnyblOS, redox, mu300-linux, flash-linux0.11-talk, sherpa-onnx, zxdeskWhich topics is it in?aarch64, bare-metal, os, embedded-systems, operating-system, arm64, kernel, raspberry-pi, embedded, hardware, guide, command-line
aarch64, bare-metal, os, embedded-systems, operating-system, arm64, kernel, raspberry-pi, embedded, hardware, guide, command-line