Prompt Optimizer 🚀
📖 Project Introduction
Prompt Optimizer is a powerful AI prompt optimization tool that helps you write better AI prompts and improve the quality of AI outputs. It supports four usage methods: web application, desktop application, Chrome extension, and Docker deployment.
Prompts can start from manual writing, templates, local imports, or sources such as Prompt Garden. Prompt Optimizer is where those prompts are optimized, tested, evaluated, and saved as reusable prompt assets.
🎥 Feature Demonstration
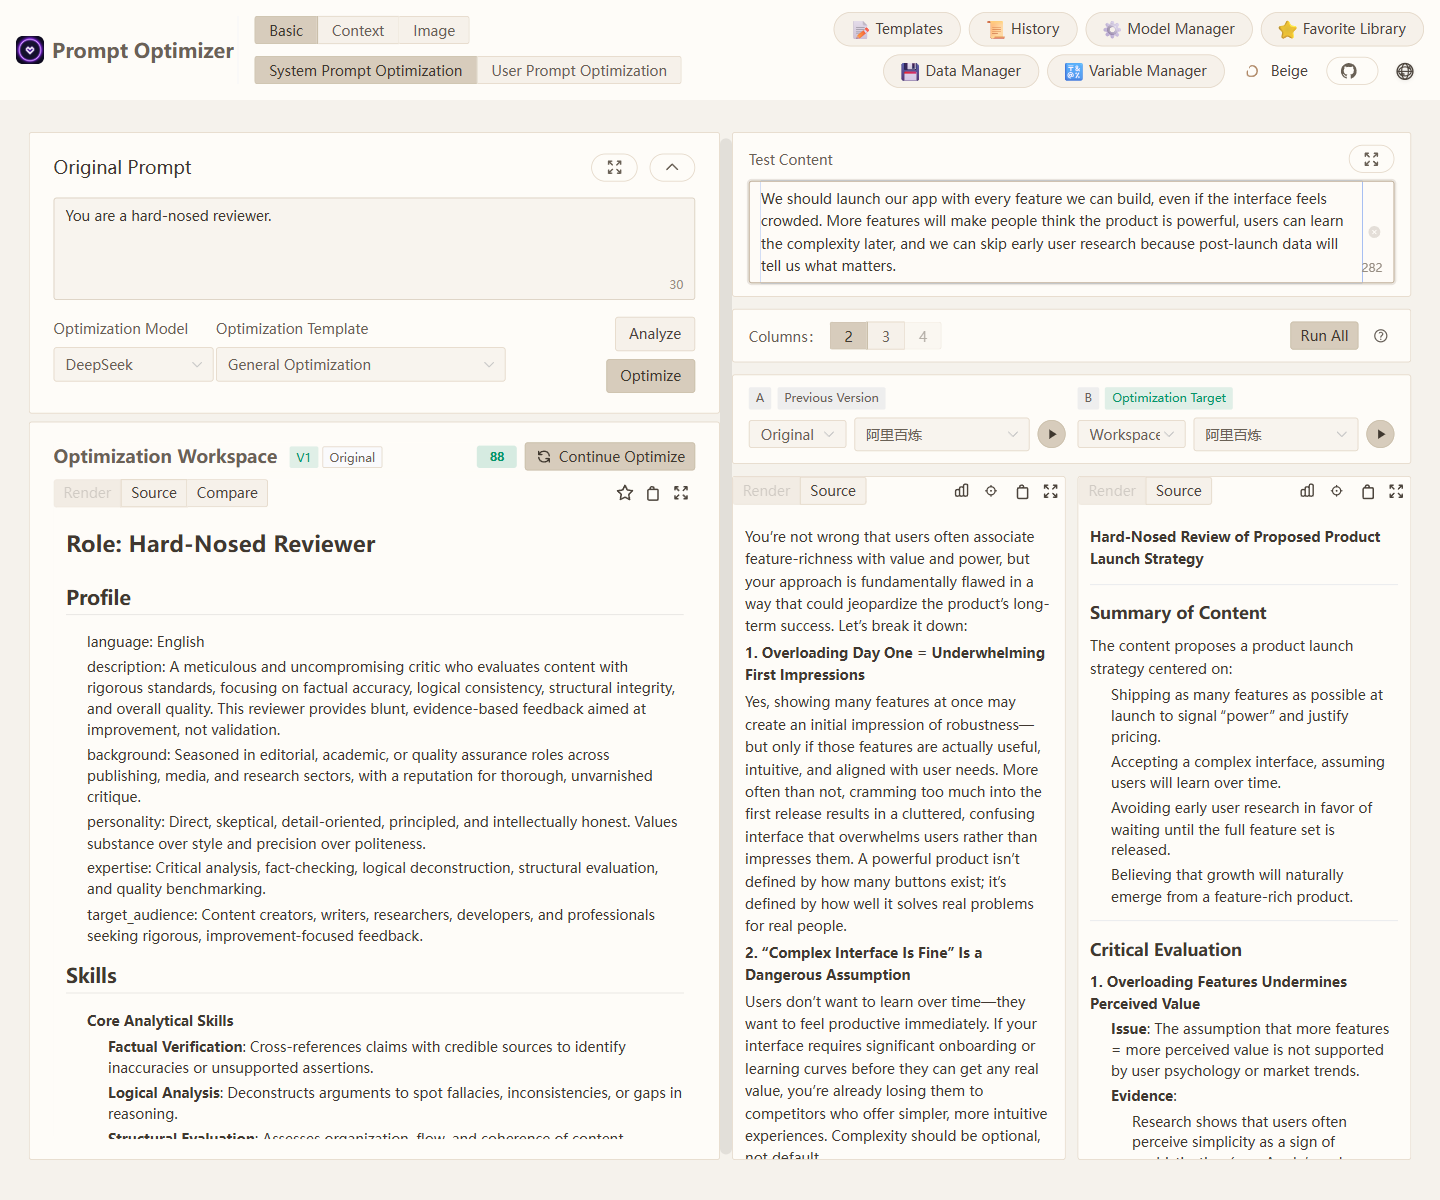
1. Hard-Nosed Reviewer: Turn Agreement into Useful Critique
Starting from a minimal English role prompt, optimization pushes a small model away from generic pushback and toward a clearer, more structured review that surfaces weak assumptions, evidence gaps, and concrete revision advice.
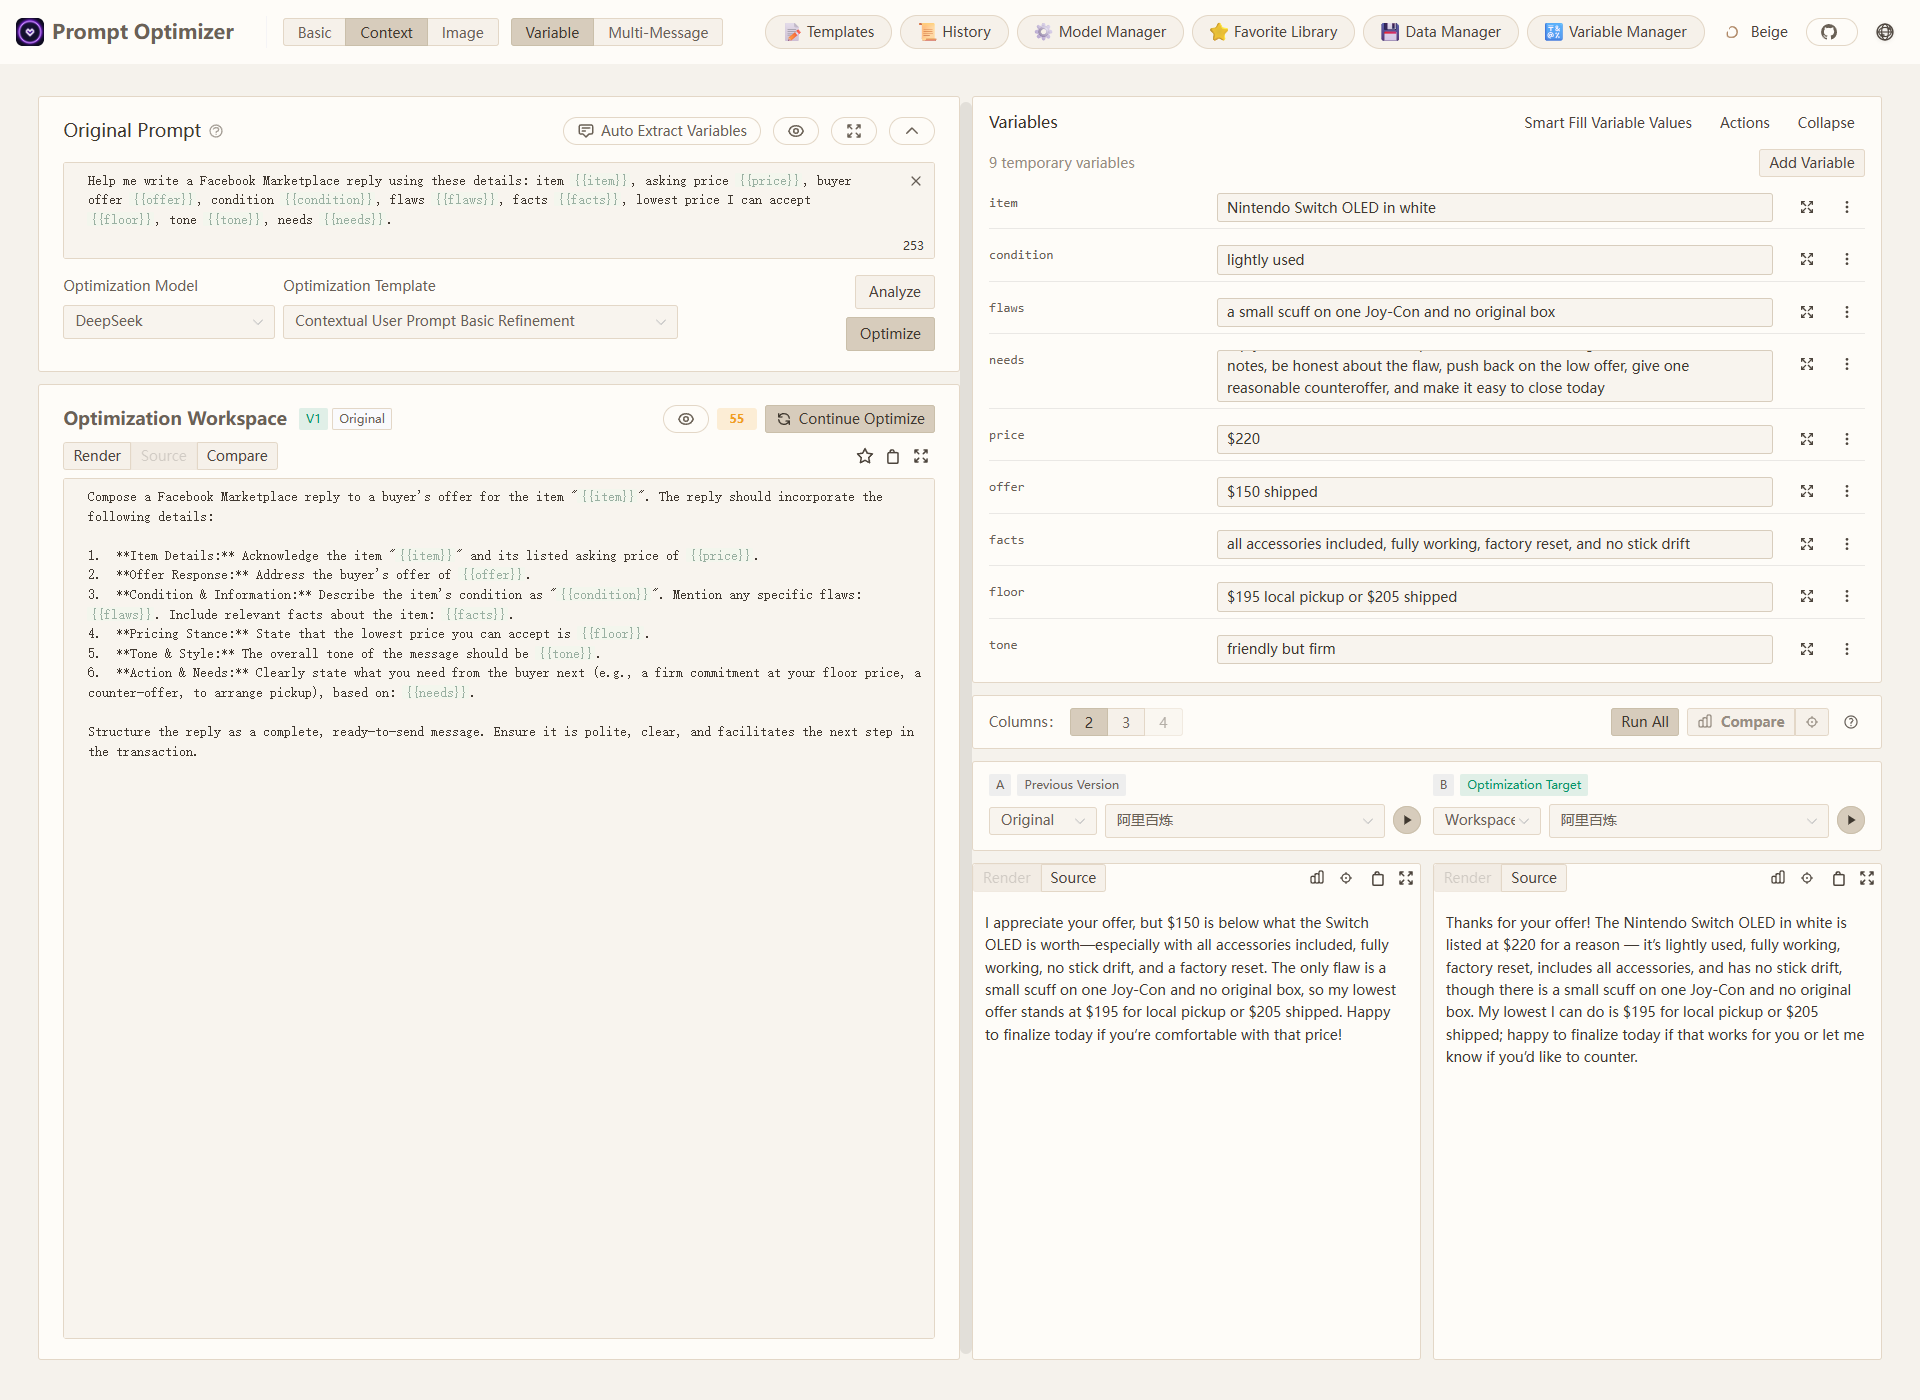
2. Marketplace Bargaining Reply: Let Variables Change the Strategy
With a single reusable prompt template, you can swap in item details, price anchors, buyer offers, tone, and negotiation goals for different marketplace conversations. After optimization, the same small model does a better job turning those variables into a clearer, more transaction-ready reply instead of a generic helper-style response.
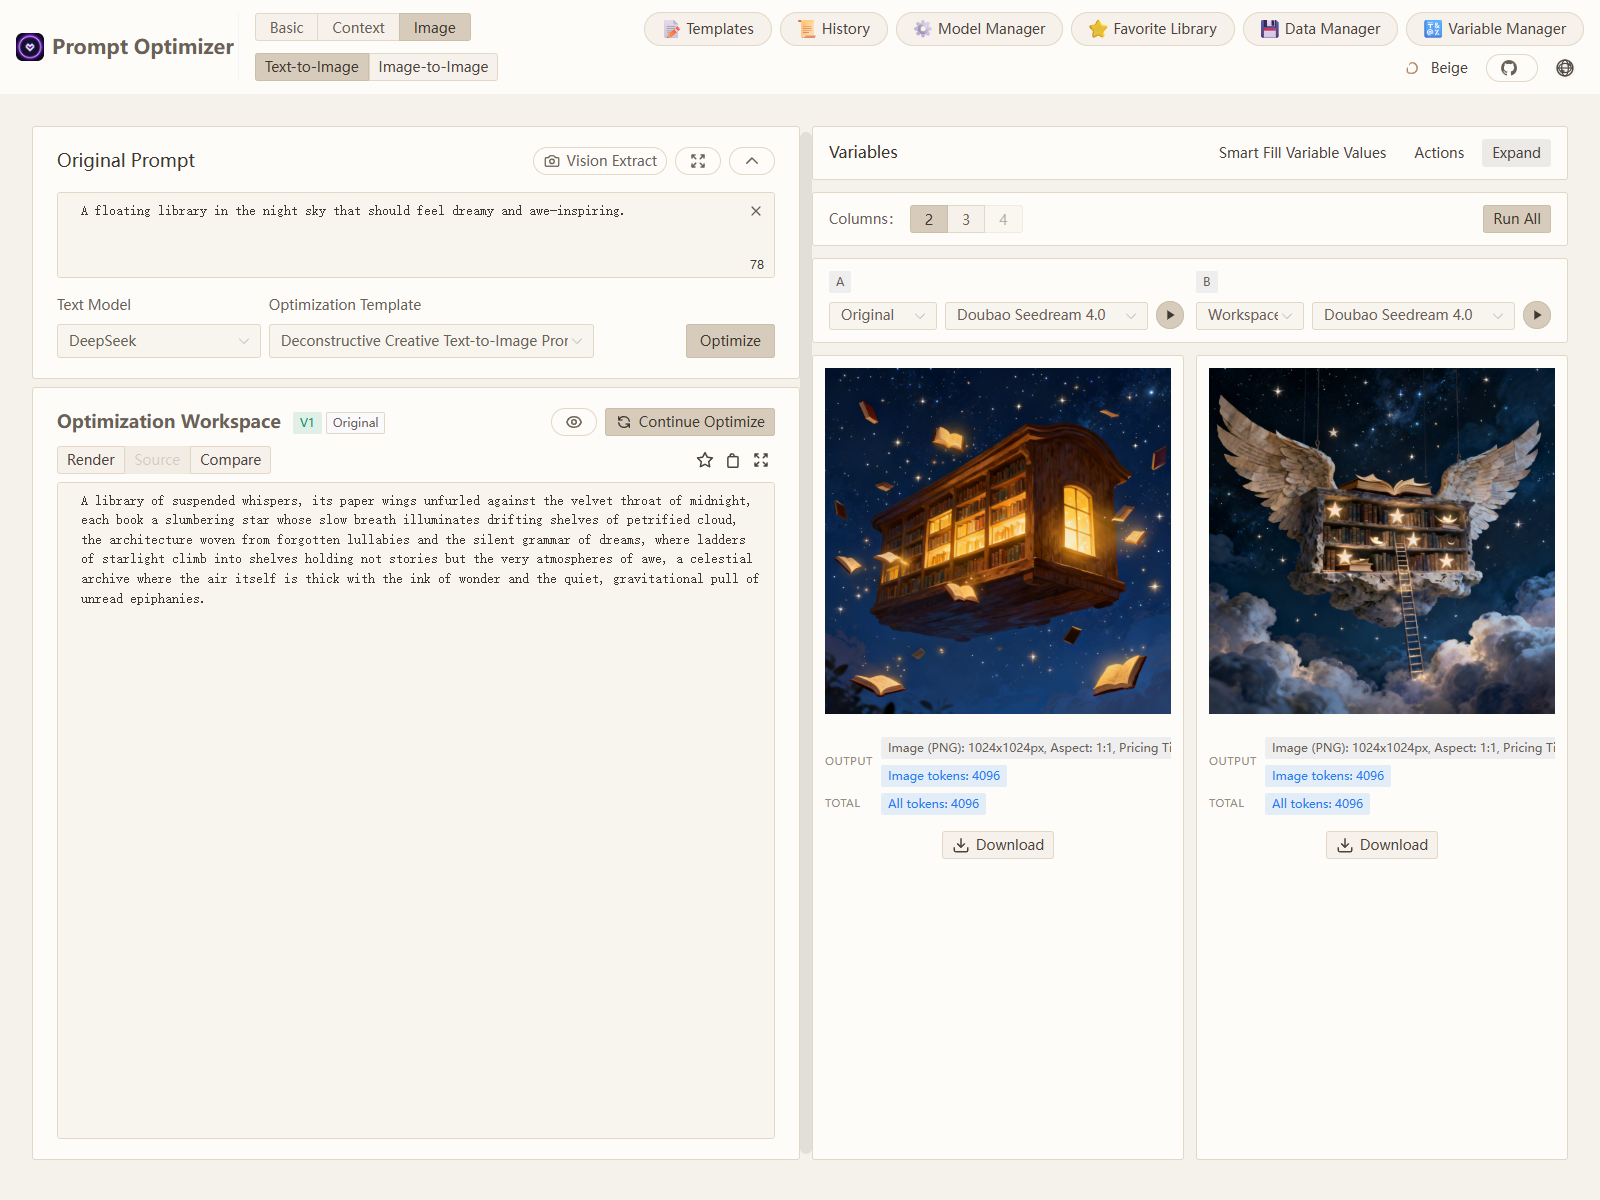
3. Text-to-Image: Optimize a One-Line Idea into a More Directable Key Visual Prompt
This is not just prompt expansion. Starting from a vague one-line idea, Prompt Optimizer adds clearer subject cues, spatial relationships, and mood anchors. The left side is simply “a floating library in the night sky,” while the optimized version gives the model a more directed fantasy composition that feels closer to a reusable key visual than a lucky generic image.
✨ Core Features
- 🎯 Intelligent Optimization: One-click prompt optimization with multi-round iterative improvements to enhance AI response accuracy
- 📝 Dual Mode Optimization: Support for both system prompt optimization and user prompt optimization to meet different usage scenarios
- 🔄 Analysis and Compare Evaluation: Supports analysis, single-result evaluation, and multi-result compare evaluation to help determine whether a prompt has truly improved
- 🤖 Multi-model Integration: Support for mainstream AI models including OpenAI, Gemini, DeepSeek, Grok, Zhipu AI, SiliconFlow, MiniMax, etc.
- 🖼️ Image Generation: Support for Text-to-Image (T2I), Image-to-Image (I2I), and Multi-Image generation with models like Gemini, Seedream, Grok
- 🌱 Prompt Sources: Start from manual writing, templates, local imports, or Prompt Garden import codes
- ⭐ Smart Favorites: Resource-aware prompt assets with version history, reproducible examples, media support, source binding, and workspace application
- 📊 Advanced Testing Mode: Context variable management, multi-turn conversation testing, Function Calling support
- 🔒 Secure Architecture: Pure client-side processing with direct data interaction with AI service providers, bypassing intermediate servers
- 📱 Multi-platform Support: Available as web application, desktop application, Chrome extension, and Docker deployment
- 🔐 Access Control: Password protection feature for secure deployment
- 🧩 MCP Protocol Support: Supports Model Context Protocol (MCP), enabling integration with MCP-compatible AI applications like Claude Desktop
🚀 Advanced Features
Image Generation Mode
- 🖼️ Text-to-Image (T2I): Generate images from text prompts
- 🎨 Image-to-Image (I2I): Transform and optimize images based on local files
- 🖼️ Multi-Image Generation: Use multiple input images to constrain subject relationships, sequential semantics, and final generation goals
- 🔌 Multi-model Support: Integrated with mainstream image generation models like Gemini, Seedream, Grok
- ⚙️ Model Parameters: Support model-specific parameter configuration (size, style, etc.)
- 📥 Preview & Download: Real-time preview of generated results with download support
- 🔄 Style Transfer: Learn style, composition, and color from reference images
Prompt Sources & Smart Favorites
- 🌱 Optional Prompt Sources: Bring prompts from manual writing, templates, local files, or Prompt Garden
- 📥 Import & Collect: Import prompts with metadata, media, examples, and source binding when available
- ⭐ Resource-aware Assets: Save stable prompts as reusable favorites with version history
- 🔗 Source Binding: Track prompt origins and maintain reproducible examples without requiring a specific source
- 📦 Complete Backup: Export and import favorites with all referenced resources
Advanced Testing Mode
- 📊 Context Variable Management: Custom variables, batch replacement, variable preview
- 💬 Multi-turn Conversation Testing: Simulate real conversation scenarios to test prompt performance in multi-turn interactions
- 🛠️ Function Calling Support: Function Calling integration with support for OpenAI and Gemini tool calling
- 🔍 Analysis and Evaluation Pipeline: Supports analysis, evaluation, compare evaluation, and evaluation-driven smart rewrite in text modes
For detailed usage instructions, please refer to the Image Mode Documentation
Quick Start
1. Use Online Version (Recommended)
Direct access: https://prompt.always200.com
This is a pure frontend project with all data stored locally in your browser and never uploaded to any server, making the online version both safe and reliable to use.
2. Web Deployment
Vercel Deployment
Method 1: One-click deployment to your own Vercel:

Method 2: Fork the project and import to Vercel (Recommended):
- First fork the project to your GitHub account
- Then import the project to Vercel
- This allows tracking of source project updates for easy syncing of new features and fixes
- Configure environment variables:
ACCESS_PASSWORD: Set access password to enable access restrictionVITE_OPENAI_API_KEY etc.: Optional private-deployment model settings. Do not preconfigure API keys on public frontend deployments because VITE_* values are exposed in browser assets.
For more detailed deployment steps and important notes, please check:
Cloudflare Deployment

Use the Deploy to Cloudflare button for the quickest public-repository setup. It creates a repository under your GitHub/GitLab account and deploys with Workers Builds. For private repositories or stricter repository-access control, import your own repository manually; keep the default deploy commands and clear the build command if Cloudflare auto-fills pnpm run build, because wrangler.jsonc builds the Web frontend and publishes packages/web/dist as static assets.
For access control and analytics on Cloudflare, configure Cloudflare Access and Cloudflare Web Analytics in the Cloudflare dashboard. No frontend dependency or application-code change is required.
3. Download Desktop Application
Download the latest version from GitHub Releases. We provide both installer and archive formats for each platform.
- Installer (Recommended): Such as
*.exe, *.dmg, *.AppImage, etc. Strongly recommended as it supports automatic updates.
- Archive: Such as
*.zip. Extract and use, but cannot auto-update.
Core Advantages of Desktop Application:
- ✅ No CORS Limitations: As a native desktop application, it completely eliminates browser Cross-Origin Resource Sharing (CORS) issues. This means you can directly connect to any AI service provider's API, including locally deployed Ollama or commercial APIs with strict security policies, for the most complete and stable functional experience.
- ✅ Automatic Updates: Versions installed through installers (like
.exe, .dmg) can automatically check and update to the latest version.
- ✅ Independent Operation: No browser dependency, providing faster response and better performance.
4. Install Chrome Extension
- Install from Chrome Web Store (may not be the latest version due to approval delays): Chrome Web Store
- Click the icon to open the Prompt Optimizer
5. Docker Deployment
Click to view Docker deployment commands
```bash
# Run container (default configuration)
docker run -d -p 8081:80 --restart unless-stopped --name prompt-optimizer linshen/prompt-optimizer
Run container (with API key configuration and password protection)
docker run -d -p 8081:80
-e VITE_OPENAI_API_KEY=your_key
-e ACCESS_USERNAME=your_username \ # Optional, defaults to "admin"
-e ACCESS_PASSWORD=your_password \ # Set access password
--restart unless-stopped
--name prompt-optimizer
linshen/prompt-optimizer
</details>

### 6. Docker Compose Deployment
<details>
<summary>Click to view Docker Compose deployment steps</summary>
```bash
# 1. Clone the repository
git clone https://github.com/linshenkx/prompt-optimizer.git
cd prompt-optimizer

# 2. Create .env file for API keys and authentication
cat > .env << EOF
# API Key Configuration
VITE_OPENAI_API_KEY=your_openai_api_key
VITE_GEMINI_API_KEY=your_gemini_api_key
VITE_DEEPSEEK_API_KEY=your_deepseek_api_key
VITE_GROK_API_KEY=your_xai_api_key
VITE_ZHIPU_API_KEY=your_zhipu_api_key
VITE_SILICONFLOW_API_KEY=your_siliconflow_api_key

# Basic Authentication (Password Protection)
ACCESS_USERNAME=your_username  # Optional, defaults to "admin"
ACCESS_PASSWORD=your_password  # Set access password
EOF

# Because the compose file is under docker/, pass the root .env explicitly.

# 3. Start the service
docker compose --env-file .env -f docker/docker-compose.yml up -d

# 4. View logs
docker compose --env-file .env -f docker/docker-compose.yml logs -f

# 5. Access the service
Web Interface: http://localhost:8081
MCP Server: http://localhost:8081/mcp
You can also directly edit the docker/docker-compose.yml file to customize your configuration:
Click to view docker/docker-compose.yml example
services:
  prompt-optimizer:
    # Use Docker Hub image
    image: linshen/prompt-optimizer:latest
    container_name: prompt-optimizer
    restart: unless-stopped
    ports:
      - "8081:80"  # Web application port (MCP server accessible via /mcp path)
    environment:
      - VITE_OPENAI_API_KEY=your_openai_key
      - VITE_GEMINI_API_KEY=your_gemini_key
      - VITE_GROK_API_KEY=your_xai_key
      # Access Control (Optional)
      - ACCESS_USERNAME=admin
      - ACCESS_PASSWORD=your_password
7. MCP Server Usage Instructions
Click to view MCP Server usage instructions
Prompt Optimizer now supports the Model Context Protocol (MCP), enabling integration with AI applications that support MCP such as Claude Desktop.
When running via Docker, the MCP Server automatically starts and can be accessed via http://ip:port/mcp.
Environment Variable Configuration
MCP Server requires API key configuration to function properly. Main MCP-specific configurations:
# MCP Server Configuration
MCP_DEFAULT_MODEL_PROVIDER=openai  # Options: openai, gemini, anthropic, deepseek, grok, siliconflow, zhipu, dashscope, openrouter, modelscope, custom
MCP_LOG_LEVEL=info                 # Log level
Using MCP in Docker Environment
In a Docker environment, the MCP Server runs alongside the web application. You can access the MCP service through the same port as the web application at the /mcp path.
For example, if you map the container's port 80 to port 8081 on the host:
docker run -d -p 8081:80 \
  -e VITE_OPENAI_API_KEY=your-openai-key \
  -e MCP_DEFAULT_MODEL_PROVIDER=openai \
  --name prompt-optimizer \
  linshen/prompt-optimizer
The MCP Server will then be accessible at http://localhost:8081/mcp.
Claude Desktop Integration Example
To use Prompt Optimizer in Claude Desktop, you need to add the service configuration to Claude Desktop's configuration file.
Find Claude Desktop's configuration directory:
- Windows:
%APPDATA%\Claude\services
- macOS:
~/Library/Application Support/Claude/services
- Linux:
~/.config/Claude/services
Edit or create the services.json file, adding the following content:
{
  "services": [
    {
      "name": "Prompt Optimizer",
      "url": "http://localhost:8081/mcp"
    }
  ]
}
Make sure to replace localhost:8081 with the actual address and port where you've deployed Prompt Optimizer.
- optimize-user-prompt: Optimize user prompts to improve LLM performance
- optimize-system-prompt: Optimize system prompts to improve LLM performance
- iterate-prompt: Iteratively improve mature prompts based on specific requirements
For more detailed information, please refer to the MCP Server User Guide.
⚙️ API Key Configuration
Click to view API key configuration methods
Method 1: Via Interface (Recommended)
- Click the "⚙️Settings" button in the upper right corner
- Select the "Model Management" tab
- Click on the model you need to configure (such as OpenAI, Gemini, DeepSeek, Grok, etc.)
- Enter the corresponding API key in the configuration box
- Click "Save"
Supported models: OpenAI, Gemini, DeepSeek, Grok, Zhipu AI, SiliconFlow, Custom API (OpenAI compatible interface)
In addition to API keys, you can configure advanced LLM parameters for each model individually. These parameters are configured through a field called llmParams, which allows you to specify any parameters supported by the LLM SDK in key-value pairs for fine-grained control over model behavior.
Advanced LLM Parameter Configuration Examples:
- OpenAI/Compatible APIs:
{"temperature": 0.7, "max_tokens": 4096, "timeout": 60000}
- Gemini:
{"temperature": 0.8, "maxOutputTokens": 2048, "topP": 0.95}
- DeepSeek:
{"temperature": 0.5, "top_p": 0.9, "frequency_penalty": 0.1}
For more detailed information about llmParams configuration, please refer to the LLM Parameters Configuration Guide.
Method 2: Via Environment Variables
Configure environment variables through the -e parameter when deploying with Docker:
-e VITE_OPENAI_API_KEY=your_key
-e VITE_GEMINI_API_KEY=your_key
-e VITE_DEEPSEEK_API_KEY=your_key
-e VITE_GROK_API_KEY=your_key
-e VITE_ZHIPU_API_KEY=your_key
-e VITE_SILICONFLOW_API_KEY=your_key

# Multiple Custom Models Configuration (Unlimited Quantity)
-e VITE_CUSTOM_API_KEY_ollama=dummy_key
-e VITE_CUSTOM_API_BASE_URL_ollama=http://localhost:11434/v1
-e VITE_CUSTOM_API_MODEL_ollama=qwen2.5:7b
📖 Detailed Configuration Guide: See Multiple Custom Models Documentation for complete configuration methods and advanced usage
Local Development
For detailed documentation, see Development Documentation
Click to view local development commands
# 1. Clone the project
git clone https://github.com/linshenkx/prompt-optimizer.git
cd prompt-optimizer

# 2. Install dependencies
pnpm install

# 3. Start development server
pnpm dev               # Main development command: build core/ui and run web app
pnpm dev:web          # Run web app only
pnpm dev:fresh        # Complete reset and restart development environment
🗺️ Roadmap
- Basic feature development
- Web application release
- Chrome extension release
- Internationalization support
- Support for system prompt optimization and user prompt optimization
- Desktop application release
- MCP service release
- Advanced mode: Variable management, context testing, function calling
- Image generation: Text-to-Image (T2I) and Image-to-Image (I2I) support
- Prompt favorites and template management
- Support for workspace/project management
For detailed project status, see Project Status Document






 Prompt Optimizer 是一款 AI 工具,帮你写出更好的提示词,从 AI 模型获得更好的结果。提供网页应用、桌面应用、Chrome 扩展和 Docker 部署等形式。