OpenWiki is a CLI that writes and maintains a wiki for your codebase or your personal knowledge. An agent reads your sources, synthesizes a linked Markdown wiki you own, and keeps it current on every change. It is built for agents to read as memory, and it ships an interactive visualizer for humans to explore.
OpenWiki gives you:
- Agent-written docs that stay accurate, generated by a Deep Agents documentation agent.
- Two modes: a
code wiki for a repository, or a personal wiki for your own knowledge.
- Thirteen model providers out of the box, from OpenAI and Anthropic to Bedrock, Gemini, and any OpenAI-compatible gateway.
- Coding-agent integrations for Codex, Claude Code, OpenCode, and Cursor, using the host's model and repository tools.
- Grounded Claims that track material facts back to versioned source evidence and surface them when the evidence changes.
- Nine built-in connectors for Custom MCP, Notion, Slack, Gmail, X, Web Search, Hacker News, LangSmith, and local git repositories.
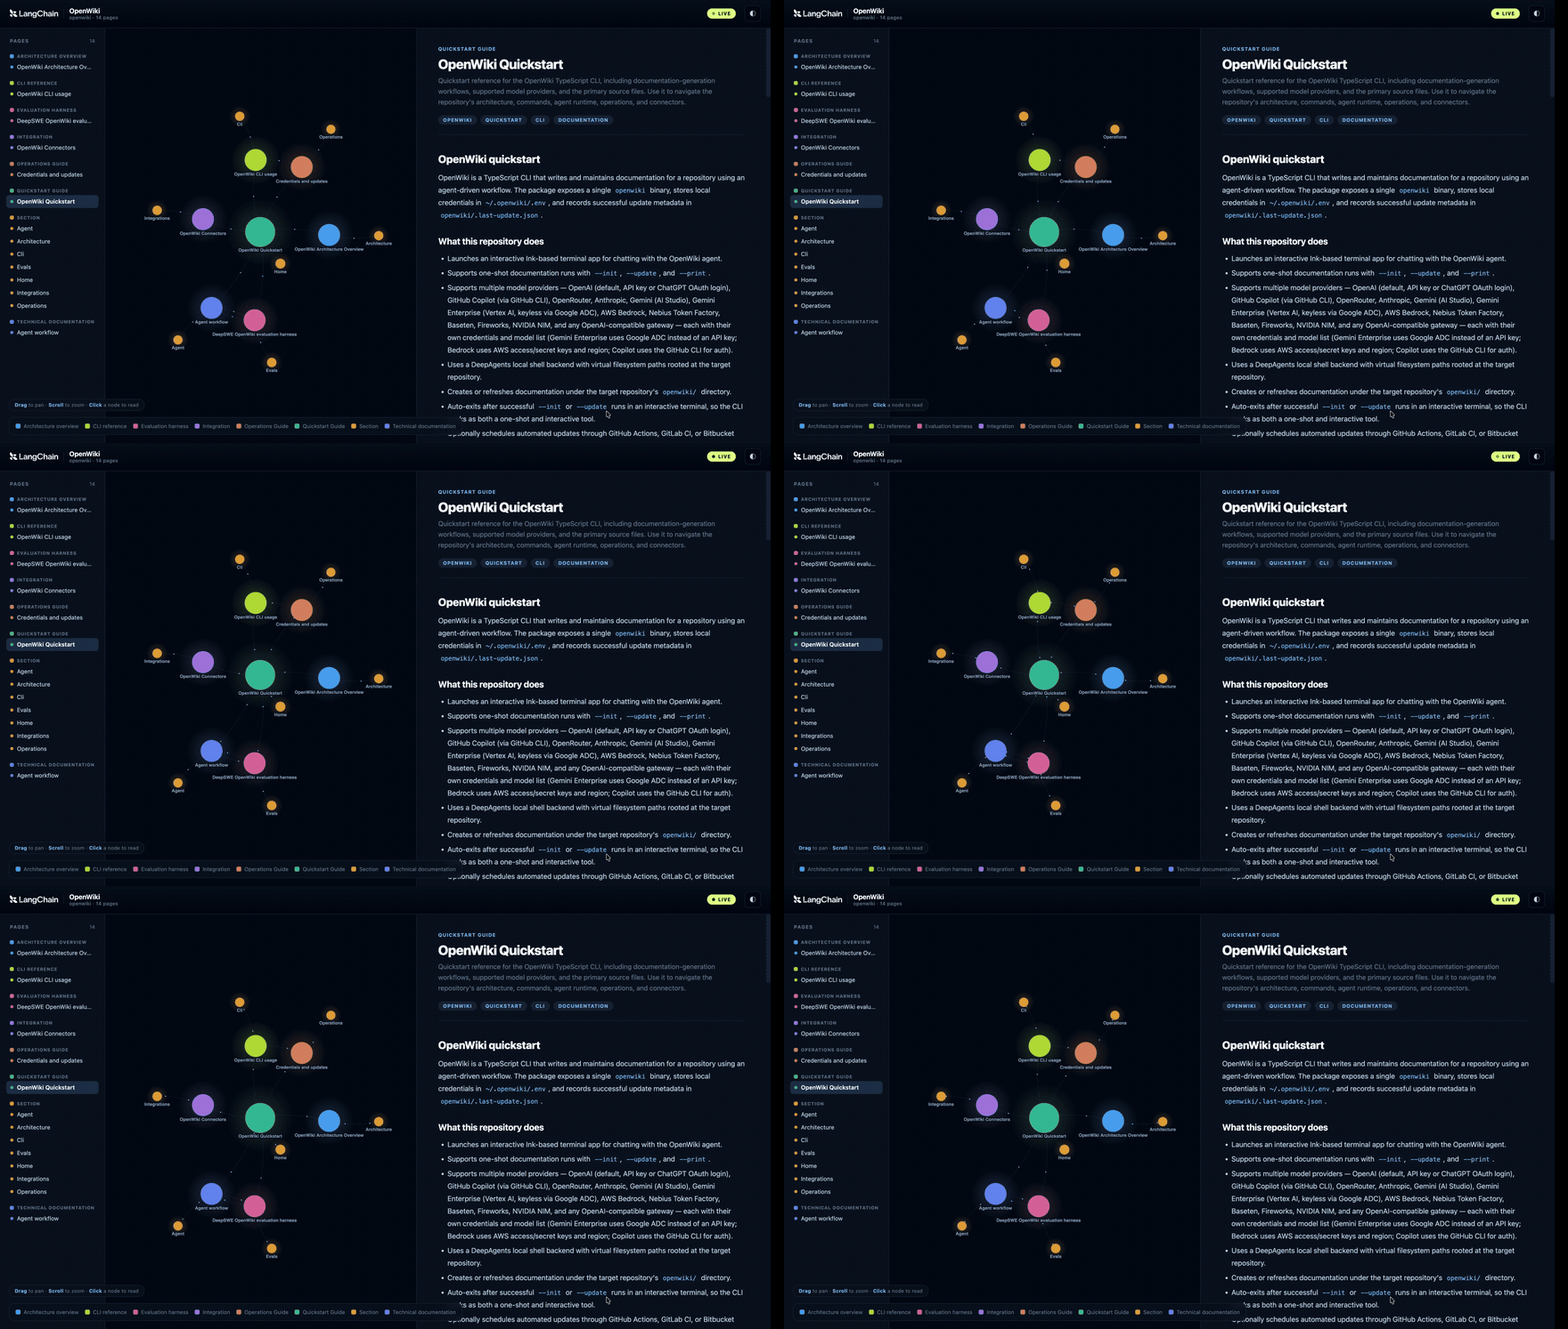
- An interactive visualizer that turns any wiki into a live, explorable node graph.
- Self-updating through GitHub Actions, GitLab CI, or Bitbucket Pipelines.
- Open Knowledge Format (OKF v0.2) output with validated Mermaid diagrams.
🎉 What's new
- Resumable page-job architecture: repository generation now follows
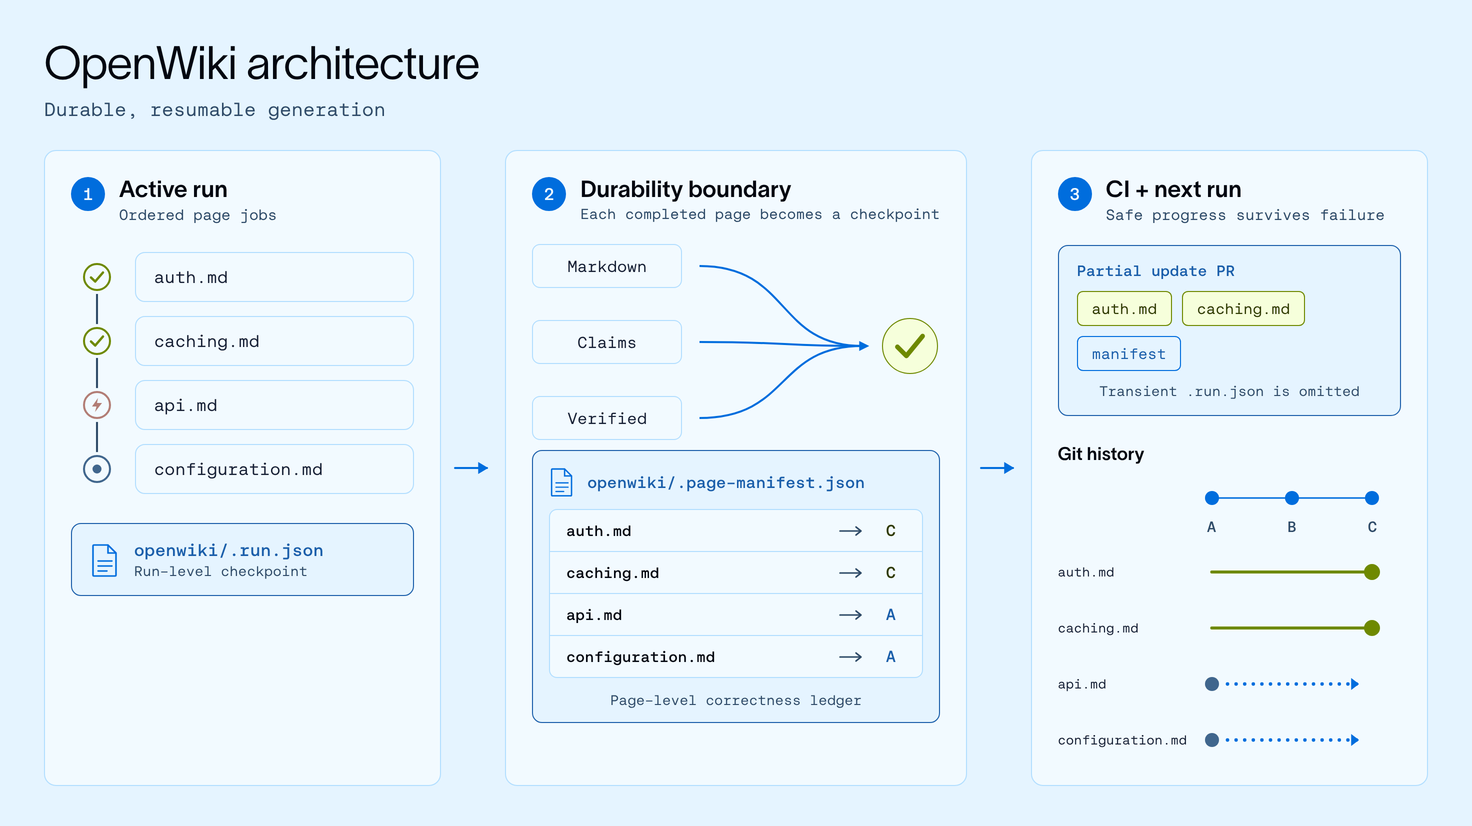
begin → submit_plan → next_page → submit_page → … → finish, with a durable ordered page queue, focused per-page workers, strict Claims persistence, per-page source checkpoints, and partial-progress PRs for ephemeral CI. See OpenWiki architecture for the full flow.
- Grounded Claims: material facts in code wikis now carry versioned source evidence. When that evidence changes or disappears, OpenWiki knows exactly which propositions need to be confirmed, rewritten, or retired.
- OpenWiki integrations: run OpenWiki directly inside Codex, Claude Code, OpenCode, or Cursor, using the coding agent's authenticated model and native repository tools while OpenWiki manages the documentation lifecycle.
- OKF v0.2: every wiki is a portable Open Knowledge Format bundle with deterministic generation provenance and validated trust and lifecycle metadata.
- Publishable visualizers: export the interactive graph and Markdown reader as a deployable static site for GitHub Pages, MkDocs, or any static host.
Quick start
Install the CLI (Node.js 22 or newer):
npm install -g openwiki
Generate a wiki for the current repository. The first run walks you through picking a provider, key, and model, then writes docs to openwiki/:
openwiki --init
Running openwiki --init again replaces the existing generated repository wiki and Claims with a brand-new generation while preserving the user-authored openwiki/INSTRUCTIONS.md brief. On a persistent checkout, OpenWiki records in-progress repository generation in openwiki/.run.json, so rerunning the same command after an interruption resumes the durable page queue. Ephemeral CI runners start fresh after failure unless their workspace is preserved. A setup failure before the new run state is durable restores the previous wiki.
Update an existing wiki from repository changes since its last successful run and any stale Claims:
openwiki --update
Keep it current automatically by adding a scheduled CI job that opens a docs PR whenever the wiki changes:
Auto-merge OpenWiki PRs
Auto-merge is repository infrastructure rather than an OpenWiki runtime feature. The GitHub Actions example creates a docs-only PR and enables GitHub auto-merge only after OpenWiki finishes successfully; required branch checks and reviews still control when the PR merges. Failed runs can preserve partial documentation in the PR and explicitly disable any pending auto-merge.
Before using the example:
- Enable Allow auto-merge in the repository's pull request settings.
- Add branch protection or a ruleset for the default branch. Require the checks that should gate generated docs, and decide whether OpenWiki PRs still require human review.
- Create a fine-grained personal access token or GitHub App token with access only to the target repository and permissions for Contents: read and write and Pull requests: read and write. Save it as the
OPENWIKI_PR_TOKEN Actions secret.
- Copy the example to
.github/workflows/openwiki-update.yml, choose a pinned OpenWiki version and provider, and add the provider secret.
The dedicated token is intentional: pull requests created with the default GITHUB_TOKEN do not start most pull_request workflows, so required PR checks may never run. Organization policies may require a GitHub App token instead of a personal access token. Keep the workflow's add-paths restricted to generated documentation, pin every action and package version, and do not auto-merge changes to executable workflow files.
[!NOTE]
On Windows, install with a Node.js package manager (npm install -g openwiki or pnpm add -g openwiki). Installing with bun can fall back to compiling the better-sqlite3 native dependency, which needs Visual Studio Build Tools with the Desktop development with C++ workload.
OpenWiki architecture
Repository generation is an ordered queue of independently durable page jobs. openwiki/.run.json checkpoints the active run and its progress. A page advances only after its Markdown, Claims, verification, and openwiki/.page-manifest.json entry are durable, preserving completed work and page-specific source baselines across interruptions and future runs.
Coding-agent integrations
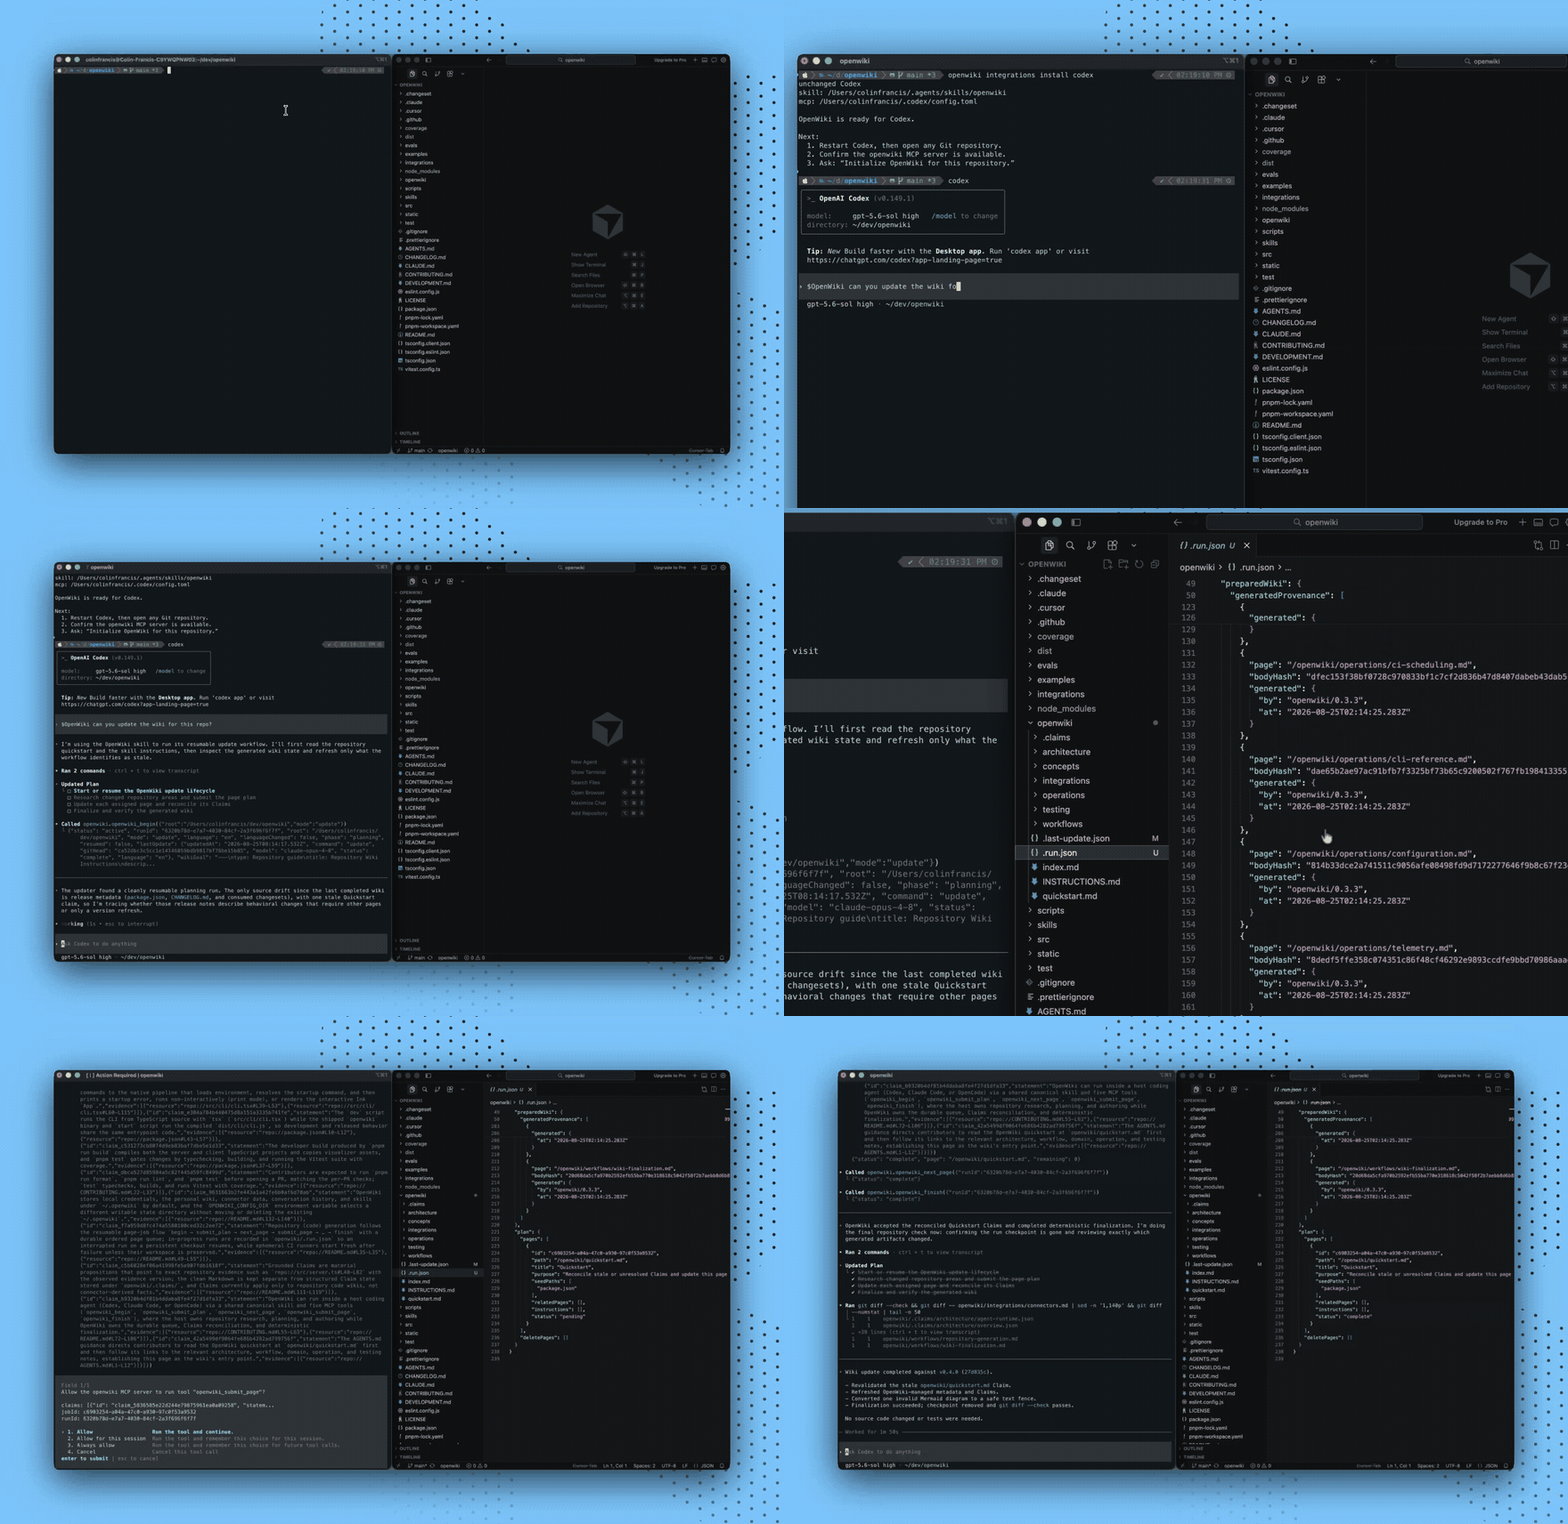
OpenWiki can run inside an existing coding agent instead of launching its own model. The coding agent investigates the repository, plans the wiki, and writes each assigned page sequentially with its native repository tools. OpenWiki provides the durable MCP page-job lifecycle, validates each completion, and deterministically finalizes Claims, indexes, provenance, setup files, and metadata.
Install the integration for your coding agent (choose one):
openwiki integrations install codex
openwiki integrations install claude
openwiki integrations install opencode
openwiki integrations install cursor
The supported targets are Codex, Claude Code, OpenCode, and Cursor. All install at user level by default, so one installation works from any Git repository. Project paths are resolved to their Git repository root. User-level OpenCode integrations live under ~/.config/opencode, OpenCode's global configuration directory on every supported platform. Restart the coding agent after installation, open the repository, and ask:
Initialize this repository's OpenWiki from the current source and tests.
For an existing wiki, ask:
Update this repository's OpenWiki for changes since its last successful run.
Host-driven runs currently support repository code wikis, not personal brains. They use the coding agent's authenticated model session, so OpenWiki provider credentials are not required. OpenWiki owns the durable queue, Claims validation and persistence, source-drift handling, and deterministic finalization; the coding agent owns repository research, planning, and factual authoring.
External coding-agent integrations currently use repository source and tests only. Connector-sourced context, including LangSmith, is not yet supported.
The integration exposes the native generation lifecycle through openwiki_begin, openwiki_submit_plan, openwiki_next_page, optional on-demand openwiki_inspect_page_claims, openwiki_submit_page, and openwiki_finish. Codex, Claude, OpenCode, or Cursor submits only sparse Claim decisions for each page; OpenWiki automatically retains current unaffected Claims, applies explicit confirmations, revisions, additions, or retractions, and refuses to finish until the final state is durable.
Use openwiki integrations list to inspect user-level installation status or openwiki integrations uninstall <host> to remove an integration safely. Add --project [path] to list, install, or uninstall for repository-scoped state.
Contributors adding another coding agent should follow
Adding a coding-agent integration.
Grounded Claims
OpenWiki makes code wikis self-correcting by tracking the material propositions behind factual pages—not just when a Markdown file was last generated. Claims cover the truths future agents rely on: behavior, responsibilities, architecture, data flow, invariants, failure semantics, configuration, and security boundaries. Each one points to exact repository evidence such as repo://src/server.ts#L40-L82, with the evidence version OpenWiki observed when the claim was established.
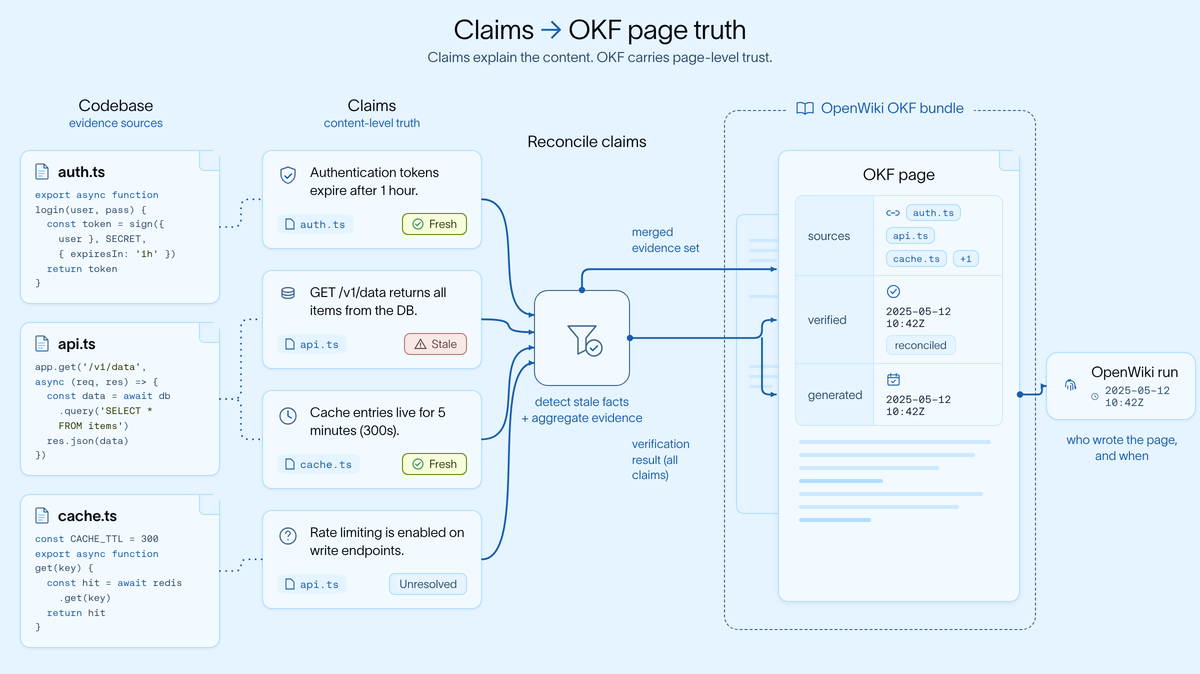
Before an update, OpenWiki checks every persisted evidence version, before even deciding whether the repository is a no-op. A stale or unresolved Claim requires work for its owning page even if the planner omits it. The page worker receives only Claims requiring attention; current issue-free Claims are retained deterministically without being repeated through every model turn. The worker explicitly confirms rechecked issue Claims, submits only revisions and additions, and names retractions. Complete current Claims remain available through on-demand inspection for broad rewrites. The Markdown stays clean; structured Claim state lives alongside it under openwiki/.claims/.
Page completion is a durability boundary. OpenWiki persists the reconciled Claims, projects verification, synchronizes the sidecar's page version, and proves the complete result before marking that page's job complete. Finalization repeats the whole-run proof before deleting openwiki/.run.json.
Grounded Claims currently apply to repository code wikis and repository evidence. Connector-derived facts, including LangSmith-only observations, are not claimed.
Two modes
OpenWiki runs in one of two modes. Bare openwiki, openwiki --init, and openwiki --update default to code mode; add the personal positional (or --mode personal) for the personal brain.
| Mode |
Documents |
Writes to |
Get started |
| Code (default) |
The current repository |
openwiki/ in the repo |
openwiki --init |
| Personal |
Your connected sources |
~/.openwiki/wiki |
openwiki personal --init |
By default the CLI stays open after a run so you can send follow-up messages. Add -p / --print for a one-shot, non-interactive run that prints the final output and exits. --init and --update auto-exit on success in an interactive terminal, so the same command works one-shot or interactively.
Local state directory
OpenWiki stores local credentials, the personal wiki, connector data, conversation history, and skills under ~/.openwiki by default. Set OPENWIKI_CONFIG_DIR before starting OpenWiki to use a different writable directory, such as a mounted container volume:
OPENWIKI_CONFIG_DIR=/data/openwiki openwiki personal --init
The override selects a separate state directory; OpenWiki does not move or delete an existing ~/.openwiki directory. Copy any state you want to preserve yourself, and point the variable at a dedicated directory because OpenWiki restricts its permissions for the current user.
Explore your wiki
Turn any wiki into an interactive node graph with a live, side-by-side Markdown reader:
openwiki visualize
This serves ./openwiki on a local loopback address (127.0.0.1, never exposed on the network) and opens your browser to the graph. Edits to the wiki files are picked up automatically while the server runs. Pass a path to visualize a different directory, --port <port> to choose the port (it increments on conflict; default 4321), and --no-open to leave the browser alone:
openwiki visualize openwiki --port 4400 --no-open
To publish the visualizer beside generated documentation, export a static directory instead of starting the server:
openwiki visualize openwiki --export docs/openwiki-visualizer
The export contains index.html, client.js, client-lib.js, styles.css, and graph.json. Its client reads the sibling graph file and does not use live reload, so the directory can be hosted by GitHub Pages, MkDocs, or any other static host. --export cannot be combined with --port or --no-open.
[!NOTE]
The page loads its graph, Markdown, and diagram libraries from a public CDN, so an internet connection is required for both local and static viewers.
Connect your sources
In personal mode, OpenWiki ingests knowledge from the tools you already use, synthesizing them into your local wiki. First-run onboarding offers setup for Custom MCP, local git repositories, Notion, Gmail, X/Twitter, Web Search, and Hacker News. Slack is also available with its OAuth app and HTTPS callback configured.
During an ingestion run, deterministic connector tools write raw data and manifests under ~/.openwiki/connectors/<connector>/raw/, then source-specific agent runs synthesize the wiki under ~/.openwiki/wiki/. You can configure the same connector more than once (for example one Web Search source for AI research and another for NBA news); OpenWiki stores them as separate instances like web-search-1 and web-search-2.
openwiki auth notion        # run a local browser OAuth flow for a provider
openwiki ingest all         # run every configured source
openwiki ingest web-search  # run one connector's sources
Connector details and OAuth
git-repo reads configured local repository paths and writes compact manifests.custom-mcp connects to any configured HTTP or stdio MCP server and permits only explicitly safe, read-only tools.x uses the X API directly with OAuth user-context credentials for home timeline, user posts, mentions, bookmarks, and list posts.notion targets the hosted Notion MCP server, so authenticate through Notion OAuth rather than pasting a token.google uses the Gmail API directly with OAuth user credentials to fetch recent mail.slack uses Slack's Web API with OAuth user and bot tokens to ingest scoped conversations and search results.web-search uses Tavily through LangChain and requires TAVILY_API_KEY.hackernews uses the public Hacker News feed and search APIs, with no credentials required.
openwiki auth <provider> runs a local browser OAuth flow, saves returned tokens into ~/.openwiki/.env, creates connector config when possible, and discovers MCP tools for MCP-backed providers. Slack and Gmail require app client credentials to already be set in that file; Notion uses dynamic client registration for hosted MCP; X uses OAuth 2.0 with PKCE. openwiki auth configure <provider> and openwiki auth tools <provider> are advanced retry commands.
Connector secrets are referenced by env var name and stored in ~/.openwiki/.env; connector config files never contain raw secret values.
Slack OAuth tunnel. openwiki ngrok start starts an ngrok tunnel with a random HTTPS forwarding URL, reads ngrok's local inspection API, appends /callback, and saves OPENWIKI_HTTPS_OAUTH_REDIRECT_URI automatically. Register the printed callback URL in Slack. With a fixed domain, run openwiki ngrok start https://<your-ngrok-domain>.
LangSmith connector (code mode)
The connectors above feed a personal wiki. The LangSmith connector instead enriches a code wiki: it pulls recent LangSmith traces (tool calls, outcomes, and latency) for the projects you choose through the official LangSmith SDK, so a repository's docs reflect how its code actually behaves at runtime, not just what the source says.
Configure it during openwiki --init in code mode. From the source menu, add LangSmith, pick your workspace region (US, EU, or APAC), and list the projects to document. OpenWiki writes a committed openwiki/.langsmith.json that names the workspaces and projects (never the key itself), so every teammate and CI run documents the same set. The API key is read from the environment:
OPENWIKI_LANGSMITH_API_KEY="<your-langsmith-key>"
Locally the setup wizard saves this to ~/.openwiki/.env. In CI, set it as a repository secret and export it for the run.
[!NOTE]
A LangSmith key is workspace- and region-bound. To document projects across more than one workspace, add an entry per workspace, each with its own key named OPENWIKI_LANGSMITH_API_KEY_2, OPENWIKI_LANGSMITH_API_KEY_3, and so on. The connector only talks to the official US (api.smith.langchain.com), EU (eu.api.smith.langchain.com), and APAC (apac.api.smith.langchain.com) hosts.
How it stays yours
Your wiki stays in the repository as plain Markdown you own, with OpenWiki-managed grounding and run metadata versioned alongside it.
- Agents read it as memory. On each
code run, O






 OpenWiki 是一个命令行工具,它利用 AI 智能体为你的代码库(或你的个人知识)编写并持续维护一个相互链接的 Markdown 维基,同时附带一个可交互的可视化工具用于浏览。