🐈 nanobot is an ultra-lightweight, open-source, self-hosted personal AI agent framework written in Python. It runs in a WebUI, terminal, or chat apps and combines tools, long-term memory, MCP integrations, model routing, multi-agent delegation, scheduled automation, and an OpenAI-compatible API in a small, readable core.
Start Here
You want to...
Go to
Install nanobot with no terminal/config background
Model freedom: OpenAI-compatible APIs, local LLMs, image generation, search, and fallbacks.
Small core: readable internals with MCP, memory, deployment, and automation built in.
Own your stack: inspect, customize, self-host, and extend without a giant platform.
📦 Install
[!IMPORTANT]
If you want the newest features and experiments, install from source.
If you want the most stable day-to-day experience, install from PyPI or with uv.
Pick one install method:
Track
Install with
Update with
What runs
Stable
installer, uv, or pip
the same package tool
one released Python/WebUI/TUI version
Current source
editable Git checkout
git pull --ff-only + editable dependency sync
Python, WebUI, and TUI from that checkout
Prerequisites: Python 3.11 or newer. Git and Bun are only needed for a source install. Published packages include the WebUI and fetch a checksummed, version-matched TUI archive—with its licenses, notices, corresponding application source, source offer, and relinking instructions—on first use.
If terminals, API keys, or config files are new to you, use the guided zero-background walkthrough in Start Without Technical Background instead of this compact README path.
One-command setup
macOS / Linux:
curl -fsSL https://raw.githubusercontent.com/HKUDS/nanobot/main/scripts/install.sh | sh
The default command installs or upgrades nanobot-ai from PyPI. On a fresh local desktop, it then starts nanobot webui so you can configure the first provider and model in Settings → Models. SSH, headless, existing-config, and older-release paths keep the terminal setup wizard. The installer avoids system-wide pip installs by using an active virtual environment, uv, pipx, or a managed venv under ~/.nanobot/venv. It also prints the exact command it used to run nanobot; reuse that full command below if nanobot is not on PATH.
To preview the plan without changing your environment, pass --dry-run.
curl -fsSL https://raw.githubusercontent.com/HKUDS/nanobot/main/scripts/install.sh | sh -s -- --dry-run
If pip reports externally-managed-environment on macOS or Linux, use the one-command installer, uv tool install nanobot-ai, pipx install nanobot-ai, or install inside a virtual environment.
Install from source
Clone the repository and install it in editable mode. Bun is required because the source
checkout runs the matching TUI directly instead of downloading an older release binary.
git clone https://github.com/HKUDS/nanobot.git
cd nanobot
python -m venv .venv
Activate it with source .venv/bin/activate on macOS/Linux or
.venv\Scripts\Activate.ps1 in Windows PowerShell, then run:
python -m pip install -e .
After that, the normal commands are identical to a stable install. nanobot runs the TUI
from this checkout, and nanobot webui rebuilds stale frontend assets automatically. A later
git pull --ff-only updates the Python, TUI, and WebUI source together; rerun
python -m pip install -e . when Python dependencies change. Contributors should also read
CONTRIBUTING.md.
Verify the install:
nanobot --version
If nanobot is not on PATH, invoke it through the method that installed it: reuse the recommended installer's command, use uv tool run --from nanobot-ai nanobot ... or pipx run --spec nanobot-ai nanobot ..., or use the Python executable from the environment where pip installed the package.
🚀 Quick Start
Open nanobot in your browser
nanobot webui
This is the recommended first run. The launcher creates the config and workspace when needed, safely enables the local WebSocket channel after confirmation, starts or joins the shared local gateway, and opens http://127.0.0.1:8765. A fresh install can open before a model is configured, so setup continues in the browser instead of beginning in a JSON file. The first-run WebUI binds to localhost by default and is not exposed to your LAN.
Your first three steps
Open Settings → Models and choose a provider, credential, and model.
Start a new topic and send Hello! to verify the connection.
Before project work, choose the intended workspace and access mode from the composer.
Any normal reply means the provider, model, workspace, and browser gateway are working together.
Keep nanobot running after you close the terminal
nanobot gateway --background
This is the only command that promotes the shared gateway to persistent background mode. It leaves channels and automations running after every local TUI and WebUI launcher exits. Complete first-time model setup with nanobot webui before switching to background mode; open the same localhost WebUI again afterward.
This skips WebUI setup and browser opening, then runs the same complete gateway in the current terminal. It is the familiar entry point if you are coming from OpenClaw or already operate agents as long-lived services. The WebUI remains available when its channel is configured; open it manually when needed.
Use nanobot gateway --background for the same direct entry point without keeping the terminal attached. For automatic startup and supervision by the operating system, see Deployment.
Prefer to work entirely in the terminal?
nanobot
This opens the native terminal client with the launch directory as its workspace. It shares saved conversations and the local gateway with the WebUI. The explicit nanobot agent form remains available for compatibility.
Type / to discover commands, /sessions to switch conversations, or @ to mention an app, MCP server, or saved session.
Paste clipboard images with Ctrl+V or Alt+V, and use $ to complete skill references.
Use /diff to inspect file changes, /context to inspect session context, or /branch to continue from a completed reply in a new session.
Press Enter to send. While nanobot is working, Enter sends now and Tab sends after the current response. Press Shift+Enter to add a newline (Ctrl+J works in terminals that cannot distinguish modified Enter keys).
Use /detach to leave the current task running, or start with nanobot gateway --background when nanobot should stay online after all local clients exit.
Each launch starts a new session by default. Use --session to resume one and --workspace to choose another workspace. See the CLI reference for session branching, diffs, history, shortcuts, gateway lifecycle, and compatibility options.
For one request and an immediate exit, use:
nanobot -m "Hello!"
The one-shot form is useful for a quick provider check, shell scripts, and local automation. If you have not configured a model yet, run nanobot webui and open Settings → Models first.
Want to run nanobot in chat apps like Telegram, Discord, WeChat or Feishu? See Chat Apps
Want Docker or Linux service deployment? See Deployment
☁️ Deploy
Render — one click
Deploy nanobot's gateway and bundled WebUI from the repository's ready-to-use Blueprint:
Render will ask for ANTHROPIC_API_KEY and a private NANOBOT_WEB_TOKEN, then provision persistent storage for sessions, memory, and WebUI history. Persistent disks require a paid Render service.
Self-host
Prefer your own infrastructure? Follow the deployment guide for Docker, Docker Compose, Linux services, and macOS LaunchAgent setup.
🌐 WebUI
The WebUI ships inside the published wheel with no separate frontend build. It is the browser workbench for persistent topics, temporary chats, visible agent activity, workspace controls, Apps, Skills, Automations, and settings. Start it with nanobot webui.
The screenshots below use example conversations, illustrative token counts, and paused schedules.
Use it to:
keep separate topics for different tasks and projects;
use temporary chats when a conversation should not be saved to history or memory;
switch models and workspaces without leaving the conversation;
configure providers and chat channels, connect Apps, discover Skills, and manage Automations from one place.
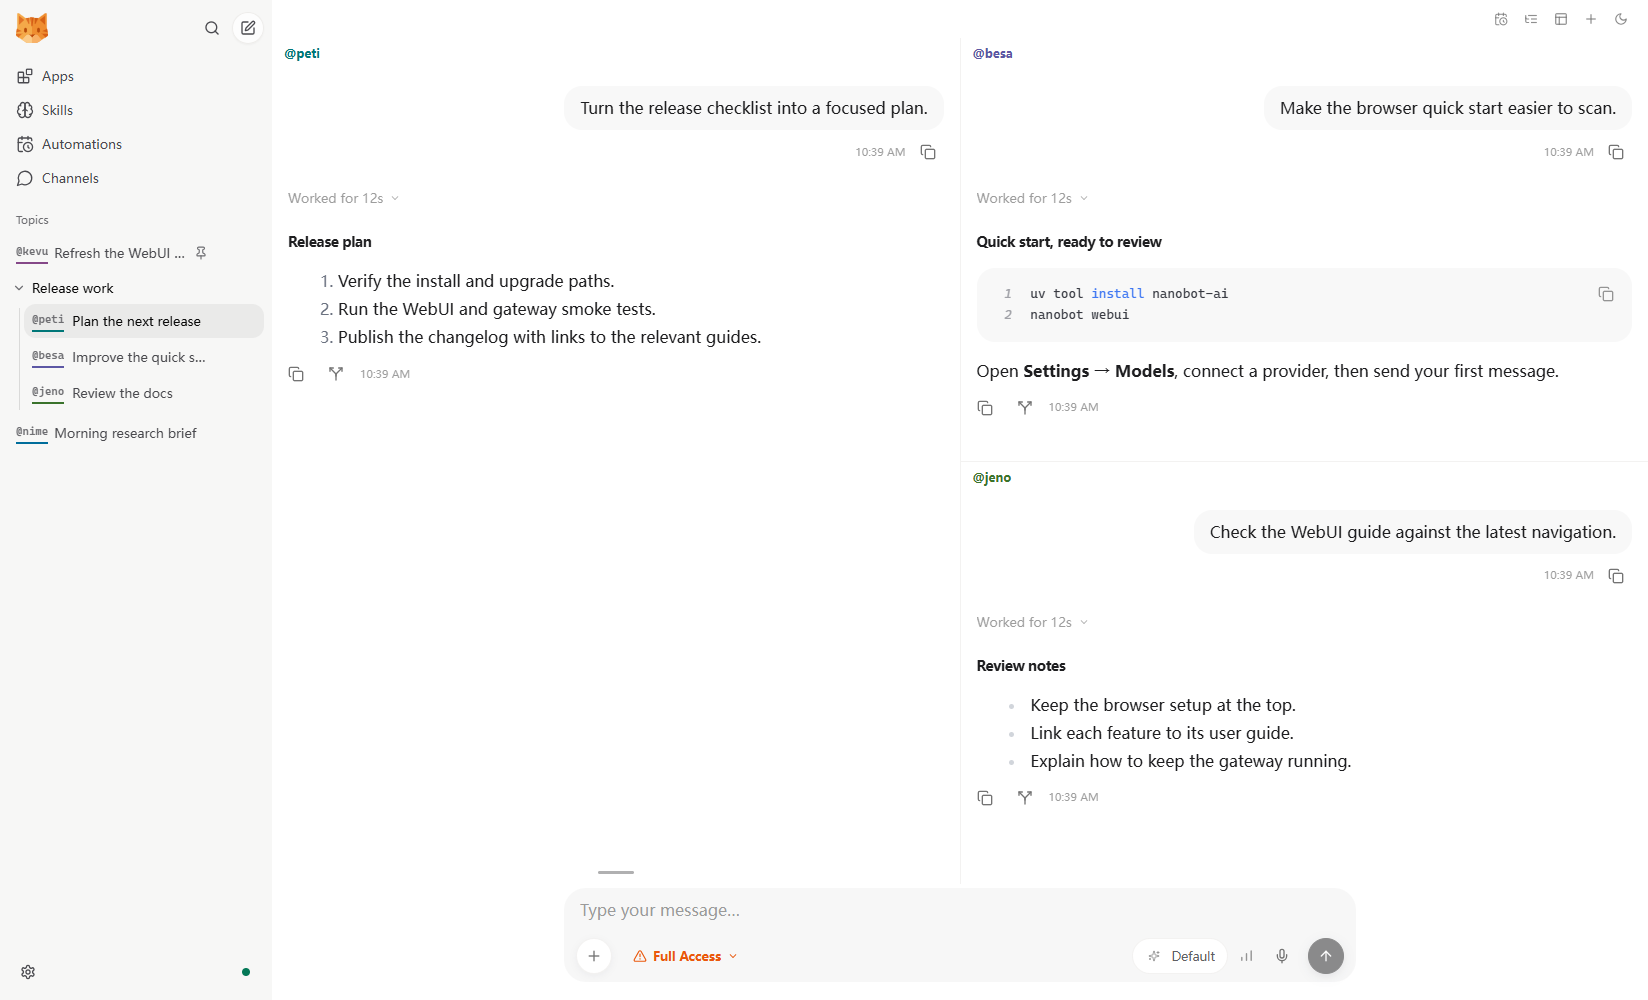
Keep related work side by side
Group up to four conversations and arrange them in columns, rows, a grid, or a main pane with supporting panes. Each topic keeps its own history. Select another topic from the @ menu, or drag it into the composer, to let the agent read its context and coordinate work across sessions.
Choose a project, access mode, and model for each task. Attach documents or images, then send follow-ups immediately or queue them for the next response. Explore topics and panes →
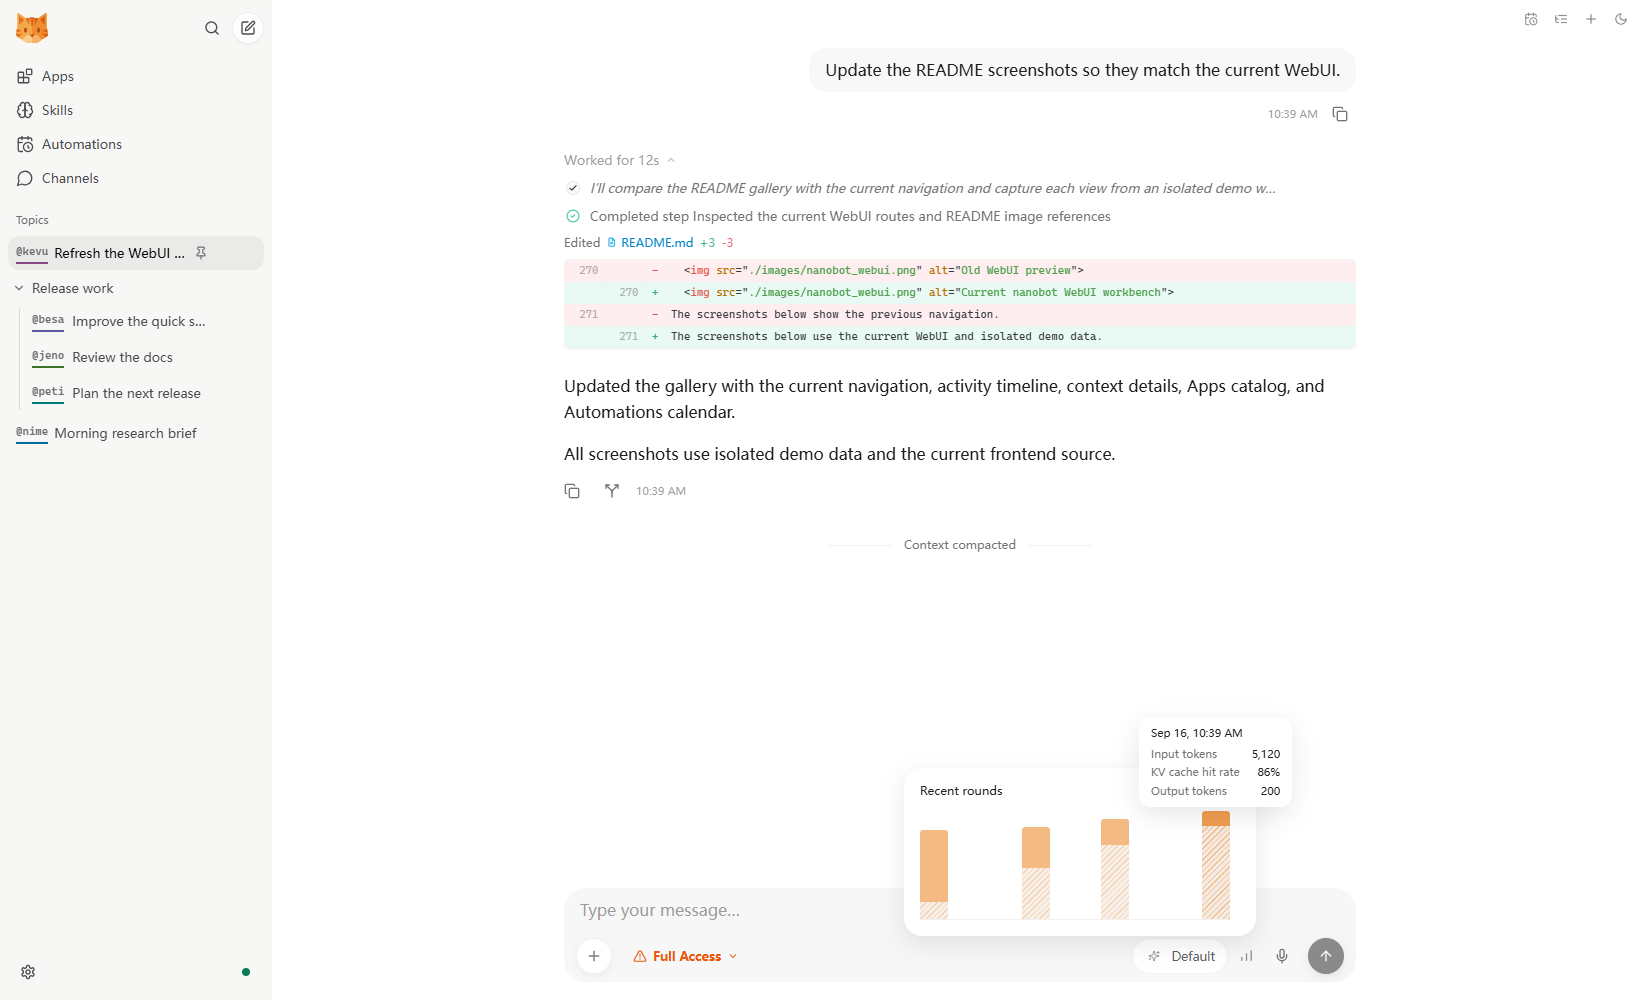
Inspect the work and its context
Expand agent activity to see reasoning, tool calls, and file changes. Switch Settings → Appearance → File edit display to Diff for inline patches. The composer's context indicator shows the current context size, input tokens by round, and cache reuse when the provider reports it.
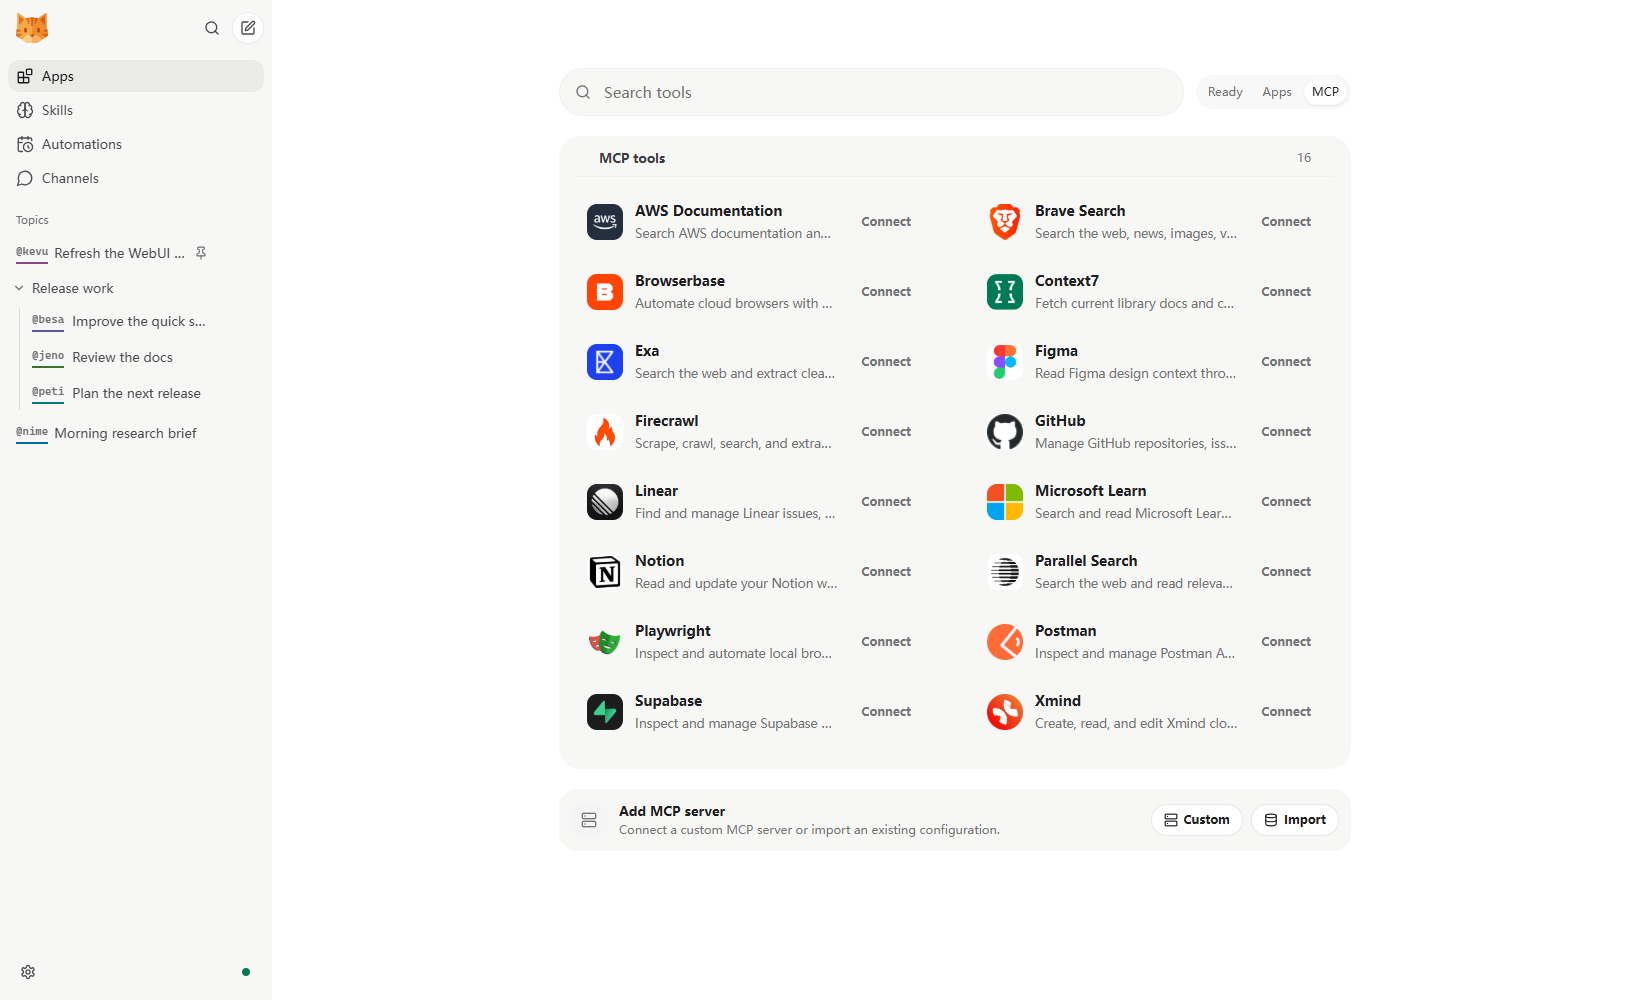
Use Apps to connect MCP servers, enable Agent Plugins, and manage local CLI App adapters. Add a preset or a custom server, then attach an available tool with @. Skills provide reusable instructions; Settings holds model, voice, image, web, and chat-channel setup.
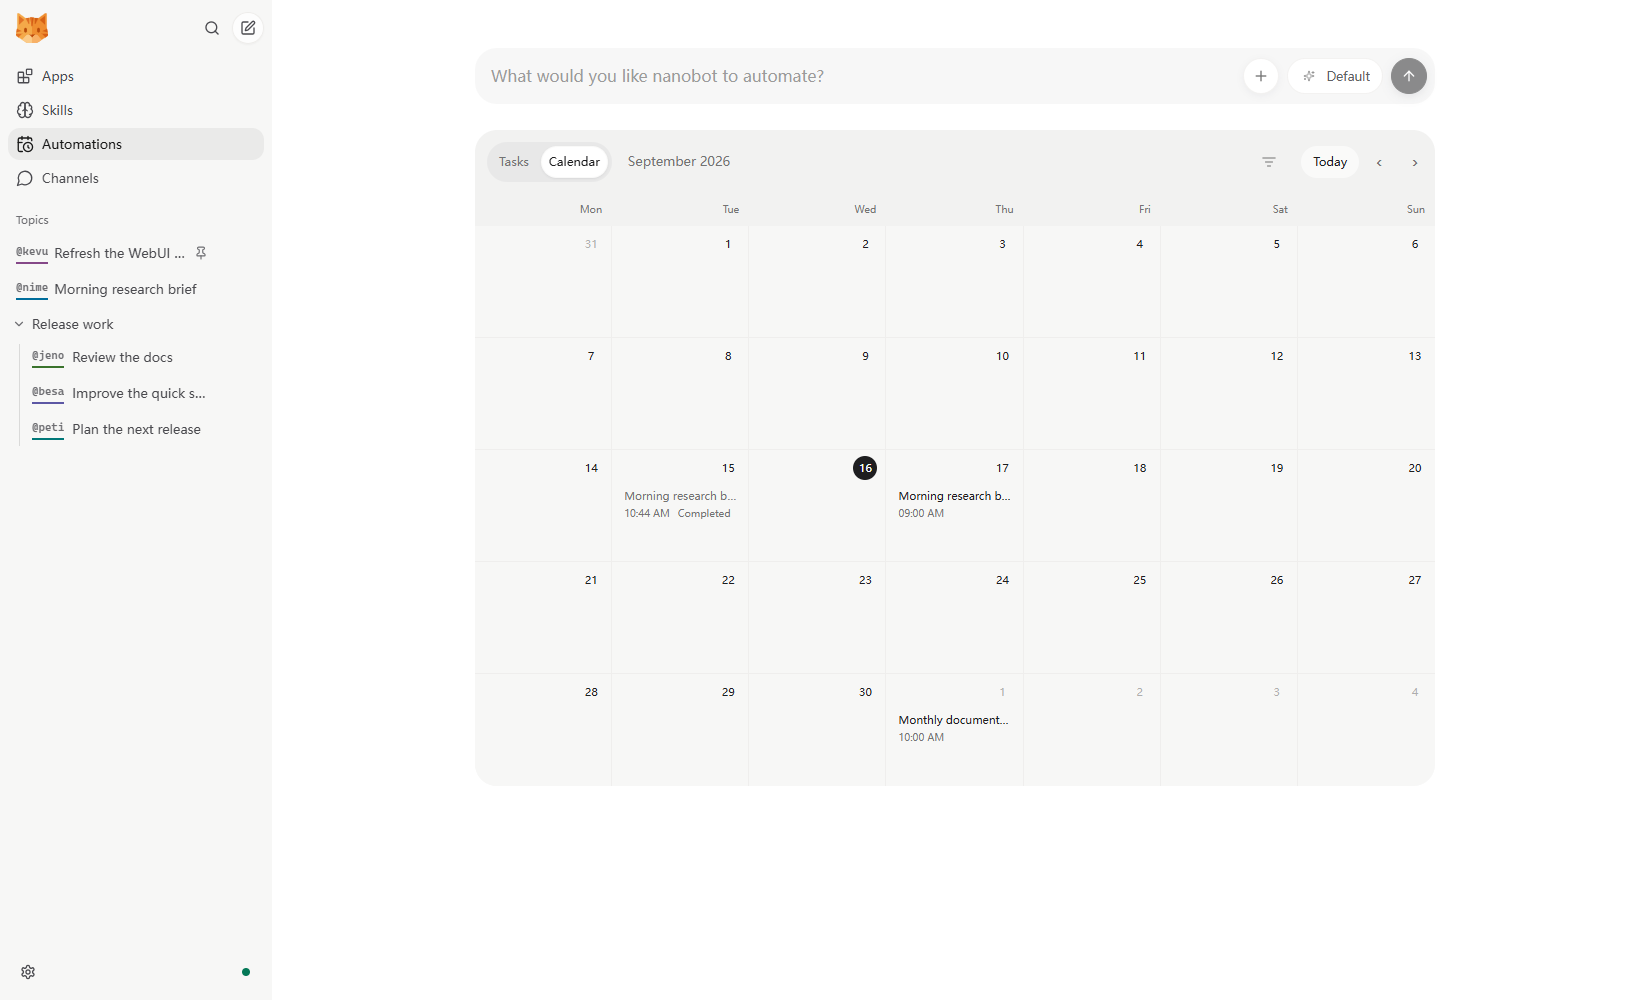
Ask for an automation from the topic that should receive its results. Review the message, schedule, linked chat, and run history in Automations; pause or edit it as your needs change. Local triggers let a script start a saved task on demand.
For a conversation that should stay out of saved topic history and long-term memory, use Temporary chat from the header. Temporary chats end when the connection closes and use the default workspace in Restricted mode.
See the WebUI guide for LAN access, background operation, workspace controls, and the full feature tour. Working on the frontend itself? Use webui/README.md.
Architecture
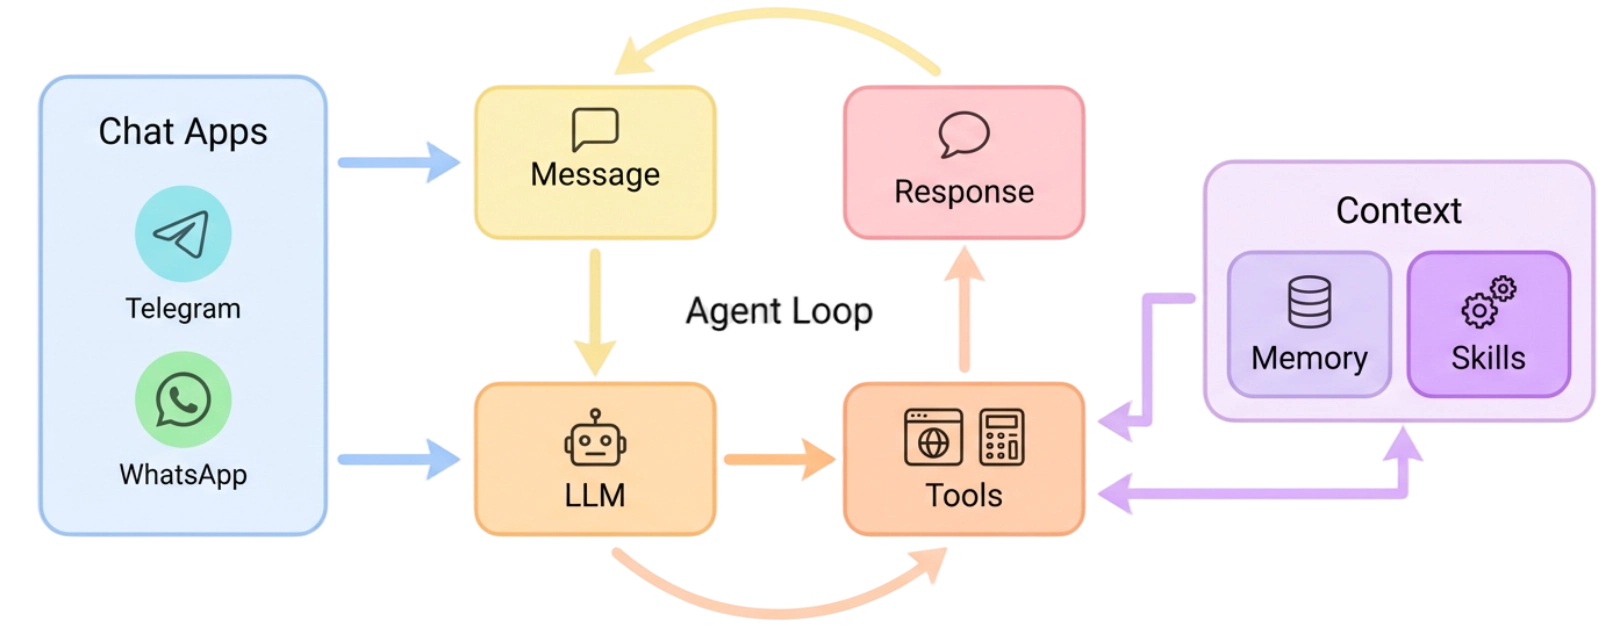
🐈 nanobot stays lightweight by centering everything around a small agent loop: messages come in from chat apps, the LLM decides when tools are needed, and memory or skills are pulled in only as context instead of becoming a heavy orchestration layer. That keeps the core path readable and easy to extend, while still letting you add channels, tools, memory, and deployment options without turning the system into a monolith.
Docs
Browse the repo docs for the latest features and GitHub development version, or visit nanobot.wiki for the stable release documentation.











 nanobot 是一个超轻量、开源、可自托管的个人 AI 智能体框架,使用 Python 编写。它可以以浏览器 WebUI、终端客户端或聊天应用集成的形式运行,并通过兼容 OpenAI 的 API 整合工具、长期记忆、MCP、多智能体委派和定时自动化功能。