Windows-MCP is a lightweight, open-source project that enables seamless integration between AI agents and the Windows operating system. Acting as an MCP server bridges the gap between LLMs and the Windows operating system, allowing agents to perform tasks such as file navigation, application control, UI interaction, QA testing, and more.
mcp-name: io.github.CursorTouch/Windows-MCP
Updates
Supported Operating Systems
- Windows 7
- Windows 8, 8.1
- Windows 10
- Windows 11
🎥 Demos
https://github.com/user-attachments/assets/d0e7ed1d-6189-4de6-838a-5ef8e1cad54e
https://github.com/user-attachments/assets/d2b372dc-8d00-4d71-9677-4c64f5987485
✨ Key Features
Seamless Windows Integration
Interacts natively with Windows UI elements, opens apps, controls windows, simulates user input, and more.
Use Any LLM (Vision Optional)
Unlike many automation tools, Windows-MCP doesn't rely on any traditional computer vision techniques or specific fine-tuned models; it works with any LLMs, reducing complexity and setup time.
Rich Toolset for UI Automation
Includes tools for basic keyboard, mouse operation and capturing window/UI state.
Lightweight & Open-Source
Minimal dependencies and easy setup with full source code available under MIT license.
Customizable & Extendable
Easily adapt or extend tools to suit your unique automation or AI integration needs.
Real-Time Interaction
Typical latency between actions (e.g., from one mouse click to the next) ranges from 0.2 to 0.5 secs, and may slightly vary based on the number of active applications and system load, also the inferencing speed of the llm.
DOM Mode for Browser Automation
Special use_dom=True mode for State-Tool that focuses exclusively on web page content, filtering out browser UI elements for cleaner, more efficient web automation. Supports Chrome, Edge, and Firefox (Firefox uses an IAccessible2 fallback since it doesn't expose RootWebArea via UIA).
🛠️Installation
Note: When you install this MCP server for the first time it may take a minute or two because of installing the dependencies in pyproject.toml. In the first run the server may timeout ignore it and restart it.
Prerequisites
- Python 3.13+
- UV (Package Manager) from Astra, install with
pip install uv or curl -LsSf https://astral.sh/uv/install.sh | sh
English as the default language in Windows preferred else disable the App-Tool in the MCP Server for Windows with other languages.
Run at Login
Run the server directly when needed:
uvx windows-mcp serve
uvx windows-mcp serve --transport sse --host localhost --port 8000
uvx windows-mcp serve --transport streamable-http --host localhost --port 8000
Install it as a background task that starts now and at every login:
windows-mcp install

# Or choose the HTTP transport and bind address explicitly
windows-mcp install --transport sse --host 127.0.0.1 --port 8000
This creates a per-user Scheduled Task named windows-mcp-server and a wrapper script at
~/.windows-mcp/start-server.cmd. Use windows-mcp uninstall to remove it. Logs are written
to ~/.windows-mcp/server.log and ~/.windows-mcp/server.error.log.
Install in Claude Desktop
- Install Claude Desktop.
npm install -g @anthropic-ai/mcpb
- Configure the MCP server.
Option A: Install from PyPI (Recommended)
Use uvx to run the latest version directly from PyPI.
Add this to your claude_desktop_config.json:
{
  "mcpServers": {
    "windows-mcp": {
      "command": "uvx",
      "args": [
        "windows-mcp",
        "serve"
      ]
    }
  }
}
Option B: Install from Source
- Clone the repository:
git clone https://github.com/CursorTouch/Windows-MCP.git
cd Windows-MCP
- Add this to your
claude_desktop_config.json:
{
  "mcpServers": {
    "windows-mcp": {
      "command": "uv",
      "args": [
        "--directory",
        "<path to the windows-mcp directory>",
        "run",
        "windows-mcp",
        "serve"
      ]
    }
  }
}
- Fully restart Claude Desktop and verify the server appears in the MCP tools list.
Claude Desktop MSIX (Windows Store)
The MSIX-packaged Claude Desktop (Microsoft Store version) virtualizes %APPDATA%. This causes two main issues:
- The config file is located at:
%LOCALAPPDATA%\Packages\Claude_pzs8sxrjxfjjc\LocalCache\Roaming\Claude\claude_desktop_config.json (not %APPDATA%\Claude\).
- Automatic installation from the "Claude Directory" will fail because the
${__dirname} variable resolves to the incorrect (non-virtualized) path.
To configure Windows-MCP on the Windows Store version of Claude:
You must manually edit the configuration file. Note that Electron apps in the MSIX sandbox do not inherit the system PATH, so you must use the full absolute path to uvx.exe (or uv.exe).
Option A: Using pre-installed executable
- In a terminal, run
uv tool install windows-mcp.
- Use the generated executable in your config:
{
  "mcpServers": {
    "windows-mcp": {
      "command": "C:\\Users\\<user>\\.local\\bin\\windows-mcp.exe",
      "args": ["serve"]
    }
  }
}
Option B: Using uvx
{
  "mcpServers": {
    "windows-mcp": {
      "command": "C:\\Users\\<user>\\.local\\bin\\uvx.exe",
      "args": ["windows-mcp", "serve"]
    }
  }
}
Option C: Install from Source
{
  "mcpServers": {
    "windows-mcp": {
      "command": "C:\\Users\\<user>\\.local\\bin\\uv.exe",
      "args": [
        "--directory",
        "C:\\path\\to\\Windows-MCP",
        "run",
        "windows-mcp",
        "serve"
      ]
    }
  }
}
Replace <user> with your Windows username. To find the correct paths, run where uvx, where windows-mcp, or where uv. Fully quit Claude Desktop (Tray → Quit) and reopen after saving the config.
For additional Claude Desktop integration troubleshooting, see the MCP documentation.
Install in Perplexity Desktop
- Install Perplexity Desktop.
- Open Perplexity Desktop and go to
Settings -> Connectors -> Add Connector -> Advanced.
- Enter the name as
Windows-MCP, then paste one of the following configs.
Option A: Install from PyPI (Recommended)
{
  "command": "uvx",
  "args": [
    "windows-mcp",
    "serve"
  ]
}
Option B: Install from Source
{
  "command": "uv",
  "args": [
    "--directory",
    "<path to the windows-mcp directory>",
    "run",
    "windows-mcp",
    "serve"
  ]
}
- Click
Save, then restart Perplexity Desktop if needed.
For additional Claude Desktop integration troubleshooting, see the Perplexity MCP Support. The documentation includes helpful tips for checking logs and resolving common issues.
Install in Gemini CLI
- Install Gemini CLI.
npm install -g @google/gemini-cli
- Open
%USERPROFILE%/.gemini/settings.json.
- Add the
windows-mcp config and save it.
{
  "theme": "Default",
  ...
  "mcpServers": {
    "windows-mcp": {
      "command": "uvx",
      "args": [
        "windows-mcp",
        "serve"
      ]
    }
  }
}
Note: To run from source, replace the command with uv and args with ["--directory", "<path>", "run", "windows-mcp", "serve"].
- Restart Gemini CLI.
Install in Qwen Code
1. Install Qwen Code.
npm install -g @qwen-code/qwen-code@latest
- Open
%USERPROFILE%/.qwen/settings.json.
- Add the
windows-mcp config and save it.
{
  "mcpServers": {
    "windows-mcp": {
      "command": "uvx",
      "args": [
        "windows-mcp",
        "serve"
      ]
    }
  }
}
Note: To run from source, replace the command with uv and args with ["--directory", "<path>", "run", "windows-mcp", "serve"].
- Restart Qwen Code.
Install in Codex CLI
1. Install Codex CLI.
npm install -g @openai/codex
- Open
%USERPROFILE%/.codex/config.toml.
- Add the
windows-mcp config and save it.
[mcp_servers.windows-mcp]
command="uvx"
args=[
  "windows-mcp",
  "serve"
]
Note: To run from source, replace the command with uv and args with ["--directory", "<path>", "run", "windows-mcp", "serve"].
- Restart Codex CLI.
Install in Autohand Code
Add the published stdio server from a Windows terminal:
autohand mcp add windows-mcp uvx windows-mcp serve
Add --scope project after add to keep the server configuration in the current project. See Autohand Code for current installation and CLI details.
Install in Claude Code
- Install Claude Code:
npm install -g @anthropic-ai/claude-code
- Configure the server:
Option A: Install from PyPI (Recommended)
Use uvx to run the latest version directly from PyPI.
claude mcp add --transport stdio windows-mcp -- uvx windows-mcp serve
Option B: Install from Source
- Clone the repository:
git clone https://github.com/CursorTouch/Windows-MCP.git
cd Windows-MCP
- Run the following command in your terminal:
claude mcp add --transport stdio windows-mcp -- uv --directory "<path>" run windows-mcp serve
Note: To make the server available across all projects, add --scope user to the command.
- Rerun Claude Code in terminal. Enjoy 🥳
Note: On Windows, if you encounter "Connection closed" errors, use the full path to uvx.exe:
claude mcp add --transport stdio windows-mcp -- C:\Users\<user>\.local\bin\uvx.exe windows-mcp serve
To verify the server is registered, run claude mcp list. Inside Claude Code, use /mcp to check server status.
WSL (Windows Subsystem for Linux)
If you run Claude Code from WSL, the MCP server must still execute on the Windows side (it needs Windows APIs for UI automation). Use powershell.exe as the command to bridge WSL and Windows:
- Install
uv on Windows (from a PowerShell terminal):
irm https://astral.sh/uv/install.ps1 | iex
- From your WSL terminal, register the server:
claude mcp add windows-mcp --transport stdio -s user -- powershell.exe -Command "C:\Users\<user>\.local\bin\uvx.exe windows-mcp serve"
Replace <user> with your Windows username. The -s user flag makes the server available across all projects.
- Restart Claude Code and verify with
/mcp.
🖥️ Running Windows-MCP
Windows-MCP runs directly on your Windows machine and exposes its tools to the connected MCP client.
# Runs with stdio transport (default)
uvx windows-mcp serve

# Or with SSE/Streamable HTTP for network access
uvx windows-mcp serve --transport sse --host localhost --port 8000
uvx windows-mcp serve --transport streamable-http --host localhost --port 8000
Optional environment variables can be set to customize behavior — see Environment Variables below.
Security for Remote Access
For network access, enable authentication and TLS:
windows-mcp serve --transport sse --host 0.0.0.0 \
  --auth-key "your_secret_token" \
  --ip-allowlist "203.0.113.0/24" \
  --ssl-certfile cert.pem --ssl-keyfile key.pem
See 🔐 Security & Access Control for all options.
Transport Options
| Transport |
Command |
Use Case |
stdio (default) |
serve --transport stdio |
Direct connection from MCP clients like Claude Desktop, Cursor, etc. |
sse |
serve --transport sse --host HOST --port PORT |
Network-accessible via Server-Sent Events |
streamable-http |
serve --transport streamable-http --host HOST --port PORT |
Network-accessible via HTTP streaming (recommended for production) |
🔐 Security & Access Control
Authentication
windows-mcp serve --transport sse --host 0.0.0.0 --auth-key "your_token"
Requires Authorization: Bearer your_token header on all requests.
IP Allowlist
windows-mcp serve --auth-key "token" --ip-allowlist "203.0.113.0/24,198.51.100.5"
Restricts connections to specified CIDR ranges. Blocks private/loopback IPs by default.
CORS Origins
By default, no CORS headers are emitted. Browsers block cross-origin requests via their own Same-Origin Policy, which means arbitrary websites cannot reach the MCP control plane even if the server is on localhost. Host-header validation (DNS rebinding protection) is also applied automatically based on the bind address.
If you need a browser-based MCP client to reach the server, opt in with an explicit origin allowlist:
windows-mcp serve --cors-origins "https://my-client.example.com,https://other.example.com"
Only the listed origins receive Access-Control-Allow-Origin headers; all other cross-origin requests are rejected by the browser. The equivalent environment variable is WINDOWS_MCP_CORS_ORIGINS.
All tools are enabled by default. Use --tools to whitelist specific tools, or --exclude-tools to block specific ones.
windows-mcp serve --tools "Screenshot,Click,Snapshot"   # Enable only these tools
windows-mcp serve --exclude-tools "PowerShell,Registry" # Disable specific tools
TLS/HTTPS
openssl req -x509 -newkey rsa:4096 -keyout key.pem -out cert.pem -days 365 -nodes

windows-mcp serve --ssl-certfile cert.pem --ssl-keyfile key.pem
OAuth 2.0 + PKCE
For MCP clients that use OAuth (e.g. Claude Desktop) instead of a static API key:
windows-mcp serve --transport streamable-http --host 0.0.0.0 \
  --ssl-certfile ~/.windows-mcp/cert.pem \
  --ssl-keyfile  ~/.windows-mcp/key.pem \
  --oauth-client-id my-client \
  --oauth-client-secret my-secret
Claude Desktop config:
{
  "mcpServers": {
    "windows-mcp": {
      "type": "http",
      "url": "https://<host>:8000/mcp/",
      "oauth": {
        "clientId": "my-client",
        "clientSecret": "my-secret"
      }
    }
  }
}
The OAuth server exposes:
GET /.well-known/oauth-authorization-server — server metadata (RFC 8414)GET /oauth/authorize — Authorization Code + PKCE (S256 required)POST /oauth/token — token exchange (client secret required)POST /oauth/register — disabled; clients must be pre-provisioned
Dynamic client registration is disabled. Redirect URIs must be loopback http(s) only.
Auth key and OAuth can coexist — both are accepted as valid Bearer tokens.
Config File (~/.windows-mcp/config.toml)
Instead of passing flags every time, store your configuration in ~/.windows-mcp/config.toml. CLI flags always override config file values.
Search order:
--config /path/to/config.toml~/.windows-mcp/config.toml
stdio — local only, no security needed:
[server]
transport = "stdio"
SSE — network access with auth and IP restriction:
[server]
transport = "sse"
host      = "0.0.0.0"
port      = 8000
auth_key  = "your-secret-key"

[security]
ip_allowlist = ["192.168.1.0/24"]
Streamable HTTP — with auth, TLS, and tool exclusions:
[server]
transport    = "streamable-http"
host         = "0.0.0.0"
port         = 8000
auth_key     = "your-secret-key"
ssl_certfile = "cert.pem"   # resolved relative to ~/.windows-mcp/
ssl_keyfile  = "key.pem"

[security]
ip_allowlist        = ["192.168.1.0/24"]
cors_origins        = ["https://my-client.example.com"]   # optional — browser CORS opt-in
oauth_client_id     = "my-client"      # optional — enables OAuth 2.0 + PKCE
oauth_client_secret = "my-secret"

[tools]
exclude = ["PowerShell", "Registry"]   # disable specific tools
Place cert and key files in the same directory:
~/.windows-mcp/
├── config.toml
├── cert.pem
└── key.pem
Generate a self-signed cert directly into that directory:
mkdir -p ~/.windows-mcp
openssl req -x509 -newkey rsa:4096 \
  -keyout ~/.windows-mcp/key.pem \
  -out ~/.windows-mcp/cert.pem \
  -days 365 -nodes
auth Helper
Generate an auth key and save a working config to ~/.windows-mcp/config.toml:
windows-mcp auth
Generate auth plus a self-signed TLS certificate:
windows-mcp auth --transport streamable-http --host 0.0.0.0 --port 8000 --with-tls
This command writes the auth key into the config file, can generate cert.pem and key.pem, and prints an example MCP client configuration for the selected transport.
SSRF Protection
Scrape tool blocks: private IPs, loopback, link-local, credentials-in-URLs, non-HTTP schemes.
⚙️ Environment Variables
All variables are optional unless noted. Set them via the env key in claude_desktop_config.json (or your MCP client's equivalent config).
Screenshot & Snapshot
| Variable |
Default |
Description |
WINDOWS_MCP_SCREENSHOT_SCALE |
1.0 |
Scale factor applied to screenshots before encoding. Accepts a float in the range 0.1–1.0. Useful on high-resolution displays (1440p, 4K) where the default produces images that exceed Claude Desktop's 1 MB tool-result limit. Set to 0.5 to halve both dimensions (quarter the file size). |
WINDOWS_MCP_SCREENSHOT_BACKEND |
auto |
Screenshot capture backend. Accepted values: auto (tries dxcam → mss → pillow in order), dxcam, mss, pillow. Use mss or pillow if dxcam is unavailable or causes issues on your GPU. |
WINDOWS_MCP_PROFILE_SNAPSHOT |
(disabled) |
Set to 1, true, yes, or on to emit per-stage timing logs for Screenshot/Snapshot calls. Useful for diagnosing slow captures. |
WINDOWS_MCP_DISABLE_FLASH |
(disabled) |
Set to 1, true, yes, or on to suppress the orange-red glowing border that briefly highlights the captured area after every screenshot. The flash is rendered on a transparent always-on-top window after capture so it never appears in the captured image. |
Security
| Variable |
Default |
Description |
WINDOWS_MCP_AUTH_KEY |
(none) |
Bearer token required on all HTTP requests. Alternative to --auth-key CLI flag. |
WINDOWS_MCP_IP_ALLOWLIST |
(none) |
Comma-separated list of allowed client IPs or CIDR ranges (e.g., 203.0.113.0/24,198.51.100.5). Alternative to --ip-allowlist CLI flag. |
WINDOWS_MCP_CORS_ORIGINS |
(none) |
Comma-separated list of origins permitted to make cross-origin browser requests (e.g., https://my-client.example.com). No CORS headers are emitted when unset. Alternative to --cors-origins CLI flag. |
WINDOWS_MCP_TOOLS |
(all enabled) |
Comma-separated explicit list of tools to enable (e.g., Screenshot,Click,Snapshot). Alternative to --tools CLI flag. |
WINDOWS_MCP_EXCLUDE_TOOLS |
(none) |
Comma-separated list of tools to disable (e.g., PowerShell,Registry). Alternative to --exclude-tools CLI flag. |
WINDOWS_MCP_SSL_CERTFILE |
(none) |
Path to TLS certificate file (.pem) for HTTPS. Must be provided with WINDOWS_MCP_SSL_KEYFILE. |
WINDOWS_MCP_SSL_KEYFILE |
(none) |
Path to TLS private key file (.pem) for HTTPS. Must be provided with WINDOWS_MCP_SSL_CERTFILE. |
WINDOWS_MCP_OAUTH_CLIENT_ID |
(none) |
OAuth client ID for HTTP transports. Must be provided with WINDOWS_MCP_OAUTH_CLIENT_SECRET. |
WINDOWS_MCP_OAUTH_CLIENT_SECRET |
(none) |
OAuth client secret for HTTP transports. Must be provided with WINDOWS_MCP_OAUTH_CLIENT_ID. |
WINDOWS_MCP_STATELESS_HTTP |
false |
Set to 1, true, yes, or on to run streamable-http without Mcp-Session-Id connection state. Useful for reconnects after restarts and for horizontally scaled deployments. |
Telemetry
| Variable |
Default |
Description |
ANONYMIZED_TELEMETRY |
true |
Set to false to disable anonymous usage telemetry. No personal data, tool arguments, or outputs are ever collected regardless of this setting. |
POSTHOG_API_KEY |
Project default |
Override the PostHog project write key used for anonymous telemetry. Set to an empty string to skip PostHog client initialization. |
POSTHOG_HOST |
https://us.i.posthog.com |
Override the PostHog host for anonymous telemetry, such as for a self-hosted PostHog deployment. |
Debug
| Variable |
Default |
Description |
WINDOWS_MCP_DEBUG |
false |
Set to 1, true, yes, or on to enable debug mode, which sets the log level to DEBUG for verbose output. Also available as the --debug CLI flag. |
WatchDog
| Variable |
Default |
Description |
WINDOWS_MCP_WATCHDOG |
false |
Set to on, 1, true, yes, or enabled (case-insensitive) to run the UIA focus watchdog. It is off by default because its only remaining effect is debug logging of focus changes, while it costs a background thread and a long-lived UIA event subscription that can crash the server on unstable UIA environments after long uptime (e.g. across a sleep/resume or session change). The accessibility tree is built on demand for every tool call either way, so tool behaviour is unaffected. |
Example claude_desktop_config.json:
Local (no security):
{
  "mcpServers": {
    "windows-mcp": {
      "command": "uvx",
      "args": ["windows-mcp", "serve"],
      "env": { "WINDOWS_MCP_SCREENSHOT_SCALE": "0.5" }
    }
  }
}
Remote (with auth + IP allowlist + TLS):
{
  "mcpServers": {
    "windows-mcp": {
      "command": "uvx",
      "args": ["windows-mcp", "serve", "--transport", "sse", "--host", "0.0.0.0"],
      "env": {
        "WINDOWS_MCP_AUTH_KEY": "your_token",
        "WINDOWS_MCP_IP_ALLOWLIST": "203.0.113.0/24",
        "WINDOWS_MCP_SSL_CERTFILE": "/path/to/cert.pem",
        "WINDOWS_MCP_SSL_KEYFILE": "/path/to/key.pem"
      }
    }
  }
}
MCP Client can access the following tools to interact with Windows:
Click: Click on the screen at the given coordinates.Type: Type text on an element (optionally clears existing text).Scroll: Scroll vertically or horizontally on the window or specific regions.Move: Move mouse pointer or drag (set drag=True) to coordinates. For deterministic
drag, set from_loc=[x, y] with drag=True to press at an explicit start point and
release at loc in one tool call. Optional duration adds bounded intermediate
movement.Shortcut: Press keyboard shortcuts (Ctrl+c, Alt+Tab, etc).Wait: Pause for a defined duration.WaitFor: Wait until text, an active window, an element, or a focused element appears by polling UI state inside one tool call.DisplayInventory: Read display layout, work areas, effective DPI, and scale metadata.Screenshot: Fast screenshot-first desktop capture with cursor position, active/open windows, and an image. Skips UI tree extraction for speed and should be the default first call when you mainly need visual context. Supports display=[0] or display=[0,1] using zero-based active Windows display indices, and region=[left, top, right, bottom] (virtual-desktop pixel coordinates) to capture just that rectangle instead of the whole screen — cheaper on tokens when you already know which area matters. region takes precedence over display when both are given; an invalid or out-of-bounds region raises an error. After capture, a brief orange-red glowing border is drawn inside the captured area as a visual confirmation (set WINDOWS_MCP_DISABLE_FLASH=1 to disable).Snapshot: Full desktop state capture for workflows that need interactive element ids, scrollable regions, or use_dom=True browser extraction. Supports use_vision=True for including screenshots, display=[0] or display=[0,1] using zero-based active Windows display indices, and region=[left, top, right, bottom] (virtual-desktop pixel coordinates) to inspect just that rectangle instead of the whole screen; region takes precedence over display when both are given, and an invalid or out-of-bounds region raises an error.App: Launch an application by Start Menu name or strictly by executable path with separated argv and optional cwd; resize, move, and switch between windows.PowerShell: To execute PowerShell commands.FileSystem: Read, write, copy, move, delete, list, search, and inspect files and directories.Scrape: To scrape the entire webpage for information.MultiSelect: Select multiple items (files, folders, checkboxes) with optional Ctrl key. Uses bulk label-to-coordinate resolution when labels are provided.MultiEdit: Enter text into multiple input fields at specified coordinates. Uses bulk label-to-coordinate resolution when labels are provided.Clipboard: Read or set Windows clipboard content.Process: List running processes or terminate them by PID or name.Notification: Send a Windows toast notification with a title and message.Registry: Read, write, delete, or list Windows Registry values and keys.
🤝 Connect with Us
Stay updated and join our community:
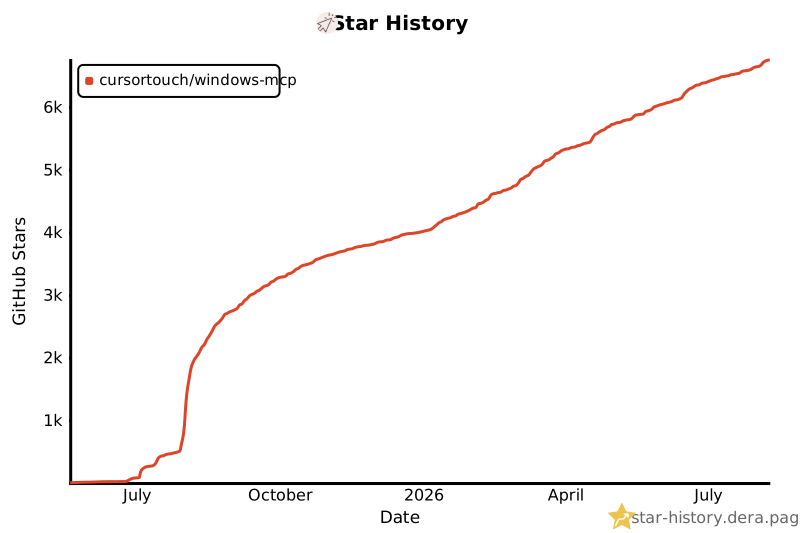
Star History
👥 Contributors
Thanks to all the amazing people who have contributed to Windows-MCP! 🎉
We appreciate every contribution, whether it's code, documentation, bug reports, or feature suggestions. Want to contribute? Check out our Contributing Guidelines!
🔒 Security
Important: Windows-MCP operates with full system access and can perform irreversible operations. Please review our comprehensive security guidelines before deployment.
For detailed security information, including:
- Tool-specific risk assessments
- Deployment recommendations
- Vulnerability reporting procedures
- Compliance and auditing guidelines
Please read our Security Policy.
📊 Telemetry
Windows-MCP collects usage data to help improve the MCP server. No personal information, no tool arguments, no outputs are tracked.
To disable telemetry, set ANONYMIZED_TELEMETRY to false in your MCP client configuration:
{
  "mcpServers": {
    "windows-mcp": {
      "command": "uvx",
      "args": [
        "windows-mcp",
        "serve"
      ],
      "env": {
        "ANONYMIZED_TELEMETRY": "false"
      }
    }
  }
}
See the Environment Variables section for the full list of configurable options.
For detailed information on what data is collected and how it is handled, please refer to the Telemetry and Data Privacy section in our Security Policy.
📝 Limitations
- Selecting specific sections of the text in a paragraph, as the MCP is relying on a11y tree. (⌛ Working on it.)
Type-Tool is meant for typing text, not programming in IDE because of it types program as a whole in a file. (⌛ Working on it.)- This MCP server can't be used to play video games 🎮.
🪪 License
This project is licensed under the MIT License - see the LICENSE file for details.
🙏 Acknowledgements
Windows-MCP makes use of several excellent open-source projects that power its Windows automation features:
Huge thanks to the maintainers and contributors of these libraries for their outstanding work and open-source spirit.
🤝Contributing
Contributions are welcome! Please see CONTRIBUTING for setup instructions and development guidelines.
Made with ❤️ by CursorTouch
Citation
@software{
  author       = {CursorTouch},
  title        = {Windows-MCP: Lightweight open-source project for integrating LLM agents with Windows},
  year         = {2024},
  publisher    = {GitHub},
  url={https://github.com/CursorTouch/Windows-MCP}
}








 Windows-MCP 是一个轻量级的开源 MCP 服务器,在大语言模型和 AI 智能体与 Windows 操作系统之间架起桥梁,让智能体能够控制应用、浏览文件、与 UI 交互并运行 QA 测试。