
https://github.com/user-attachments/assets/6bceea0f-60b6-4c3e-a745-b891de00b8d0
[!TIP]
⭐ Star the repo and follow @getAsterisk on X for early access to asteria-swe-v0.
[!NOTE]
This project is not affiliated with, endorsed by, or sponsored by Anthropic. Claude is a trademark of Anthropic, PBC. This is an independent developer project using Claude.
🌟 Overview
opcode is a powerful desktop application that transforms how you interact with Claude Code. Built with Tauri 2, it provides a beautiful GUI for managing your Claude Code sessions, creating custom agents, tracking usage, and much more.
Think of opcode as your command center for Claude Code - bridging the gap between the command-line tool and a visual experience that makes AI-assisted development more intuitive and productive.
📋 Table of Contents
✨ Features
🗂️ Project & Session Management
- Visual Project Browser: Navigate through all your Claude Code projects in
~/.claude/projects/
- Session History: View and resume past coding sessions with full context
- Smart Search: Find projects and sessions quickly with built-in search
- Session Insights: See first messages, timestamps, and session metadata at a glance
🤖 CC Agents
- Custom AI Agents: Create specialized agents with custom system prompts and behaviors
- Agent Library: Build a collection of purpose-built agents for different tasks
- Background Execution: Run agents in separate processes for non-blocking operations
- Execution History: Track all agent runs with detailed logs and performance metrics
📊 Usage Analytics Dashboard
- Cost Tracking: Monitor your Claude API usage and costs in real-time
- Token Analytics: Detailed breakdown by model, project, and time period
- Visual Charts: Beautiful charts showing usage trends and patterns
- Export Data: Export usage data for accounting and analysis
🔌 MCP Server Management
- Server Registry: Manage Model Context Protocol servers from a central UI
- Easy Configuration: Add servers via UI or import from existing configs
- Connection Testing: Verify server connectivity before use
- Claude Desktop Import: Import server configurations from Claude Desktop
⏰ Timeline & Checkpoints
- Session Versioning: Create checkpoints at any point in your coding session
- Visual Timeline: Navigate through your session history with a branching timeline
- Instant Restore: Jump back to any checkpoint with one click
- Fork Sessions: Create new branches from existing checkpoints
- Diff Viewer: See exactly what changed between checkpoints
📝 CLAUDE.md Management
- Built-in Editor: Edit CLAUDE.md files directly within the app
- Live Preview: See your markdown rendered in real-time
- Project Scanner: Find all CLAUDE.md files in your projects
- Syntax Highlighting: Full markdown support with syntax highlighting
📖 Usage
Getting Started
- Launch opcode: Open the application after installation
- Welcome Screen: Choose between CC Agents or Projects
- First Time Setup: opcode will automatically detect your
~/.claude directory
Managing Projects
Projects → Select Project → View Sessions → Resume or Start New
- Click on any project to view its sessions
- Each session shows the first message and timestamp
- Resume sessions directly or start new ones
Creating Agents
CC Agents → Create Agent → Configure → Execute
- Design Your Agent: Set name, icon, and system prompt
- Configure Model: Choose between available Claude models
- Set Permissions: Configure file read/write and network access
- Execute Tasks: Run your agent on any project
Tracking Usage
Menu → Usage Dashboard → View Analytics
- Monitor costs by model, project, and date
- Export data for reports
- Set up usage alerts (coming soon)
Working with MCP Servers
Menu → MCP Manager → Add Server → Configure
- Add servers manually or via JSON
- Import from Claude Desktop configuration
- Test connections before using
🚀 Installation
Prerequisites
Release Executables Will Be Published Soon
🔨 Build from Source
Prerequisites
Before building opcode from source, ensure you have the following installed:
System Requirements
- Operating System: Windows 10/11, macOS 11+, or Linux (Ubuntu 20.04+)
- RAM: Minimum 4GB (8GB recommended)
- Storage: At least 1GB free space
Rust (1.70.0 or later)
# Install via rustup
curl --proto '=https' --tlsv1.2 -sSf https://sh.rustup.rs | sh
Bun (latest version)
# Install bun
curl -fsSL https://bun.sh/install | bash
Git
# Usually pre-installed, but if not:
# Ubuntu/Debian: sudo apt install git
# macOS: brew install git
# Windows: Download from https://git-scm.com
Claude Code CLI
Linux (Ubuntu/Debian)
# Install system dependencies
sudo apt update
sudo apt install -y \
  libwebkit2gtk-4.1-dev \
  libgtk-3-dev \
  libayatana-appindicator3-dev \
  librsvg2-dev \
  patchelf \
  build-essential \
  curl \
  wget \
  file \
  libssl-dev \
  libxdo-dev \
  libsoup-3.0-dev \
  libjavascriptcoregtk-4.1-dev
macOS
# Install Xcode Command Line Tools
xcode-select --install

# Install additional dependencies via Homebrew (optional)
brew install pkg-config
Windows
Build Steps
Clone the Repository
git clone https://github.com/getAsterisk/opcode.git
cd opcode
Install Frontend Dependencies
bun install
Build the Application
For Development (with hot reload)
bun run tauri dev
For Production Build
# Build the application
bun run tauri build

# The built executable will be in:
# - Linux: src-tauri/target/release/
# - macOS: src-tauri/target/release/
# - Windows: src-tauri/target/release/
Platform-Specific Build Options
Debug Build (faster compilation, larger binary)
bun run tauri build --debug
Universal Binary for macOS (Intel + Apple Silicon)
bun run tauri build --target universal-apple-darwin
Troubleshooting
Common Issues
"cargo not found" error
- Ensure Rust is installed and
~/.cargo/bin is in your PATH
- Run
source ~/.cargo/env or restart your terminal
Linux: "webkit2gtk not found" error
- Install the webkit2gtk development packages listed above
- On newer Ubuntu versions, you might need
libwebkit2gtk-4.0-dev
Windows: "MSVC not found" error
- Install Visual Studio Build Tools with C++ support
- Restart your terminal after installation
"claude command not found" error
- Ensure Claude Code CLI is installed and in your PATH
- Test with
claude --version
Build fails with "out of memory"
- Try building with fewer parallel jobs:
cargo build -j 2
- Close other applications to free up RAM
Verify Your Build
After building, you can verify the application works:
# Run the built executable directly
# Linux/macOS
./src-tauri/target/release/opcode

# Windows
./src-tauri/target/release/opcode.exe
Build Artifacts
The build process creates several artifacts:
- Executable: The main opcode application
- Installers (when using
tauri build):
.deb package (Linux).AppImage (Linux).dmg installer (macOS).msi installer (Windows).exe installer (Windows)
All artifacts are located in src-tauri/target/release/.
🛠️ Development
Tech Stack
- Frontend: React 18 + TypeScript + Vite 6
- Backend: Rust with Tauri 2
- UI Framework: Tailwind CSS v4 + shadcn/ui
- Database: SQLite (via rusqlite)
- Package Manager: Bun
Project Structure
opcode/
├── src/                   # React frontend
│   ├── components/        # UI components
│   ├── lib/               # API client & utilities
│   └── assets/            # Static assets
├── src-tauri/             # Rust backend
│   ├── src/
│   │   ├── commands/      # Tauri command handlers
│   │   ├── checkpoint/    # Timeline management
│   │   └── process/       # Process management
│   └── tests/             # Rust test suite
└── public/                # Public assets
Development Commands
# Start development server
bun run tauri dev

# Run frontend only
bun run dev

# Type checking
bunx tsc --noEmit

# Run Rust tests
cd src-tauri && cargo test

# Format code
cd src-tauri && cargo fmt
🔒 Security
opcode prioritizes your privacy and security:
- Process Isolation: Agents run in separate processes
- Permission Control: Configure file and network access per agent
- Local Storage: All data stays on your machine
- No Telemetry: No data collection or tracking
- Open Source: Full transparency through open source code
🤝 Contributing
We welcome contributions! Please see our Contributing Guide for details.
Areas for Contribution
- 🐛 Bug fixes and improvements
- ✨ New features and enhancements
- 📚 Documentation improvements
- 🎨 UI/UX enhancements
- 🧪 Test coverage
- 🌐 Internationalization
📄 License
This project is licensed under the AGPL License - see the LICENSE file for details.
🙏 Acknowledgments
- Built with Tauri - The secure framework for building desktop apps
- Claude by Anthropic
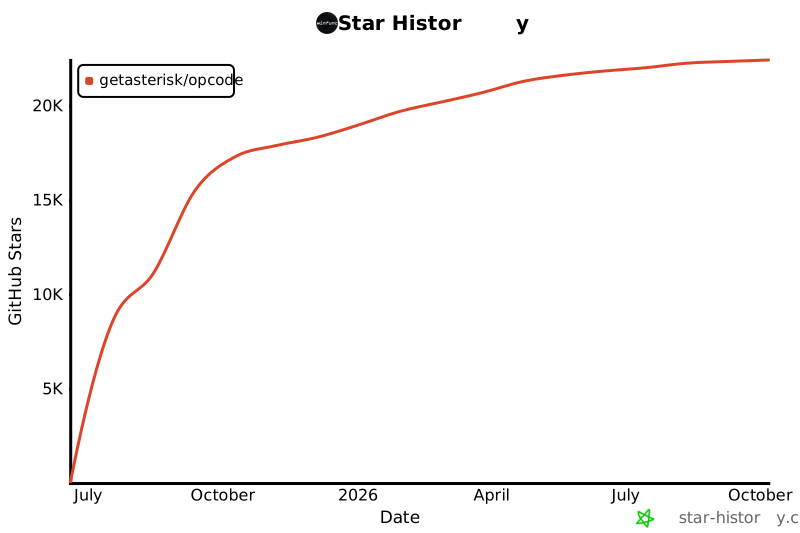
Star History






 opcode 是一个非官方的 Claude Code 桌面图形界面应用和工具集:它让你在一个可视化界面里管理编程会话、自定义智能体、使用成本、MCP 服务器和 CLAUDE.md 文件,而不用去操作终端。