SwiftLint
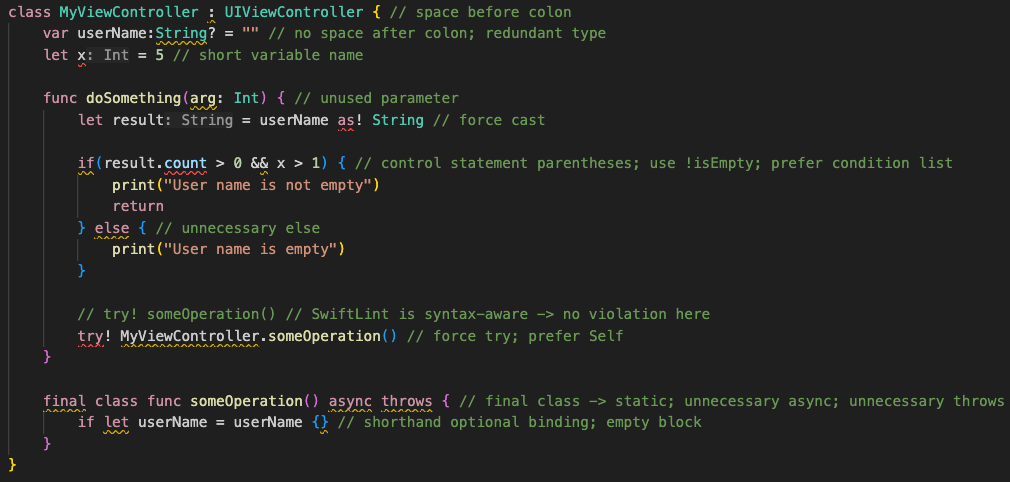
A tool to enforce Swift style and conventions, loosely based on the now
archived GitHub Swift Style Guide.
SwiftLint enforces the style guide rules that are generally accepted by the
Swift community. These rules are well described in popular style guides like
Kodeco's Swift Style Guide.
SwiftLint rules are predominantly based on SwiftSyntax.
Some rules still hook into Clang and
SourceKit to access type information.



This project adheres to the
Contributor Covenant Code of Conduct.
By participating, you are expected to uphold this code.
Switch Language:
中文,
한국어
Video Introduction
To get a high-level overview of SwiftLint, we encourage you to watch this
presentation recorded January 9th, 2017 by JP Simard (transcript provided):
Installation
SwiftLint can be used as a command plugin
or a build tool plugin.
Add
.package(url: "https://github.com/SimplyDanny/SwiftLintPlugins", from: "<version>")
to your Package.swift file to consume the latest release of SwiftLint
automatically or pin the dependency to a specific version:
.package(url: "https://github.com/SimplyDanny/SwiftLintPlugins", exact: "<version>")
Therein, replace <version> with the desired minimum or exact version.
[!NOTE]
Consuming the plugins directly from the SwiftLint repository comes
with several drawbacks. To avoid them and reduce the overhead imposed, it's
highly recommended to consume the plugins from the dedicated
SwiftLintPlugins repository,
even though plugins from the SwiftLint repository are also absolutely
functional. If the plugins from SwiftLint are preferred, just use the URL
https://github.com/realm/SwiftLint in the package declarations above.
However, SwiftLintPlugins
facilitates plugin adoption massively. It lists some of the reasons that
drive the plugins as provided by SwiftLint itself very troublesome. Since
the plugin code and the releases are kept in sync, there is no difference
in functionality between the two, but you spare yourself a lot of time and
trouble using the dedicated plugins repository.
This document assumes you're relying on SwiftLintPlugins.
Use the following link to add SwiftLint as a Package Dependency to an Xcode
project:
https://github.com/SimplyDanny/SwiftLintPlugins
brew install swiftlint
Add the following to your Podfile:
pod 'SwiftLint'
This will download the SwiftLint binaries and dependencies in Pods/ during
your next pod install execution and will allow you to invoke it via
${PODS_ROOT}/SwiftLint/swiftlint in your Script Build Phases.
Installing via Cocoapods also enables pinning to a specific version of
SwiftLint rather than simply the latest (which is the case with
Homebrew).
Note that this will add the SwiftLint binaries, its dependencies' binaries, and
the Swift binary library distribution to the Pods/ directory, so checking in
this directory to SCM such as Git is discouraged.
mint install realm/SwiftLint
Put this in your MODULE.bazel:
bazel_dep(name = "swiftlint", version = "0.52.4", repo_name = "SwiftLint")
Or put this in your WORKSPACE:
WORKSPACE
load("@bazel_tools//tools/build_defs/repo:http.bzl", "http_archive")

http_archive(
    name = "build_bazel_rules_apple",
    sha256 = "390841dd5f8a85fc25776684f4793d56e21b098dfd7243cd145b9831e6ef8be6",
    url = "https://github.com/bazelbuild/rules_apple/releases/download/2.4.1/rules_apple.2.4.1.tar.gz",
)

load(
    "@build_bazel_rules_apple//apple:repositories.bzl",
    "apple_rules_dependencies",
)

apple_rules_dependencies()

load(
    "@build_bazel_rules_swift//swift:repositories.bzl",
    "swift_rules_dependencies",
)

swift_rules_dependencies()

load(
    "@build_bazel_rules_swift//swift:extras.bzl",
    "swift_rules_extra_dependencies",
)

swift_rules_extra_dependencies()

http_archive(
    name = "SwiftLint",
    sha256 = "c6ea58b9c72082cdc1ada4a2d48273ecc355896ed72204cedcc586b6ccb8aca6",
    url = "https://github.com/realm/SwiftLint/releases/download/0.52.4/bazel.tar.gz",
)

load("@SwiftLint//bazel:repos.bzl", "swiftlint_repos")

swiftlint_repos()

load("@SwiftLint//bazel:deps.bzl", "swiftlint_deps")

swiftlint_deps()
Then you can run SwiftLint in the current directory with this command:
bazel run -c opt @SwiftLint//:swiftlint
Pre-Built Package
Download SwiftLint.pkg from the
latest GitHub release and
run it.
From Source
Make sure the build tool Bazel and a
recent Swift toolchain are
installed and all tools are discoverable in your PATH.
To build SwiftLint, clone this repository and run make install.
Setup
[!IMPORTANT]
While it may seem intuitive to run SwiftLint before compiling Swift source
files to exit a build early when there are lint violations, it is important
to understand that SwiftLint is designed to analyze valid source code that
is compilable. Non-compiling code can very easily lead to unexpected and
confusing results, especially when executing with --fix/--autocorrect
command line arguments.
SwiftLint can be used as a build tool plugin for both
Swift Package projects
and Xcode projects.
The build tool plugin determines the SwiftLint working directory by locating
the topmost config file within the package/project directory. If a config file
is not found therein, the package/project directory is used as the working
directory.
The plugin throws an error when it is unable to resolve the SwiftLint working
directory. For example, this will occur in Xcode projects where the target's
Swift files are not located within the project directory.
To maximize compatibility with the plugin, avoid project structures that require
the use of the --config option.
Swift Package Projects
[!NOTE]
Requires installing via Swift Package Manager.
Build tool plugins run when building each target. When a project has multiple
targets, the plugin must be added to the desired targets individually.
To do this, add the plugin to the target(s) to be linted as follows:
.target(
    ...
    plugins: [.plugin(name: "SwiftLintBuildToolPlugin", package: "SwiftLintPlugins")]
),
Swift Package Command Plugin
[!NOTE]
Requires installing via Swift Package Manager.
The command plugin enables running SwiftLint from the command line as follows:
swift package plugin swiftlint
Xcode Projects
[!NOTE]
Requires installing via Xcode Package Dependency.
Build tool plugins run as a build phase of each target. When a project has
multiple targets, the plugin must be added to the desired targets individually.
To do this, add the SwiftLintBuildToolPlugin to the Run Build Tool Plug-ins
phase of the Build Phases for the target(s) to be linted.
[!TIP]
When using the plugin for the first time, be sure to trust and enable
it when prompted. If a macros build warning exists, select it to trust
and enable the macros as well.
For unattended use (e.g. on CI), package plugin and macro
validations can be disabled with either of the following:
Using xcodebuild options:
-skipPackagePluginValidation
-skipMacroValidation
Setting Xcode defaults:
defaults write com.apple.dt.Xcode IDESkipPackagePluginFingerprintValidatation -bool YES
defaults write com.apple.dt.Xcode IDESkipMacroFingerprintValidation -bool YES
[!IMPORTANT]
The unattended use options bypass Xcode's validation dialogs
and implicitly trust all plugins and macros, which has security implications.
Unexpected Xcode Project Structures
Project structures where SwiftLint's configuration file is located
outside of the package/project directory are not directly supported
by the build tool plugin. This is because it isn't possible to pass
arguments to build tool plugins (e.g., passing the config file path).
If your project structure doesn't work directly with the build tool
plugin, please consider one of the following options:
- To use a config file located outside the package/project directory, a config
file may be added to that directory specifying a parent config path to the
other config file, e.g.,
parent_config: path/to/.swiftlint.yml.
- You can also consider the use of a
Run Script Build Phase in place of the build
tool plugin.
Xcode Run Script Build Phase
[!NOTE]
Based upon the installation method used, the shell command syntax in the
Run Script Build Phase may be different or additional configuration could
be required. Refer to the installation instructions for
more information.
If the build tool plugin does not work for your project setup or when
additional custom setup is required, SwiftLint can be added as a Run Script
Build Phase. This is useful when a project setup relies on the --config
SwiftLint option; or to lint all targets together in a single swiftlint
invocation. File inclusions and exclusions can be configured in the
.swiftlint.yml configuration.
To do this, add a custom script to a Run Script phase of the Build Phases
of the primary app target, after the Compile Sources phase. Use the
following script implementation:
if command -v swiftlint >/dev/null 2>&1
then
    swiftlint
else
    echo "warning: `swiftlint` command not found - See https://github.com/realm/SwiftLint#installation for installation instructions."
fi
If you're using the SwiftLintPlugin in a Swift package,
you may refer to the swiftlint executable in the
following way:
SWIFT_PACKAGE_DIR="${SWIFT_PACKAGE_DIR:-${BUILD_DIR%Build/*}SourcePackages}"
SWIFTLINT_CMD="$SWIFT_PACKAGE_DIR/artifacts/swiftlintplugins/SwiftLintBinary/SwiftLintBinary.artifactbundle/macos/swiftlint"

if test -f "$SWIFTLINT_CMD" 2>&1
then
    "$SWIFTLINT_CMD"
else
    echo "warning: `swiftlint` command not found - See https://github.com/realm/SwiftLint#xcode-run-script-build-phase for installation instructions."
fi
[!NOTE]
The SWIFTLINT_CMD path uses the default Xcode configuration and has been
tested on Xcode 15/16. In case of another configuration (e.g. a custom
Swift package path), please adapt the values accordingly.
If you run xcodebuild with -clonedSourcePackagesDirPath, set
SWIFT_PACKAGE_DIR to <that path> before running the script.
[!TIP]
Uncheck Based on dependency analysis to run swiftlint on all incremental
builds, suppressing the unspecified outputs warning.
Consideration for Xcode 15.0
Xcode 15 made a significant change by setting the default value of the
ENABLE_USER_SCRIPT_SANDBOXING build setting from NO to YES.
As a result, SwiftLint encounters an error related to missing file permissions,
which typically manifests as
error: Sandbox: swiftlint(19427) deny(1) file-read-data.
To resolve this issue, it is necessary to manually set the
ENABLE_USER_SCRIPT_SANDBOXING setting to NO for the specific target that
SwiftLint is being configured for.
Consideration for Apple Silicon
If you installed SwiftLint via Homebrew on Apple Silicon, you might experience
this warning:
warning: SwiftLint not installed, download from https://github.com/realm/SwiftLint
That is because Homebrew on Apple Silicon installs the binaries into the
/opt/homebrew/bin folder by default. To instruct Xcode where to find
SwiftLint, you can either add /opt/homebrew/bin to the PATH environment
variable in your build phase:
if [[ "$(uname -m)" == arm64 ]]
then
    export PATH="/opt/homebrew/bin:$PATH"
fi

if command -v swiftlint >/dev/null 2>&1
then
    swiftlint
else
    echo "warning: `swiftlint` command not found - See https://github.com/realm/SwiftLint#installation for installation instructions."
fi
or you can create a symbolic link in /usr/local/bin pointing to the actual
binary:
ln -s /opt/homebrew/bin/swiftlint /usr/local/bin/swiftlint
Additional Considerations
If you wish to fix violations as well, your script could run
swiftlint --fix && swiftlint instead of just swiftlint. This will mean
that all correctable violations are fixed while ensuring warnings show up in
your project for remaining violations.
If you've installed SwiftLint via CocoaPods the script should look like this:
"${PODS_ROOT}/SwiftLint/swiftlint"
Visual Studio Code
To integrate SwiftLint with Visual Studio Code, install the
vscode-swiftlint
extension from the marketplace.
Fastlane
You can use the official
swiftlint fastlane action
to run SwiftLint as part of your fastlane process.
swiftlint(
    mode: :lint,                            # SwiftLint mode: :lint (default) or :autocorrect
    executable: "Pods/SwiftLint/swiftlint", # The SwiftLint binary path (optional). Important if you've installed it via CocoaPods
    path: "/path/to/lint",                  # Specify path to lint (optional)
    output_file: "swiftlint.result.json",   # The path of the output file (optional)
    reporter: "json",                       # The custom reporter to use (optional)
    config_file: ".swiftlint-ci.yml",       # The path of the configuration file (optional)
    files: [                                # List of files to process (optional)
        "AppDelegate.swift",
        "path/to/project/Model.swift"
    ],
    ignore_exit_status: true,               # Allow fastlane to continue even if SwiftLint returns a non-zero exit status (Default: false)
    quiet: true,                            # Don't print status logs like 'Linting ' & 'Done linting' (Default: false)
    strict: true                            # Fail on warnings? (Default: false)
)
Docker
SwiftLint is also available as a Docker image using
Ubuntu. So just the first time you need to pull the docker image using the
next command:
docker pull ghcr.io/realm/swiftlint:latest
Then following times, you just run swiftlint inside of the docker like:
docker run -it -v `pwd`:`pwd` -w `pwd` ghcr.io/realm/swiftlint:latest
This will execute swiftlint in the folder where you are right now (pwd),
showing an output like:
$ docker run -it -v `pwd`:`pwd` -w `pwd` ghcr.io/realm/swiftlint:latest
Linting Swift files in current working directory
Linting 'RuleDocumentation.swift' (1/490)
...
Linting 'YamlSwiftLintTests.swift' (490/490)
Done linting! Found 0 violations, 0 serious in 490 files.
Here you have more documentation about the usage of
Docker Images.
MegaLinter
SwiftLint is also embedded in MegaLinter, an
open-source aggregator of linters for CI. See its
SwiftLint documentation
for setup instructions.
Command Line Usage
$ swiftlint help
OVERVIEW: A tool to enforce Swift style and conventions.

USAGE: swiftlint <subcommand>

OPTIONS:
  --version               Show the version.
  -h, --help              Show help information.

SUBCOMMANDS:
  analyze                 Run analysis rules
  docs                    Open SwiftLint documentation website in the default web browser
  generate-docs           Generates markdown documentation for selected group of rules
  lint (default)          Print lint warnings and errors
  baseline                Operations on existing baselines
  reporters               Display the list of reporters and their identifiers
  rules                   Display the list of rules and their identifiers
  version                 Display the current version of SwiftLint

  See 'swiftlint help <subcommand>' for detailed help.
Run swiftlint in the directory containing the Swift files to lint. Directories
will be searched recursively.
To specify a list of files when using lint or analyze
(like the list of files modified by Xcode specified by the
ExtraBuildPhase Xcode
plugin, or modified files in the working tree based on git ls-files -m), you
can do so by passing the option --use-script-input-files and setting the
following instance variables: SCRIPT_INPUT_FILE_COUNT
and SCRIPT_INPUT_FILE_0, SCRIPT_INPUT_FILE_1, ...,
SCRIPT_INPUT_FILE_{SCRIPT_INPUT_FILE_COUNT - 1}.
Similarly, files can be read from file lists by passing
the option --use-script-input-file-lists and setting the
following instance variables: SCRIPT_INPUT_FILE_LIST_COUNT
and SCRIPT_INPUT_FILE_LIST_0, SCRIPT_INPUT_FILE_LIST_1, ...,
SCRIPT_INPUT_FILE_LIST_{SCRIPT_INPUT_FILE_LIST_COUNT - 1}.
These are same environment variables set for input files to
custom Xcode script phases.
Working With Multiple Swift Versions
SwiftLint hooks into SourceKit so it continues working even as Swift evolves!
This also keeps SwiftLint lean, as it doesn't need to ship with a full Swift
compiler, it just communicates with the official one you already have installed
on your machine.
You should always run SwiftLint with the same toolchain you use to compile your
code.
You may want to override SwiftLint's default Swift toolchain if you have
multiple toolchains or Xcodes installed.
Here's the order in which SwiftLint determines which Swift toolchain to use:
$XCODE_DEFAULT_TOOLCHAIN_OVERRIDE$TOOLCHAIN_DIR or $TOOLCHAINSxcrun -find swift/Applications/Xcode.app/Contents/Developer/Toolchains/XcodeDefault.xctoolchain/Applications/Xcode-beta.app/Contents/Developer/Toolchains/XcodeDefault.xctoolchain- `~/Applications/Xcode.app/Contents/Developer/Toolchains/XcodeDefault.xctool

 SwiftLint — это опенсорсный линтер, который следит за стилем и соглашениями в Swift. Он применяет правила, принятые в сообществе Swift, и в общих чертах опирается на уже заархивированный GitHub Swift Style Guide.