rathole






English | 简体中文
A secure, stable and high-performance reverse proxy for NAT traversal, written in Rust
rathole, like frp and ngrok, can help to expose the service on the device behind the NAT to the Internet, via a server with a public IP.
Features
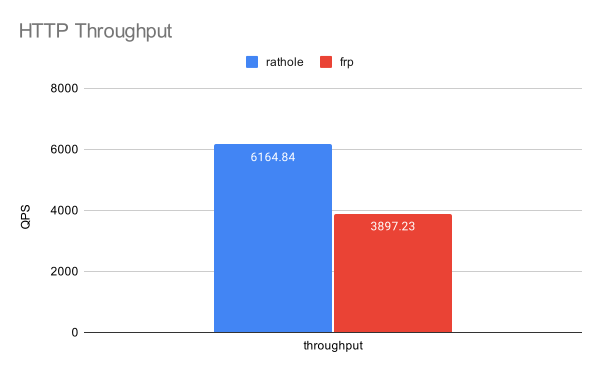
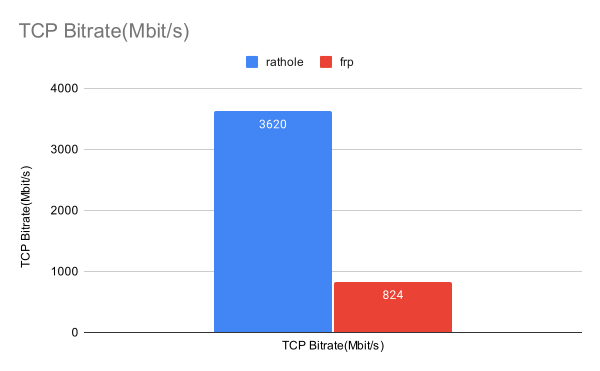
- High Performance Much higher throughput can be achieved than frp, and more stable when handling a large volume of connections. See Benchmark
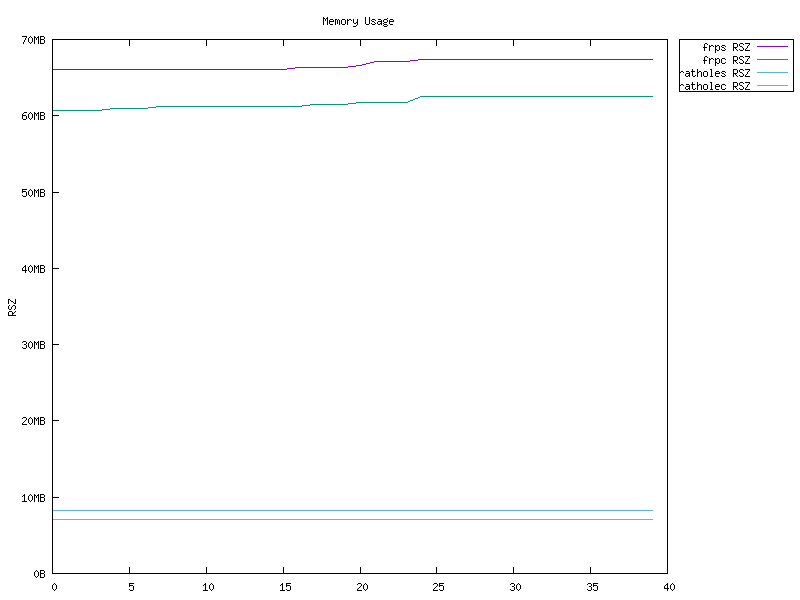
- Low Resource Consumption Consumes much fewer memory than similar tools. See Benchmark. The binary can be as small as ~500KiB to fit the constraints of devices, like embedded devices as routers.
- Security Tokens of services are mandatory and service-wise. The server and clients are responsible for their own configs. With the optional Noise Protocol, encryption can be configured at ease. No need to create a self-signed certificate! TLS is also supported.
- Hot Reload Services can be added or removed dynamically by hot-reloading the configuration file. HTTP API is WIP.
Quickstart
A full-powered rathole can be obtained from the release page. Or build from source for other platforms and minimizing the binary. A Docker image is also available.
The usage of rathole is very similar to frp. If you have experience with the latter, then the configuration is very easy for you. The only difference is that configuration of a service is split into the client side and the server side, and a token is mandatory.
To use rathole, you need a server with a public IP, and a device behind the NAT, where some services that need to be exposed to the Internet.
Assuming you have a NAS at home behind the NAT, and want to expose its ssh service to the Internet:
- On the server which has a public IP
Create server.toml with the following content and accommodate it to your needs.
# server.toml
[server]
bind_addr = "0.0.0.0:2333" # `2333` specifies the port that rathole listens for clients

[server.services.my_nas_ssh]
token = "use_a_secret_that_only_you_know" # Token that is used to authenticate the client for the service. Change to an arbitrary value.
bind_addr = "0.0.0.0:5202" # `5202` specifies the port that exposes `my_nas_ssh` to the Internet
Then run:
./rathole server.toml
- On the host which is behind the NAT (your NAS)
Create client.toml with the following content and accommodate it to your needs.
# client.toml
[client]
remote_addr = "myserver.com:2333" # The address of the server. The port must be the same with the port in `server.bind_addr`

[client.services.my_nas_ssh]
token = "use_a_secret_that_only_you_know" # Must be the same with the server to pass the validation
local_addr = "127.0.0.1:22" # The address of the service that needs to be forwarded
Then run:
./rathole client.toml
- Now the client will try to connect to the server
myserver.com on port 2333, and any traffic to myserver.com:5202 will be forwarded to the client's port 22.
So you can ssh myserver.com:5202 to ssh to your NAS.
To run rathole run as a background service on Linux, checkout the systemd examples.
Configuration
rathole can automatically determine to run in the server mode or the client mode, according to the content of the configuration file, if only one of [server] and [client] block is present, like the example in Quickstart.
But the [client] and [server] block can also be put in one file. Then on the server side, run rathole --server config.toml and on the client side, run rathole --client config.toml to explicitly tell rathole the running mode.
Before heading to the full configuration specification, it's recommend to skim the configuration examples to get a feeling of the configuration format.
See Transport for more details about encryption and the transport block.
Here is the full configuration specification:
[client]
remote_addr = "example.com:2333" # Necessary. The address of the server
default_token = "default_token_if_not_specify" # Optional. The default token of services, if they don't define their own ones
heartbeat_timeout = 40 # Optional. Set to 0 to disable the application-layer heartbeat test. The value must be greater than `server.heartbeat_interval`. Default: 40 seconds
retry_interval = 1 # Optional. The interval between retry to connect to the server. Default: 1 second

[client.transport] # The whole block is optional. Specify which transport to use
type = "tcp" # Optional. Possible values: ["tcp", "tls", "noise"]. Default: "tcp"

[client.transport.tcp] # Optional. Also affects `noise` and `tls`
proxy = "socks5://user:[email protected]:1080" # Optional. The proxy used to connect to the server. `http` and `socks5` is supported.
nodelay = true # Optional. Determine whether to enable TCP_NODELAY, if applicable, to improve the latency but decrease the bandwidth. Default: true
keepalive_secs = 20 # Optional. Specify `tcp_keepalive_time` in `tcp(7)`, if applicable. Default: 20 seconds
keepalive_interval = 8 # Optional. Specify `tcp_keepalive_intvl` in `tcp(7)`, if applicable. Default: 8 seconds

[client.transport.tls] # Necessary if `type` is "tls"
trusted_root = "ca.pem" # Necessary. The certificate of CA that signed the server's certificate
hostname = "example.com" # Optional. The hostname that the client uses to validate the certificate. If not set, fallback to `client.remote_addr`

[client.transport.noise] # Noise protocol. See `docs/transport.md` for further explanation
pattern = "Noise_NK_25519_ChaChaPoly_BLAKE2s" # Optional. Default value as shown
local_private_key = "key_encoded_in_base64" # Optional
remote_public_key = "key_encoded_in_base64" # Optional

[client.transport.websocket] # Necessary if `type` is "websocket"
tls = true # If `true` then it will use settings in `client.transport.tls`

[client.services.service1] # A service that needs forwarding. The name `service1` can change arbitrarily, as long as identical to the name in the server's configuration
type = "tcp" # Optional. The protocol that needs forwarding. Possible values: ["tcp", "udp"]. Default: "tcp"
token = "whatever" # Necessary if `client.default_token` not set
local_addr = "127.0.0.1:1081" # Necessary. The address of the service that needs to be forwarded
nodelay = true # Optional. Override the `client.transport.nodelay` per service
retry_interval = 1 # Optional. The interval between retry to connect to the server. Default: inherits the global config

[client.services.service2] # Multiple services can be defined
local_addr = "127.0.0.1:1082"

[server]
bind_addr = "0.0.0.0:2333" # Necessary. The address that the server listens for clients. Generally only the port needs to be change.
default_token = "default_token_if_not_specify" # Optional
heartbeat_interval = 30 # Optional. The interval between two application-layer heartbeat. Set to 0 to disable sending heartbeat. Default: 30 seconds

[server.transport] # Same as `[client.transport]`
type = "tcp"

[server.transport.tcp] # Same as the client
nodelay = true
keepalive_secs = 20
keepalive_interval = 8

[server.transport.tls] # Necessary if `type` is "tls"
pkcs12 = "identify.pfx" # Necessary. pkcs12 file of server's certificate and private key
pkcs12_password = "password" # Necessary. Password of the pkcs12 file

[server.transport.noise] # Same as `[client.transport.noise]`
pattern = "Noise_NK_25519_ChaChaPoly_BLAKE2s"
local_private_key = "key_encoded_in_base64"
remote_public_key = "key_encoded_in_base64"

[server.transport.websocket] # Necessary if `type` is "websocket"
tls = true # If `true` then it will use settings in `server.transport.tls`

[server.services.service1] # The service name must be identical to the client side
type = "tcp" # Optional. Same as the client `[client.services.X.type]
token = "whatever" # Necessary if `server.default_token` not set
bind_addr = "0.0.0.0:8081" # Necessary. The address of the service is exposed at. Generally only the port needs to be change.
nodelay = true # Optional. Same as the client

[server.services.service2]
bind_addr = "0.0.0.1:8082"
Logging
rathole, like many other Rust programs, use environment variables to control the logging level. info, warn, error, debug, trace are available.
RUST_LOG=error ./rathole config.toml
will run rathole with only error level logging.
If RUST_LOG is not present, the default logging level is info.
Tuning
From v0.4.7, rathole enables TCP_NODELAY by default, which should benefit the latency and interactive applications like rdp, Minecraft servers. However, it slightly decreases the bandwidth.
If the bandwidth is more important, TCP_NODELAY can be opted out with nodelay = false.
Benchmark
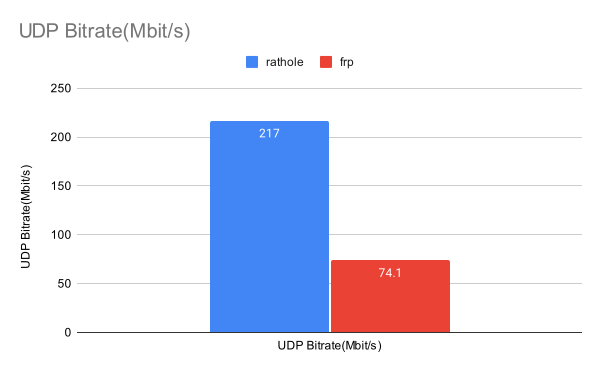
rathole has similar latency to frp, but can handle a more connections, provide larger bandwidth, with less memory usage.
For more details, see the separate page Benchmark.
However, don't take it from here that rathole can magically make your forwarded service faster several times than before. The benchmark is done on local loopback, indicating the performance when the task is cpu-bounded. One can gain quite a improvement if the network is not the bottleneck. Unfortunately, that's not true for many users. In that case, the main benefit is lower resource consumption, while the bandwidth and the latency may not improved significantly.
Planning
- HTTP APIs for configuration
Out of Scope lists features that are not planned to be implemented and why.

 Rathole 是一个用 Rust 编写的安全、稳定、高性能反向代理,可以通过一台拥有公网 IP 的服务器,把位于 NAT 后面的设备上运行的服务暴露到互联网上,类似于 frp 和 ngrok。