Drop a shape, cut a hole, round an edge, print it. In your browser, with no account and no CAD background.
layerling (henmedia/layerling)
Searching Database…
The project's README from github.com/henmedia/layerling. As one markdown file: README.md.

|
layerlingEasy 3D CAD for 3D printingDrop a shape, cut a hole, round an edge, print it. In your browser, with no account and no CAD background. |




English · Deutsch · Nederlands
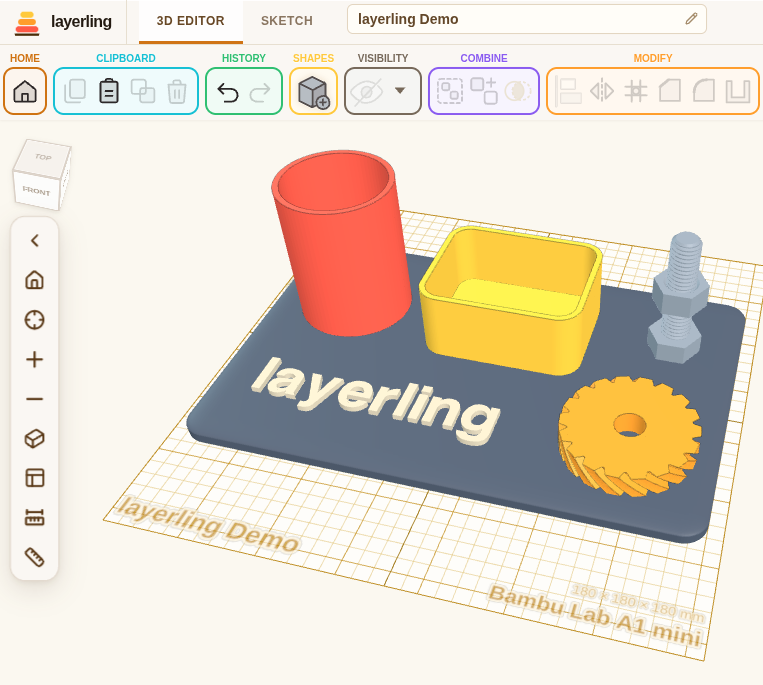
layerling in the browser
User guide, step by step and with pictures
You own a 3D printer. You want a part that fits something, not a career in CAD.
layerling works the way you already think: put a shape on the plate, drag it to size, turn a second shape into a hole, group the two, export, print. There is nothing to learn before you start and nothing to sign up for – open the page and build. Your designs stay in your own browser: no account, no cloud, nothing uploaded anywhere.
layerling sits a step beyond Tinkercad towards Fusion 360: it is operated the same way, so you will recognise everything – the plate, the shapes, solids and holes, group and ungroup, bundle, Alt-drag for a copy – but it does not stop where Tinkercad does. Things you have been missing are waiting for you:
It is not a full CAD package: there is no parametric timeline and no assemblies. And you can run it yourself: install it as an app (it then starts without internet), or host your own copy on Windows, a NAS or a home server – see Getting Started.
An AI can build along with you. layerling ships an MCP server. An AI client such as Gemini, Claude or Codex sees an open editor tab and works in it: add shapes, change measurements, group, cut, round edges, read the scene back, take pictures of the viewport. You describe the part, the AI builds it, you watch it happen and step in whenever you want. This runs locally, with nothing leaving the browser – see layerling MCP Skill for the setup.
.mtl – or a coloured 3MF, slicer projects included, comes in as one body per colour, and a 3MF with several objects as one body per object..lyl file and carry on elsewhere. In Chrome and Edge you choose the folder yourself and Ctrl+S saves into that same file again; other browsers download it. Older .skf files from earlier versions still open; saving then writes a .lyl beside them..lyl and a text with the version, browser and last messages, ready to attach in the forum or on GitHub, which refuse a bare .lyl.Made by others, not by this project:
The shortest way is the hosted version. Nothing to install, nothing to sign up for – open it and build:
The rest of this section is about running your own copy: on your computer, or on a machine in the workshop that everyone opens in their browser. Wherever the app is served from, the designs never leave the browser they were made in, and exports download straight to the person's own computer.
Never used a terminal before? On a Windows 11 (or current Windows 10) machine with nothing installed yet, open PowerShell (search for it in the Start menu, no administrator rights needed) and paste this one line:
irm https://raw.githubusercontent.com/henmedia/layerling/main/scripts/windows-quickstart.ps1 | iex
It installs Git and Node.js if they are missing, downloads layerling into %USERPROFILE%\layerling, and opens it in
your browser at http://127.0.0.1:3000/. Leave the PowerShell window open while you use layerling; Ctrl+C in that
window stops it.
Run the very same line again whenever you want to update layerling – it notices the existing folder and pulls the
latest version instead of downloading it a second time. The script itself lives at
scripts/windows-quickstart.ps1, so you can read exactly what it does before
running it, or download it and run it locally instead of piping it into PowerShell.
The one-liner above also leaves a shortcut named “Start layerling” on your desktop. Double-click it whenever you want to open layerling again – no PowerShell, no re-installing, no re-downloading, just the server starting and your browser opening on its own. It also updates layerling first (when the folder has no changes of your own) and opens the browser only once the server is really ready. If layerling is already running, it starts no second server and does not update underneath the running one - it just opens the page. Wanted layerling somewhere else, say on another drive? Run the script with the folder you want:
& ([scriptblock]::Create((irm https://raw.githubusercontent.com/henmedia/layerling/main/scripts/windows-quickstart.ps1))) -InstallPath "D:\3DPrinter\Layerling"
If your shortcut was made by an older version of the script, run the one-liner once more; it replaces the shortcut with the new one.
Prefer doing it by hand? Open PowerShell and run:
cd $env:USERPROFILE\layerling
npm run dev
then open http://127.0.0.1:3000/ yourself. Ctrl+C in that window stops it either way.
To run layerling on a computer, NAS (Synology, Unraid, etc.) or home server without installing Node.js, use the ready-made image henmedia/layerling on Docker Hub (also at ghcr.io/henmedia/layerling, the same image). Every release publishes it for amd64 and arm64 (Raspberry Pi, ARM NAS) under its version number and as latest. The app listens on port 3000.
The quickest way is a single command:
docker run -d --name layerling -p 3000:3000 --restart unless-stopped ghcr.io/henmedia/layerling:latest
On a NAS with a container manager (Synology Container Manager, Unraid, Portainer), search for henmedia/layerling in its registry (Docker Hub) or enter henmedia/layerling:latest, and map port 3000. To update, pull the image again and recreate the container (or let Watchtower do it).
The image tags are plain version numbers without a "v": ghcr.io/henmedia/layerling:1.42.0, while the GitHub release is called v1.42.0. A pull only fetches the new image; a container that already exists keeps running the old one until it is removed and created again:
docker pull ghcr.io/henmedia/layerling:latest
docker stop layerling
docker rm layerling
docker run -d --name layerling -p 3000:3000 --restart unless-stopped ghcr.io/henmedia/layerling:latest
docker inspect layerling | grep image.version shows which version the container really runs. If you mounted a folder for the server storage, add the same -v option again.
To build the image yourself instead, use the included Dockerfile and compose.yml:
docker compose or the standalone docker-compose).git clone https://github.com/henmedia/layerling.git
cd layerling
docker compose -f docker/compose.yml up -d --build
docker-compose instead of docker compose. Docker builds the image and runs the container in the background (-d); the first build takes about 2–3 minutes. Without --build, the same command pulls the ready-made image instead.http://localhost:3000/, from other devices on your network at http://<YOUR-SERVER-IP>:3000/.Everyday commands:
docker compose -f docker/compose.yml downdocker compose -f docker/compose.yml up -ddocker compose -f docker/compose.yml up -d --build; with the ready-made image docker compose -f docker/compose.yml pull and then up -dInstalling as an app and offline use need https, and the static export. A browser installs an app and keeps it for offline use only on https:// or on localhost; on a plain http://192.168.x.x:3000 address it offers neither (layerling hides its install hint there). Even with https, the offline files (sw.js) are written only into the static export (see Static Hosting), not into this image, which runs the server version. For installing and offline use on a network, serve the static export over https; for an https address in front of the container, use a reverse proxy such as Caddy or nginx with a certificate (for example from mkcert).
The image runs next start in production mode, so the MCP bridge is off there unless you switch it on (see Letting an AI client reach a copy on a NAS or server). To offer a shared project folder, bind a writable directory and set LAYERLING_SHARED_PROJECTS_DIR in compose.yml to the path inside the container where it is mounted, for example ./shared-projects:/shared-projects with LAYERLING_SHARED_PROJECTS_DIR: "/shared-projects" (see Shared Designs on a Network). The container runs as the user with the number 999, so that user must be allowed to write to the folder: sudo chown 999:999 ./shared-projects, or add user: "1000:1000" to the service (your own user and group numbers, id -u and id -g show them) so that the container runs as you. Without it the folder shows up on the start page but nothing can be saved there. After changing it, run docker compose up -d: docker compose restart keeps the old setting. docker exec <container> printenv LAYERLING_SHARED_PROJECTS_DIR shows the one in use.
To choose the colour theme people get on their first visit, set LAYERLING_DEFAULT_THEME to system, light, dark or graphite (the same way, in compose.yml or in the environment of npm run start). Anyone who has opened layerling before keeps the theme their browser already has, and anyone can still change it with the theme switch. Without the setting the theme follows the system. A copy served as plain files has no server to read it, so it does not apply there.
With the shared folder on, LAYERLING_NEW_DESIGNS_ON_SERVER makes new designs start on the server: true is the start for people who have not chosen (they can untick New designs on the server on the start page), always holds for everyone and locks the tick. It is set the same way, and a copy served as plain files has no server to read it.
Any web server can serve layerling as plain files; no Node.js runs on it. Build the files once on a computer that has Node.js (see What You Need):
npm install
npm run export
The finished site is in apps/web/.next-export/. Copy the contents of that folder (not the folder itself) into the web server's document root, so that index.html lies directly in it.
Four things to know:
/_next/...), so layerling must be served at the root of an address, such as https://layerling.example.com/ or http://192.168.0.5:8080/. It does not work in a subfolder (https://example.com/layerling/) and cannot be opened from disk (file://). If you only see a block of plain text without any styling, the script and style files did not load: open the browser's developer tools (F12), look at the Network tab for red /_next/... entries and compare their address with where you put the files..nojekyll file, for example), and _next holds the whole program.npx serve apps/web/.next-export and open the address it prints.sw.js), but a browser uses them only on an https:// address or on localhost, not on a plain http:// address in your network.layerling itself is only files, so the shared folder needs something on the server that can write. There are two ways, and you need just one of them: Node or Docker (this section, with LAYERLING_SHARED_PROJECTS_DIR), or a plain web server with PHP (the store folder, further down). A web server that serves the files without either of them – npx serve, nginx or Apache without PHP – shows layerling fine, but has no server folder.
If you run layerling with npm run dev or npm run start on a machine other people open in their browser, it can offer a
shared folder for .lyl designs. npm run start serves what npm run build made, so run that once first. Point LAYERLING_SHARED_PROJECTS_DIR at a directory the user who starts layerling may write to (a folder under /srv often belongs to root, make one of your own or change its owner) and start:
LAYERLING_SHARED_PROJECTS_DIR=/srv/layerling-projects npm run start
The start page then shows a folder named On the server beside your browser designs. Open it and you are in that
folder: New design starts one right there, New folder makes a subfolder, and a trail under the heading says where
you are. A .. tile leads back out, and Back to designs in this browser at the left of the buttons returns to the designs of this browser. Designs move by dragging them onto a folder, onto that tile or onto a step of the
trail – or through Move to … in their menu. A design from your browser goes onto the server the same way: drag its
card onto the server folder.
Two buttons on the start page save the trouble of moving designs one by one: Put all on the server moves every design of this browser into the server folder in one go, and the tick New designs on the server makes each new design start in the server folder, so it is saved there from the first change on. A design whose name is already taken on the server stays in the browser.
The search box at the top searches the whole server folder, not just the one you are standing in. Every hit says which folder holds it, and that folder is a button: one click and you are there, with the search cleared. Folders are found by name too. While you are searching, the server tile on the start page says how many matches are waiting over there.
Duplicate in a design's menu makes a copy of it. On the server the file itself is copied, next to the original and under a free name, picture and all – nothing is repacked, so the copy carries exactly the geometry of the original. In your browser the copy becomes a design of its own, with the same shapes, the same history and its own preview picture, and it belongs to nobody on the server.
A design that lives on the server saves itself back there, five seconds after the last change and when you leave the
editor. Thumbnails land beside the files in .thumbnails. Designs that are only in your browser stay there, untouched.
Custom shapes saved to the server go into a folder named Custom shapes at the top of the store, one .lyl with its
picture each. layerling creates it with the first such shape; it is an ordinary folder, so it shows on the start page and
a shape in it opens and saves like any design. Neither the Node route nor store.php needs anything extra for it.
Opening a design from the server gives you a private local working copy. Saving back checks the revision on the server first; if someone else changed the file in the meantime, layerling refuses to overwrite it and asks you to reload or save under a different name. This is shared file storage, not simultaneous editing.
store FolderAn installation served as a static export – plain files on a web server – cannot write anything by itself. For that case
store.php travels with the export. Create a folder named store next to index.html that the web server may write to,
and layerling offers the same shared storage as above, folders and all. Without the folder the feature stays invisible,
and the short guide in the editor explains how to switch it on. The web server needs PHP.
The folder has no login: whoever can reach the page can read, write and delete what is in it. On a home network or in a workshop that is the point; on a publicly reachable site, protect it or leave it out.
One thing to remember when deploying: if you mirror the export with an option that removes anything extra – rsync --delete, robocopy /MIR, WinSCP -delete – exclude store explicitly, or every update will wipe the projects.
Take this path if you want to change the code.
Check your versions with node -v and npm -v. If those commands do not work, install Node.js from the official
Node.js website and reopen your terminal.
git clone https://github.com/henmedia/layerling.git
cd layerling
npm install
npm run dev
No Git? Press the green Code button on the GitHub page, choose Download ZIP, extract it, open a terminal in the
extracted folder and start with npm install.
Then open http://127.0.0.1:3000/. Leave the terminal open while you use the app; Ctrl+C stops the development server.
To open the development server from another computer by a name, such as http://myhost.local:3000/, list that name in the environment variable LAYERLING_ALLOWED_DEV_ORIGINS before you start (several names separated by commas, *.local for every name ending in .local). Without it, the development server answers only to localhost and 127.0.0.1. The static export and npm run start do not need it.
On Linux and macOS, scripts/start-layerling.sh does the daily start for you: it updates the checkout first (skipped if you changed files in it), starts the server, waits until it answers and then opens the browser. Run it from anywhere, for example ~/layerling/scripts/start-layerling.sh. It needs Git and Node.js, as above. If layerling already runs on that port, it only opens the browser instead of starting a second server. Port 3000 taken by something else? Start it with PORT=3100 scripts/start-layerling.sh. It has been tried on Debian Linux (without a desktop, so the browser step only prints the address) and in a Windows shell; macOS is untested – if it misbehaves on your system, please tell us in the discussions.
Prefer not to install Node.js? Develop in a container instead. You need a container engine with Compose –
docker compose or podman compose (rootless Podman on SELinux works too; the :z flag in the compose file handles
the file labels):
docker compose -f docker/compose.dev.yml up
Open http://127.0.0.1:3000/. The first start installs dependencies; later starts go straight to the dev server with
hot reload. Stop it with Ctrl+C. If you update dependencies and something looks stale, delete node_modules/ in the
project folder and start again.
Running the production container from docker/compose.yml at the same time? It uses port 3000 as well – change the
host-side port on one of them (e.g. "3100:3000").
| Command | What it does |
|---|---|
npm run typecheck |
TypeScript checks |
npm run test |
Unit tests |
npm run test:e2e |
End-to-end tests |
npm run build |
Production build (npm run start serves it) |
npm run export |
Static export for plain web hosting |
npm run guide |
Build the user guide pages from docs/guide (the export and npm run dev do this too) |
npm run guide:images |
Retake the guide's pictures from the running program (needs npm run dev -- -p 3010; see docs/guide/README.md) |
npm run printers:update |
Refresh the printer presets from OrcaSlicer's profiles |
npm run mcp:layerling |
Start the MCP server for AI clients (see below) |
layerling includes a local MCP server for AI clients that support MCP tools. It lets an agent inspect and control a live editor tab: list open editors, read the scene, create, update and select objects, group, cut and separate parts, list CAD edge ids, apply chamfer or fillet, hollow a body, inspect errors and capture viewport images.
It works against a local development server. In production builds and static hosting the MCP route is disabled, unless the server switches it on with an access token (see below); on layerling.com it is always off.
npm run dev (see Install and Run).http://127.0.0.1:3000/?editor=1 - or leave it out: when no editor is open, the first tool that needs one starts your browser with an editor (not for a copy on a NAS or server; LAYERLING_MCP_OPEN_EDITOR=0 switches it off).node scripts/layerling-mcp-server.mjs.The main tool names are layerling_list_editors, layerling_read_scene, layerling_list_objects,
layerling_create_shape, layerling_update_object, layerling_list_edges, layerling_apply_edge_treatment,
layerling_hollow_object, layerling_array_objects, layerling_set_section_view and layerling_capture_image.
Nothing to install: the repo already ships .mcp.json, which registers the MCP server for this project, and a copy of the
skill at .claude/skills/layerling-mcp-skill, which is where Claude Code looks for one. Open the layerling folder in
Claude Code and ask:
Use the layerling MCP tools to list my open layerling editors and inspect the current scene.
Claude Desktop does not read a project's .mcp.json or skill files, but it can use the same MCP server through its own
config. Add the server there, using docs/mcp/claude-desktop-config.example.json
as the template and replacing the script path with the absolute path on your machine. After restarting Claude Desktop, ask:
Use the layerling MCP tools to list open editors, inspect the scene, and modify the selected object.
Copy the skill from docs/skills/layerling-mcp-skill into your Codex skills folder.
Windows PowerShell:
New-Item -ItemType Directory -Force "$env:USERPROFILE\.codex\skills" | Out-Null
Copy-Item -Recurse -Force "docs\skills\layerling-mcp-skill" "$env:USERPROFILE\.codex\skills\layerling-mcp-skill"
macOS or Linux:
mkdir -p ~/.codex/skills
cp -R docs/skills/layerling-mcp-skill ~/.codex/skills/
Then add an MCP server entry to your Codex config, using docs/mcp/codex-config.example.toml
as the template and replacing the script path with the absolute path on your machine. Restart Codex and ask:
Use $layerling-mcp-skill to list my open layerling editors and inspect the current scene.
For Antigravity, the repo ships a copy of the skill at .agents/skills/layerling-mcp-skill, which Antigravity discovers automatically. For Gemini CLI, copy the skill from docs/skills/layerling-mcp-skill into your global skills folder.
Windows PowerShell:
New-Item -ItemType Directory -Force "$env:USERPROFILE\.gemini\skills" | Out-Null
Copy-Item -Recurse -Force "docs\skills\layerling-mcp-skill" "$env:USERPROFILE\.gemini\skills\layerling-mcp-skill"
macOS or Linux:
mkdir -p ~/.gemini/skills
cp -R docs/skills/layerling-mcp-skill ~/.gemini/skills/
Then add the server to your Gemini CLI settings.json or Antigravity mcp_config.json, using docs/mcp/gemini-config.example.json as the template and replacing the script path with the absolute path on your machine. Restart the client and ask:
Use the layerling MCP tools to list my open layerling editors and inspect the current scene.
A copy you host yourself (the Docker image on a NAS, a home server) can let an AI client drive its open editors over the network. It is off by default, because whoever can drive the bridge can read and change the open designs. Switch it on with two settings on the server, read when it starts - the ready-made image needs no rebuild:
environment:
  LAYERLING_MCP_REMOTE: "true"
  LAYERLING_MCP_TOKEN: "a-long-random-secret-of-at-least-16-characters"
Without a token of at least 16 characters the bridge stays closed. Then:
http://nas:3000/?editor=1, and keep it open.LAYERLING_URL=http://nas:3000 and
LAYERLING_MCP_TOKEN=<the token> in its configuration (see the examples in docs/mcp).The token protects the commands: only a client that sends it can list or drive the editors. The editor pages need none,
but they only count when they are pages of that copy, opened by an address or a name that only someone in your own
network can use (an IP address, a name without a dot, or one ending in .local or .lan). This keeps a web page on the
internet from reaching your NAS through your browser. If you open the copy under a real domain, for example behind a
reverse proxy, list it in LAYERLING_MCP_ALLOWED_HOSTS (comma-separated). Use this on a network you trust, and use HTTPS
for anything beyond it: the token travels in a header.
Contributions are welcome, and you do not have to be a 3D printing person to help – a clearer sentence in this README counts. Good places to start:
Read .github/CONTRIBUTING.md before opening a pull request. What changed in each version is in the changelog.
Please do not open public issues for security-sensitive reports. Read .github/SECURITY.md for the reporting process.
layerling is a fork of SketchForge-3D by Formsmith746 and the SketchForge contributors. The fork started on 16 September 2026 from SketchForge 1.0.9. SketchForge remains an excellent project and the reason this one exists.
Tinkercad is a trademark of Autodesk, Inc. layerling is an independent project and is not affiliated with, endorsed or sponsored by Autodesk.
Copyright (C) 2026 layerling contributors. Copyright (C) 2026 SketchForge contributors.
layerling is a modified version of SketchForge-3D and is licensed under the GNU Affero General Public License v3.0 only
(AGPL-3.0-only) – the same licence as the original. See LICENSE.
If you modify layerling and let people use the modified version over a network, section 13 of the licence requires you to
offer them the corresponding source code. The dashboard carries a Source link for exactly that: set
NEXT_PUBLIC_SOURCE_CODE_URL at build time to the public URL of the source your build came from.
Drop a shape, cut a hole, round an edge, print it. In your browser, with no account and no CAD background.