frp



README | 中文文档
frp is an open source project with its ongoing development made possible entirely by the support of our awesome sponsors. If you'd like to join them, please consider sponsoring frp's development.
Gold Sponsors

High-performance residential and ISP proxies for developers
90M+ residential IPs worldwide. Rotating IPs, sticky sessions, and traffic that never expires.
From $0.55/GB. Use RAPID10 for 10% off. Try it for free.

The complete IDE crafted for professional Go developers

The sovereign cloud that puts you in control
An open source, self-hosted alternative to public clouds, built for data ownership and privacy
Recall.ai - API for meeting recordings
If you're looking for a meeting recording API, consider checking out Recall.ai,
an API that records Zoom, Google Meet, Microsoft Teams, in-person meetings, and more.
What is frp?
frp is a fast reverse proxy that allows you to expose a local server located behind a NAT or firewall to the Internet. It currently supports TCP and UDP, as well as HTTP and HTTPS protocols, enabling requests to be forwarded to internal services via domain name.
frp also offers a P2P connect mode.
Table of Contents
Development Status
frp is currently under development. You can try the latest release version in the master branch, or use the dev branch to access the version currently in development.
We are currently working on version 2 and attempting to perform some code refactoring and improvements. However, please note that it will not be compatible with version 1.
We will transition from version 0 to version 1 at the appropriate time and will only accept bug fixes and improvements, rather than big feature requests.
About V2
The complexity and difficulty of the v2 version are much higher than anticipated. I can only work on its development during fragmented time periods, and the constant interruptions disrupt productivity significantly. Given this situation, we will continue to optimize and iterate on the current version until we have more free time to proceed with the major version overhaul.
The concept behind v2 is based on my years of experience and reflection in the cloud-native domain, particularly in K8s and ServiceMesh. Its core is a modernized four-layer and seven-layer proxy, similar to envoy. This proxy itself is highly scalable, not only capable of implementing the functionality of intranet penetration but also applicable to various other domains. Building upon this highly scalable core, we aim to implement all the capabilities of frp v1 while also addressing the functionalities that were previously unachievable or difficult to implement in an elegant manner. Furthermore, we will maintain efficient development and iteration capabilities.
In addition, I envision frp itself becoming a highly extensible system and platform, similar to how we can provide a range of extension capabilities based on K8s. In K8s, we can customize development according to enterprise needs, utilizing features such as CRD, controller mode, webhook, CSI, and CNI. In frp v1, we introduced the concept of server plugins, which implemented some basic extensibility. However, it relies on a simple HTTP protocol and requires users to start independent processes and manage them on their own. This approach is far from flexible and convenient, and real-world demands vary greatly. It is unrealistic to expect a non-profit open-source project maintained by a few individuals to meet everyone's needs.
Finally, we acknowledge that the current design of modules such as configuration management, permission verification, certificate management, and API management is not modern enough. While we may carry out some optimizations in the v1 version, ensuring compatibility remains a challenging issue that requires a considerable amount of effort to address.
We sincerely appreciate your support for frp.
Architecture
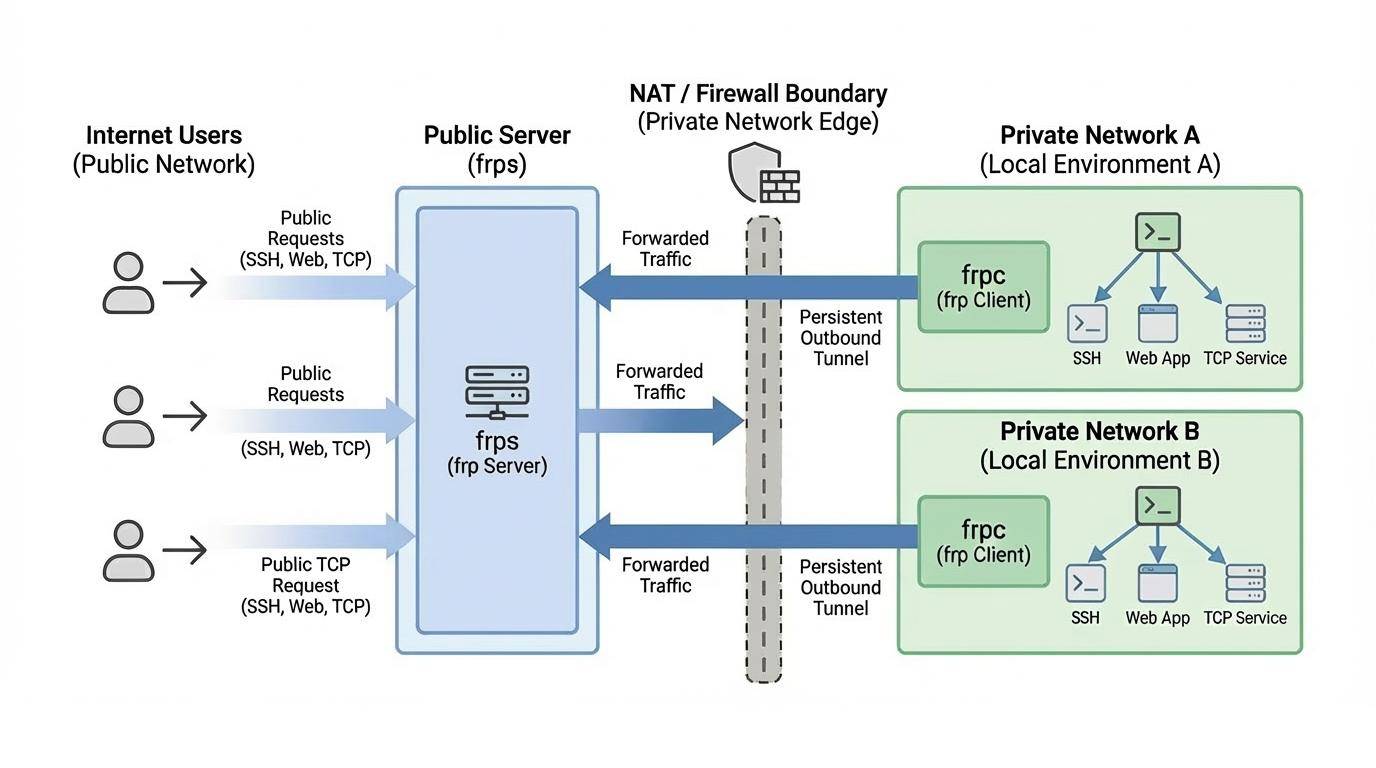
Example Usage
To begin, download the latest program for your operating system and architecture from the Release page.
Next, place the frps binary and server configuration file on Server A, which has a public IP address.
Finally, place the frpc binary and client configuration file on Server B, which is located on a LAN that cannot be directly accessed from the public internet.
Some antiviruses improperly mark frpc as malware and delete it. This is due to frp being a networking tool capable of creating reverse proxies. Antiviruses sometimes flag reverse proxies due to their ability to bypass firewall port restrictions. If you are using antivirus, then you may need to whitelist/exclude frpc in your antivirus settings to avoid accidental quarantine/deletion. See issue 3637 for more details.
Access your computer in a LAN network via SSH
- Modify
frps.toml on server A by setting the bindPort for frp clients to connect to:
# frps.toml
bindPort = 7000
- Start
frps on server A:
./frps -c ./frps.toml
- Modify
frpc.toml on server B and set the serverAddr field to the public IP address of your frps server:
# frpc.toml
serverAddr = "x.x.x.x"
serverPort = 7000

[[proxies]]
name = "ssh"
type = "tcp"
localIP = "127.0.0.1"
localPort = 22
remotePort = 6000
Note that the localPort (listened on the client) and remotePort (exposed on the server) are used for traffic going in and out of the frp system, while the serverPort is used for communication between frps and frpc.
- Start
frpc on server B:
./frpc -c ./frpc.toml
- To access server B from another machine through server A via SSH (assuming the username is
test), use the following command:
ssh -oPort=6000 [email protected]
Multiple SSH services sharing the same port
This example implements multiple SSH services exposed through the same port using a proxy of type tcpmux. Similarly, as long as the client supports the HTTP Connect proxy connection method, port reuse can be achieved in this way.
- Deploy frps on a machine with a public IP and modify the frps.toml file. Here is a simplified configuration:
bindPort = 7000
tcpmuxHTTPConnectPort = 5002
- Deploy frpc on the internal machine A with the following configuration:
serverAddr = "x.x.x.x"
serverPort = 7000

[[proxies]]
name = "ssh1"
type = "tcpmux"
multiplexer = "httpconnect"
customDomains = ["machine-a.example.com"]
localIP = "127.0.0.1"
localPort = 22
- Deploy another frpc on the internal machine B with the following configuration:
serverAddr = "x.x.x.x"
serverPort = 7000

[[proxies]]
name = "ssh2"
type = "tcpmux"
multiplexer = "httpconnect"
customDomains = ["machine-b.example.com"]
localIP = "127.0.0.1"
localPort = 22
- To access internal machine A using SSH ProxyCommand, assuming the username is "test":
ssh -o 'proxycommand socat - PROXY:x.x.x.x:%h:%p,proxyport=5002' [email protected]
- To access internal machine B, the only difference is the domain name, assuming the username is "test":
ssh -o 'proxycommand socat - PROXY:x.x.x.x:%h:%p,proxyport=5002' [email protected]
Accessing Internal Web Services with Custom Domains in LAN
Sometimes we need to expose a local web service behind a NAT network to others for testing purposes with our own domain name.
Unfortunately, we cannot resolve a domain name to a local IP. However, we can use frp to expose an HTTP(S) service.
- Modify
frps.toml and set the HTTP port for vhost to 8080:
# frps.toml
bindPort = 7000
vhostHTTPPort = 8080
If you want to configure an https proxy, you need to set up the vhostHTTPSPort.
- Start
frps:
./frps -c ./frps.toml
- Modify
frpc.toml and set serverAddr to the IP address of the remote frps server. Specify the localPort of your web service:
# frpc.toml
serverAddr = "x.x.x.x"
serverPort = 7000

[[proxies]]
name = "web"
type = "http"
localPort = 80
customDomains = ["www.example.com"]
- Start
frpc:
./frpc -c ./frpc.toml
Map the A record of www.example.com to either the public IP of the remote frps server or a CNAME record pointing to your original domain.
Visit your local web service using url http://www.example.com:8080.
Forward DNS query requests
- Modify
frps.toml:
# frps.toml
bindPort = 7000
- Start
frps:
./frps -c ./frps.toml
- Modify
frpc.toml and set serverAddr to the IP address of the remote frps server. Forward DNS query requests to the Google Public DNS server 8.8.8.8:53:
# frpc.toml
serverAddr = "x.x.x.x"
serverPort = 7000

[[proxies]]
name = "dns"
type = "udp"
localIP = "8.8.8.8"
localPort = 53
remotePort = 6000
- Start frpc:
./frpc -c ./frpc.toml
- Test DNS resolution using the
dig command:
dig @x.x.x.x -p 6000 www.google.com
Forward Unix Domain Socket
Expose a Unix domain socket (e.g. the Docker daemon socket) as TCP.
Configure frps as above.
- Start
frpc with the following configuration:
# frpc.toml
serverAddr = "x.x.x.x"
serverPort = 7000

[[proxies]]
name = "unix_domain_socket"
type = "tcp"
remotePort = 6000
[proxies.plugin]
type = "unix_domain_socket"
unixPath = "/var/run/docker.sock"
- Test the configuration by getting the docker version using
curl:
curl http://x.x.x.x:6000/version
Expose a simple HTTP file server
Expose a simple HTTP file server to access files stored in the LAN from the public Internet.
Configure frps as described above, then:
- Start
frpc with the following configuration:
# frpc.toml
serverAddr = "x.x.x.x"
serverPort = 7000

[[proxies]]
name = "test_static_file"
type = "tcp"
remotePort = 6000
[proxies.plugin]
type = "static_file"
localPath = "/tmp/files"
stripPrefix = "static"
httpUser = "abc"
httpPassword = "abc"
- Visit
http://x.x.x.x:6000/static/ from your browser and specify correct username and password to view files in /tmp/files on the frpc machine.
Enable HTTPS for a local HTTP(S) service
You may substitute https2https for the plugin, and point the localAddr to a HTTPS endpoint.
- Start
frpc with the following configuration:
# frpc.toml
serverAddr = "x.x.x.x"
serverPort = 7000

[[proxies]]
name = "test_https2http"
type = "https"
customDomains = ["test.example.com"]

[proxies.plugin]
type = "https2http"
localAddr = "127.0.0.1:80"
crtPath = "./server.crt"
keyPath = "./server.key"
hostHeaderRewrite = "127.0.0.1"
requestHeaders.set.x-from-where = "frp"
- Visit
https://test.example.com.
Expose your service privately
To mitigate risks associated with exposing certain services directly to the public network, STCP (Secret TCP) mode requires a preshared key to be used for access to the service from other clients.
Configure frps same as above.
- Start
frpc on machine B with the following config. This example is for exposing the SSH service (port 22), and note the secretKey field for the preshared key, and that the remotePort field is removed here:
# frpc.toml
serverAddr = "x.x.x.x"
serverPort = 7000

[[proxies]]
name = "secret_ssh"
type = "stcp"
secretKey = "abcdefg"
localIP = "127.0.0.1"
localPort = 22
- Start another
frpc (typically on another machine C) with the following config to access the SSH service with a security key (secretKey field):
# frpc.toml
serverAddr = "x.x.x.x"
serverPort = 7000

[[visitors]]
name = "secret_ssh_visitor"
type = "stcp"
serverName = "secret_ssh"
secretKey = "abcdefg"
bindAddr = "127.0.0.1"
bindPort = 6000
- On machine C, connect to SSH on machine B, using this command:
ssh -oPort=6000 127.0.0.1
P2P Mode
xtcp is designed to transmit large amounts of data directly between clients. A frps server is still needed, as P2P here only refers to the actual data transmission.
Note that it may not work with all types of NAT devices. You might want to fallback to stcp if xtcp doesn't work.
- Start
frpc on machine B, and expose the SSH port. Note that the remotePort field is removed:
# frpc.toml
serverAddr = "x.x.x.x"
serverPort = 7000
# set up a new stun server if the default one is not available.
# natHoleStunServer = "xxx"

[[proxies]]
name = "p2p_ssh"
type = "xtcp"
secretKey = "abcdefg"
localIP = "127.0.0.1"
localPort = 22
- Start another
frpc (typically on another machine C) with the configuration to connect to SSH using P2P mode:
# frpc.toml
serverAddr = "x.x.x.x"
serverPort = 7000
# set up a new stun server if the default one is not available.
# natHoleStunServer = "xxx"

[[visitors]]
name = "p2p_ssh_visitor"
type = "xtcp"
serverName = "p2p_ssh"
secretKey = "abcdefg"
bindAddr = "127.0.0.1"
bindPort = 6000
# when automatic tunnel persistence is required, set it to true
keepTunnelOpen = false
- On machine C, connect to SSH on machine B, using this command:
ssh -oPort=6000 127.0.0.1
Features
Configuration Files
Since v0.52.0, we support TOML, YAML, and JSON for configuration. Please note that INI is deprecated and will be removed in future releases. New features will only be available in TOML, YAML, or JSON. Users wanting these new features should switch their configuration format accordingly.
Read the full example configuration files to find out even more features not described here.
Examples use TOML format, but you can still use YAML or JSON.
These configuration files is for reference only. Please do not use this configuration directly to run the program as it may have various issues.
Full configuration file for frps (Server)
Full configuration file for frpc (Client)
Using Environment Variables
Environment variables can be referenced in the configuration file, using Go's standard format:
# frpc.toml
serverAddr = "{{ .Envs.FRP_SERVER_ADDR }}"
serverPort = 7000

[[proxies]]
name = "ssh"
type = "tcp"
localIP = "127.0.0.1"
localPort = 22
remotePort = {{ .Envs.FRP_SSH_REMOTE_PORT }}
With the config above, variables can be passed into frpc program like this:
export FRP_SERVER_ADDR=x.x.x.x
export FRP_SSH_REMOTE_PORT=6000
./frpc -c ./frpc.toml
frpc will render configuration file template using OS environment variables. Remember to prefix your reference with .Envs.
You can split multiple proxy configs into different files and include them in the main file.
# frpc.toml
serverAddr = "x.x.x.x"
serverPort = 7000
includes = ["./confd/*.

 frp 是一个快速的反向代理工具,可以把位于 NAT 或防火墙后面的本地服务器暴露到互联网上,转发 TCP、UDP、HTTP 和 HTTPS 流量;还可以选择开启 P2P 模式,实现客户端之间的直接传输。