OpenClaw on Cloudflare Workers
Run OpenClaw (formerly Moltbot, formerly Clawdbot) personal AI assistant in a Cloudflare Sandbox.

Experimental: This is a proof of concept demonstrating that OpenClaw can run in Cloudflare Sandbox. It is not officially supported and may break without notice. Use at your own risk.

Requirements
The following Cloudflare features used by this project have free tiers:
- Cloudflare Access (authentication)
- Browser Rendering (for browser navigation)
- AI Gateway (optional, for API routing/analytics)
- R2 Storage (optional, for persistence)
Container Cost Estimate
This project uses a standard-1 Cloudflare Container instance (1/2 vCPU, 4 GiB memory, 8 GB disk). Below are approximate monthly costs assuming the container runs 24/7, based on Cloudflare Containers pricing:
| Resource |
Provisioned |
Monthly Usage |
Included Free |
Overage |
Approx. Cost |
| Memory |
4 GiB |
2,920 GiB-hrs |
25 GiB-hrs |
2,895 GiB-hrs |
~$26/mo |
| CPU (at ~10% utilization) |
1/2 vCPU |
~2,190 vCPU-min |
375 vCPU-min |
~1,815 vCPU-min |
~$2/mo |
| Disk |
8 GB |
5,840 GB-hrs |
200 GB-hrs |
5,640 GB-hrs |
~$1.50/mo |
| Workers Paid plan |
|
|
|
|
$5/mo |
| Total |
|
|
|
|
~$34.50/mo |
Notes:
- CPU is billed on active usage only, not provisioned capacity. The 10% utilization estimate is a rough baseline for a lightly-used personal assistant; your actual cost will vary with usage.
- Memory and disk are billed on provisioned capacity for the full time the container is running.
- To reduce costs, configure
SANDBOX_SLEEP_AFTER (e.g., 10m) so the container sleeps when idle. A container that only runs 4 hours/day would cost roughly ~$5-6/mo in compute on top of the $5 plan fee.
- Network egress, Workers/Durable Objects requests, and logs are additional but typically minimal for personal use.
- See the instance types table for other options (e.g.,
lite at 256 MiB/$0.50/mo memory or standard-4 at 12 GiB for heavier workloads).
What is OpenClaw?
OpenClaw (formerly Moltbot, formerly Clawdbot) is a personal AI assistant with a gateway architecture that connects to multiple chat platforms. Key features:
- Control UI - Web-based chat interface at the gateway
- Multi-channel support - Telegram, Discord, Slack
- Device pairing - Secure DM authentication requiring explicit approval
- Persistent conversations - Chat history and context across sessions
- Agent runtime - Extensible AI capabilities with workspace and skills
This project packages OpenClaw to run in a Cloudflare Sandbox container, providing a fully managed, always-on deployment without needing to self-host. Optional R2 storage enables persistence across container restarts.
Architecture

Quick Start
Cloudflare Sandboxes are available on the Workers Paid plan.
# Install dependencies
npm install

# Set your API key (direct Anthropic access)
npx wrangler secret put ANTHROPIC_API_KEY

# Or use Cloudflare AI Gateway instead (see "Optional: Cloudflare AI Gateway" below)
# npx wrangler secret put CLOUDFLARE_AI_GATEWAY_API_KEY
# npx wrangler secret put CF_AI_GATEWAY_ACCOUNT_ID
# npx wrangler secret put CF_AI_GATEWAY_GATEWAY_ID

# Generate and set a gateway token (required for remote access)
# Save this token - you'll need it to access the Control UI
export MOLTBOT_GATEWAY_TOKEN=$(openssl rand -hex 32)
echo "Your gateway token: $MOLTBOT_GATEWAY_TOKEN"
echo "$MOLTBOT_GATEWAY_TOKEN" | npx wrangler secret put MOLTBOT_GATEWAY_TOKEN

# Deploy
npm run deploy
After deploying, open the Control UI with your token:
https://your-worker.workers.dev/?token=YOUR_GATEWAY_TOKEN
Replace your-worker with your actual worker subdomain and YOUR_GATEWAY_TOKEN with the token you generated above.
Note: The first request may take 1-2 minutes while the container starts.
Important: You will not be able to use the Control UI until you complete the following steps. You MUST:
- Set up Cloudflare Access to protect the admin UI
- Pair your device via the admin UI at
/_admin/
You'll also likely want to enable R2 storage so your paired devices and conversation history persist across container restarts (optional but recommended).
Setting Up the Admin UI
To use the admin UI at /_admin/ for device management, you need to:
- Enable Cloudflare Access on your worker
- Set the Access secrets so the worker can validate JWTs
1. Enable Cloudflare Access on workers.dev
The easiest way to protect your worker is using the built-in Cloudflare Access integration for workers.dev:
- Go to the Workers & Pages dashboard
- Select your Worker (e.g.,
moltbot-sandbox)
- In Settings, under Domains & Routes, in the
workers.dev row, click the meatballs menu (...)
- Click Enable Cloudflare Access
- Copy the values shown in the dialog (you'll need the AUD tag later). Note: The "Manage Cloudflare Access" link in the dialog may 404 — ignore it.
- To configure who can access, go to Zero Trust in the Cloudflare dashboard sidebar → Access → Applications, and find your worker's application:
- Add your email address to the allow list
- Or configure other identity providers (Google, GitHub, etc.)
- Copy the Application Audience (AUD) tag from the Access application settings. This will be your
CF_ACCESS_AUD in Step 2 below
2. Set Access Secrets
After enabling Cloudflare Access, set the secrets so the worker can validate JWTs:
# Your Cloudflare Access team domain (e.g., "myteam.cloudflareaccess.com")
npx wrangler secret put CF_ACCESS_TEAM_DOMAIN

# The Application Audience (AUD) tag from your Access application that you copied in the step above
npx wrangler secret put CF_ACCESS_AUD
You can find your team domain in the Zero Trust Dashboard under Settings > Custom Pages (it's the subdomain before .cloudflareaccess.com).
3. Redeploy
npm run deploy
Now visit /_admin/ and you'll be prompted to authenticate via Cloudflare Access before accessing the admin UI.
Alternative: Manual Access Application
If you prefer more control, you can manually create an Access application:
- Go to Cloudflare Zero Trust Dashboard
- Navigate to Access > Applications
- Create a new Self-hosted application
- Set the application domain to your Worker URL (e.g.,
moltbot-sandbox.your-subdomain.workers.dev)
- Add paths to protect:
/_admin/*, /api/*, /debug/*
- Configure your desired identity providers (e.g., email OTP, Google, GitHub)
- Copy the Application Audience (AUD) tag and set the secrets as shown above
Local Development
For local development, create a .dev.vars file with:
DEV_MODE=true               # Skip Cloudflare Access auth + bypass device pairing
DEBUG_ROUTES=true           # Enable /debug/* routes (optional)
Authentication
By default, moltbot uses device pairing for authentication. When a new device (browser, CLI, etc.) connects, it must be approved via the admin UI at /_admin/.
Device Pairing
- A device connects to the gateway
- The connection is held pending until approved
- An admin approves the device via
/_admin/
- The device is now paired and can connect freely
This is the most secure option as it requires explicit approval for each device.
Gateway Token (Required)
A gateway token is required to access the Control UI when hosted remotely. Pass it as a query parameter:
https://your-worker.workers.dev/?token=YOUR_TOKEN
wss://your-worker.workers.dev/ws?token=YOUR_TOKEN
Note: Even with a valid token, new devices still require approval via the admin UI at /_admin/ (see Device Pairing above).
For local development only, set DEV_MODE=true in .dev.vars to skip Cloudflare Access authentication and enable allowInsecureAuth (bypasses device pairing entirely).
Persistent Storage (R2)
By default, moltbot data (configs, paired devices, conversation history) is lost when the container restarts. To enable persistent storage across sessions, configure R2:
1. Create R2 API Token
- Go to R2 > Overview in the Cloudflare Dashboard
- Click Manage R2 API Tokens
- Create a new token with Object Read & Write permissions
- Select the
moltbot-data bucket (created automatically on first deploy)
- Copy the Access Key ID and Secret Access Key
2. Set Secrets
# R2 Access Key ID
npx wrangler secret put R2_ACCESS_KEY_ID

# R2 Secret Access Key
npx wrangler secret put R2_SECRET_ACCESS_KEY

# Your Cloudflare Account ID
npx wrangler secret put CF_ACCOUNT_ID
To find your Account ID: Go to the Cloudflare Dashboard, click the three dots menu next to your account name, and select "Copy Account ID".
How It Works
R2 storage uses a backup/restore approach for simplicity:
On container startup:
- If R2 is mounted and contains backup data, it's restored to the moltbot config directory
- OpenClaw uses its default paths (no special configuration needed)
During operation:
- A cron job runs every 5 minutes to sync the moltbot config to R2
- You can also trigger a manual backup from the admin UI at
/_admin/
In the admin UI:
- When R2 is configured, you'll see "Last backup: [timestamp]"
- Click "Backup Now" to trigger an immediate sync
Without R2 credentials, moltbot still works but uses ephemeral storage (data lost on container restart).
Container Lifecycle
By default, the sandbox container stays alive indefinitely (SANDBOX_SLEEP_AFTER=never). This is recommended because cold starts take 1-2 minutes.
To reduce costs for infrequently used deployments, you can configure the container to sleep after a period of inactivity:
npx wrangler secret put SANDBOX_SLEEP_AFTER
# Enter: 10m (or 1h, 30m, etc.)
When the container sleeps, the next request will trigger a cold start. If you have R2 storage configured, your paired devices and data will persist across restarts.
Admin UI
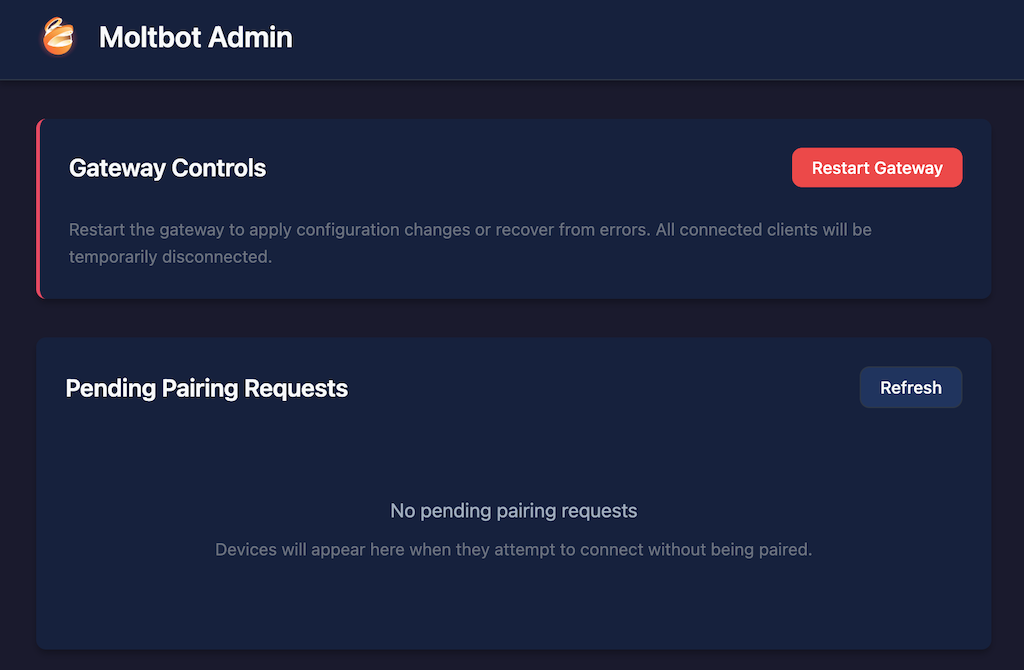
Access the admin UI at /_admin/ to:
- R2 Storage Status - Shows if R2 is configured, last backup time, and a "Backup Now" button
- Restart Gateway - Kill and restart the moltbot gateway process
- Device Pairing - View pending requests, approve devices individually or all at once, view paired devices
The admin UI requires Cloudflare Access authentication (or DEV_MODE=true for local development).
Debug Endpoints
Debug endpoints are available at /debug/* when enabled (requires DEBUG_ROUTES=true and Cloudflare Access):
GET /debug/processes - List all container processesGET /debug/logs?id=<process_id> - Get logs for a specific processGET /debug/version - Get container and moltbot version info
Optional: Chat Channels
Telegram
npx wrangler secret put TELEGRAM_BOT_TOKEN
npm run deploy
Discord
npx wrangler secret put DISCORD_BOT_TOKEN
npm run deploy
Slack
npx wrangler secret put SLACK_BOT_TOKEN
npx wrangler secret put SLACK_APP_TOKEN
npm run deploy
Optional: Browser Automation (CDP)
This worker includes a Chrome DevTools Protocol (CDP) shim that enables browser automation capabilities. This allows OpenClaw to control a headless browser for tasks like web scraping, screenshots, and automated testing.
Setup
- Set a shared secret for authentication:
npx wrangler secret put CDP_SECRET
# Enter a secure random string
- Set your worker's public URL:
npx wrangler secret put WORKER_URL
# Enter: https://your-worker.workers.dev
- Redeploy:
npm run deploy
Endpoints
| Endpoint |
Description |
GET /cdp/json/version |
Browser version information |
GET /cdp/json/list |
List available browser targets |
GET /cdp/json/new |
Create a new browser target |
WS /cdp/devtools/browser/{id} |
WebSocket connection for CDP commands |
All endpoints require authentication via the ?secret=<CDP_SECRET> query parameter.
Built-in Skills
The container includes pre-installed skills in /root/clawd/skills/:
cloudflare-browser
Browser automation via the CDP shim. Requires CDP_SECRET and WORKER_URL to be set (see Browser Automation above).
Scripts:
screenshot.js - Capture a screenshot of a URLvideo.js - Create a video from multiple URLscdp-client.js - Reusable CDP client library
Usage:
# Screenshot
node /root/clawd/skills/cloudflare-browser/scripts/screenshot.js https://example.com output.png

# Video from multiple URLs
node /root/clawd/skills/cloudflare-browser/scripts/video.js "https://site1.com,https://site2.com" output.mp4 --scroll
See skills/cloudflare-browser/SKILL.md for full documentation.
Optional: Cloudflare AI Gateway
You can route API requests through Cloudflare AI Gateway for caching, rate limiting, analytics, and cost tracking. OpenClaw has native support for Cloudflare AI Gateway as a first-class provider.
AI Gateway acts as a proxy between OpenClaw and your AI provider (e.g., Anthropic). Requests are sent to https://gateway.ai.cloudflare.com/v1/{account_id}/{gateway_id}/anthropic instead of directly to api.anthropic.com, giving you Cloudflare's analytics, caching, and rate limiting. You still need a provider API key (e.g., your Anthropic API key) — the gateway forwards it to the upstream provider.
Setup
- Create an AI Gateway in the AI Gateway section of the Cloudflare Dashboard.
- Set the three required secrets:
# Your AI provider's API key (e.g., your Anthropic API key).
# This is passed through the gateway to the upstream provider.
npx wrangler secret put CLOUDFLARE_AI_GATEWAY_API_KEY

# Your Cloudflare account ID
npx wrangler secret put CF_AI_GATEWAY_ACCOUNT_ID

# Your AI Gateway ID (from the gateway overview page)
npx wrangler secret put CF_AI_GATEWAY_GATEWAY_ID
All three are required. OpenClaw constructs the gateway URL from the account ID and gateway ID, and passes the API key to the upstream provider through the gateway.
- Redeploy:
npm run deploy
When Cloudflare AI Gateway is configured, it takes precedence over direct ANTHROPIC_API_KEY or OPENAI_API_KEY.
Choosing a Model
By default, AI Gateway uses Anthropic's Claude Sonnet 4.5. To use a different model or provider, set CF_AI_GATEWAY_MODEL with the format provider/model-id:
npx wrangler secret put CF_AI_GATEWAY_MODEL
# Enter: workers-ai/@cf/meta/llama-3.3-70b-instruct-fp8-fast
This works with any AI Gateway provider:
| Provider |
Example CF_AI_GATEWAY_MODEL value |
API key is... |
| Workers AI |
workers-ai/@cf/meta/llama-3.3-70b-instruct-fp8-fast |
Cloudflare API token |
| OpenAI |
openai/gpt-4o |
OpenAI API key |
| Anthropic |
anthropic/claude-sonnet-4-5 |
Anthropic API key |
| Groq |
groq/llama-3.3-70b |
Groq API key |
Note: CLOUDFLARE_AI_GATEWAY_API_KEY must match the provider you're using — it's your provider's API key, forwarded through the gateway. You can only use one provider at a time through the gateway. For multiple providers, use direct keys (ANTHROPIC_API_KEY, OPENAI_API_KEY) alongside the gateway config.
Workers AI with Unified Billing
With Unified Billing, you can use Workers AI models without a separate provider API key — Cloudflare bills you directly. Set CLOUDFLARE_AI_GATEWAY_API_KEY to your AI Gateway authentication token (the cf-aig-authorization token).
Legacy AI Gateway Configuration
The previous AI_GATEWAY_API_KEY + AI_GATEWAY_BASE_URL approach is still supported for backward compatibility but is deprecated in favor of the native configuration above.
All Secrets Reference
| Secret |
Required |
Description |
CLOUDFLARE_AI_GATEWAY_API_KEY |
Yes* |
Your AI provider's API key, passed through the gateway (e.g., your Anthropic API key). Requires CF_AI_GATEWAY_ACCOUNT_ID and CF_AI_GATEWAY_GATEWAY_ID |
CF_AI_GATEWAY_ACCOUNT_ID |
Yes* |
Your Cloudflare account ID (used to construct the gateway URL) |
CF_AI_GATEWAY_GATEWAY_ID |
Yes* |
Your AI Gateway ID (used to construct the gateway URL) |
CF_AI_GATEWAY_MODEL |
No |
Override default model: provider/model-id (e.g. workers-ai/@cf/meta/llama-3.3-70b-instruct-fp8-fast). See Choosing a Model |
ANTHROPIC_API_KEY |
Yes* |
Direct Anthropic API key (alternative to AI Gateway) |
ANTHROPIC_BASE_URL |
No |
Direct Anthropic API base URL |
OPENAI_API_KEY |
No |
OpenAI API key (alternative provider) |
AI_GATEWAY_API_KEY |
No |
Legacy AI Gateway API key (deprecated, use CLOUDFLARE_AI_GATEWAY_API_KEY instead) |
AI_GATEWAY_BASE_URL |
No |
Legacy AI Gateway endpoint URL (deprecated) |
CF_ACCESS_TEAM_DOMAIN |
Yes* |
Cloudflare Access team domain (required for admin UI) |
CF_ACCESS_AUD |
Yes* |
Cloudflare Access application audience (required for admin UI) |
MOLTBOT_GATEWAY_TOKEN |
Yes |
Gateway token for authentication (pass via ?token= query param) |
DEV_MODE |
No |
Set to true to skip CF Access auth + device pairing (local dev only) |
DEBUG_ROUTES |
No |
Set to true to enable /debug/* routes |
SANDBOX_SLEEP_AFTER |
No |
Container sleep timeout: never (default) or duration like 10m, 1h |
R2_ACCESS_KEY_ID |
No |
R2 access key for persistent storage |
R2_SECRET_ACCESS_KEY |
No |
R2 secret key for persistent storage |
CF_ACCOUNT_ID |
No |
Cloudflare account ID (required for R2 storage) |
TELEGRAM_BOT_TOKEN |
No |
Telegram bot token |
TELEGRAM_DM_POLICY |
No |
Telegram DM policy: pairing (default) or open |
DISCORD_BOT_TOKEN |
No |
Discord bot token |
DISCORD_DM_POLICY |
No |
Discord DM policy: pairing (default) or open |
SLACK_BOT_TOKEN |
No |
Slack bot token |
SLACK_APP_TOKEN |
No |
Slack app token |
CDP_SECRET |
No |
Shared secret for CDP endpoint authentication (see Browser Automation) |
WORKER_URL |
No |
Public URL of the worker ( |

 一个概念验证部署,让 OpenClaw(曾用名 Moltbot、更早叫 Clawdbot)——一个个人 AI 助手——运行在 Workers 上的 Cloudflare Sandbox 容器里,这样不需要自己的服务器也能保持在线。