🦙 LaMa: Resolution-robust Large Mask Inpainting with Fourier Convolutions
by Roman Suvorov, Elizaveta Logacheva, Anton Mashikhin,
Anastasia Remizova, Arsenii Ashukha, Aleksei Silvestrov, Naejin Kong, Harshith Goka, Kiwoong Park, Victor Lempitsky.
🔥🔥🔥
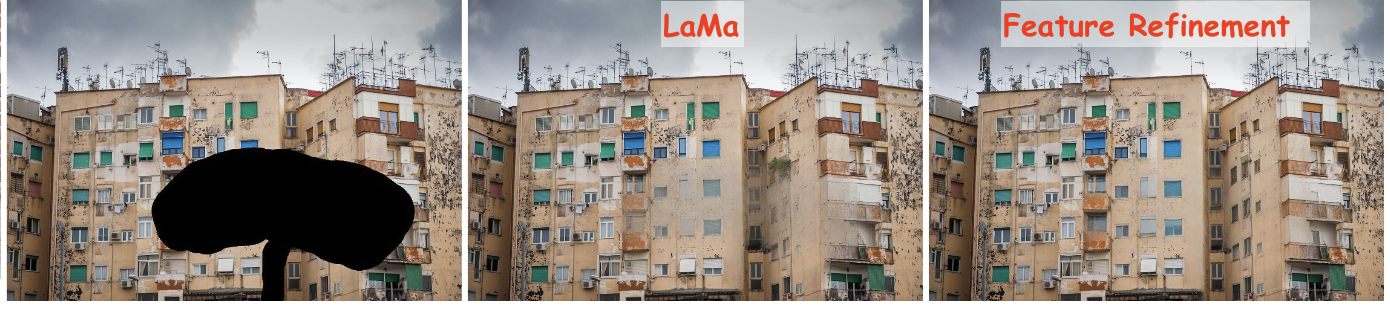
LaMa generalizes surprisingly well to much higher resolutions (~2k❗️) than it saw during training (256x256), and achieves the excellent performance even in challenging scenarios, e.g. completion of periodic structures.
[Project page] [arXiv] [Supplementary] [BibTeX] [Casual GAN Papers Summary]

Try out in Google Colab
All yandex dist links went bad, you can download the model from the https://drive.google.com/drive/folders/1B2x7eQDgecTL0oh3LSIBDGj0fTxs6Ips?usp=sharing
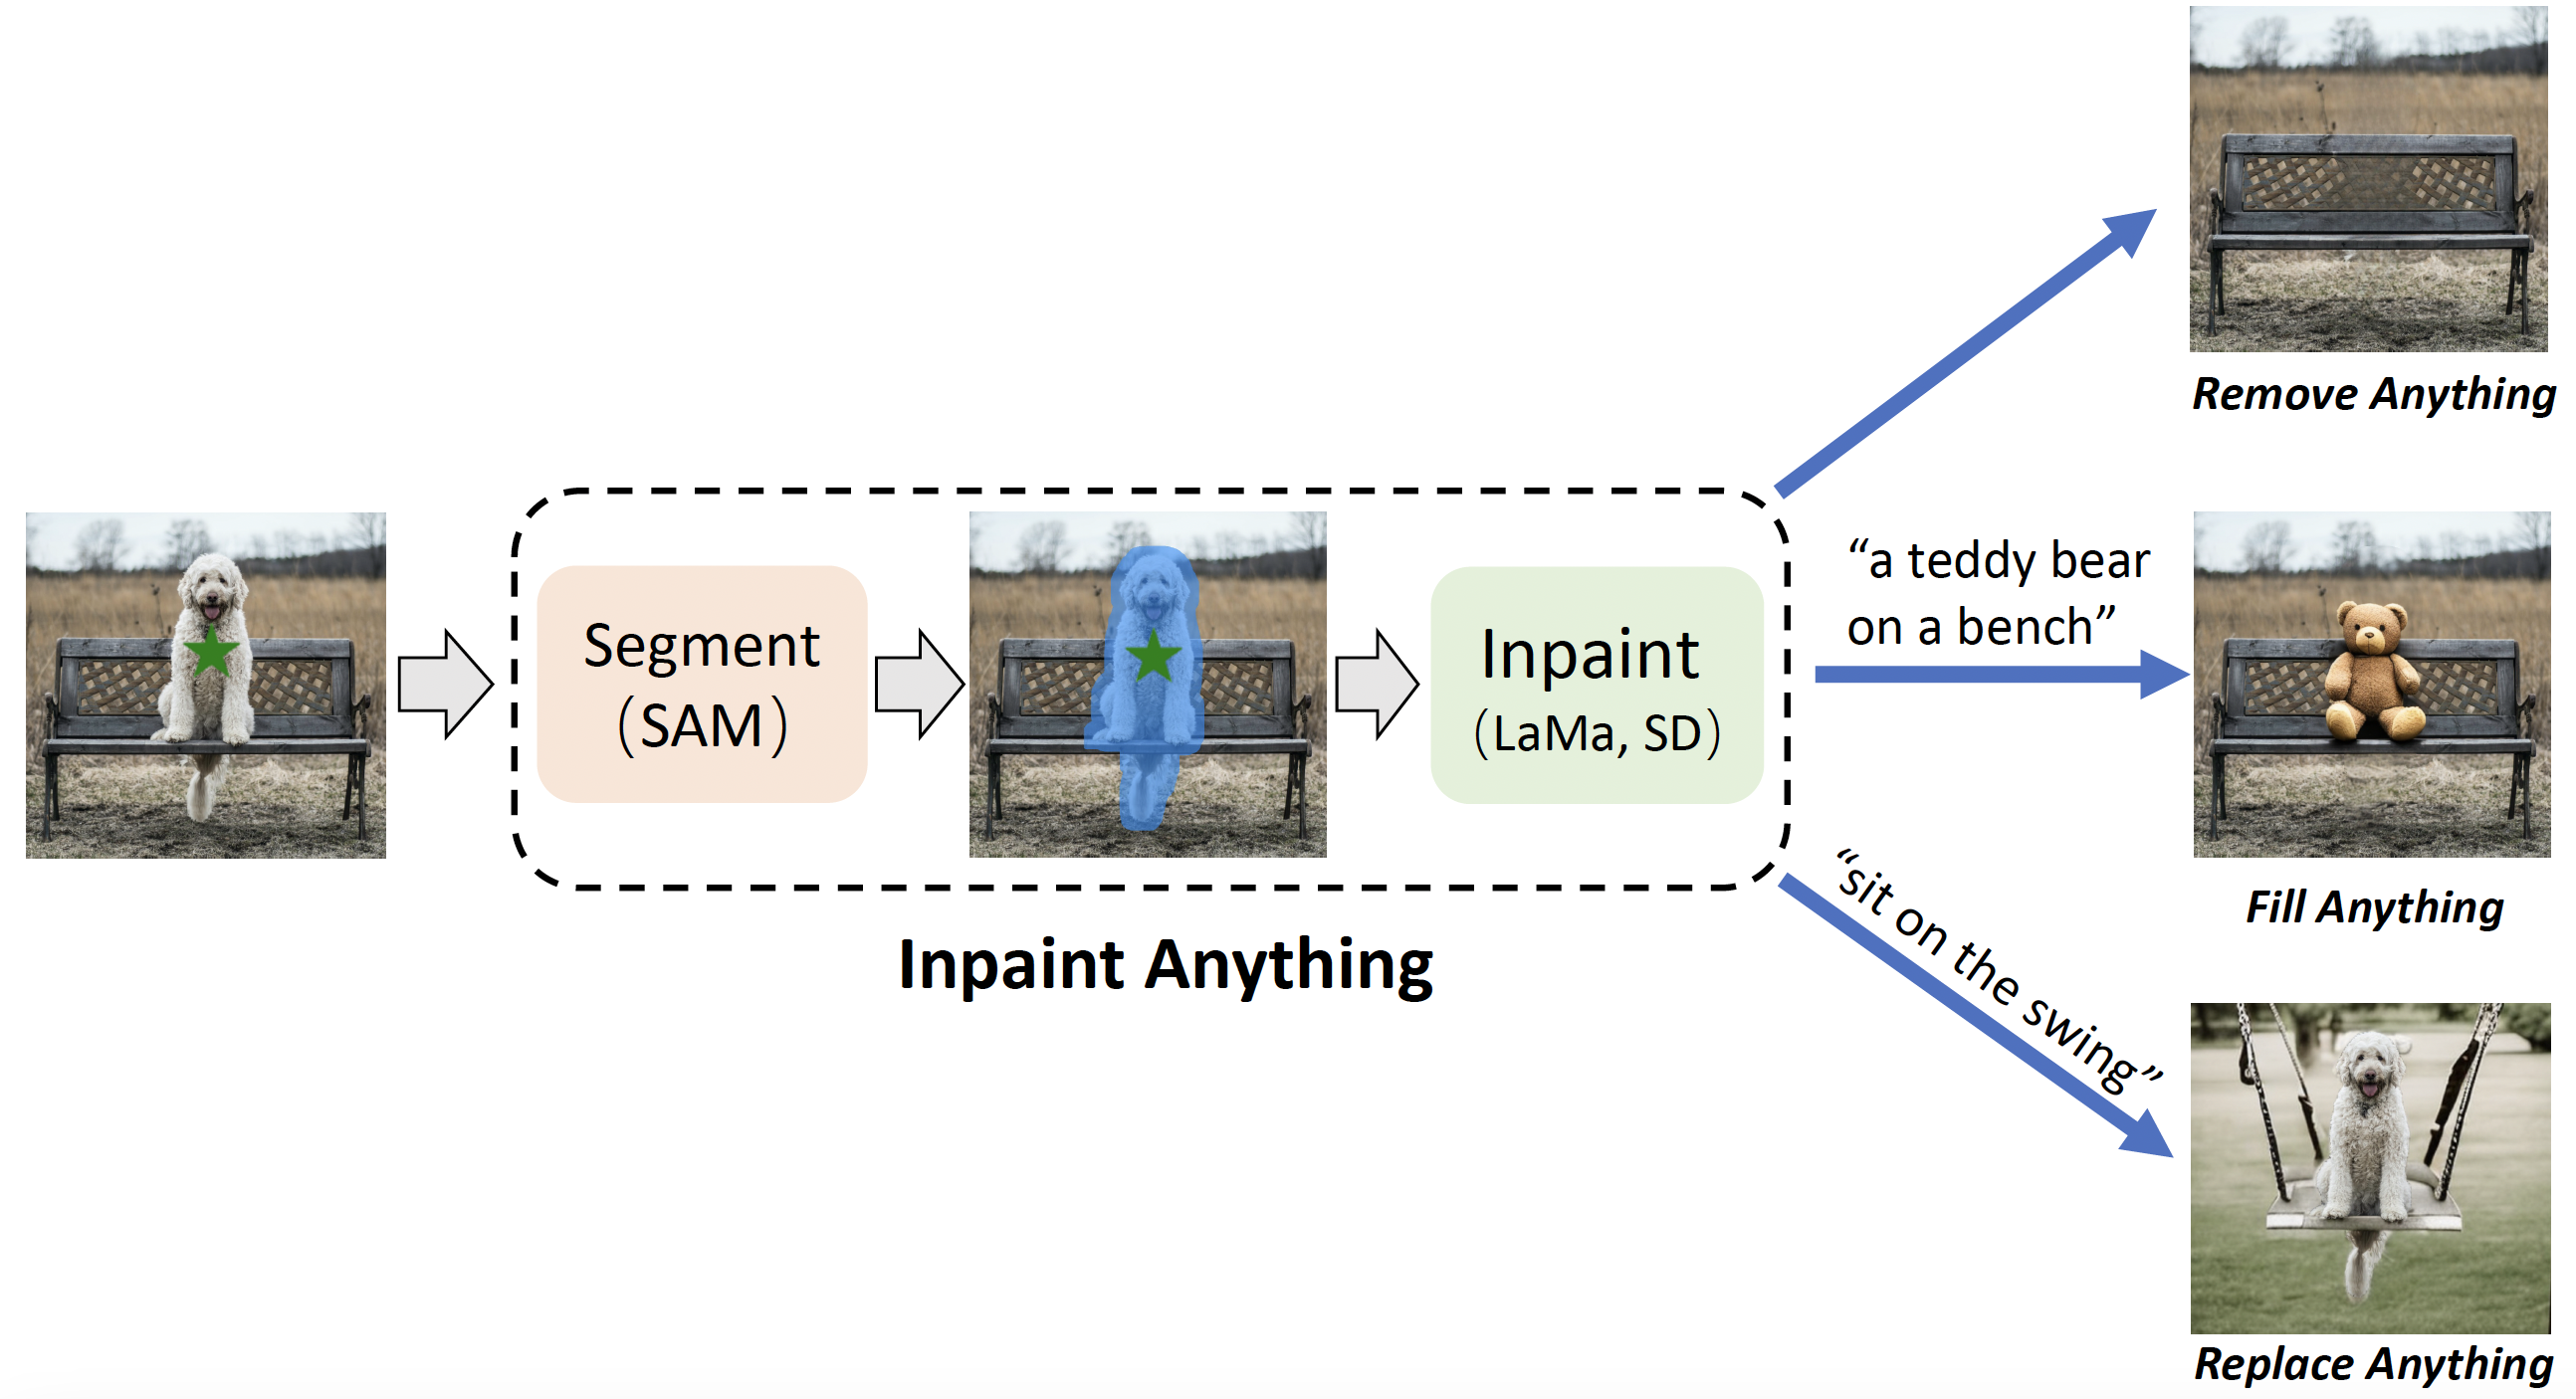
LaMa development
(Feel free to share your paper by creating an issue)
Non-official 3rd party apps:
(Feel free to share your app/implementation/demo by creating an issue)
Environment setup
❗️❗️❗️ All yandex dist links went bad, you can download the model from the google drive ❗️❗️❗️
Clone the repo:
git clone https://github.com/advimman/lama.git
There are three options of an environment:
Python virtualenv:
virtualenv inpenv --python=/usr/bin/python3
source inpenv/bin/activate
pip install torch==1.8.0 torchvision==0.9.0

cd lama
pip install -r requirements.txt
Conda
% Install conda for Linux, for other OS download miniconda at https://docs.conda.io/en/latest/miniconda.html
wget https://repo.anaconda.com/miniconda/Miniconda3-latest-Linux-x86_64.sh
bash Miniconda3-latest-Linux-x86_64.sh -b -p $HOME/miniconda
$HOME/miniconda/bin/conda init bash

cd lama
conda env create -f conda_env.yml
conda activate lama
conda install pytorch torchvision torchaudio cudatoolkit=10.2 -c pytorch -y
pip install pytorch-lightning==1.2.9
Docker: No actions are needed 🎉.
Inference
Run
cd lama
export TORCH_HOME=$(pwd) && export PYTHONPATH=$(pwd)
1. Download pre-trained models
The best model (Places2, Places Challenge):
curl -LJO https://huggingface.co/smartywu/big-lama/resolve/main/big-lama.zip
unzip big-lama.zip
All models (Places & CelebA-HQ):
download [https://drive.google.com/drive/folders/1B2x7eQDgecTL0oh3LSIBDGj0fTxs6Ips?usp=drive_link]
unzip lama-models.zip
2. Prepare images and masks
Download test images:
unzip LaMa_test_images.zip
OR prepare your data:
1) Create masks named as `[images_name]_maskXXX[image_suffix]`, put images and masks in the same folder.
- Specify
image_suffix, e.g. .png or .jpg or _input.jpg in configs/prediction/default.yaml.
3. Predict
On the host machine:
python3 bin/predict.py model.path=$(pwd)/big-lama indir=$(pwd)/LaMa_test_images outdir=$(pwd)/output
OR in the docker
The following command will pull the docker image from Docker Hub and execute the prediction script
bash docker/2_predict.sh $(pwd)/big-lama $(pwd)/LaMa_test_images $(pwd)/output device=cpu
Docker cuda:
bash docker/2_predict_with_gpu.sh $(pwd)/big-lama $(pwd)/LaMa_test_images $(pwd)/output
4. Predict with Refinement
On the host machine:
python3 bin/predict.py refine=True model.path=$(pwd)/big-lama indir=$(pwd)/LaMa_test_images outdir=$(pwd)/output
Train and Eval
Make sure you run:
cd lama
export TORCH_HOME=$(pwd) && export PYTHONPATH=$(pwd)
Then download models for perceptual loss:
mkdir -p ade20k/ade20k-resnet50dilated-ppm_deepsup/
wget -P ade20k/ade20k-resnet50dilated-ppm_deepsup/ http://sceneparsing.csail.mit.edu/model/pytorch/ade20k-resnet50dilated-ppm_deepsup/encoder_epoch_20.pth
Places
⚠️ NB: FID/SSIM/LPIPS metric values for Places that we see in LaMa paper are computed on 30000 images that we produce in evaluation section below.
For more details on evaluation data check [Section 3. Dataset splits in Supplementary] ⚠️
On the host machine:
# Download data from http://places2.csail.mit.edu/download.html
# Places365-Standard: Train(105GB)/Test(19GB)/Val(2.1GB) from High-resolution images section
wget http://data.csail.mit.edu/places/places365/train_large_places365standard.tar
wget http://data.csail.mit.edu/places/places365/val_large.tar
wget http://data.csail.mit.edu/places/places365/test_large.tar

# Unpack train/test/val data and create .yaml config for it
bash fetch_data/places_standard_train_prepare.sh
bash fetch_data/places_standard_test_val_prepare.sh

# Sample images for test and viz at the end of epoch
bash fetch_data/places_standard_test_val_sample.sh
bash fetch_data/places_standard_test_val_gen_masks.sh

# Run training
python3 bin/train.py -cn lama-fourier location=places_standard

# To evaluate trained model and report metrics as in our paper
# we need to sample previously unseen 30k images and generate masks for them
bash fetch_data/places_standard_evaluation_prepare_data.sh

# Infer model on thick/thin/medium masks in 256 and 512 and run evaluation
# like this:
python3 bin/predict.py \
model.path=$(pwd)/experiments/<user>_<date:time>_lama-fourier_/ \
indir=$(pwd)/places_standard_dataset/evaluation/random_thick_512/ \
outdir=$(pwd)/inference/random_thick_512 model.checkpoint=last.ckpt

python3 bin/evaluate_predicts.py \
$(pwd)/configs/eval2_gpu.yaml \
$(pwd)/places_standard_dataset/evaluation/random_thick_512/ \
$(pwd)/inference/random_thick_512 \
$(pwd)/inference/random_thick_512_metrics.csv
Docker: TODO
CelebA
On the host machine:
# Make shure you are in lama folder
cd lama
export TORCH_HOME=$(pwd) && export PYTHONPATH=$(pwd)

# Download CelebA-HQ dataset
# Download data256x256.zip from https://drive.google.com/drive/folders/11Vz0fqHS2rXDb5pprgTjpD7S2BAJhi1P

# unzip & split into train/test/visualization & create config for it
bash fetch_data/celebahq_dataset_prepare.sh

# generate masks for test and visual_test at the end of epoch
bash fetch_data/celebahq_gen_masks.sh

# Run training
python3 bin/train.py -cn lama-fourier-celeba data.batch_size=10

# Infer model on thick/thin/medium masks in 256 and run evaluation
# like this:
python3 bin/predict.py \
model.path=$(pwd)/experiments/<user>_<date:time>_lama-fourier-celeba_/ \
indir=$(pwd)/celeba-hq-dataset/visual_test_256/random_thick_256/ \
outdir=$(pwd)/inference/celeba_random_thick_256 model.checkpoint=last.ckpt
Docker: TODO
Places Challenge
On the host machine:
# This script downloads multiple .tar files in parallel and unpacks them
# Places365-Challenge: Train(476GB) from High-resolution images (to train Big-Lama)
bash places_challenge_train_download.sh

TODO: prepare
TODO: train
TODO: eval
Docker: TODO
Create your data
Please check bash scripts for data preparation and mask generation from CelebaHQ section,
if you stuck at one of the following steps.
On the host machine:
# Make shure you are in lama folder
cd lama
export TORCH_HOME=$(pwd) && export PYTHONPATH=$(pwd)

# You need to prepare following image folders:
$ ls my_dataset
train
val_source # 2000 or more images
visual_test_source # 100 or more images
eval_source # 2000 or more images

# LaMa generates random masks for the train data on the flight,
# but needs fixed masks for test and visual_test for consistency of evaluation.

# Suppose, we want to evaluate and pick best models
# on 512x512 val dataset  with thick/thin/medium masks
# And your images have .jpg extention:

python3 bin/gen_mask_dataset.py \
$(pwd)/configs/data_gen/random_<size>_512.yaml \ # thick, thin, medium
my_dataset/val_source/ \
my_dataset/val/random_<size>_512.yaml \# thick, thin, medium
--ext jpg

# So the mask generator will:
# 1. resize and crop val images and save them as .png
# 2. generate masks

ls my_dataset/val/random_medium_512/
image1_crop000_mask000.png
image1_crop000.png
image2_crop000_mask000.png
image2_crop000.png
...

# Generate thick, thin, medium masks for visual_test folder:

python3 bin/gen_mask_dataset.py \
$(pwd)/configs/data_gen/random_<size>_512.yaml \  #thick, thin, medium
my_dataset/visual_test_source/ \
my_dataset/visual_test/random_<size>_512/ \ #thick, thin, medium
--ext jpg


ls my_dataset/visual_test/random_thick_512/
image1_crop000_mask000.png
image1_crop000.png
image2_crop000_mask000.png
image2_crop000.png
...

# Same process for eval_source image folder:

python3 bin/gen_mask_dataset.py \
$(pwd)/configs/data_gen/random_<size>_512.yaml \  #thick, thin, medium
my_dataset/eval_source/ \
my_dataset/eval/random_<size>_512/ \ #thick, thin, medium
--ext jpg


# Generate location config file which locate these folders:

touch my_dataset.yaml
echo "data_root_dir: $(pwd)/my_dataset/" >> my_dataset.yaml
echo "out_root_dir: $(pwd)/experiments/" >> my_dataset.yaml
echo "tb_dir: $(pwd)/tb_logs/" >> my_dataset.yaml
mv my_dataset.yaml ${PWD}/configs/training/location/


# Check data config for consistency with my_dataset folder structure:
$ cat ${PWD}/configs/training/data/abl-04-256-mh-dist
...
train:
  indir: ${location.data_root_dir}/train
  ...
val:
  indir: ${location.data_root_dir}/val
  img_suffix: .png
visual_test:
  indir: ${location.data_root_dir}/visual_test
  img_suffix: .png


# Run training
python3 bin/train.py -cn lama-fourier location=my_dataset data.batch_size=10

# Evaluation: LaMa training procedure picks best few models according to
# scores on my_dataset/val/

# To evaluate one of your best models (i.e. at epoch=32)
# on previously unseen my_dataset/eval do the following
# for thin, thick and medium:

# infer:
python3 bin/predict.py \
model.path=$(pwd)/experiments/<user>_<date:time>_lama-fourier_/ \
indir=$(pwd)/my_dataset/eval/random_<size>_512/ \
outdir=$(pwd)/inference/my_dataset/random_<size>_512 \
model.checkpoint=epoch32.ckpt

# metrics calculation:
python3 bin/evaluate_predicts.py \
$(pwd)/configs/eval2_gpu.yaml \
$(pwd)/my_dataset/eval/random_<size>_512/ \
$(pwd)/inference/my_dataset/random_<size>_512 \
$(pwd)/inference/my_dataset/random_<size>_512_metrics.csv
OR in the docker:
TODO: train
TODO: eval
Hints
Generate different kinds of masks
The following command will execute a script that generates random masks.
bash docker/1_generate_masks_from_raw_images.sh \
    configs/data_gen/random_medium_512.yaml \
    /directory_with_input_images \
    /directory_where_to_store_images_and_masks \
    --ext png
The test data generation command stores images in the format,
which is suitable for prediction.
The table below describes which configs we used to generate different test sets from the paper.
Note that we do not fix a random seed, so the results will be slightly different each time.
|
Places 512x512 |
CelebA 256x256 |
| Narrow |
random_thin_512.yaml |
random_thin_256.yaml |
| Medium |
random_medium_512.yaml |
random_medium_256.yaml |
| Wide |
random_thick_512.yaml |
random_thick_256.yaml |
Feel free to change the config path (argument #1) to any other config in configs/data_gen
or adjust config files themselves.
Override parameters in configs
Also you can override parameters in config like this:
python3 bin/train.py -cn <config> data.batch_size=10 run_title=my-title
Where .yaml file extension is omitted
Models options
Config names for models from paper (substitude into the training command):
* big-lama
* big-lama-regular
* lama-fourier
* lama-regular
* lama_small_train_masks
Which are seated in configs/training/folder
Links
Training time & resources
TODO
Acknowledgments
Citation
If you found this code helpful, please consider citing:
@article{suvorov2021resolution,
  title={Resolution-robust Large Mask Inpainting with Fourier Convolutions},
  author={Suvorov, Roman and Logacheva, Elizaveta and Mashikhin, Anton and Remizova, Anastasia and Ashukha, Arsenii and Silvestrov, Aleksei and Kong, Naejin and Goka, Harshith and Park, Kiwoong and Lempitsky, Victor},
  journal={arXiv preprint arXiv:2109.07161},
  year={2021}
}


 LaMa 是一个 AI 图像修复(inpainting)模型,附带其研究代码:它利用傅里叶卷积去除照片中不需要的物体并填补大面积缺失区域,即使在高分辨率下依然表现稳定。它是 WACV 2022 一篇论文的官方代码。