🧊 This project is archived and no longer developed or maintained. 🧊
The code remains available for historic purposes.
The README as of the archival date remains unchanged below for historic purposes.
kaniko - Build Images In Kubernetes
🚨NOTE: kaniko is not an officially supported Google product🚨





kaniko is a tool to build container images from a Dockerfile, inside a container
or Kubernetes cluster.
kaniko doesn't depend on a Docker daemon and executes each command within a
Dockerfile completely in userspace. This enables building container images in
environments that can't easily or securely run a Docker daemon, such as a
standard Kubernetes cluster.
kaniko is meant to be run as an image: gcr.io/kaniko-project/executor. We do
not recommend running the kaniko executor binary in another image, as it
might not work as you expect - see Known Issues.
We'd love to hear from you! Join us on
#kaniko Kubernetes Slack
:mega: Please fill out our
quick 5-question survey so that we can
learn how satisfied you are with kaniko, and what improvements we should make.
Thank you! :dancers:
If you are interested in contributing to kaniko, see
DEVELOPMENT.md and CONTRIBUTING.md.
Table of Contents generated with
DocToc
We'd love to hear from you! Join
#kaniko on Kubernetes Slack
How does kaniko work?
The kaniko executor image is responsible for building an image from a Dockerfile
and pushing it to a registry. Within the executor image, we extract the
filesystem of the base image (the FROM image in the Dockerfile). We then execute
the commands in the Dockerfile, snapshotting the filesystem in userspace after
each one. After each command, we append a layer of changed files to the base
image (if there are any) and update image metadata.
Known Issues
- kaniko does not support building Windows containers.
- Running kaniko in any Docker image other than the official kaniko image is not
supported due to implementation details.
- This includes copying the kaniko executables from the official image into
another image (e.g. a Jenkins CI agent).
- In particular, it cannot use chroot or bind-mount because its container must
not require privilege, so it unpacks directly into its own container root
and may overwrite anything already there.
- kaniko does not support the v1 Registry API
(Registry v1 API Deprecation)
Demo
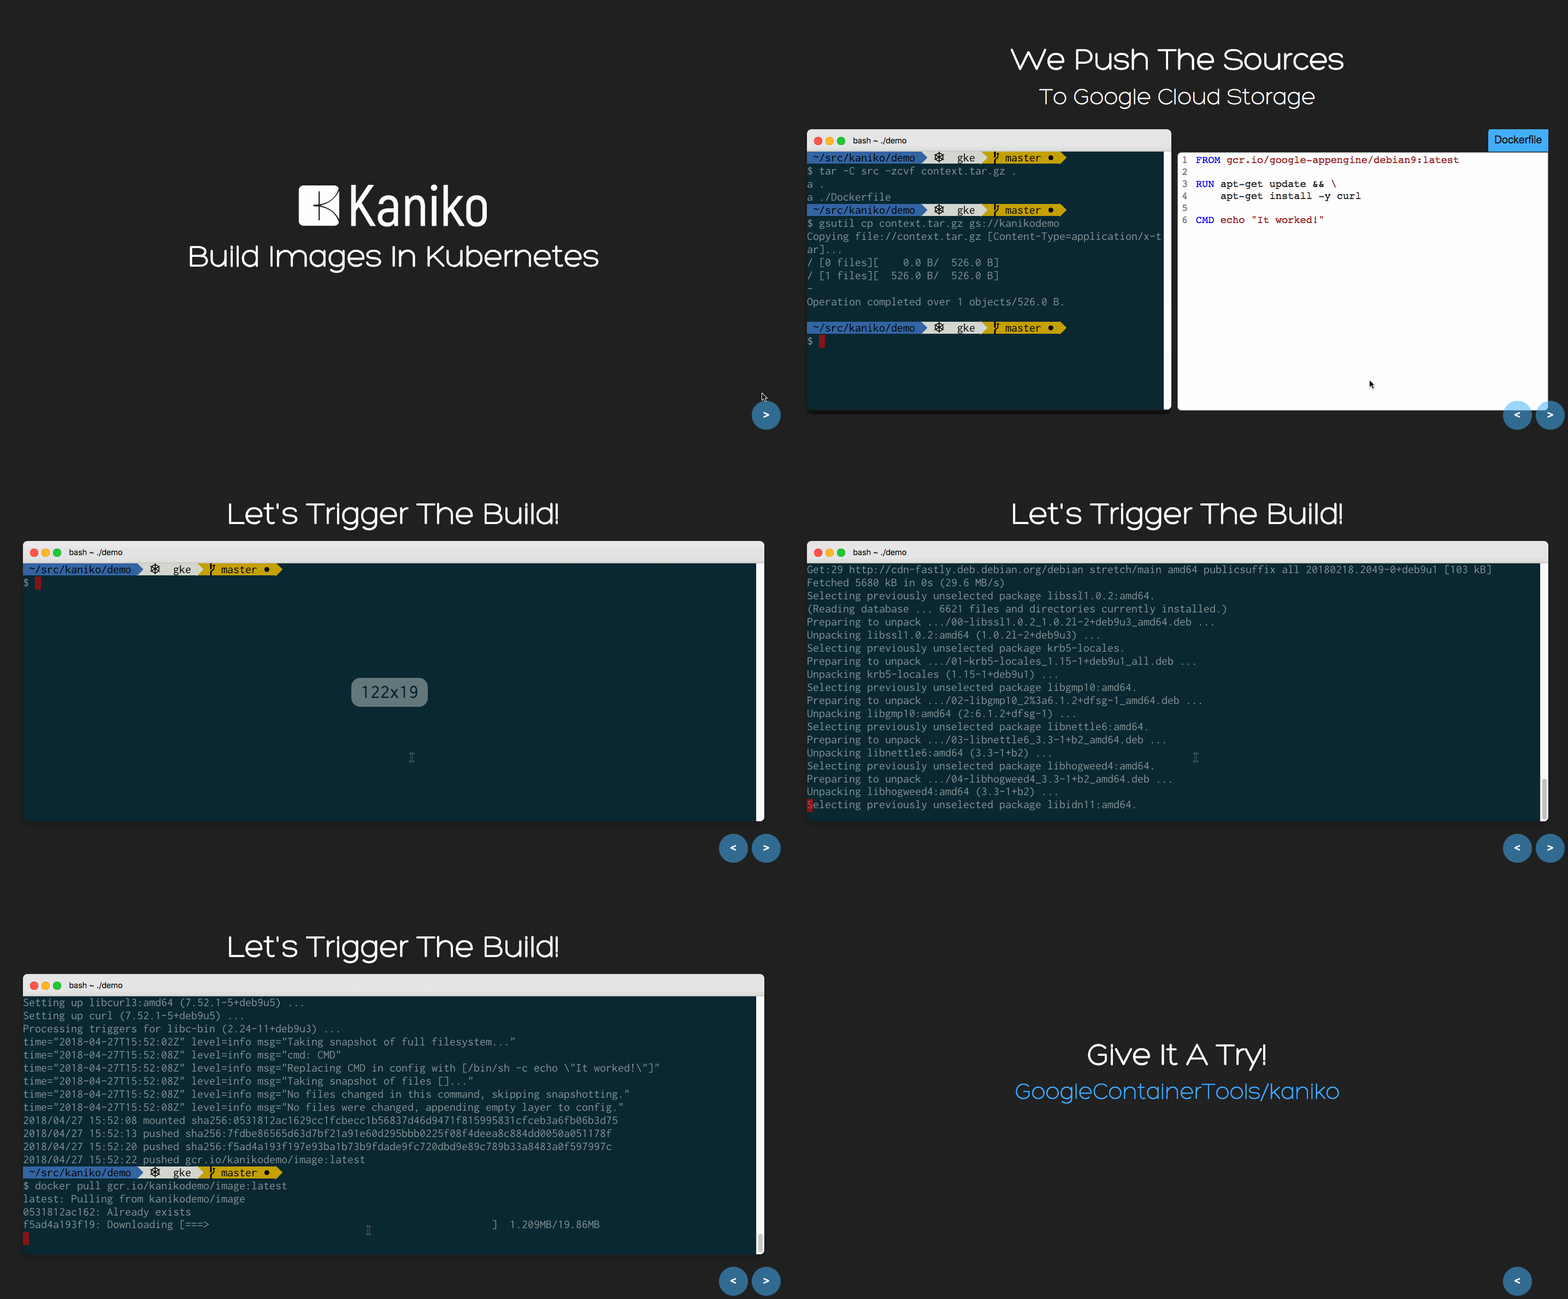
Tutorial
For a detailed example of kaniko with local storage, please refer to a
getting started tutorial.
Please see References for more docs & video tutorials
Using kaniko
To use kaniko to build and push an image for you, you will need:
- A build context, aka something to build
- A running instance of kaniko
kaniko Build Contexts
kaniko's build context is very similar to the build context you would send your
Docker daemon for an image build; it represents a directory containing a
Dockerfile which kaniko will use to build your image. For example, a COPY
command in your Dockerfile should refer to a file in the build context.
You will need to store your build context in a place that kaniko can access.
Right now, kaniko supports these storage solutions:
- GCS Bucket
- S3 Bucket
- Azure Blob Storage
- Local Directory
- Local Tar
- Standard Input
- Git Repository
Note about Local Directory: this option refers to a directory within the kaniko
container. If you wish to use this option, you will need to mount in your build
context into the container as a directory.
Note about Local Tar: this option refers to a tar gz file within the kaniko
container. If you wish to use this option, you will need to mount in your build
context into the container as a file.
Note about Standard Input: the only Standard Input allowed by kaniko is in
.tar.gz format.
If using a GCS or S3 bucket, you will first need to create a compressed tar of
your build context and upload it to your bucket. Once running, kaniko will then
download and unpack the compressed tar of the build context before starting the
image build.
To create a compressed tar, you can run:
tar -C <path to build context> -zcvf context.tar.gz .
Then, copy over the compressed tar into your bucket. For example, we can copy
over the compressed tar to a GCS bucket with gsutil:
gsutil cp context.tar.gz gs://<bucket name>
When running kaniko, use the --context flag with the appropriate prefix to
specify the location of your build context:
| Source |
Prefix |
Example |
| Local Directory |
dir://[path to a directory in the kaniko container] |
dir:///workspace |
| Local Tar Gz |
tar://[path to a .tar.gz in the kaniko container] |
tar:///path/to/context.tar.gz |
| Standard Input |
tar://[stdin] |
tar://stdin |
| GCS Bucket |
gs://[bucket name]/[path to .tar.gz] |
gs://kaniko-bucket/path/to/context.tar.gz |
| S3 Bucket |
s3://[bucket name]/[path to .tar.gz] |
s3://kaniko-bucket/path/to/context.tar.gz |
| Azure Blob Storage |
https://[account].[azureblobhostsuffix]/[container]/[path to .tar.gz] |
https://myaccount.blob.core.windows.net/container/path/to/context.tar.gz |
| Git Repository |
git://[repository url][#reference][#commit-id] |
git://github.com/acme/myproject.git#refs/heads/mybranch#<desired-commit-id> |
If you don't specify a prefix, kaniko will assume a local directory. For
example, to use a GCS bucket called kaniko-bucket, you would pass in
--context=gs://kaniko-bucket/path/to/context.tar.gz.
Using Azure Blob Storage
If you are using Azure Blob Storage for context file, you will need to pass
Azure Storage Account Access Key
as an environment variable named AZURE_STORAGE_ACCESS_KEY through Kubernetes
Secrets
Using Private Git Repository
You can use Personal Access Tokens for Build Contexts from Private
Repositories from
GitHub.
You can either pass this in as part of the git URL (e.g.,
git://[email protected]/acme/myproject.git#refs/heads/mybranch) or using the
environment variable GIT_TOKEN.
You can also pass GIT_USERNAME and GIT_PASSWORD (password being the token)
if you want to be explicit about the username.
If running kaniko and using Standard Input build context, you will need to add
the docker or kubernetes -i, --interactive flag. Once running, kaniko will
then get the data from STDIN and create the build context as a compressed tar.
It will then unpack the compressed tar of the build context before starting the
image build. If no data is piped during the interactive run, you will need to
send the EOF signal by yourself by pressing Ctrl+D.
Complete example of how to interactively run kaniko with .tar.gz Standard
Input data, using docker:
echo -e 'FROM alpine \nRUN echo "created from standard input"' > Dockerfile | tar -cf - Dockerfile | gzip -9 | docker run \
  --interactive -v $(pwd):/workspace gcr.io/kaniko-project/executor:latest \
  --context tar://stdin \
  --destination=<gcr.io/$project/$image:$tag>
Complete example of how to interactively run kaniko with .tar.gz Standard
Input data, using Kubernetes command line with a temporary container and
completely dockerless:
echo -e 'FROM alpine \nRUN echo "created from standard input"' > Dockerfile | tar -cf - Dockerfile | gzip -9 | kubectl run kaniko \
--rm --stdin=true \
--image=gcr.io/kaniko-project/executor:latest --restart=Never \
--overrides='{
  "apiVersion": "v1",
  "spec": {
    "containers": [
      {
        "name": "kaniko",
        "image": "gcr.io/kaniko-project/executor:latest",
        "stdin": true,
        "stdinOnce": true,
        "args": [
          "--dockerfile=Dockerfile",
          "--context=tar://stdin",
          "--destination=gcr.io/my-repo/my-image"
        ],
        "volumeMounts": [
          {
            "name": "cabundle",
            "mountPath": "/kaniko/ssl/certs/"
          },
          {
            "name": "docker-config",
            "mountPath": "/kaniko/.docker/"
          }
        ]
      }
    ],
    "volumes": [
      {
        "name": "cabundle",
        "configMap": {
          "name": "cabundle"
        }
      },
      {
        "name": "docker-config",
        "configMap": {
          "name": "docker-config"
        }
      }
    ]
  }
}'
Running kaniko
There are several different ways to deploy and run kaniko:
Running kaniko in a Kubernetes cluster
Requirements:
Kubernetes secret
To run kaniko in a Kubernetes cluster, you will need a standard running
Kubernetes cluster and a Kubernetes secret, which contains the auth required to
push the final image.
To create a secret to authenticate to Google Cloud Registry, follow these steps:
- Create a service account in the Google Cloud Console project you want to push
the final image to with
Storage Admin permissions.
- Download a JSON key for this service account
- Rename the key to
kaniko-secret.json
- To create the secret, run:
kubectl create secret generic kaniko-secret --from-file=<path to kaniko-secret.json>
Note: If using a GCS bucket in the same GCP project as a build context, this
service account should now also have permissions to read from that bucket.
The Kubernetes Pod spec should look similar to this, with the args parameters
filled in:
apiVersion: v1
kind: Pod
metadata:
  name: kaniko
spec:
  containers:
    - name: kaniko
      image: gcr.io/kaniko-project/executor:latest
      args:
        - "--dockerfile=<path to Dockerfile within the build context>"
        - "--context=gs://<GCS bucket>/<path to .tar.gz>"
        - "--destination=<gcr.io/$PROJECT/$IMAGE:$TAG>"
      volumeMounts:
        - name: kaniko-secret
          mountPath: /secret
      env:
        - name: GOOGLE_APPLICATION_CREDENTIALS
          value: /secret/kaniko-secret.json
  restartPolicy: Never
  volumes:
    - name: kaniko-secret
      secret:
        secretName: kaniko-secret
This example pulls the build context from a GCS bucket. To use a local directory
build context, you could consider using configMaps to mount in small build
contexts.
Running kaniko in gVisor
Running kaniko in gVisor provides an
additional security boundary. You will need to add the --force flag to run
kaniko in gVisor, since currently there isn't a way to determine whether or not
a container is running in gVisor.
docker run --runtime=runsc -v $(pwd):/workspace -v ~/.config:/root/.config \
gcr.io/kaniko-project/executor:latest \
--dockerfile=<path to Dockerfile> --context=/workspace \
--destination=gcr.io/my-repo/my-image --force
We pass in --runtime=runsc to use gVisor. This example mounts the current
directory to /workspace for the build context and the ~/.config directory
for GCR credentials.
Running kaniko in Google Cloud Build
Requirements:
To run kaniko in GCB, add it to your build config as a build step:
steps:
  - name: gcr.io/kaniko-project/executor:latest
    args:
      [
        "--dockerfile=<path to Dockerfile within the build context>",
        "--context=dir://<path to build context>",
        "--destination=<gcr.io/$PROJECT/$IMAGE:$TAG>",
      ]
kaniko will build and push the final image in this build step.
Running kaniko in Docker
Requirements:
We can run the kaniko executor image locally in a Docker daemon to build and
push an image from a Dockerfile.
For example, when using gcloud and GCR you could run kaniko as follows:
docker run \
    -v "$HOME"/.config/gcloud:/roo

 Он собирает образы контейнеров из Dockerfile внутри контейнера или кластера Kubernetes, без Docker-демона — это удобно там, где демон небезопасно запускать, например в обычном кластере Kubernetes.