DockFlare README

项目的 README,来自 github.com/ChrispyBacon-dev/DockFlare。合并为一个 markdown 文件:README.md。

DockFlare Logo

Automate Cloudflare Tunnels with Docker Labels

Go from container to publicly-secured URL in seconds. No manual Cloudflare dashboard configuration required.

Stars Release Docker Pulls Python License Swiss Made

Website · Documentation · Report a Bug · Sponsor


Introduction

DockFlare is a self-hosted ingress and access-control plane for Cloudflare Tunnel environments. It continuously translates your desired state into Cloudflare configuration by combining Docker labels, manual rules from the web UI, and optional remote agents.

It was built to remove repetitive dashboard work from fast-changing self-hosted environments. Instead of manually updating DNS records, tunnel ingress rules, and Access applications, you define intent once and DockFlare reconciles it.

The result is a set-it-and-forget-it workflow with a fully localized native experience: less operational drift, more reliable service exposure, and one place to manage routing and access decisions.

Core Capabilities

Architecture Overview

Detailed architecture guide: https://dockflare.app/architecture

Component Purpose
DockFlare Master Web UI, encrypted config/state, reconciliation, Cloudflare API orchestration
DockFlare Mail Manager Sovereign email backend, SQLite storage, R2 integration, and webhook handling
DockFlare Webmail PWA-ready mail client with push notification support
Redis Shared cache, coordination, and pub/sub signaling
DockFlare Agent Remote host watcher and command executor for distributed deployments
cloudflared Tunnel connector runtime managed per deployment mode
Cloudflare API Source of truth for Tunnel, DNS, Email, and Access resources

Reconciliation Flow

  1. DockFlare collects desired state from labels, manual rules, and agent-reported containers.
  2. It computes deltas against persisted state and Cloudflare state.
  3. It applies updates for ingress, DNS, and Access resources.
  4. It updates local runtime state and keeps cloudflared aligned.

Getting Started

One-Liner Install

bash <(curl -fsSL https://dockflare.app/install.sh)

The script will guide you through:

  1. Choosing an install directory (default: ~/dockflare/).
  2. Choosing a local UI port (default: 5000).
  3. Optionally configuring a Cloudflare Tunnel for DockFlare itself.
  4. Optionally enabling the Email profile (dockflare-mail-manager + dockflare-webmail).

For full setup documentation, use the project docs site:

Prerequisites

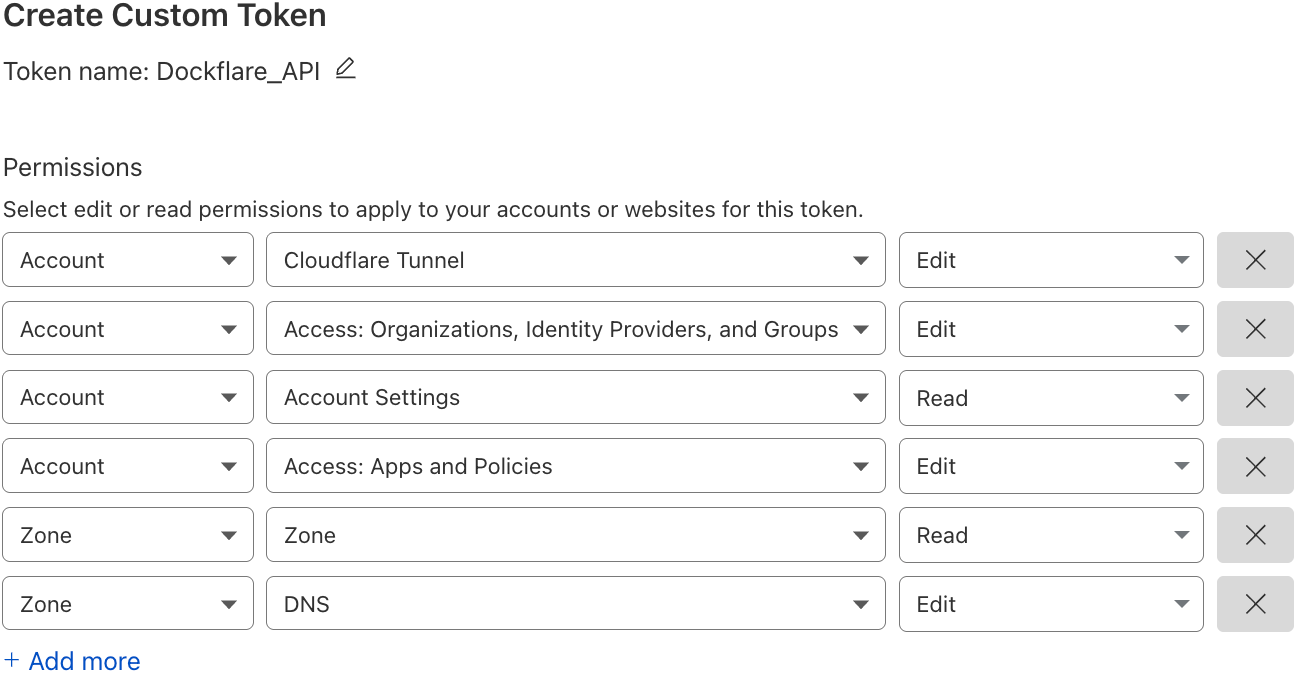
Cloudflare API Permissions

Quick Start Docker Compose

Before first launch, create the shared network once:

docker network create cloudflare-net
  1. Create docker-compose.yml:
services:
  docker-socket-proxy:
    image: tecnativa/docker-socket-proxy:v0.4.1
    container_name: docker-socket-proxy
    restart: unless-stopped
    logging:
      driver: "none"
    environment:
      - DOCKER_HOST=unix:///var/run/docker.sock
      - CONTAINERS=1
      - EVENTS=1
      - NETWORKS=1
      - IMAGES=1
      - POST=1
      - PING=1
      - INFO=1
      - EXEC=1
    volumes:
      - /var/run/docker.sock:/var/run/docker.sock
    networks:
      - dockflare-internal

  dockflare-init:
    image: alpine:3.20
    command: ["sh", "-c", "chown -R ${DOCKFLARE_UID:-65532}:${DOCKFLARE_GID:-65532} /app/data"]
    volumes:
      - dockflare_data:/app/data
    networks:
      - dockflare-internal
    restart: "no"

  dockflare:
    image: alplat/dockflare:stable
    container_name: dockflare
    restart: unless-stopped
    ports:
      - "5000:5000" # Optional: comment out once exposed via Cloudflare Tunnel with an Access Policy to restrict access to tunnel-only
    #labels: # -- Cloudflare Tunnel Configuration (via DockFlare) OPTIONAL --
      # Main DockFlare with access policy
      #- dockflare.enable=true
      #- dockflare.hostname=dockflare.TLD  # replace with your domain
      #- dockflare.service=http://dockflare:5000
      #- dockflare.access.group=YOUR-ACCESS-GROUP-ID  # your custom access policy
      # -- OAuth Callback Path (Bypass Access Policy) OPTIONAL --
      # Required if using OAuth authentication with access policies on main interface
      #- dockflare.0.hostname=dockflare.example.tld
      #- dockflare.0.path=/auth/google/callback
      #- dockflare.0.service=http://dockflare:5000
      #- dockflare.0.access.group=public-default-bypass

      # Add additional callback paths for other OAuth providers as needed
      # - dockflare.1.hostname=dockflare.example.com
      # - dockflare.1.path=/auth/github/callback
      # - dockflare.1.service=http://dockflare:5000
      # - dockflare.1.access.group=public-default-bypass
    volumes:
      - dockflare_data:/app/data
    environment:
      - REDIS_URL=redis://redis:6379/0
      - REDIS_DB_INDEX=0
      - DOCKER_HOST=tcp://docker-socket-proxy:2375
    depends_on:
      docker-socket-proxy:
        condition: service_started
      dockflare-init:
        condition: service_completed_successfully
      redis:
        condition: service_started
    networks:
      - cloudflare-net
      - dockflare-internal

  redis:
    image: redis:7-alpine
    container_name: dockflare-redis
    restart: unless-stopped
    command: ["redis-server", "--save", "", "--appendonly", "no"]
    logging:
      driver: "none"
    volumes:
      - dockflare_redis:/data
    networks:
      - dockflare-internal

  dockflare-mail-manager:
    image: alplat/dockflare-mail-manager:stable
    container_name: dockflare-mail-manager
    restart: unless-stopped
    profiles: ["email"]
    environment:
      - DOCKFLARE_MASTER_URL=http://dockflare:5000
      - MAIL_DATA_PATH=/data
    volumes:
      - mail_data:/data
    depends_on:
      dockflare:
        condition: service_started
    networks:
      - cloudflare-net
      - dockflare-internal

  dockflare-webmail:
    image: alplat/dockflare-webmail:stable
    container_name: dockflare-webmail
    restart: unless-stopped
    profiles: ["email"]
    environment:
      - DOCKFLARE_MASTER_URL=https://dockflare.TLD  # replace with your domain
    labels:
      - dockflare.enable=true
      - dockflare.hostname=mail.dockflare.TLD  # replace with your domain
      - dockflare.service=http://dockflare-webmail:80
    depends_on:
      dockflare-mail-manager:
        condition: service_started
    networks:
      - cloudflare-net
      - dockflare-internal

volumes:
  dockflare_data:
  dockflare_redis:
  mail_data:

networks:
  cloudflare-net:
    name: cloudflare-net
    external: true
  dockflare-internal:
    name: dockflare-internal
  1. Start DockFlare:
docker compose up -d

The Email Suite is an optional, opt-in feature and will not start by default. To include email services, add the email profile:

docker compose --profile email up -d

Email setup and provisioning guide: Email Overview

  1. Open http://your-server-ip:5000 and complete the setup wizard.

If you are migrating from older environment-based setups, DockFlare can import existing values during onboarding.

Configuration Modes

Docker Label Mode

Use container labels to declare hostname, service target, and access behavior. DockFlare observes lifecycle events and reconciles records and ingress rules automatically.

Detailed label reference: https://dockflare.app/docs/container-labels

Manual Rule Mode

Create and edit routes directly in the UI for static hosts, VMs, appliances, or external services. Manual rules support HTTP/HTTPS advanced origin options and are persisted in DockFlare state.

Hybrid Mode

Use labels for most workloads while managing exceptions in UI. DockFlare merges both sources into one reconciliation model.

Agent Mode (Multi-Server)

Run a central master with agents on remote Docker hosts. Agents stream host-local container events and execute commands while the master owns policy and Cloudflare configuration decisions.

Multi-agent setup guide: https://dockflare.app/docs/multi-server-agent

Agent source and standalone deployment files: dockflare-agent/

Access Control Model

DockFlare uses Access Groups as the primary abstraction for reusable access intent.

For one-off services, individual dockflare.access.* labels are still supported.

Example Labels

services:
  picoshare:
    image: mtlynch/picoshare
    labels:
      - "dockflare.enable=true"
      - "dockflare.hostname=files.example.com"
      - "dockflare.service=http://picoshare:8080"
      - "dockflare.access.group=nas-family"
services:
  internal-tool:
    image: nginx:latest
    labels:
      - "dockflare.enable=true"
      - "dockflare.hostname=tool.example.com"
      - "dockflare.service=http://internal-tool:80"
      - "dockflare.access.policy=authenticate"
      - "[email protected],@example.com"

Reliability and Drift Management

Security Model

Operations and Day-2 Tasks

Common workflows handled in UI:

Troubleshooting Pointers

Additional troubleshooting references:

Development

docker compose build --no-cache
docker compose up -d
curl http://localhost:5000/ping
curl http://localhost:5000/api/v2/overview

Documentation Map

(Available in 8 languages directly within the DockFlare UI or online)

Changelog

Release notes are maintained in CHANGELOG.md. ailable in 8 languages directly within the DockFlare UI or online)*

Changelog

Release notes are maintained in CHANGELOG.md.

DockFlare (ChrispyBacon-dev/DockFlare)

正在搜索数据库…

这是什么?DockFlare 可以为自托管服务自动配置 Cloudflare Tunnel。它读取 Docker 标签,并同步 DNS 记录、Tunnel 入口规则和 Cloudflare Access 应用,因此你不必在 Cloudflare 控制台里手动配置这些内容。
它是我要运行的应用,还是要加到代码里的库?它是一个应用,不是库。它以 Docker Compose 栈的形式运行,包含一个网页界面、一个 Redis 实例,以及可选的邮件和 agent 组件。
我该怎么把它跑起来?先创建一次共享的 Docker 网络,然后运行一行安装脚本。脚本会询问安装目录(默认为 ~/dockflare/)、网页界面端口(默认为 5000),以及是否配置可选的 Cloudflare Tunnel 和邮件功能。之后在浏览器中完成设置向导即可。
开始之前我需要准备什么?Docker(含 Docker Compose)、一个 Cloudflare 账户、你的 Account ID 和主 Zone ID,以及一个具有所列权限范围(Tunnel、Access、DNS)的 API 令牌。邮件功能还需要额外的 Workers、R2 和 Email Routing 权限范围。快速启动栈中已包含 Redis。
最常见的坑是什么?API 令牌的权限范围。README 提到,API 调用失败时应先检查令牌权限,所以在首次启动前把令牌配置正确很值得。
它是给家庭实验室用的,还是给公司用的?它主要面向变化频繁的自托管环境,例如家庭实验室。带 agent 的多主机部署也适用于运行多个 Docker 主机的小团队。
Email Suite 是什么?我需要它吗?这是一个可选的、需手动开启的配置文件,它基于 Cloudflare Email Routing 增加一套自托管邮件系统。支持多个域名,并内置一个可安装的 Vue 3 网页邮件客户端。除非你启用邮件配置文件,否则它不会启动。
我怎么用标签把 Docker 服务暴露出去?在容器上添加标签,声明主机名、服务目标和访问行为。之后 DockFlare 会自动创建 DNS 记录和入口规则。
它能暴露不在 Docker 里的服务吗?可以。网页界面中的手动规则可以覆盖静态主机、虚拟机、设备和外部服务。混合模式会把这些规则与基于标签的路由合并到同一套同步模型中。
Access Groups 有什么用?Group 是一种可复用的访问策略,可以附加到多个服务上。区域级默认设置有助于防止通配符域名被意外暴露。
大小
33.9 MB
星标
2.5K
时长
1年
提交 · 90 天