DockFlare is a self-hosted ingress and access-control plane for Cloudflare Tunnel environments. It continuously translates your desired state into Cloudflare configuration by combining Docker labels, manual rules from the web UI, and optional remote agents.
It was built to remove repetitive dashboard work from fast-changing self-hosted environments. Instead of manually updating DNS records, tunnel ingress rules, and Access applications, you define intent once and DockFlare reconciles it.
The result is a set-it-and-forget-it workflow with a fully localized native experience: less operational drift, more reliable service exposure, and one place to manage routing and access decisions.
Core Capabilities
Automatic service discovery from Docker labels.
Sovereign Email Suite: A fully self-hosted email system using Cloudflare Email Routing as a stateless delivery layer with local data sovereignty.
Multi-Domain Email Support: Manage inbound and outbound email for an unlimited number of domains simultaneously.
PWA-Ready Webmail: Modern, installable Vue 3 webmail client with offline support and desktop/mobile push notifications.
Automated Infrastructure Provisioning: One-click setup for Cloudflare Workers, R2 buckets, and Email Routing.
Advanced DNS & DKIM Management: Automatic zone-aware record placement with authoritative DKIM key handling.
Native Multi-Language Support (13 languages) for the Web UI and Help Center.
Manual Ingress Rule Management for non-Docker workloads.
Cloudflare Tunnel Ingress Orchestration, including advanced origin options.
Access Group & Reusable Policy Management with application assignment.
Open http://your-server-ip:5000 and complete the setup wizard.
If you are migrating from older environment-based setups, DockFlare can import existing values during onboarding.
Configuration Modes
Docker Label Mode
Use container labels to declare hostname, service target, and access behavior. DockFlare observes lifecycle events and reconciles records and ingress rules automatically.
Create and edit routes directly in the UI for static hosts, VMs, appliances, or external services. Manual rules support HTTP/HTTPS advanced origin options and are persisted in DockFlare state.
Hybrid Mode
Use labels for most workloads while managing exceptions in UI. DockFlare merges both sources into one reconciliation model.
Agent Mode (Multi-Server)
Run a central master with agents on remote Docker hosts. Agents stream host-local container events and execute commands while the master owns policy and Cloudflare configuration decisions.
DockFlare reconciliation is designed to be idempotent.
Runtime and configuration state are persisted in encrypted files.
Manual rule options are preserved and re-applied across restarts.
Optional unmanaged-ingress-field preservation can keep Cloudflare-side values that DockFlare does not explicitly model.
Backup and restore enable rapid recovery of full control-plane state.
Security Model
Supports web authentication with local credentials and OAuth providers.
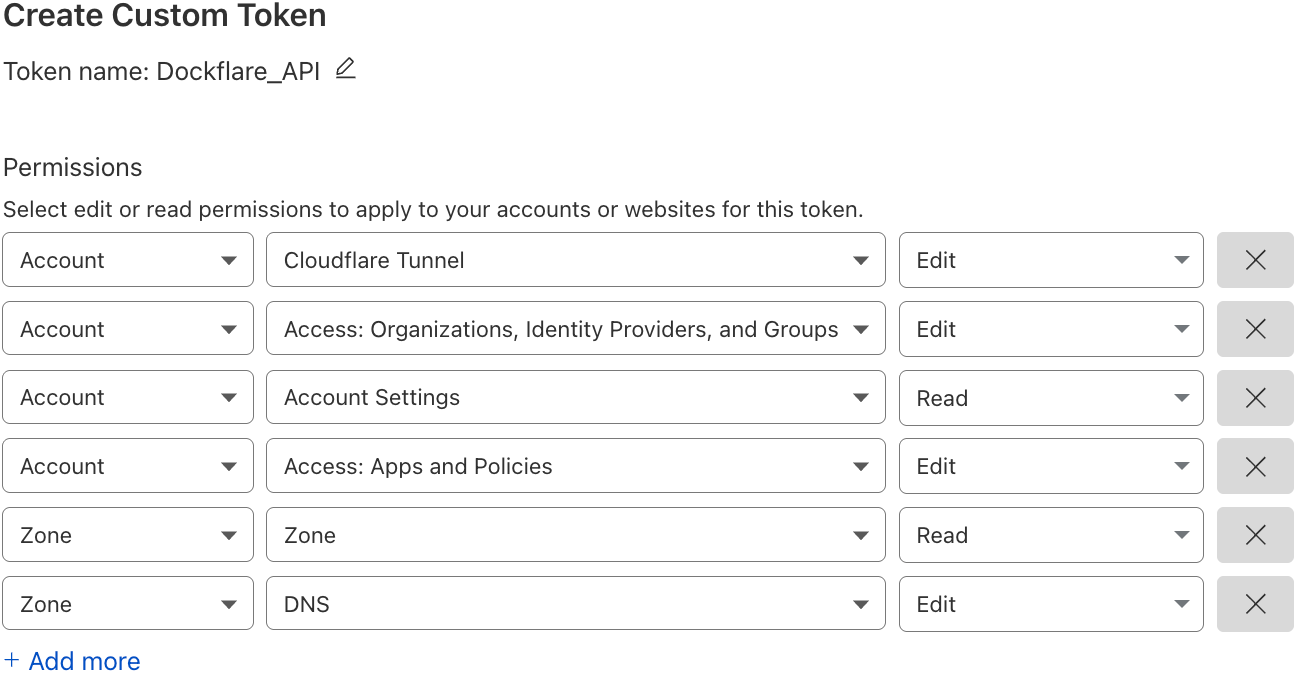
Uses scoped Cloudflare API tokens.
Encourages Docker socket proxy for least-privilege Docker API exposure.
Runs containers as non-root (UID/GID 65532) in the reference setup.
Supports agent API key lifecycle controls and enrollment flow.
Optional Cloudflare Zero Trust service token authentication for all agent traffic, removing the need for a private network or VPN between master and agents.
Operations and Day-2 Tasks
Common workflows handled in UI:
Add, edit, and remove manual routes.
Assign or change Access Groups on services.
View service status and reconciliation state.
Rotate or revoke agent API keys.
Trigger agent tunnel actions.
Export and restore backups.
Troubleshooting Pointers
Verify Cloudflare token scopes first when API calls fail.
Confirm domain-to-zone mapping when records do not appear.
Validate service URL format (http:// or https://) for manual rules.
Check agent heartbeat and enrollment status for remote hosts.
Confirm Docker socket proxy permissions if container discovery fails.
What is this?DockFlare automates Cloudflare Tunnel setup for self-hosted services. It reads Docker labels and reconciles DNS records, tunnel ingress rules, and Cloudflare Access apps, so you don't have to configure them by hand in the Cloudflare dashboard.
Is it an app I run or a library I add to my code?It's an app, not a library. It runs as a Docker Compose stack with a web UI, a Redis instance, and optional email and agent components.
How do I get it running?Create the shared Docker network once, then run the one-liner install script. It asks for an install directory (default ~/dockflare/), a UI port (default 5000), and optional Cloudflare Tunnel and Email profile setup. Finish in the setup wizard in your browser.
What do I need before starting?Docker with Docker Compose, a Cloudflare account, your Account ID and primary Zone ID, and an API token with the listed scopes (Tunnel, Access, DNS). Email features need extra Workers, R2, and Email Routing scopes. Redis is included in the quick-start stack.
What's the most common pitfall?API token scopes. The README says to check token permissions first when API calls fail, so it's worth getting the token right before the first launch.
Is it meant for a home lab or for a company?It's built for fast-changing self-hosted environments such as home labs. Multi-host setups with agents also work for small teams running several Docker hosts.
What is the Email Suite, and do I need it?It's an optional, opt-in profile that adds a self-hosted email system on Cloudflare Email Routing. It supports multiple domains and includes an installable Vue 3 webmail client. It doesn't start unless you enable the email profile.
How do I expose a Docker service with labels?Add labels to the container that declare the hostname, service target, and access behavior. DockFlare then creates the DNS record and ingress rule automatically.
Can it expose things that aren't in Docker?Yes. Manual rules in the web UI cover static hosts, VMs, appliances, and external services. Hybrid mode merges them with label-based routes into one reconciliation model.
What are Access Groups for?A group is a reusable access policy that can be attached to several services. Zone-level defaults help protect wildcard domains from accidental exposure.






 DockFlare automates Cloudflare Tunnel setup for self-hosted services. It reads Docker labels and reconciles DNS records, tunnel ingress rules, and Cloudflare Access apps, so you don't have to configure them by hand in the Cloudflare dashboard.